2018 MERCEDES-BENZ SL ROADSTER warning light
[x] Cancel search: warning lightPage 234 of 322
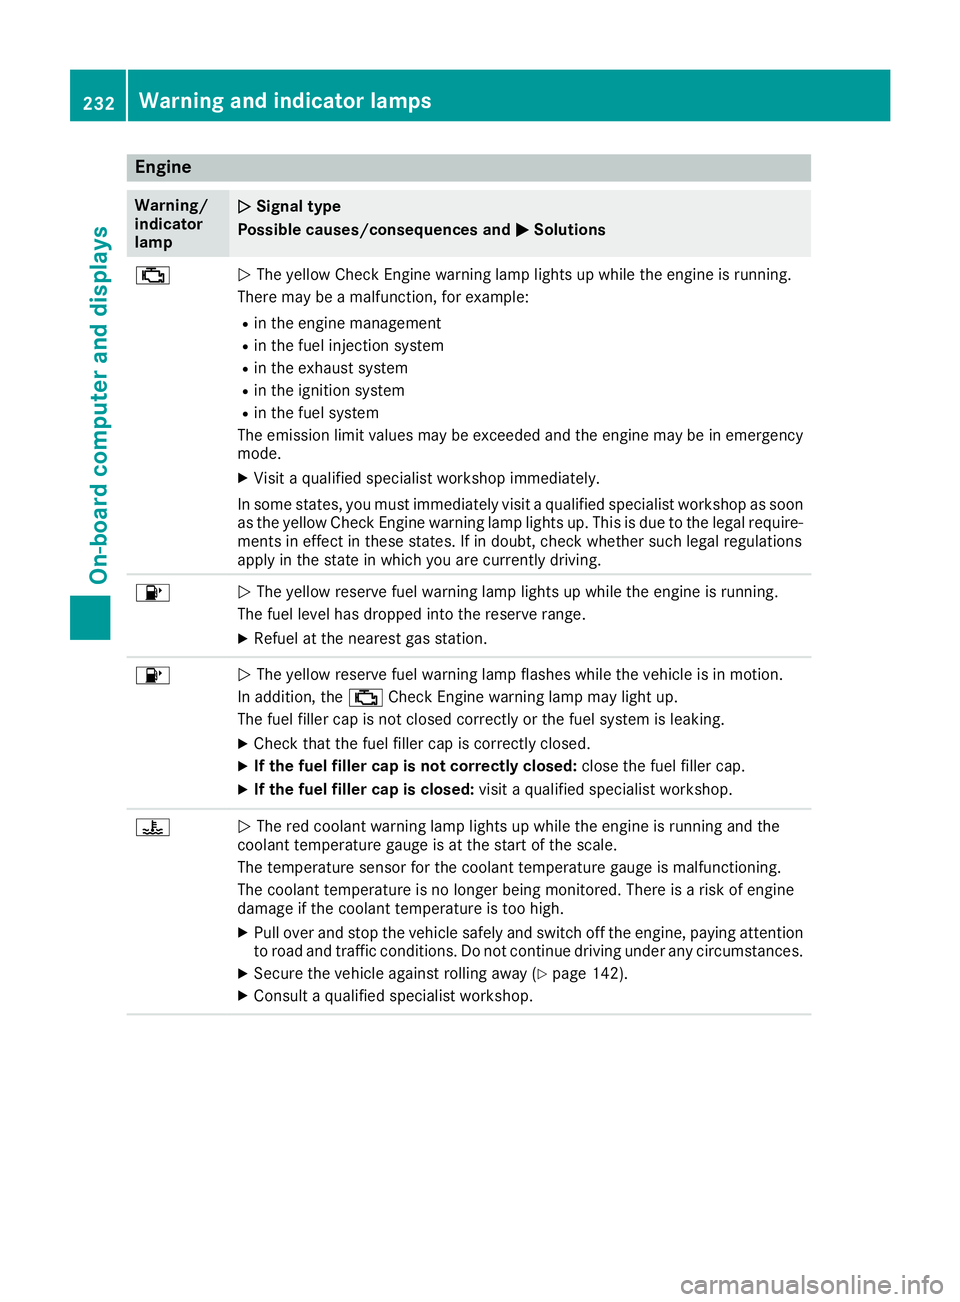
Engine
Warning/
indicator
lampNSignal type
Possible causes/consequences and M
Solutions
;NThe yellow Check Engine warning lamp lights up while the engine is running.
There may be a malfunction, for example:
Rin the engine management
Rin the fuel injection system
Rin the exhaust system
Rin the ignition system
Rin the fuel system
The emission limit values may be exceeded and the engine may be in emergency
mode.
XVisit a qualified specialist workshop immediately.
In some states, you must immediately visit a qualified specialist workshop as soon as the yellow Check Engine warning lamp lights up. This is due to the legal require-
ments in effect in these states. If in doubt, check whether such legal regulations
apply in the state in which you are currently driving.
8N The yellow reserve fuel warning lamp lights up while the engine is running.
The fuel level has dropped into the reserve range.
XRefuel at the nearest gas station.
8N The yellow reserve fuel warning lamp flashes while the vehicle is in motion.
In addition, the ;Check Engine warning lamp may light up.
The fuel filler cap is not closed correctly or the fuel system is leaking.
XCheck that the fuel filler cap is correctly closed.
XIf the fuel filler cap is not correctly closed: close the fuel filler cap.
XIf the fuel filler cap is closed:visit a qualified specialist workshop.
?NThe red coolant warning lamp lights up while the engine is running and the
coolant temperature gauge is at the start of the scale.
The temperature sensor for the coolant temperature gauge is malfunctioning.
The coolant temperature is no longer being monitored. There is a risk of engine
damage if the coolant temperature is too high.
XPull over and stop the vehicle safely and switch off the engine, paying attention
to road and traffic conditions. Do not continue driving under any circumstances.
XSecure the vehicle against rolling away (Ypage 142).
XConsult a qualified specialist workshop.
232Warning and indicator lamps
On-board computer and displays
Page 236 of 322
Warning/
indicator
lampNSignal type
Possible causes/consequences and M
Solutions
XIf the coolant temperature gauge is below the Hmarking (Ypage 186), drive on
to the next qualified specialist workshop.
XAvoid heavy loads on the engine as you do so, e.g. driving in mountainous terrain
and stop-and-go traffic.
Driving systems
Warning/
indicator
lampNSignal type
Possible causes/consequences and M
Solutions
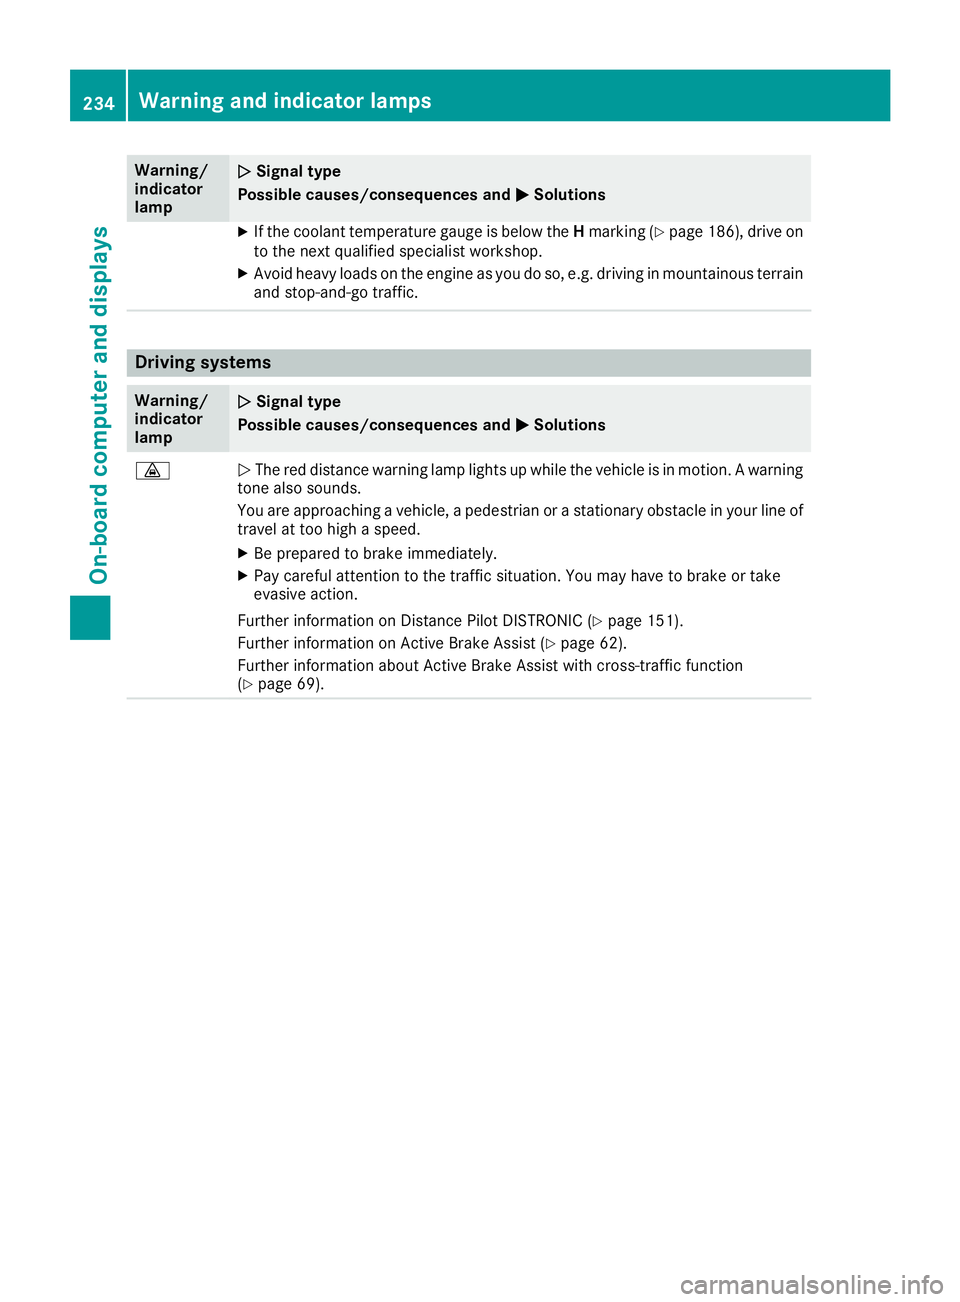
·NThe red distance warning lamp lights up while the vehicle is in motion. A warning
tone also sounds.
You are approaching a vehicle, a pedestrian or a stationary obstacle in your line of travel at too high a speed.
XBe prepared to brake immediately.
XPay careful attention to the traffic situation. You may have to brake or take
evasive action.
Further information on Distance Pilot DISTRONIC (
Ypage 151).
Further information on Active Brake Assist (
Ypage 62).
Further information about Active Brake Assist with cross-traffic function
(
Ypage 69).
234Warning and indicator lamps
On-board computer and displays
Page 238 of 322
General notes
The multimedia system section in this Opera-
tor's Manual describes the basic principles for
operation. More information can be found in theDigital Operator's Manual.
Important safety notes
GWARNING
If you operate information systems and com-
munication equipment integrated in the vehi-
cle when driving, you may be distracted from
the traffic situation. You could also lose con-
trol of the vehicle. There is a risk of an acci-
dent.
Only operate this equipment when the traffic
situation permits. If you are not sure that this
is possible, park the vehicle paying attention
to traffic conditions and operate the equip-
ment when the vehicle is stationary.
You must observe the legal requirements for the
country in which you are currently driving when
operating the multimedia system.
The multimedia system calculates the route to
the destination without taking the following into
account, for example:
Rtraffic lights
Rstop and yield signs
Rparking or stopping restrictions
Rroad narrowing
Rother road and traffic rules and regulations
The multimedia system may give incorrect nav-
igation recommendations if the actual street/
traffic situation does not correspond with the
digital map's data.
For example:
Ra diverted route
Rthe road layout or the direction of a one-way
street has been changed
For this reason, you must always observe road
and traffic rules and regulations during your
journey. Road and traffic rules and regulations
always have priority over multimedia system
driving recommendations. Navigation announcements are intended to
direct you while driving without diverting your
attention from the road and driving.
Please always use this feature instead of con-
sulting the map display for directions. Looking
at the icons or map display can distract you from
traffic conditions and driving, and increase the
risk of an accident.
This equipment complies with FCC radiation
exposure limits set forth for uncontrolled equip-
ment and meets the FCC radio frequency (RF)
Exposure Guidelines in Supplement C to OET65.
This equipment has very low levels of RF energy
that is deemed to comply without maximum
permissive exposure evaluation (MPE). How-
ever, it is
recommended to insta
ll it at a distance
of at least 8 inches (approx. 20 cm) between the
radiation source and a person's body (not
including limbs such as hands, wrists, feet and
legs).
GWARNING
Modifications to electronic components, their software as well as wiring can impair their
function and/or the function of other net-
worked components. In particular, systems
relevant to safety could also be affected. As a
result, these may no longer function as inten-
ded and/or jeopardize the operating safety of
the vehicle. There is an increased risk of an
accident and injury.
Never tamper with the wiring as well as elec-
tronic components or their software. You
should have all work to electrical and elec-
tronic equipment carried out at a qualified
specialist workshop.
Function restrictions
For safety reasons, some functions are restric-
ted or unavailable while the vehicle is in motion.
You will notice this, for example, because either
you will not be able to select certain menu items
or a message will appear to this effect.
236Function restrictions
Multimedia system
Page 246 of 322
Stowage compartment in the rear
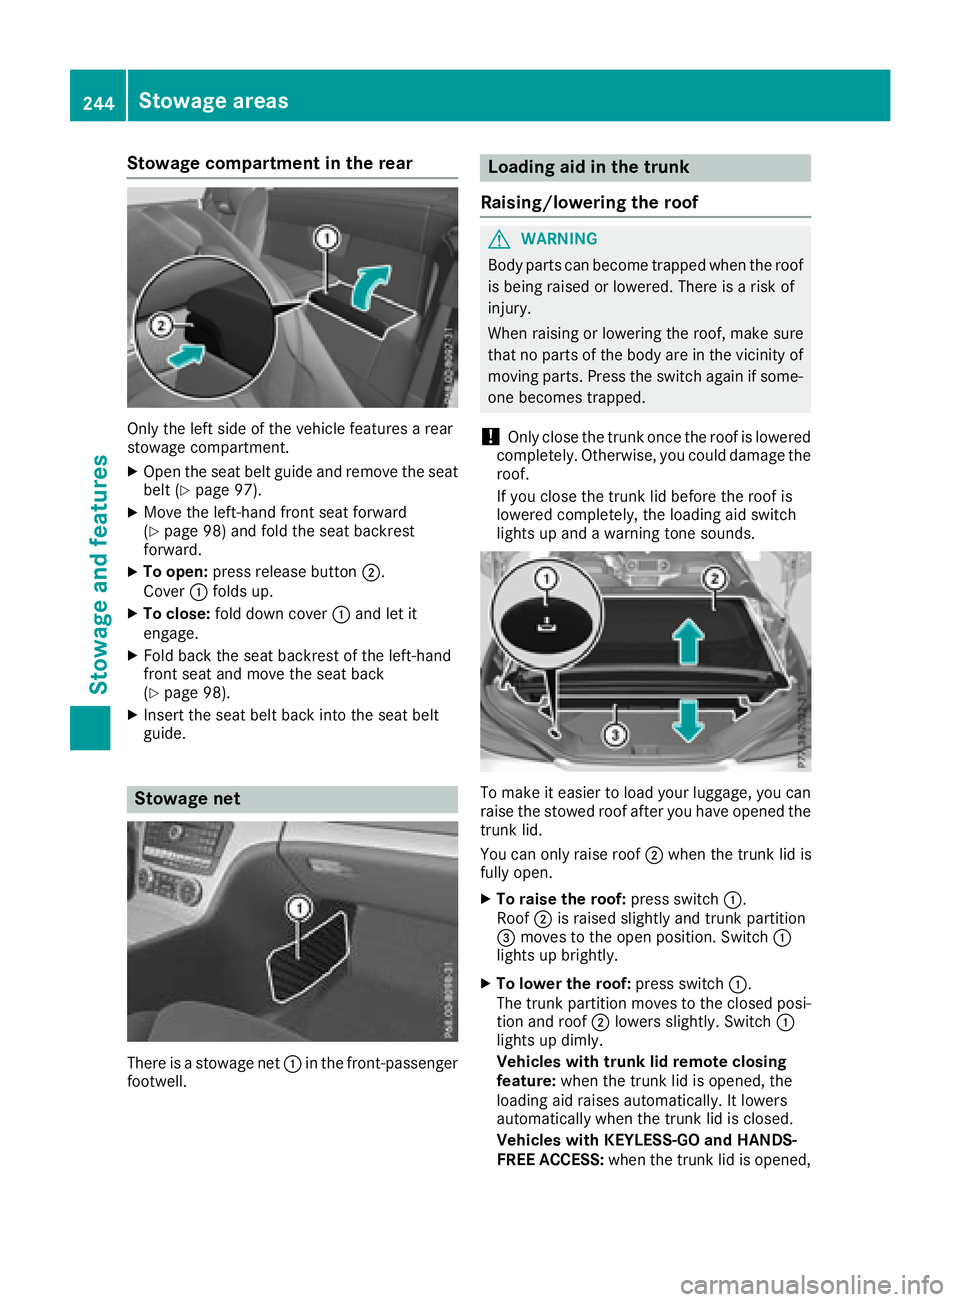
Only the left side of the vehicle features a rear
stowage compartment.
XOpen the seat belt guide and remove the seat
belt (Ypage 97).
XMove the left-hand front seat forward
(Ypage 98) and fold the seat backrest
forward.
XTo open: press release button ;.
Cover :folds up.
XTo close: fold down cover :and let it
engage.
XFold back the seat backrest of the left-hand
front seat and move the seat back
(
Ypage 98).
XInsert the seat belt back into the seat belt
guide.
Stowage net
There is a stowage net :in the front-passenger
footwell.
Loading aid in the trunk
Raising/lowering the roof
GWARNING
Body parts can become trapped when the roof
is being raised or lowered. There is a risk of
injury.
When raising or lowering the roof, make sure
that no parts of the body are in the vicinity of
moving parts. Press the switch again if some-
one becomes trapped.
!Only close the trunk once the roof is lowered
completely. Otherwise, you could damage the
roof.
If you close the trunk lid before the roof is
lowered completely, the loading aid switch
lights up and a warning tone sounds.
To make it easier to load your luggage, you can
raise the stowed roof after you have opened the trunk lid.
You can only raise roof ;when the trunk lid is
fully open.
XTo raise the roof: press switch:.
Roof ;is raised slightly and trunk partition
= moves to the open position. Switch :
lights up brightly.
XTo lower the roof: press switch:.
The trunk partition moves to the closed posi- tion and roof ;lowers slightly. Switch :
lights up dimly.
Vehicles with trunk lid remote closing
feature: when the trunk lid is opened, the
loading aid raises automatically. It lowers
automatically when the trunk lid is closed.
Vehicles with KEYLESS-GO and HANDS-
FREE ACCESS: when the trunk lid is opened,
244Stowage areas
Stowage and features
Page 247 of 322
the loading aid rises automatically. When the
roof is closed, the trunk partition remains in
the open position. The trunk partition movesto the closed position automatically when the
roof is lowered.
Problems with the loading aid
ProblemPossible causes/consequences and
MSolutions
It is no longer possible to
lower the stowed roof in
the trunk using the load-
ing aid.You cannot close the trunk any more.
XCall a qualified specialist workshop.
Stowage well under the trunk floor
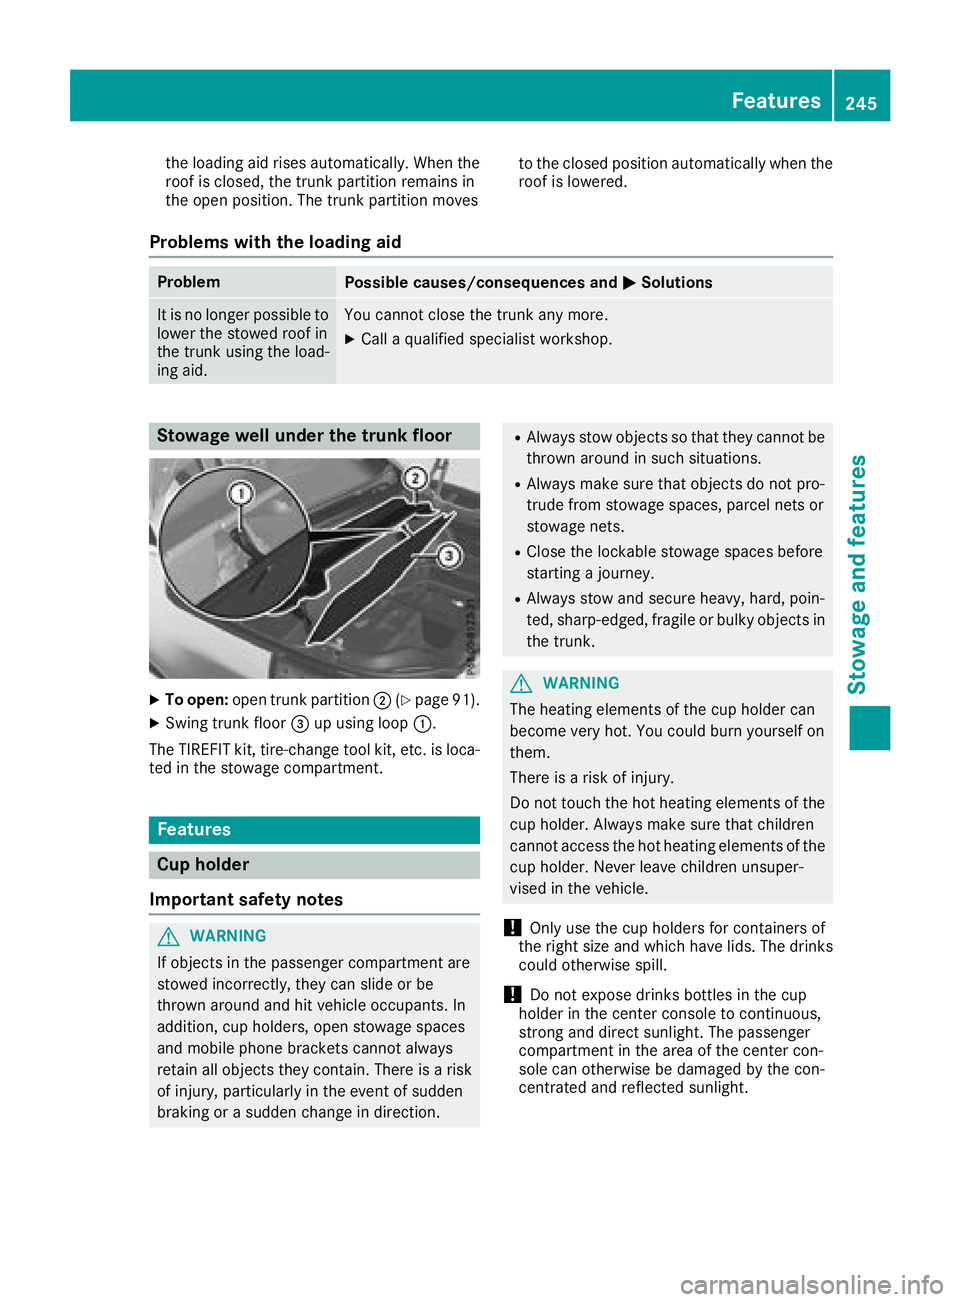
XTo open:open trunk partition ;(Ypage 91).
XSwing trunk floor =up using loop :.
The TIREFIT kit, tire-change tool kit, etc. is loca- ted in the stowage compartment.
Features
Cup holder
Important safety notes
GWARNING
If objects in the passenger compartment are
stowed incorrectly, they can slide or be
thrown around and hit vehicle occupants. In
addition, cup holders, open stowage spaces
and mobile phone brackets cannot always
retain all objects they contain. There is a risk of injury, particularly in the event of sudden
braking or a sudden change in direction.
RAlways stow objects so that they cannot be
thrown around in such situations.
RAlways make sure that objects do not pro-
trude from stowage spaces, parcel nets or
stowage nets.
RClose the lockable stowage spaces before
starting a journey.
RAlways stow and secure heavy, hard, poin-
ted, sharp-edged, fragile or bulky objects in
the trunk.
GWARNING
The heating elements of the cup holder can
become very hot. You could burn yourself on
them.
There is a risk of injury.
Do not touch the hot heating elements of the
cup holder. Always make sure that children
cannot access the hot heating elements of the
cup holder. Never leave children unsuper-
vised in the vehicle.
!Only use the cup holders for containers of
the right size and which have lids. The drinks could otherwise spill.
!Do not expose drinks bottles in the cup
holder in the center console to continuous,
strong and direct sunlight. The passenger
compartment in the area of the center con-
sole can otherwise be damaged by the con-
centrated and reflected sunlight.
Features245
Stowag ean d features
Z
Page 248 of 322
Cup holder in the center console
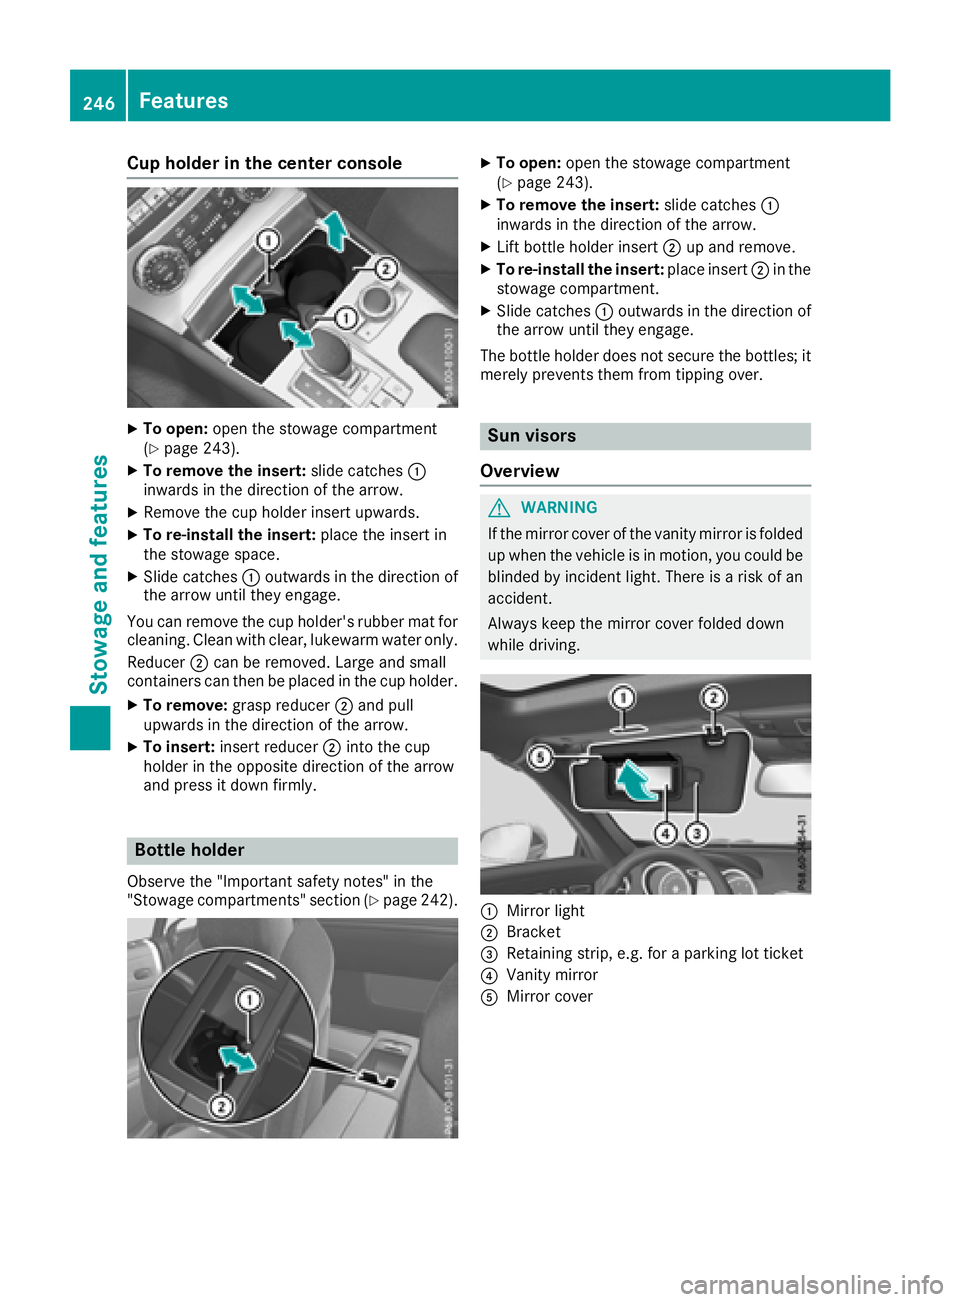
XTo open:open the stowage compartment
(Ypage 243).
XTo remove the insert: slide catches:
inwards in the direction of the arrow.
XRemove the cup holder insert upwards.
XTo re-install the insert: place the insert in
the stowage space.
XSlide catches :outwards in the direction of
the arrow until they engage.
You can remove the cup holder's rubber mat for
cleaning. Clean with clear, lukewarm water only.
Reducer ;can be removed. Large and small
containers can then be placed in the cup holder.
XTo remove: grasp reducer ;and pull
upwards in the direction of the arrow.
XTo insert: insert reducer ;into the cup
holder in the opposite direction of the arrow
and press it down firmly.
Bottle holder
Observe the "Important safety notes" in the
"Stowage compartments" section (Ypage 242).
XTo open: open the stowage compartment
(Ypage 243).
XTo remove the insert: slide catches:
inwards in the direction of the arrow.
XLift bottle holder insert ;up and remove.
XTo re-install the insert: place insert;in the
stowage compartment.
XSlide catches :outwards in the direction of
the arrow until they engage.
The bottle holder does not secure the bottles; it
merely prevents them from tipping over.
Sun visors
Overview
GWARNING
If the mirror cover of the vanity mirror is folded
up when the vehicle is in motion, you could be
blinded by incident light. There is a risk of an
accident.
Always keep the mirror cover folded down
while driving.
:Mirror light
;Bracket
=Retaining strip, e.g. for a parking lot ticket
?Vanity mirror
AMirror cover
246Features
Stowage and features
Page 251 of 322
RThe indicator lamp in one or more of the fol-
lowing buttons continues to light up red afterthe system self-diagnosis:
-SOS button
-F Roadside Assistance call button
-ïMB Info call button
RAfter the system self-diagnosis, the Inoper‐ativeorServiceNotActivatedmessage
appears in the multifunction display.
If a malfunction is indicated as outlined above,
the system may not operate as expected. In the event of an emergency, help will have to be
summoned by other means.
Have the system checked at the nearest author-
ized Mercedes-Benz Center or contact the fol-
lowing service hotlines:
RUSA: Mercedes-Benz Customer Assistance
Center at 1-800-FOR-MERCedes
(1-800-367-6372) or 1-866-990-9007
RCanada: Customer Service at
1-888-923-8367
Emergency call
Important safety notes
GWARNING
It can be dangerous to remain in the vehicle,
even if you have pressed the SOS button in an emergency if:
Ryou see smoke inside or outside of the vehi-
cle, e.g. if there is a fire after an accident
Rthe vehicle is on a dangerous section of
road
Rthe vehicle is not visible or cannot easily beseen by other road users, particularly when
dark or in poor visibility conditions
There is a risk of an accident and injury.
Leave the vehicle immediately in this or simi-
lar situations as soon as it is safe to do so.
Move to a safe location along with other vehi-
cle occupants. In such situations, secure the
vehicle in accordance with national regula-
tions, e. g. with a warning triangle.
You must have a license agreement to activate
the mbrace service. Make sure that your system
is activated and operational. To register, press
the ï MB Info call button. If any of the steps mentioned are not carried out, the system may
not be activated.
If you have questions about the activation, con-
tact one of the following telephone hotlines:
RUSA: Mercedes-Benz Customer Assistance
Center at 1-800-FOR-MERCedes
(1-800-367-6372) or 1-866-990-9007
RCanada: Customer Service at
1-888-923-8367
General notes
An emergency call is dialed automatically if an
air bag or Emergency Tensioning Device is trig-
gered.
iYou cannot end an automatically triggered
emergency call yourself.
An emergency call can also be initiated man-
ually.
As soon as the emergency call has been initi-
ated, the indicator lamp in the SOS button
flashes. The multifunction display shows the
Connecting Call
message.
The audio output is muted.
Once the connection has been made, the Call
Connectedmessage appears in the multifunc-
tion display.
All important information on the emergency is
transmitted, for example:
Rcurrent location of the vehicle (as determined
by the GPS system)
Rvehicle identification number
Rinformation on the severity of the accident
Shortly after the emergency call has been initi-
ated, a voice connection is automatically estab-
lished between the Customer Assistance Center
and the vehicle occupants.
RIf the vehicle occupants respond, the
Mercedes-Benz Customer Assistance Center
attempts to get more information on the
emergency.
RIf there is no response from the vehicle occu-
pants, an ambulance is immediately sent to
the vehicle.
If no voice connection can be established to the
Mercedes-Benz Customer Assistance Center,
the system has been unable to initiate an emer-
gency call.
This can occur, for example, if the relevant
mobile phone network is not available. The indi-
Features249
Stowage and features
Z
Page 255 of 322
Important safety notes
GWARNING
When you operate or program th egarage door
wit hth eintegrate dgarage door opener, per -
son sin th erange of movement of th egarage
door can become trapped or struc kby th e
garage door .Ther eis aris kof injury.
When usin gth eintegrate dgarage door
opener, always mak esur ethat nobody is
within th erange of movement of th egarage
door .
GWARNIN G
Combustion engines emit poisonous exhaust
gase ssuc has carbon monoxide. Inhalin g
these exhaust gase sleads to poisoning .Ther e
is aris kof fatal injury. Therefore never leav e
th eengin erunnin gin enclosed spaces with-
out sufficien tventilation .
Programming
Programming the but tons
Pay attention to th e"Importan tsafet ynotes"
(Ypage 253).
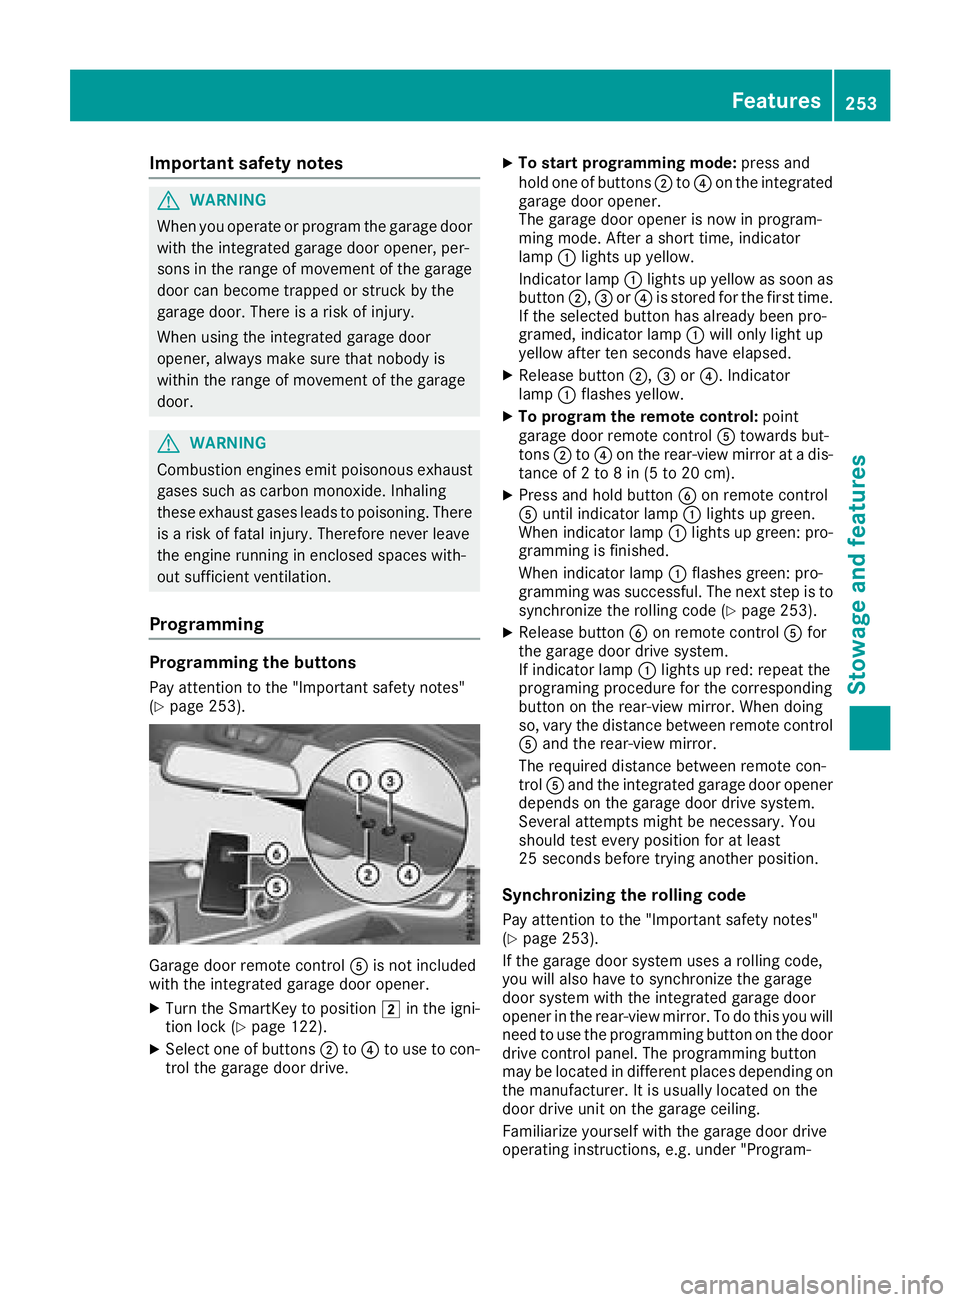
Garag edoor remot econtrol Ais no tincluded
wit hth eintegrate dgarage door opener.
XTurn th eSmartKey to position 2in th eigni-
tion loc k (Ypage 122).
XSelecton eof buttons ;to? to use to con-
trol th egarage door drive.
XTo star tprogramming mode: press and
hold on eof buttons ;to? on th eintegrate d
garage door opener.
The garage door opener is no win program -
min gmode. Afte r ashort time, indicator
lamp :lights up yellow .
Indicato rlamp :lights up yellow as soo nas
butto n;, =or? is store dfor th efirst time.
If th eselected butto nhas already been pro -
gramed, indicator lamp :will only ligh tup
yellow after te nseconds hav eelapsed.
XReleas ebutto n;, =or?. Indicato r
lamp :flashes yellow .
XTo program th eremote control :poin t
garage door remot econtrol Atowards but -
tons ;to? on th erear-view mirror at adis-
tance of 2to 8in (5 to 20 cm).
XPress and hold butto nB on remot econtrol
A until indicator lamp :lights up green .
When indicator lamp :lights up green :pro -
grammin gis finished.
When indicator lamp :flashes green :pro -
grammin gwas successful. The next step is to
synchroniz eth erollin gcode (
Ypage 253).
XReleas ebutto nB on remot econtrol Afor
th egarage door driv esystem.
If indicator lamp :lights up red :repeat th e
programing procedure for th ecorresponding
butto non th erear-view mirror .When doin g
so, var yth edistanc ebetween remot econtrol
A and th erear-view mirror .
The require ddistanc ebetween remot econ-
trol Aand th eintegrate dgarage door opener
depend son th egarage door driv esystem.
Several attempts might be necessary. You
should test every position for at least
25 seconds before trying another position .
Synchronizingtherol ling code
Pay attention to th e"Importan tsafet ynotes"
(Ypage 253).
If th egarage door system uses arollin gcode,
you will also hav eto synchroniz eth egarage
door system wit hth eintegrate dgarage door
opener in th erear-view mirror .To do this you will
need to use th eprogrammin gbutto non th edoor
driv econtrol panel. The programmin gbutto n
may be locate din differen tplaces depending on
th emanufacturer. It is usually locate don th e
door driv eunit on th egarage ceiling.
Familiariz eyourself wit hth egarage door driv e
operating instructions, e.g. under "Program -
Features253
Stowage and features
Z