2018 MERCEDES-BENZ SL ROADSTER reset
[x] Cancel search: resetPage 7 of 322

Head bag ......................................... 47
Important safety notes .................... 45
Introduction .....................................45
Knee bag .......................................... 46
Occupant Classification System
(OCS) ............................................... 47
PASSENGER AIR BAG indicator
lamps ............................................... 41
Side impact air bag .......................... 46
AIR FLOW ........................................... 116
Air vents
Glove box ....................................... 120
Important safety notes .................. 119
Setting ........................................... 119
Setting the blower output of the
AIRSCARF vents .............................1 20
Setting the center air vents ........... 120
Setting the side air vents ...............1 20
Switching AIRSCARF on/off .......... 100
Air-conditioning system
see Climate control
AIRSCARF
Switching on/off ........................... 100
AIRSCARF vents
Setting the blower output .............. 120
Alarm
ATA (Anti-Theft Alarm system) ......... 72
Switching off (ATA) .......................... 72
Switching the function on/off
(ATA) ................................................ 72
Alarm system
see ATA (Anti-Theft Alarm system)
Ambient lighting
Setting the brightness (on-board
computer) ...................................... 195
Setting the color (on-board com-
puter) ............................................. 195
AMG menu (on-board computer) ..... 197
Anti-lock braking system
see ABS (Anti-lock Braking System)
Anti-skid chains
see Snow chains
Anti-theft alarm system
see ATA (Anti-Theft Alarm system)
Ashtray ............................................... 247
Assistance display (on-board com-
puter) ..................................................1 93Assistance menu (on-board com-
puter)
..................................................1 92
ASSYST PLUS
Displaying a service message ........2
62
Hi
ding a service message .............. 262
Resetting the service interval dis-
play ................................................ 262
Service message ............................ 262
Special service requirements ......... 262
ATA (Anti-Theft Alarm system)
Activating/deactivating ................... 72
Function ...........................................7 2
Switching off the alarm .................... 72
ATTENTION ASSIST
Activating/deactivating ................. 193
Display message ............................ 216
Function/notes ............................. 177
Audio menu (on-board computer) .... 190
Audio system
see Digital Operator's Manual
Authorized Mercedes-Benz Center
see Qualified specialist workshop
Authorized workshop
see Qualified specialist workshop
AUTO lights
Display message ............................ 212
see Lights
Automatic car wash (care) ............... 263
Automatic engine start (ECO start/
stop function) .................................... 126
Automatic engine switch-off (ECO
start/stop function) .......................... 125
Automatic headlamp mode .............. 106
Automatic transmission
Accelerator pedal position ............. 133
Changing gear ............................... 133
Display message ............................ 222
Drive program ................................ 134
Drive program display .................... 131
Driving tips .................................... 133
DYNAMIC SELECT button (all vehi-
cles except Mercedes-AMG vehi-
cles) ............................................... 128
DYNAMIC SELECT controller
(Mercedes-AMG vehicles) .............. 129
Emergency running mode .............. 139
Engaging drive position .................. 132
Index5
Page 16 of 322
MP3Operation ....................................... 191
see also Digital Operator's Man-
ual .................................................. 236
Multifunction display
Function/notes ............................. 187
Permanent display ......................... 194
Multifunction steering wheel
Operating the on-board computer .. 186
Overview .......................................... 34
Multimedia system
Switching on and off ...................... 237
Music files
see also Digital Operator's Man-
ual .................................................. 236
N
NavigationEntering a destination .................... 238
Menu (on-board computer) ............ 189
see also Digital Operator's Man-
ual .................................................. 236
Navigation menu
Important safety notes .................. 189
NECK-PRO head restraints
Important safety notes .................... 55
Operation .........................................5 5
Resettin gtriggered .......................... 55
Notes on breaking-in anew vehi-
cle ...................................................... .121
O
Occupant Classification System
(OCS)
Conditions ....................................... 48
Faults ............................................... 51
Operation ......................................... 48
System self-test ............................... 50
Occupant safety
Air bags ...........................................4 5
Automatic measures after an acci-
dent ................................................. 56
Belt warning .....................................4 4
Childr eninthe vehicle .................... .56
Important safety notes .................... 40
Introduction to the restraint sys-
tem .................................................. 40 Occupant Classification System
(OCS) ............................................... 47
PASSENGER AIR BAG indicator
lamps ............................................... 41
Pets in the vehicle ........................... 59
PRE-SAFE
®(anticipatory occu-
pant protection) ............................... 55
PRE-SAFE
®PLUS (anticipatory
occupant protection PLUS) .............. 56
Restraint system warning lamp ........ 40
Seat belt .......................................... 41
OCS
Conditions ....................................... 48
Faults ............................................... 51
Operation .........................................4 8
System self-test ............................... 50
Odometer ........................................... 188
Oil
see Engine oil
On-board computer
AMG menu ..................................... 197
Assistance menu ........................... 192
Audio menu ................................... 190
Convenience submenu .................. 196
Display messages .......................... 200
Displaying a service message ........ 262
Factory settings submenu ............. 197
Important safety notes .................. 185
Instrument cluster submenu .......... 194
Lighting submenu .......................... 195
Menu overview .............................. 188
Message memory .......................... 200
Navigation menu ............................ 189
Operation ....................................... 186
RACET
IMER ................................... 198
Service menu ................................. 194
Settings menu ............................... 194
Standard display ............................ 188
Telephone menu ............................ 191
Trip menu ...................................... 188
Vehicle submenu ........................... 196
Video DVD operation ..................... 191
Operating safety
Declaration of conformity ................ 27
Important safety notes .................... 27
Operating system
see On-board computer
14Index
Page 19 of 322
SD memory cardsee also Digital Operator's Man-
ual .................................................. 236
Selecting ........................................1 91
Search & Send
see also Digital Operator's Man-
ual ..................................................2 36
Seat
Correct driver's seat position ........... 95
Seat belts
Adjusting the driver's and front-
passenger seat belt ......................... 44
Correct usage .................................. 43
Fastening ......................................... 44
Important safety guidelines ............. 42
Introduction ..................................... 41
Releasing ......................................... 44
Seat belt guide ................................. 97
Switching belt adjustment on/off
(on-board computer) ...................... 197
Warning lamp ................................. 227
Warning lamp (function) ................... 44
Seats
Adjusting (electrically) ..................... 97
Adjusting the head restraint ............ 98
Belt guide ......................................... 97
Important safety notes .................... 95
Overview .......................................... 95
Seat heating problem ...................... 99
Seat ventilation problem ................ 100
Sliding forward/back ....................... 98
Storing settings (memory func-
tion) ............................................... 105
Switching AIRSCARF on/off .......... 100
Switching seat heating on/off ......... 99
Switching seat ventilation on/off .... 99
Selector lever
Positions ........................................ 130
Sensors (cleaning instructions) ....... 267
Service menu (on-board com-
puter) .................................................. 194
Service message
see ASSYST PLUS
Service products
Brake fluid ..................................... 315
Coolant (engine) ............................ 315
Engine oil ....................................... 314
Fuel ................................................ 313 Important safety notes .................. 312
Refrigerant (air-conditioning sys-
tem) ............................................... 316
Washer fluid ................................... 316
Setting the air distribution ............... 117
Setting the airflow ............................ 117
Se
tting the date/time format
see also Digital Operator's Man-
ual .................................................. 236
Setting the language
see also Digital Operator's Man-
ual .................................................. 236
Setting the time
see also Digital Operator's Man-
ual .................................................. 236
Settings
Factory (on-board computer) ......... 197
On-board computer ....................... 194
SETUP (on-board computer,
Mercedes-AMG vehicles) .................. 198
Side impact air bag ............................. 46
Side marker lamp (display mes-
sage) ................................................... 212
Side windows
Cleaning ......................................... 266
Convenience closing feature ............ 87
Important safety information ........... 85
Opening/closing (all) ....................... 87
Opening/closing (front) ................... 86
Opening/closing (rear) .................... 86
Overview .......................................... 85
Problem (malfunction) ..................... 88
Resetting ......................................... 88
Reversing feature ............................. 86
SIRIUS services
see also Digital Operator's Man-
ual .................................................. 236
SmartKey
Changing the battery ....................... 76
Changing the programming ............. 74
Checking the battery ....................... 76
Display message ............................ 225
Door central locking/unlocking ....... 73
Important safety notes .................... 73
Loss ................................................. 77
Mechanical key ................................ 75
Opening/closing the roof ................ 90
Index17
Page 22 of 322
Load index .....................................300
Load index (definition) ................... 302
M+S tires ....................................... 287
Maximum load on a tire (defini-
tion) ............................................... 303
Maximum loaded vehicle weight
(definition) ..................................... 302
Maximum permissible tire pres-
sure (definition) .............................3 03
Maximum tire load ......................... 301
Maximum tire load (definition) ....... 303
MOExtended tires .......................... 287
Optional equipment weight (defi-
nition) ............................................ 303
Overview ........................................ 285
PSI (pounds per square inch) (def-
inition) ...........................................3 03
Replacing ....................................... 304
Service life ..................................... 286
Sidewall (definition) ....................... 303
Speed rating (definition) ................ 302
Storing ...........................................3 04
Structure and characteristics
(definition) ..................................... 302
Summer tires ................................. 287
Temperature .................................. 298
TIN (Tire Identification Number)
(definition) ..................................... 303
Tire bead (definition) ......................3 03
Tire pressure (definition) ................ 303
Tire pressures (recommended) ...... 302
Tire size (data) ............................... 308
Tire size designation, load-bearing
capacity, speed rating .................... 298
Tire tread ....................................... 286
Tire tread (definition) ..................... 303
Total load limit (definition) ............. 303
Traction ......................................... 297
Traction (definition) ....................... 303
Tread wear ..................................... 297
Uniform Tire Quality Grading
Standards ...................................... 297
Uniform Tire Quality Grading
Standards (definition) .................... 302
Wear indi
cator (definition) ............. 303
Wheel and tire combination ........... 308
Wheel rim (definition) .................... 302
see Flat tire Tow-starting
Emergency engine starting ............ 282
Important safety notes .................. 280
Towing away
Important safety guidelines ........... 280
Installing the towing eye ................ 281
Removing the towing eye ............... 281
Transporting the vehicle ................ 282
With both axles on the ground ....... 281
With the rear axle raised ................ 282
Traffic reports
see also Digital Operator's Man-
ual .................................................. 236
Traffic Sign Assist
Display message ............................ 216
Transmission
Selector lever ................................ 130
see Automatic transmission
Transmission position display ......... 131
Transporting the vehicle .................. 282
Trip computer (on-board com-
puter) .................................................. 188
Trip odometer
Calling up ....................................... 188
Resetting (on-board computer) ...... 189
Trunk
Emergency release .......................... 85
Important safety notes .................... 80
Locking separately ........................... 84
Opening/closing (automatically
from inside) ...................................... 84
Opening/closing (automatically
from outside) ................................... 82
Opening/closing (from outside,
HANDS-FREE ACCESS) .................... 82
Opening/closing (manually from
outside) ............................................ 81
Overview .......................................... 80
Power closing .................................. 80
Trunk lid
Display message ............................ 224
Opening dimensions ...................... 317
Trunk partition
Display message ............................ 224
General notes .................................. 91
Installing .......................................... 91
Opening/closing .............................. 91
Removing ......................................... 91
20Index
Page 30 of 322
Diagnostics connection
The diagnosticsconnection is only intended fo r
th econnection of diagnostic equipmen tat a
qualified specialis tworkshop .
GWARNING
If you connec tequipmen tto adiagnostic s
connection in th evehicle, it may affec tth e
operation of vehicle systems .As aresult ,th e
operatin gsafet yof th evehicle could be affec -
ted. There is aris kof an accident.
Only connec tequipmen tto adiagnostic scon-
nection in th evehicle, whic his approved fo r
your vehicle by Mercedes-Benz.
GWARNING
Objects in th edriver's footwell may restric t
th eclearanc earound th epedals or bloc k a
depressed pedal. Thi sjeopardizes th eoper-
atin gand road safet yof th evehicle. There is a
ris kof an accident.
Stow all objects securely in th evehicle so that
they do no tget into th edriver's footwell.
Whe nusin gfloormat sor carpets, mak esur e
that they are properly secure dso that they do
no tslip or obstruct th epedals. Do no tplac e
severa lfloormat sor carpet son to pof on e
another.
!If th eengin eis switched of fand equipmen t
on th ediagnostic sconnection is used ,th e
starter battery may discharge.
Connectin gequipmen tto th ediagnostic scon-
nection can lead to emission smonitorin ginfor-
mation bein greset ,fo rexample. Thi smay lead
to th evehicle failin gto mee tth erequirements of
th enext emission stest durin gth emain inspec-
tion .
Qualified specialist workshop
An authorized Mercedes-Ben zCente ris aquali-
fie dspecialis tworkshop .It has th enecessary
specialis tknowledge ,tools and qualification sto
correctl ycarry out th ewor krequire don your
vehicle. Thi sis especially th ecas efo rwor krel -
evant to safety.
Observ eth enote sin th eMaintenance Booklet .Always hav
eth efollowin gwor kcarrie dout at an
authorized Mercedes-Ben zCenter:
Rwor krelevant to safet y
Rserviceand maintenance wor k
Rrepair work
Ralterations, installation wor kand modifica-
tion s
Rworkon electronic component s
Correct use
If you remov eany warnin gstickers ,you or oth-
ers could fail to recogniz ecertain dangers.
Leave warnin gstickers in position .
Observ eth efollowin ginformation when drivin g
your vehicle:
Rth esafet ynote sin this manual
Rtechnical dat afo rth evehicle
Rtraffic rule sand regulation s
Rlaws and safetystandard spertainin gto moto r
vehicles
Problem swit hyou rvehicle
If you should experience aproblem wit hyour
vehicle, particularly on ethat you believe may
affec tit s saf eoperation ,we urg eyou to contact
an authorized Mercedes-Ben zCente rimmedi-
ately to hav eth eproblem diagnosed and recti -
fied. If th eproblem is no tresolved to your sat -
isfaction ,please discus sth eproblem again wit h
an authorized Mercedes-Ben zCente ror ,if nec-
essary, contact us at on eof th efollowin g
addresses.
In th eUSA
Customer Assistanc eCente r
Mercedes-Ben zUSA, LL C
3 Mercedes Drive
Montvale, NJ 07645-0350
In Canad a
Customer Relation sDepartmen t
Mercedes-Ben zCanada, Inc.
98 Vanderhoo fAvenue
Toronto ,Ontario M4 G4C9
Reporting safet ydefect s
USAonly:
28Operating safety
Introduction
Page 57 of 322
NECK-PRO head restraints
Important safety notes
GWARNING
The function of the head restraint may be
impaired if you:
Rattach objects such as coat hangers to the
head restraints, for example
Ruse head restraint covers
If you do so, the head restraints cannot fulfill
their intended protective function in the event of an accident. In addition, objects attached
to the head restraints could endanger other
vehicle occupants. There is an increased risk
of injury.
Do not attach any objects to the head
restraints and do not use head restraint cov-
ers.
Method of operation
NECK-PRO head restraints reduce the likelihood
of head and chest injuries. The NECK-PRO head
restraints on the driver's and front-passenger
seats are moved forwards and upwards in the
event of a rear-end collision of a certain severity.
This provides better head support.
If the NECK-PRO head restraints have been trig-
gered in an accident, you must reset the NECK-
PRO head restraints on the driver’s and front-
passenger seat (
Ypage 55). Otherwise, the
additional protection will not be available in the event of another rear-end collision. You can rec-
ognize when NECK-PRO head restraints have
been triggered by the fact that they have moved
forwards and can no longer be adjusted.
Mercedes-Benz recommends that you have the
NECK-PRO head restraints checked for func-
tionality at a qualified specialist workshop after
a rear-end collision.
Resetting triggered NECK-PRO head
restraints
Do not insert your finger between the upholstery
of the head restraint and the seat. Pay particular
attention while resetting the NECK-PRO head
restraints.
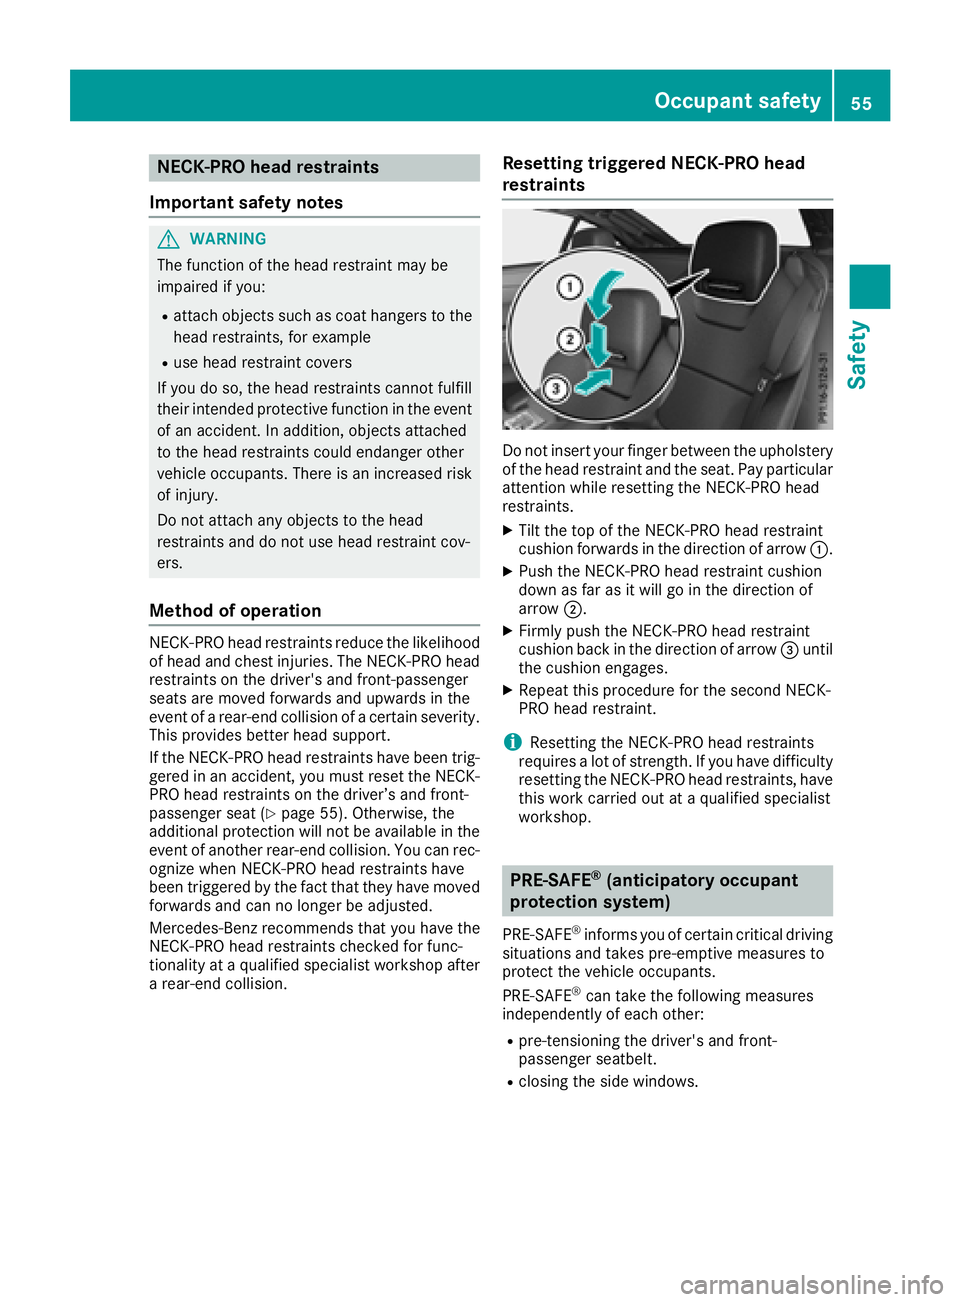
XTilt the top of the NECK-PRO head restraint
cushion forwards in the direction of arrow :.
XPush the NECK-PRO head restraint cushion
down as far as it will go in the direction of
arrow;.
XFirmly push the NECK-PRO head restraint
cushion back in the direction of arrow =until
the cushion engages.
XRepeat this procedure for the second NECK-
PRO head restraint.
iResetting the NECK-PRO head restraints
requires a lot of strength. If you have difficulty
resetting the NECK-PRO head restraints, have
this work carried out at a qualified specialist
workshop.
PRE-SAFE®(anticipatory occupant
protection system)
PRE-SAFE®informs you of certain critical driving
situations and takes pre-emptive measures to
protect the vehicle occupants.
PRE-SAFE
®can take the following measures
independently of each other:
Rpre-tensioning the driver's and front-
passenger seatbelt.
Rclosing the side windows.
Occupant safety55
Safety
Z
Page 88 of 322
GWARNING
If children operate the side windows they
could become trapped, particularly if they are left unsupervised. There is a risk of injury.
When leaving the vehicle, always take the
SmartKey with you and lock the vehicle. Never
leave children unsupervised in the vehicle.
Side window reversing feature
The front side windows are equipped with an
automatic reversing feature. If a solid object
blocks or restricts the upward movement of one
of the front side windows during the closing
process, the side window opens again automat-
ically. During the manual closing process, the
side window only opens again automatically
after the corresponding switch is released. How-
ever, the automatic reversing feature is only an
aid and does not relieve you of the responsibility
of paying attention when closing a side window.
GWARNING
The reversing feature does not react:
Rto soft, light and thin objects, e.g. small fin-
gers
Rover the last 1/6 in(4 mm) of the closing
movement
Rduring resetting
Rwhen closing the side window again man-
ually immediately after automatic reversing
This means that the reversing feature cannot
prevent someone being trapped in these sit-
uations. There is a risk of injury.
Make sure that no body parts are in close
proximity during the closing procedure. If
someone becomes trapped, press the switch
to open the side window again.
Opening and closing the side win-
dows
Opening and closing the side windows
in the front
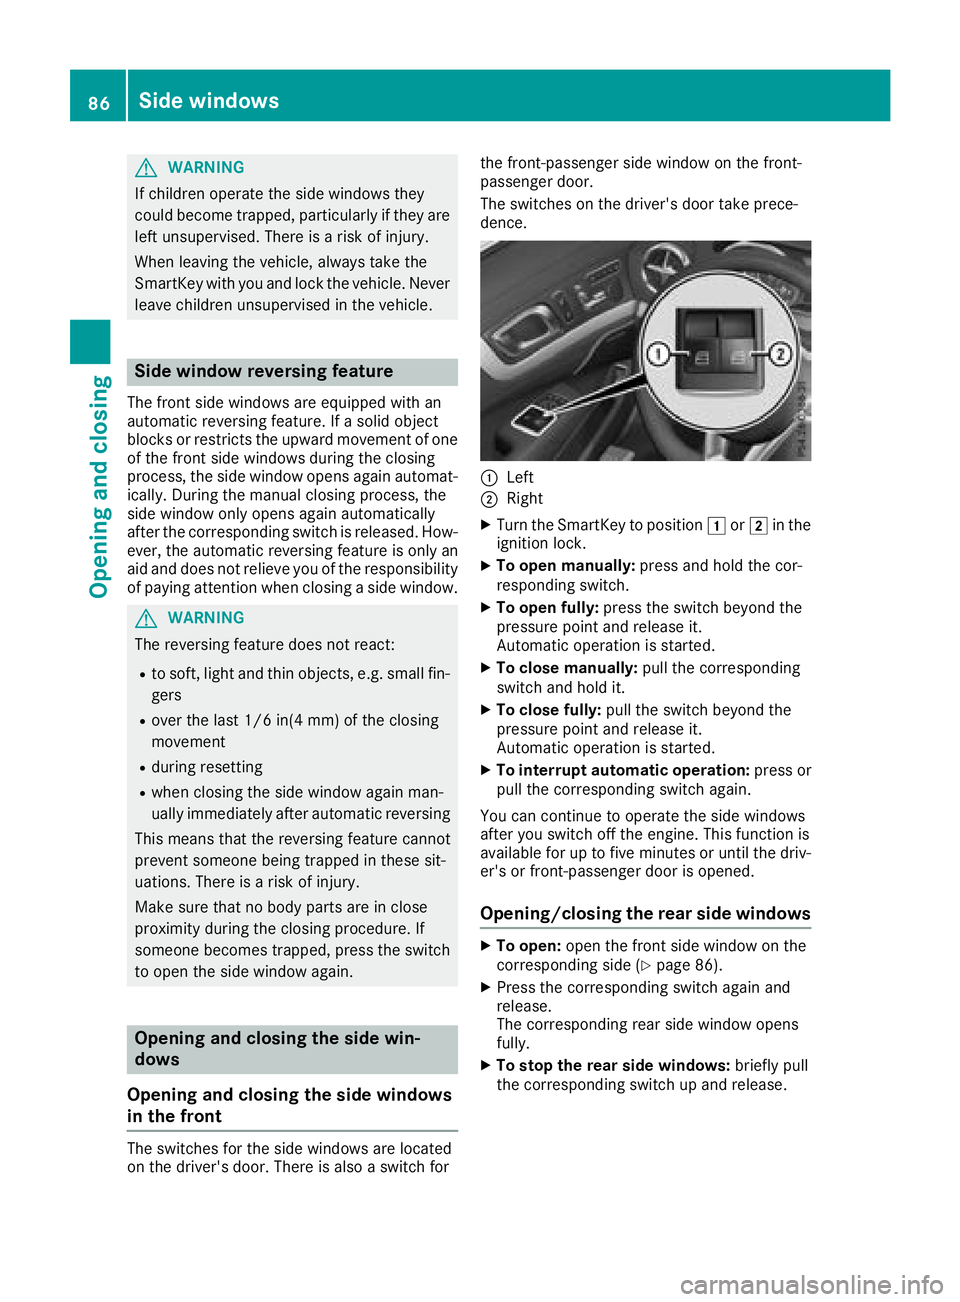
The switches for the side windows are located
on the driver's door. There is also a switch for the front-passenger side window on the front-
passenger door.
The switches on the driver's door take prece-
dence.
:Left
;Right
XTurn the SmartKey to position
1or2 in the
ignition lock.
XTo open manually: press and hold the cor-
responding switch.
XTo open fully: press the switch beyond the
pressure point and release it.
Automatic operation is started.
XTo close manually: pull the corresponding
switch and hold it.
XTo close fully: pull the switch beyond the
pressure point and release it.
Automatic operation is started.
XTo interrupt automatic operation: press or
pull the corresponding switch again.
You can continue to operate the side windows
after you switch off the engine. This function is
available for up to five minutes or until the driv-
er's or front-passenger door is opened.
Opening/closing the rear side windows
XTo open: open the front side window on the
corresponding side (Ypage 86).
XPress the corresponding switch again and
release.
The corresponding rear side window opens
fully.
XTo stop the rear side windows: briefly pull
the corresponding switch up and release.
86Side windows
Opening and closing
Page 90 of 322
Resetting the side windows
If a side window can no longer be closed fully,
you must reset it.
XClose all the doors.
XTurn the SmartKey to position1or2 in the
ignition lock.
XPull the corresponding switch on the door
control panel until the side window is com-
pletely closed (
Ypage 86).
XHold the switch for an additional second. If the side window opens again slightly:
XImmediately pull the corresponding switch on
the door control panel until the side window is
completely closed (
Ypage 86).
XHold the switch for an additional second.
If the respective side window remains closed
after the button is released, then it has been
set correctly. If this is not the case, repeat the
steps above.
Problems with the side windows
GWARNING
If you close a side window again immediately after it has been blocked or reset, the side window
closes with increased or maximum force. The reversing feature is then not active. Parts of the
body could be trapped in the closing area in the process. This poses an increased risk of injury or
even fatal injury.
Make sure that no parts of the body are in the closing area. To stop the closing process, release
the switch or push the switch again to reopen the side window.
ProblemPossible causes/consequences and MSolutions
A side window cannot be
closed because it is
blocked by objects, e.g.
leaves in the window
guide.XRemove the objects.
XClose the side window.
A side window cannot be
closed and you cannot
see the cause.If a side window is obstructed during closing and reopens again
slightly:
XImmediately after the window blocks, pull the corresponding switch
again until the side window has closed.
The side window is closed with increased force.
If a side window is obstructed again during closing and reopens again slightly:
XImmediately after the window blocks, pull the corresponding switchagain until the side window has closed.
The side window is closed without the automatic reversing feature.
The side windows cannot
be opened or closed
using the convenience
opening/closing fea-
ture.The SmartKey battery is discharged or nearly discharged.
XCheck the SmartKey battery (Ypage 76 )and replace it if necessary
(Ypage 76).
88Side windows
Opening and closing