2018 MERCEDES-BENZ GLS SUV lock
[x] Cancel search: lockPage 163 of 398

overfilling. DEF may leak if overfilled. Mercedes-
Benz offers a special disposable hose with over-
fill protection. You can obtain this from any
authorized Mercedes-Benz Center. DEF is avail-
able in a variety of containers and receptacles.
Only use the disposable hose with the
Mercedes-Benz DEF refill canisters.
DEF refill bottle
!Only screw on the DEF refill bottle hand-
tight. Otherwise, the thread of the DEF refill
bottle could be damaged and DEF could leak
out.
XUnscrew the protective cap from DEF refill
bottle :.
XPlace DEF refill bottle :on the filler neck as
shown and screw it on clockwise until hand-
tight.
XPress DEF refill bottle :towards the filler
neck.
The DEF tank is filled. This may take up to one
minute.
iWhen DEF refill bottle :is no longer
pressed, filling stops and the bottle may be
taken off again after being only partially emp-
tied.
XRelease DEF refill bottle :.
XTurn DEF refill bottle:counter-clockwise
and remove it.
XScrew the protective cap onto DEF refill bot-
tle : again.
DEF refill bottles are available at many gas sta-
tions or at a qualified specialist workshop. Refill
bottles without a threaded cap do not provide
overfill protection. DEF may leak if overfilled.
Mercedes Benz offers special refill bottles with a threaded seal. These are available at any author-
ized Mercedes-Benz Center.
Parking
Important safety notes
GWARNING
Flammable material such as leaves, grass or
twigs may ignite if they come into contact with
hot parts of the exhaust system or exhaust
gas flow. There is a risk of fire.
Park the vehicle so that no flammable mate-
rials come into contact with parts of the vehi-
cle which are hot. Take particular care not to
park on dry grassland or harvested grain
fields.
GWARNING
If you leave children unsupervised in the vehi-
cle, they could set it in motion by, for example:
Rrelease the parking brake.
Rshift the automatic transmission out of the
parking position P.
Rstart the engine.
In addition, they may operate vehicle equip-
ment and become trapped. There is a risk of
an accident and injury.
When leaving the vehicle, always take the
SmartKey with you and lock the vehicle. Never
leave children unsupervised in the vehicle.
!Always secure the vehicle correctly against
rolling away. Otherwise, the vehicle or its driv-
etrain could be damaged.
To ensure that the vehicle is secured against
rolling away unintentionally:
Rthe electric parking brake must be applied
Rthe transmission must be in position jand
the SmartKey must be removed from the igni- tion lock
Rthe front wheels must be turned towards the
curb on steep uphill or downhill gradients
Rthe empty vehicle must be secured at the
front axle with a wheel chock or similar, for
example, on uphill or downhill gradients
Ra laden vehicle must also be secured at the
rear axle with a wheel chock or similar, for
example, on uphill or downhill gradients
Parking161
Driving and parking
Z
Page 164 of 398
Switching off the engine
GWARNING
The automatic transmission switches to neu-
tral position Nwhen you switch off the engine.
The vehicle may roll away. There is a risk of an
accident.
After switching off the engine, always switch
to parking position P. Prevent the parked vehi-
cle from rolling away by applying the parking
brake.
XApply the electric parking brake.
XShift the transmission to position j.
XWith the SmartKey:turn the SmartKey to
position uin the ignition lock and remove it.
The immobilizer is activated.
XWith KEYLESS-GO:
Press the Start/Stop button (
Ypage 140)
The engine stops and all the indicator lamps in
the instrument cluster go out.
If you switch the engine off with the transmis-
sion in position korh, the automatic trans-
mission shifts to iautomatically.
If you then open the driver's or front-passenger
door, the automatic transmission shifts to j
automatically.
If you want the automatic transmission to
remain in neutral i, e.g. when having the vehi-
cle cleaned in an automatic, tow-through car
wash:
XVehicles with a SmartKey: switch on the
ignition.
XVehicles with KEYLESS-GO: remove the
Start/Stop button from the ignition lock.
XInsert the SmartKey into the ignition lock.
XSwitch on the ignition.
XAll vehicles: depress the brake pedal and
keep it depressed.
XEngage neutral i.
XRelease the brake pedal.
XRelease the electric parking brake.
XSwitch off the ignition and leave the SmartKey
in the ignition lock.
iThe engine can be switched off in an emer-
gency while the vehicle is in motion by press-
ing and holding the Start/Stop button for
three seconds.
Electric parking brake
General notes
GWARNING
If you leave children unsupervised in the vehi-
cle, they could set it in motion by, for example:
Rrelease the parking brake.
Rshift the automatic transmission out of the
parking position P.
Rstart the engine.
In addition, they may operate vehicle equip-
ment and become trapped. There is a risk of
an accident and injury.
When leaving the vehicle, always take the
SmartKey with you and lock the vehicle. Never
leave children unsupervised in the vehicle.
The function of the electric parking brake is
dependent on the on-board voltage. If the on-
board voltage is low or there is a malfunction in
the system, it may not be possible to apply the
released parking brake.
XIf this is the case, only park the vehicle on
level ground and secure it to prevent it rolling
away.
XShift the automatic transmission to position
j.
It may not be possible to release an applied
parking brake if the on-board voltage is low or
there is a malfunction in the system. Contact a
qualified specialist workshop.
iThe electric parking brake performs a func-
tion test at regular intervals while the engine
is switched off. The sounds that can be heard
while this is occurring are normal.
162Parking
Driving and parking
Page 171 of 398
Off-road fording
!Under no circumstances should you accel-
erate before entering the water. The bow
wave could cause water to enter and damage
the engine and other assemblies.
!Do not open any of the vehicle's doors while
fording. Otherwise, water could get into the
vehicle interior and damage the vehicle's
electronics and interior equipment.
REstablish how deep the water is and the char-
acteristics of the body of water before ford-
ing.
RSelect the highest possible vehicle level.
RShift to a lower gear using the left-hand steer-
ing wheel paddle shifter.
RAvoid high engine speeds.
REnter and exit the water at a flat place and at
a steady walking pace.
RDrive slowly and at an even speed through the
water.
REnsure that a bow wave does not form as you
drive.
RDo not stop and do not switch off the engine.
Water offers a high degree of resistance, and
the ground is slippery and in some cases
unstable. Therefore, it is difficult and danger-
ous to pull away in the water.
RClean any mud from the tire tread after ford-
ing.
RApply the brakes to dry them after fording.
Always observe the fording depth values
(
Ypage 393).
Winter driving
GWARNING
If you shift down on a slippery road surface in an attempt to increase the engine's braking
effect, the drive wheels could lose their grip.
There is an increased danger of skidding and
accidents.
Do not shift down for additional engine brak-
ing on a slippery road surface.
GDANGER
If the exhaust pipe is blocked or adequate
ventilation is not possible, poisonous gases
such as carbon monoxide (CO) may enter the vehicle. This is the case, e.g. if the vehicle
becomes trapped in snow. There is a risk of
fatal injury.
If you leave the engine or the auxiliary heating
running, make sure the exhaust pipe and area
around the vehicle are clear of snow. To
ensure an adequate supply of fresh air, open a
window on the side of the vehicle that is not
facing into the wind.
!When scraping ice off the rear window, take
care not to damage the rear-window seal or
trim.
Have your vehicle winter-proofed at a qualified
specialist workshop at the onset of winter.
Drive particularly carefully on slippery road sur-
faces. Avoid sudden acceleration, steering and
braking maneuvers. Do not use cruise control or
Distance Pilot DISTRONIC.
If the vehicle threatens to skid or cannot be
stopped when moving at low speed:
XShift the transmission to position i.
XTry to bring the vehicle under control using
corrective steering.
When driving in snow with or without snow
chains, select driving program Slippery
(
Ypage 147).
iVehicles with a diesel engine: do not
cover the radiator, e.g. with a protective
cover. The measuring function of the on-
board diagnosis system may otherwise pro-
vide inaccurate values. Some of these values
are required by law and must therefore always be accurate.
The outside temperature indicator is not
designed to serve as an ice-warning device and
is therefore unsuitable for that purpose.
Changes in the outside temperature are dis-
played after a short delay.
Indicated temperatures just above the freezing
point do not guarantee that the road surface is
free of ice. The road may still be icy, especially in
wooded areas or on bridges. You should pay
special attention to road conditions when tem-
peratures are around the freezing point.
For more information on driving with snow
chains, see (
Ypage 356).
Driving tips169
Driving and parking
Z
Page 173 of 398
Familiarize yourself with the characteristics of
your vehicle and the gear shift operation before
driving through difficult terrain.
The following driving systems are specially
adapted to off-road driving:
RtheOff-road drive program (vehicles without
Off-Road Engineering package)
(
Ypage 219)
ROff-road andOff-road Plus drive programs
(vehicles with Off-Road Engineering package)
(
Ypage 220)
RLOW RANGE off-road gear (vehicles with the
Off-Road Engineering package)
(
Ypage 221)
RDifferential lock (vehicles with the Off-Road
Engineering package) (Ypage 221)
ROff-road ABS (Ypage 67)
ROff-road 4ETS (Ypage 70)
ROff-road ESP®(Ypage 71)
RAIRMATIC package (vehicle level)
(Ypage 188)
RDSR (Downhill Speed Regulation)
(Ypage 218)
Observe the following notes:
RStop the vehicle before starting to drive along
an off-road route. If necessary, select the off- road program (
Ypage 220) or shift to the
LOW RANGE off-road gear (Ypage 221).
RSelect a vehicle level that is suitable for the
terrain. To avoid damaging the vehicle, make
sure there is always sufficient ground clear-
ance.
RCheck that items of cargo and loads are
stowed safely and are well secured
(
Ypage 305).
RAlways keep the engine running and in gear
when driving on a downhill gradient. Activate
DSR (
Ypage 218).
RAlways keep the engine running and in gear
when driving down an incline.
RAdapt your speed to the terrain. The rougher,
steeper or more ruts on the terrain, the slower
your speed should be.
RDo not jump with the vehicle as this will inter- rupt the vehicle's propulsion.
RDrive with extreme care on unfamiliar off-road
routes where visibility is poor. For safety rea-
sons, get out of the vehicle first and survey
the off-road route.
RLook out for obstacles, such as rocks, holes,
tree stumps and furrows.
RTake care when turning on an uphill or down-hill slope or when driving across a slope. The
vehicle could otherwise tip over.
RAlways keep the doors, the tailgate, the side
windows and the sliding sunroof closed whilethe vehicle is in motion.
RDo not shift the automatic transmission to
position i.
RObserve the notes on off-road fording
(Ypage 169).
iInformation about retrofitting special all-ter-
rain tires is available from any qualified spe-
cialist workshop.
iDo not use the HOLD function when driving
off-road, on steep uphill or downhill gradients
or on slippery or loose surfaces. The HOLD
function cannot hold the vehicle on such sur-
faces.
Checklist before driving off-road
!If the engine oil warning lamp lights up while
the vehicle is in motion, stop the vehicle in a
safe place as soon as possible. Check the
engine oil level. The engine oil warning lamp
warning must not be ignored. Continuing the
journey while the symbol is displayed could
lead to engine damage.
XEngine oil level: check the engine oil level
and add oil if necessary.
When driving on steep gradients, the engine
oil level must be sufficiently high to ensure a
correct oil supply in the vehicle.
XDEF tank (BlueTEC vehicles): check the
level and add if necessary (Ypage 158).
XTire-changing tool kit: check that the jack is
working and make sure you have the lug
wrench, a robust tow cable and a folding
spade in the vehicle.
XWheels and tires: check the tread depth and
pressure of the tires.
XCheck for damage and remove any foreign
objects, e.g. small stones, from the wheels/
tires.
XReplace any missing valve caps.
XReplace dented or damaged wheels.
XRims: dented or bent rims can result in a loss
of tire pressure and damage the tire bead.
Driving tips171
Driving and parking
Z
Page 176 of 398

Hilltops
When driving up an uphill gradient, slightly
reduce pressure on the accelerator immediately
before reaching the brow of the hill. Make use of
the vehicle's own impetus to travel over the
brow.
This style of driving prevents:
Rthe vehicle from lifting off the ground on the
brow of a hill
Rthe vehicle from traveling too quickly down
the other side
Driving downhill
RDrive slowly.
RDo not drive at an angle down steep inclines.
Steer into the line of fall and drive with the
front wheels aligned straight. Otherwise, the
vehicle could slip sideways, tip and rollover.
RShift to a lower gear using the left-hand pad-
dle shifter before tackling steep downhill gra-
dients.
RActivate DSR. If this is not sufficient, brake
gently. When doing so, make sure that the
vehicle is facing in the direction of the line of
fall.
RCheck that the brakes are working normally
after a long downhill stretch.
iThe special off-road ABS setting enables a
precise, brief and repeated locking of the
front wheels. This causes them to dig into
loose earth. Be aware that the front wheels
easily skid across the ground surface if com-
pletely braked and therefore lose their ability
to steer.
Driving systems
Intelligent Drive
Mercedes-Benz Intelligent Drive stands for inno-
vative driver assistance and safety systems
which enhance comfort and support the driver in critical situations. With these intelligent co-ordi-
nated systems Mercedes-Benz has set a mile-
stone on the path towards autonomous driving.
Mercedes-Benz Intelligent Drive embraces all
elements of active and passive safety in one well
thought out system – for the safety of the vehi-
cle occupants and that of other road users. Further information on driving safety systems
(
Ypage 66).
Cruise control
General notes
Cruise control maintains a constant road speed
for you. It brakes automatically in order to avoid
exceeding the set speed. You must select a
lower gear in good time on long and steep down-
hill gradients, especially if the vehicle is laden or
towing a trailer. By doing so, you will make use of
the braking effect of the engine. This relieves the
load on the brake system and prevents the
brakes from overheating and wearing too
quickly.
Use cruise control only if road and traffic con-
ditions make it appropriate to maintain a steady
speed for a prolonged period. You can store any
road speed above 20 mph (30 km/h).
iCruise control should not be activated when
driving off-road.
Important safety notes
If you fail to adapt your driving style, cruise con- trol can neither reduce the risk of an accident
nor override the laws of physics. Cruise control
cannot take into account the road, traffic and
weather conditions. Cruise control is only an
aid. You are responsible for the distance to the
vehicle in front, for vehicle speed, for braking in
good time and for staying in your lane.
Do not use cruise control:
Rin road and traffic conditions which do not
allow you to maintain a constant speed, e.g. in
heavy traffic or on winding roads
Ron slippery road surfaces. Braking or accel-
erating could cause the drive wheels to lose
traction and the vehicle could then skid
Rwhen there is poor visibility, e.g. due to fog,
heavy rain or snow
If there is a change of drivers, advise the new
driver of the speed stored.
174Driving systems
Driving and parking
Page 186 of 398
When Distance Pilot DISTRONIC is deactivated
or not available, Steering Pilot is deactivated
automatically.
Level control (vehicles with the Off-
Road Engineering package)
Important safety notes
Level control adapts the vehicle level automati-
cally to the current operating and driving situa-
tion. This results in reduced fuel consumption
and improved handling.
Make changes to the vehicle level while the
vehicle is in motion. This enables the vehicle to
adjust to the new level as quickly as possible.
The vehicle level may change visibly if you park
the vehicle and the outside temperature
changes. If the temperature drops, the vehicle
level is lower; with an increase in temperature,
the vehicle level rises.
If you unlock the vehicle or open a door, the
vehicle begins to compensate for load discrep-
ancies while still parked. However, for signifi-
cant level changes, such as after the vehicle has
been stationary for a long period, the engine
must be on. For safety reasons, the vehicle is
only lowered when the doors are closed. Low-
ering is interrupted if a door is opened, and it
continues once the door has been closed.
Further information about "Driving off-road"
(
Ypage 170).
GWARNING
When the vehicle is being lowered, people
could become trapped if their limbs are
between the vehicle body and the wheels or
underneath the vehicle. There is a risk of
injury.
Make sure no one is underneath the vehicle or
in the immediate vicinity of the wheel arches
when the vehicle is being lowered.
GWARNING
When you drive with the vehicle raised, the
driving characteristics could be impaired by
the vehicle's raised center of gravity. The vehi-
cle could rollover more easily, for example on
a bend. There is a risk of an accident.
Always select as low a vehicle level as possi-
ble and adjust your driving style.
GWARNING
When you drive with the chassis lowered or
raised, the vehicle's braking and driving char-
acteristics can be significantly impaired. You
could also exceed the permissible vehicle
height if the chassis is raised. There is a risk of an accident.
Adjust the vehicle level before pulling away.
GWARNING
Due to the high center of gravity, the vehicle
may start to skid and roll over in the event of
an abrupt steering maneuver and/or when
the vehicle's speed is not adapted to the road
conditions. There is a risk of an accident.
Always adapt your speed and driving style to
the vehicle's driving characteristics and to the
prevailing road and weather conditions.
!When driving on extremely rough terrain,
select a high vehicle level in good time. Make
sure there is always sufficient ground clear-
ance. You will otherwise damage the vehicle.
RUtility vehicles have a significantly higher roll- over rate than other types of vehicles.
Failure to operate this vehicle safely may
result in an accident, rollover of the vehicle,
and severe or fatal injury.
RIn a rollover crash, an unbelted person is sig-
nificantly more likely to die than a person
wearing a seat belt.
You and all vehicle occupants should always
wear your seat belts.
Basic settings
The extent to which the vehicle is raised or low-
ered depends on the basic setting selected.
Select:
Rthe Comfort orSport drive program for driv-
ing on normal roads
Rthe Offroad drive program for driving on eas-
ily negotiable off-road terrain
Rthe Offroad Plus drive program for off-road
driving
184Driving systems
Driving and parking
Page 187 of 398
Roffroad level 1 for driving on easily negotiableoff-road terrain
Roffroad level 2 for driving on normal off-road
terrain
Roffroad level 3 for freeing the vehicle in par-
ticularly rough terrain at low speeds only
The individual vehicle levels differ from the nor- mal level as follows:
R–0.6 in (–15 mm) in the Sportdrive program
R+/–0 in (+/–0 mm) in the Comfortdrive pro-
gram
R+ 1.2 in (+ 30 mm) in the Offroaddrive pro-
gram
R+ 2.4 in (+ 60 mm) in the Offroad Plusdrive
program
R+ 1.2 in (+ 30 mm) in offroad level 1
R+ 2.4 in (+ 60 mm) in offroad level 2
R+ 3.5 in (+ 90 mm) in offroad level 3
Setting the vehicle level
!Make sure that there is enough ground
clearance when the vehicle is being lowered.
It could otherwise hit the ground, damaging
the underbody.
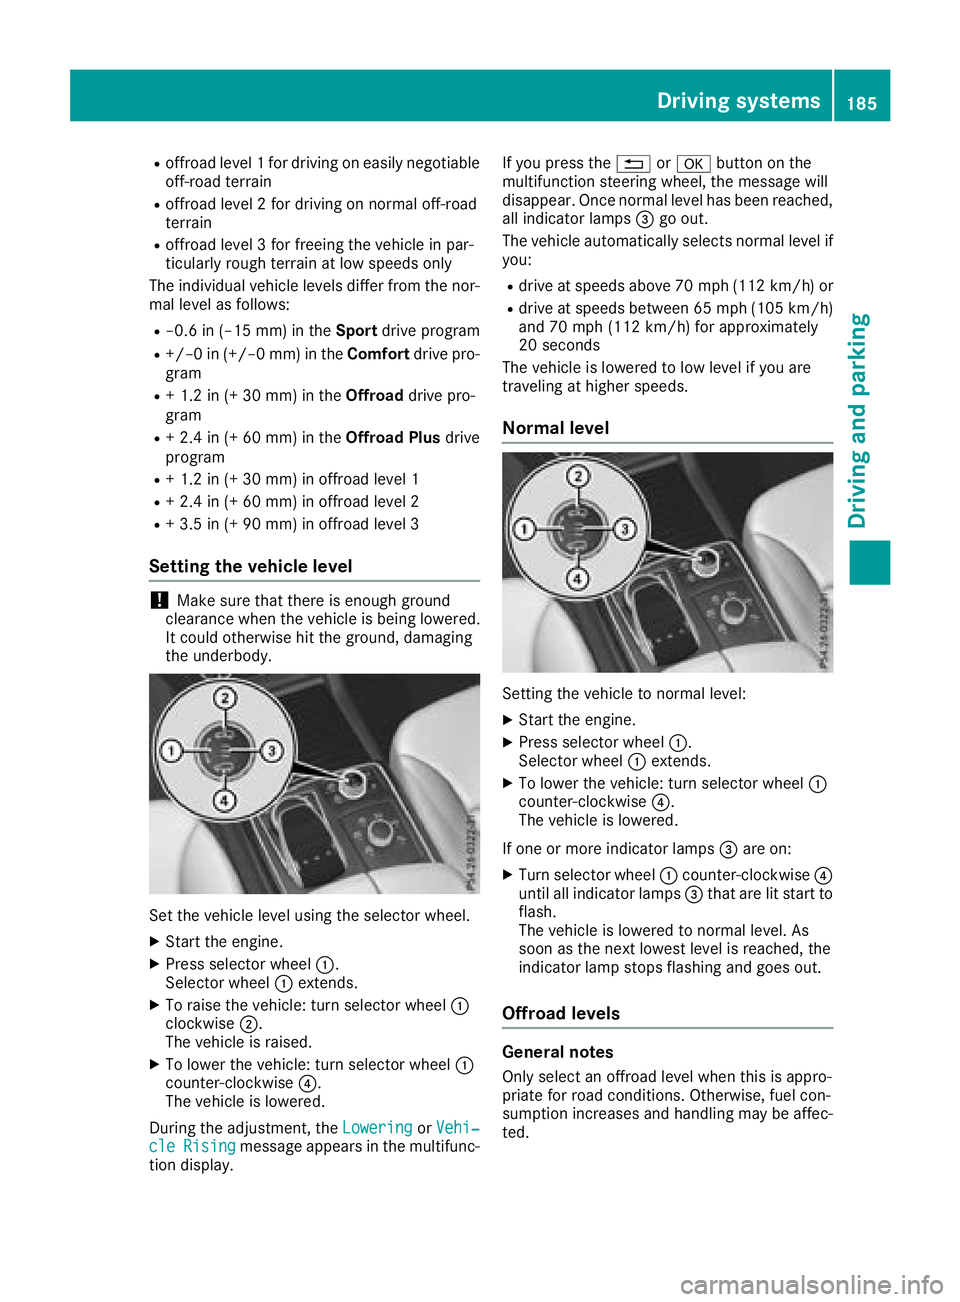
Set the vehicle level using the selector wheel.
XStart the engine.
XPress selector wheel :.
Selector wheel :extends.
XTo raise the vehicle: turn selector wheel :
clockwise ;.
The vehicle is raised.
XTo lower the vehicle: turn selector wheel :
counter-clockwise ?.
The vehicle is lowered.
During the adjustment, the Lowering
orVehi‐cleRisingmessage appears in the multifunc-
tion display. If you press the
%ora button on the
multifunction steering wheel, the message will
disappear. Once normal level has been reached, all indicator lamps =go out.
The vehicle automatically selects normal level if
you:
Rdrive at speeds above 70 mph (112 km/h) or
Rdrive at speeds between 65 mph (105 km/h)
and 70 mph (112km/ h)for approximately
20 seconds
The vehicle is lowered to low level if you are
traveling at higher speeds.
Normal level
Setting the vehicle to normal level:
XStart the engine.
XPress selector wheel :.
Selector wheel :extends.
XTo lower the vehicle: turn selector wheel :
counter-clockwise ?.
The vehicle is lowered.
If one or more indicator lamps =are on:
XTurn selector wheel :counter-clockwise ?
until all indicator lamps =that are lit start to
flash.
The vehicle is lowered to normal level. As
soon as the next lowest level is reached, the
indicator lamp stops flashing and goes out.
Offroad levels
General notes
Only select an offroad level when this is appro-
priate for road conditions. Otherwise, fuel con-
sumption increases and handling may be affec-
ted.
Driving systems185
Driving and parking
Z
Page 188 of 398
You can select from the following:
ROffroad level 1 at speeds up to 60 mph
(96 km/h)
ROffroad level 2 at speeds up to 40 mph
(64 km/h)
ROffroad level 3 at speeds up to 12 mph
(20 km/h)
If you select an offroad level when driving at too
high a speed, the Drive
MoreSlowlymessage
appears in the multifunction display.
Offroad level 3 is only suitable for driving on
extremely difficult off-road terrain under partic-
ularly rough conditions.
RAdjust your driving style to the altered han-
dling characteristics.
RDo not drive at speeds above 12 mph
(20 km/h).
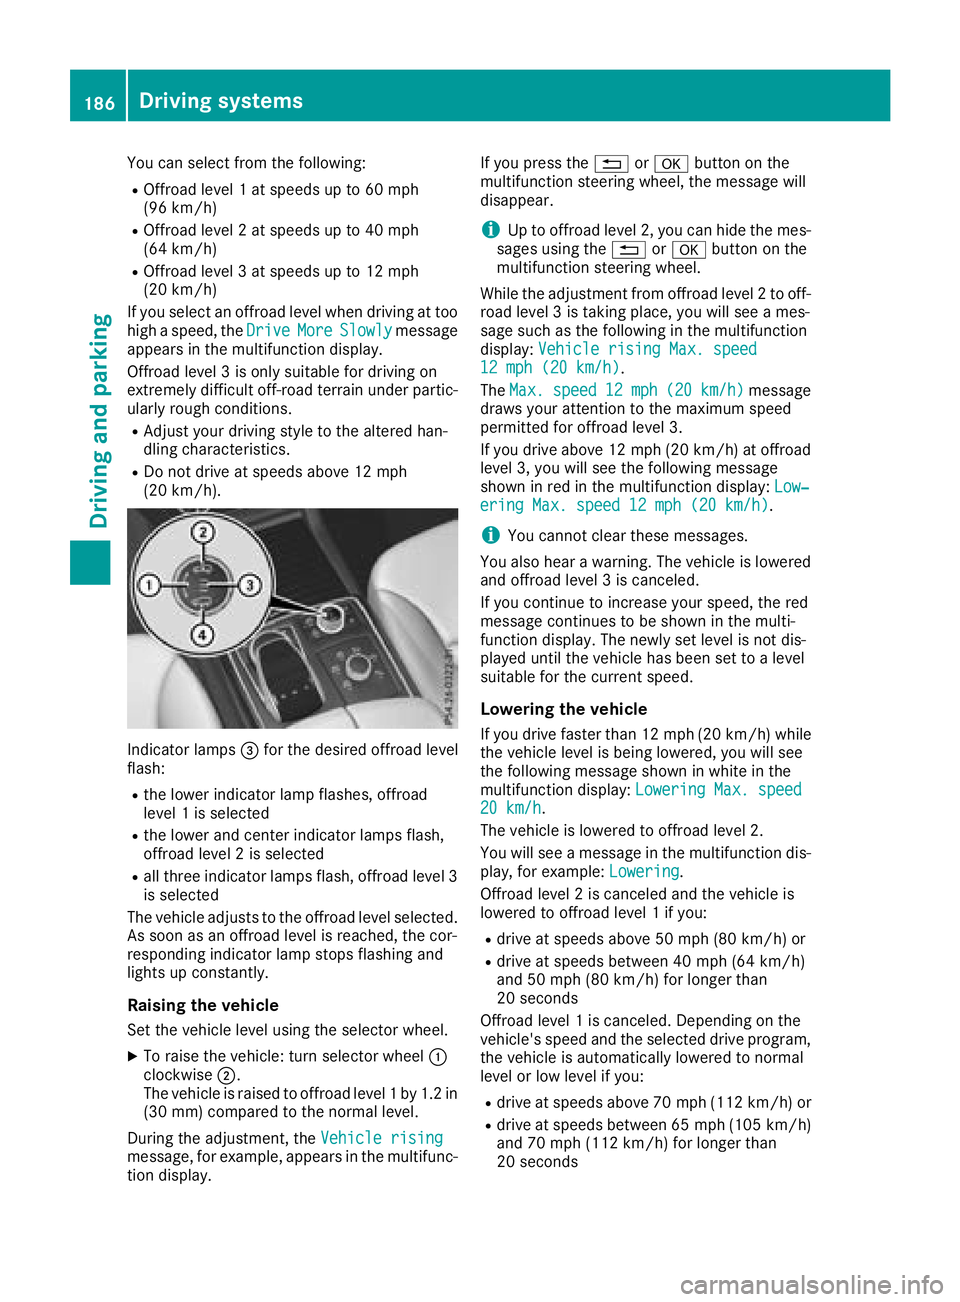
Indicator lamps =for the desired offroad level
flash:
Rthe lower indicator lamp flashes, offroad
level 1 is selected
Rthe lower and center indicator lamps flash,
offroad level 2 is selected
Rall three indicator lamps flash, offroad level 3
is selected
The vehicle adjusts to the offroad level selected.
As soon as an offroad level is reached, the cor-
responding indicator lamp stops flashing and
lights up constantly.
Raising the vehicle
Set the vehicle level using the selector wheel.
XTo raise the vehicle: turn selector wheel :
clockwise ;.
The vehicle is raised to offroad level 1 by 1.2 in
(30 mm) compared to the normal level.
During the adjustment, the Vehicle rising
message, for example, appears in the multifunc-
tion display. If you press the
%ora button on the
multifunction steering wheel, the message will
disappear.
iUp to offroad level 2, you can hide the mes-
sages using the %ora button on the
multifunction steering wheel.
While the adjustment from offroad level 2 to off-
road level 3 is taking place, you will see a mes-
sage such as the following in the multifunction
display: Vehicle rising Max. speed
12 mph (20 km/h).
The Max.
speed12 mph(20 km/h)message
draws your attention to the maximum speed
permitted for offroad level 3.
If you drive above 12 mph (20 km/h) at offroad
level 3, you will see the following message
shown in red in the multifunction display: Low‐
ering Max. speed 12 mph (20 km/h).
iYou cannot clear these messages.
You also hear a warning. The vehicle is lowered
and offroad level 3 is canceled.
If you continue to increase your speed, the red
message continues to be shown in the multi-
function display. The newly set level is not dis-
played until the vehicle has been set to a level
suitable for the current speed.
Lowering the vehicle
If you drive faster than 12 mph (20 km/h) while
the vehicle level is being lowered, you will see
the following message shown in white in the
multifunction display: Lowering Max. speed
20 km/h.
The vehicle is lowered to offroad level 2.
You will see a message in the multifunction dis-
play, for example: Lowering
.
Offroad level 2 is canceled and the vehicle is
lowered to offroad level 1 if you:
Rdrive at speeds above 50 mph (80 km/h) or
Rdrive at speeds between 40 mph (64 km/h)
and 50 mph (80 km/h) for longer than
20 seconds
Offroad level 1 is canceled. Depending on the
vehicle's speed and the selected drive program,
the vehicle is automatically lowered to normal
level or low level if you:
Rdrive at speeds above 70 mph (112 km/h) or
Rdrive at speeds between 65 mph (105 km/h)
and 70 mph (112 km/h) for longer than
20 seconds
186Driving systems
Driving and parking