2018 MERCEDES-BENZ GLS SUV lock
[x] Cancel search: lockPage 378 of 398

XPlace chocks or other suitable items under
the front and rear of the wheel that is diago-
nally opposite the wheel you wish to change.
Raising the vehicle
GWARNING
If you do not position the jack correctly at the
appropriate jacking point of the vehicle, the
jack could tip over with the vehicle raised.
There is a risk of injury.
Only position the jack at the appropriate jack-
ing point of the vehicle. The base of the jack
must be positioned vertically, directly under
the jacking point of the vehicle.
!Mercedes-AMG vehicles with
"Minispare" emergency spare wheel: only
use the "Minispare" emergency spare wheel
on the rear axle. If you mount the
"Minispare" emergency spare wheel on the
front axle, this could result in damage to the
brake system.
If a tire on the front axle is defective, an intact
wheel from the rear axle must first be
replaced with the "Minispare" emergency
spare wheel. The damaged wheel on the front
axle can then be replaced by the undamaged
wheel from the rear axle.
Make sure to note the placard on the
"Minispare" emergency spare wheel.
!Only position the jack at the appropriate
jacking point of the vehicle. Otherwise, you
could damage the vehicle.
Observe the following when raising the vehi-
cle:
RTo raise the vehicle, only use the vehicle-spe-
cific jack that has been tested and approved by Mercedes-Benz. If used incorrectly, the
jack could tip over with the vehicle raised.
RThe jack is designed only to raise and hold the
vehicle for a short time while a wheel is being
changed. It must not be used for performing
maintenance work under the vehicle.
RAvoid changing the wheel on uphill and down-
hill slopes.
RBefore raising the vehicle, secure it from roll-
ing away by applying the parking brake and
inserting wheel chocks. Do not disengage the
parking brake while the vehicle is raised.
RThe jack must be placed on a firm, flat and
non-slip surface. On a loose surface, a large,
flat, load-bearing underlay must be used. On a
slippery surface, a non-slip underlay must be
used, e.g. rubber mats.
RDo not use wooden blocks or similar objects
as a jack underlay. Otherwise, the jack will not
be able to achieve its load-bearing capacity
due to the restricted height.
RMake sure that the distance between the
underside of the tires and the ground does not
exceed 1.2 in (3 cm).
RDo not place your hands or feet under the
raised vehicle.
RDo not lie under the vehicle.
RDo not start the engine when the vehicle is
raised.
RNever open or close a door or the tailgate
when the vehicle is raised.
RMake sure that no persons are present in the
vehicle when the vehicle is raised.
XUsing lug wrench :, loosen the bolts on the
wheel you wish to change by about one full
turn. Do not unscrew the bolts completely.
376Changing a wheel
Wheels and tires
Page 383 of 398

Removing/stowing the emergency
spare wheel
Vehicles with a "Minispare" emergency
spare wheel under the cargo compart-
ment floor
Always observe the instructions and safety
notes in the "Mounting a wheel" section
(
Ypage 375).
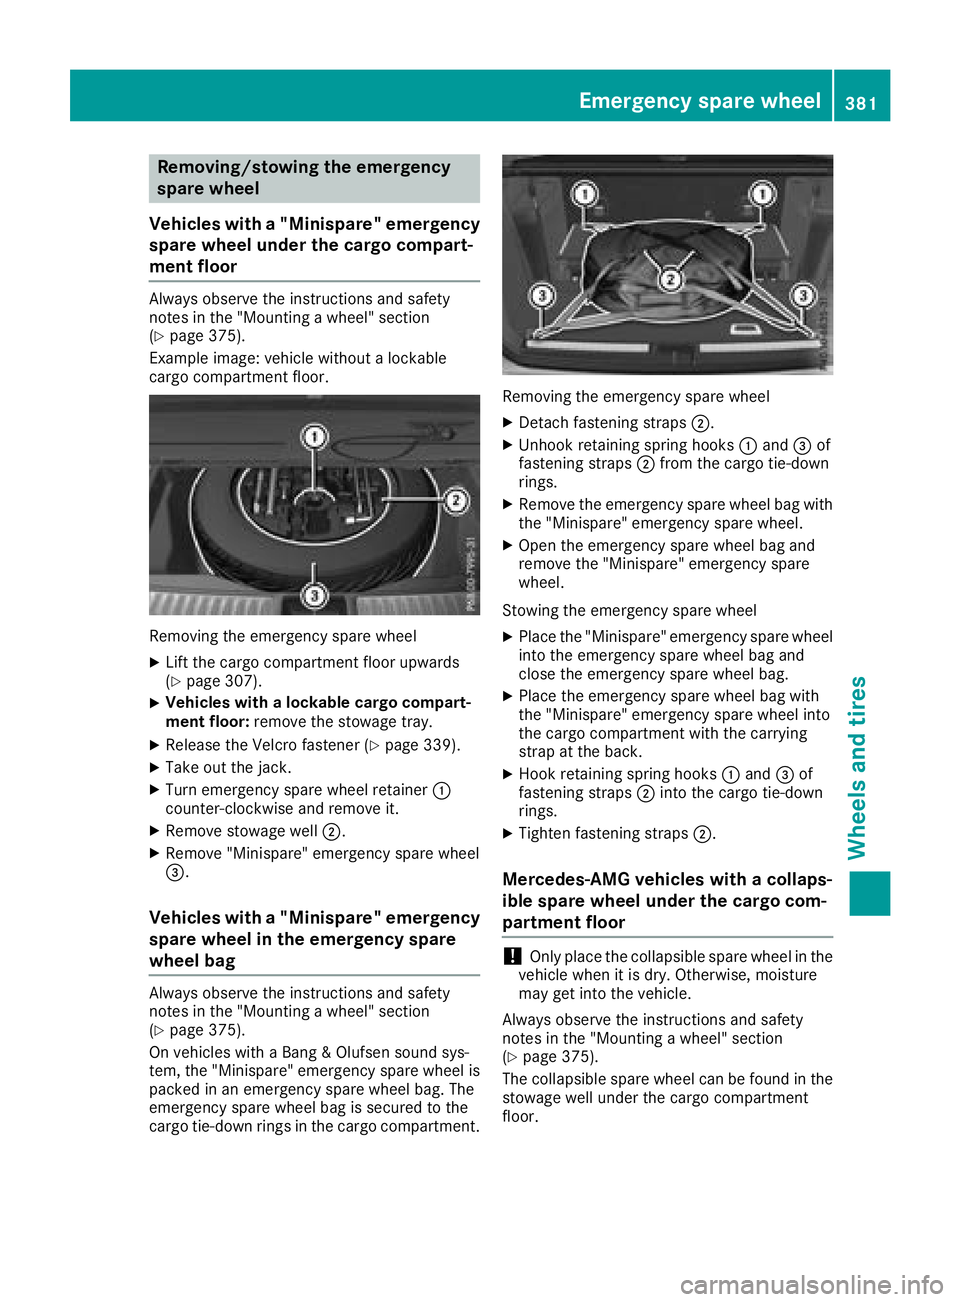
Example image: vehicle without a lockable
cargo compartment floor.
Removing the emergency spare wheel
XLift the cargo compartment floor upwards
(Ypage 307).
XVehicles with a lockable cargo compart-
ment floor: remove the stowage tray.
XRelease the Velcro fastener (Ypage 339).
XTake out the jack.
XTurn emergency spare wheel retainer :
counter-clockwise and remove it.
XRemove stowage well ;.
XRemove "Minispare" emergency spare wheel
=.
Vehicles with a "Minispare" emergency
spare wheel in the emergency spare
wheel bag
Always observe the instructions and safety
notes in the "Mounting a wheel" section
(
Ypage 375).
On vehicles with a Bang & Olufsen sound sys-
tem, the "Minispare" emergency spare wheel is
packed in an emergency spare wheel bag. The
emergency spare wheel bag is secured to the
cargo tie-down rings in the cargo compartment.
Removing the emergency spare wheel
XDetach fastening straps ;.
XUnhook retaining spring hooks :and =of
fastening straps ;from the cargo tie-down
rings.
XRemove the emergency spare wheel bag with
the "Minispare" emergency spare wheel.
XOpen the emergency spare wheel bag and
remove the "Minispare" emergency spare
wheel.
Stowing the emergency spare wheel
XPlace the "Minispare" emergency spare wheel
into the emergency spare wheel bag and
close the emergency spare wheel bag.
XPlace the emergency spare wheel bag with
the "Minispare" emergency spare wheel into
the cargo compartment with the carrying
strap at the back.
XHook retaining spring hooks :and =of
fastening straps ;into the cargo tie-down
rings.
XTighten fastening straps ;.
Mercedes-AMG vehicles with a collaps-
ible spare wheel under the cargo com-
partment floor
!Only place the collapsible spare wheel in the
vehicle when it is dry. Otherwise, moisture
may get into the vehicle.
Always observe the instructions and safety
notes in the "Mounting a wheel" section
(
Ypage 375).
The collapsible spare wheel can be found in the
stowage well under the cargo compartment
floor.
Emergency spare wheel381
Wheels and tires
Z
Page 384 of 398

Removingth eemergenc yspar ewhee l
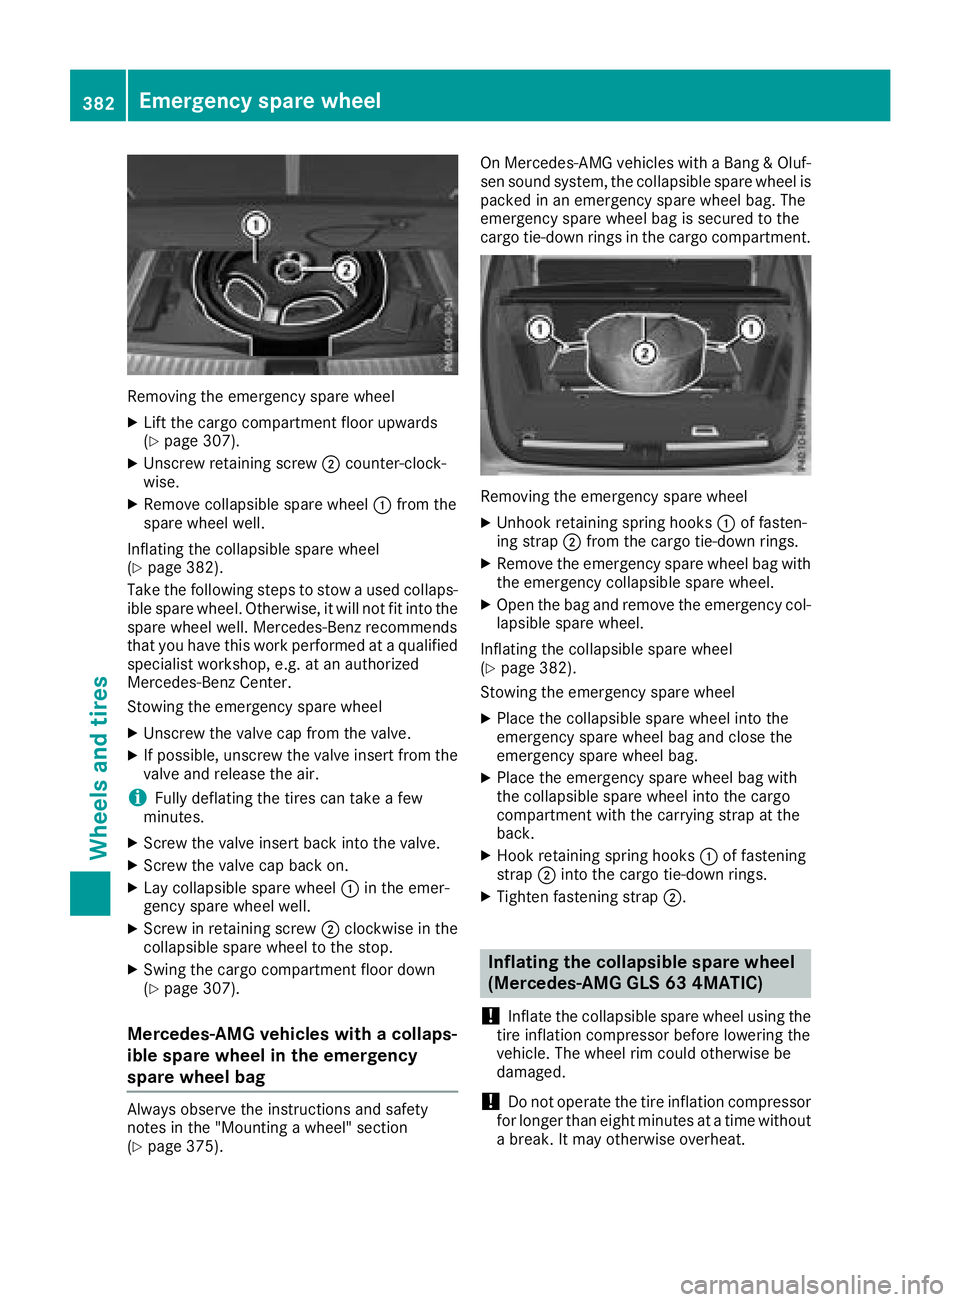
XLiftth ecargo compartmen tfloor upwards
(Ypage 307).
XUnscrew retaining screw ;counter-clock -
wise.
XRemove collapsible spar ewhee l: from th e
spar ewhee lwell.
Inflating th ecollapsible spar ewhee l
(
Ypage 382).
Tak eth efollowin gsteps to stow aused collaps -
ible spar ewheel. Otherwise, it will no tfit int oth e
spar ewhee lwell. Mercedes-Ben zrecommends
that you hav ethis wor kperformed at aqualified
specialist workshop, e.g. at an authorize d
Mercedes-Ben zCenter.
Stowin gth eemergenc yspar ewhee l
XUnscrew th evalv ecap from th evalve.
XIf possible, unscrew th evalv einsert from th e
valv eand release th eair.
iFull ydeflating th etires can tak e afew
minutes.
XScrew th evalv einsert bac kint oth evalve.
XScrew th evalv ecap bac kon .
XLay collapsible spar ewhee l: in th eemer-
gency spar ewhee lwell.
XScrew in retaining screw ;clockwise in th e
collapsible spar ewhee lto th estop.
XSwing th ecargo compartmen tfloor down
(Ypage 307).
Mercedes-AMG vehicles with a collaps-
ible spare wheel in the emergency
spare wheel bag
Always observ eth einstruction sand safet y
note sin th e"Mounting awheel" section
(
Ypage 375). On Mercedes-AM
Gvehicles wit h aBan g & Oluf -
sen soun dsystem, th ecollapsible spar ewhee lis
packe din an emergenc yspar ewhee lbag. The
emergenc yspar ewhee lbag is secured to th e
cargo tie-down rings in th ecargo compartment.
Removin gth eemergenc yspar ewhee l
XUnhoo kretaining spring hooks :of fasten-
ing strap ;from th ecargo tie-down rings.
XRemove th eemergenc yspar ewhee lbag wit h
th eemergenc ycollapsible spar ewheel.
XOpen th ebag and remove th eemergenc ycol-
lapsible spar ewheel.
Inflating th ecollapsible spar ewhee l
(
Ypage 382).
Stowin gth eemergenc yspar ewhee l
XPlaceth ecollapsible spar ewhee lint oth e
emergenc yspar ewhee lbag and close th e
emergenc yspar ewhee lbag.
XPlac eth eemergenc yspar ewhee lbag wit h
th ecollapsible spar ewhee lint oth ecargo
compartmen twit hth ecarryin gstrap at th e
back.
XHook retaining spring hooks :of fastenin g
strap ;intoth ecargo tie-down rings.
XTighte nfastenin gstrap ;.
Inflating the collapsible spare wheel
(Mercedes-AMG GLS 63 4MATIC)
!
Inflat eth ecollapsible spar ewhee lusin gth e
tire inflation compressor before lowering th e
vehicle. The whee lrim could otherwise be
damaged.
!Do no toperate th etire inflation compressor
for longer than eigh tminute sat atime without
a break. It may otherwise overheat.
382Emergency spare wheel
Wheels and tires
Page 385 of 398

The tire inflation compressor can be operated
again once it has cooled down.
Comply with the manufacturer's safety instruc-
tions on the tire inflation compressor label and
on the tire sealant bottle.
XMount the collapsible spare wheel as descri-
bed (Ypage 375).
The collapsible spare wheel must be mounted before it is inflated.
XRemove the tire inflation compressor from
the stowage space under the cargo compart-
ment floor (
Ypage 339).
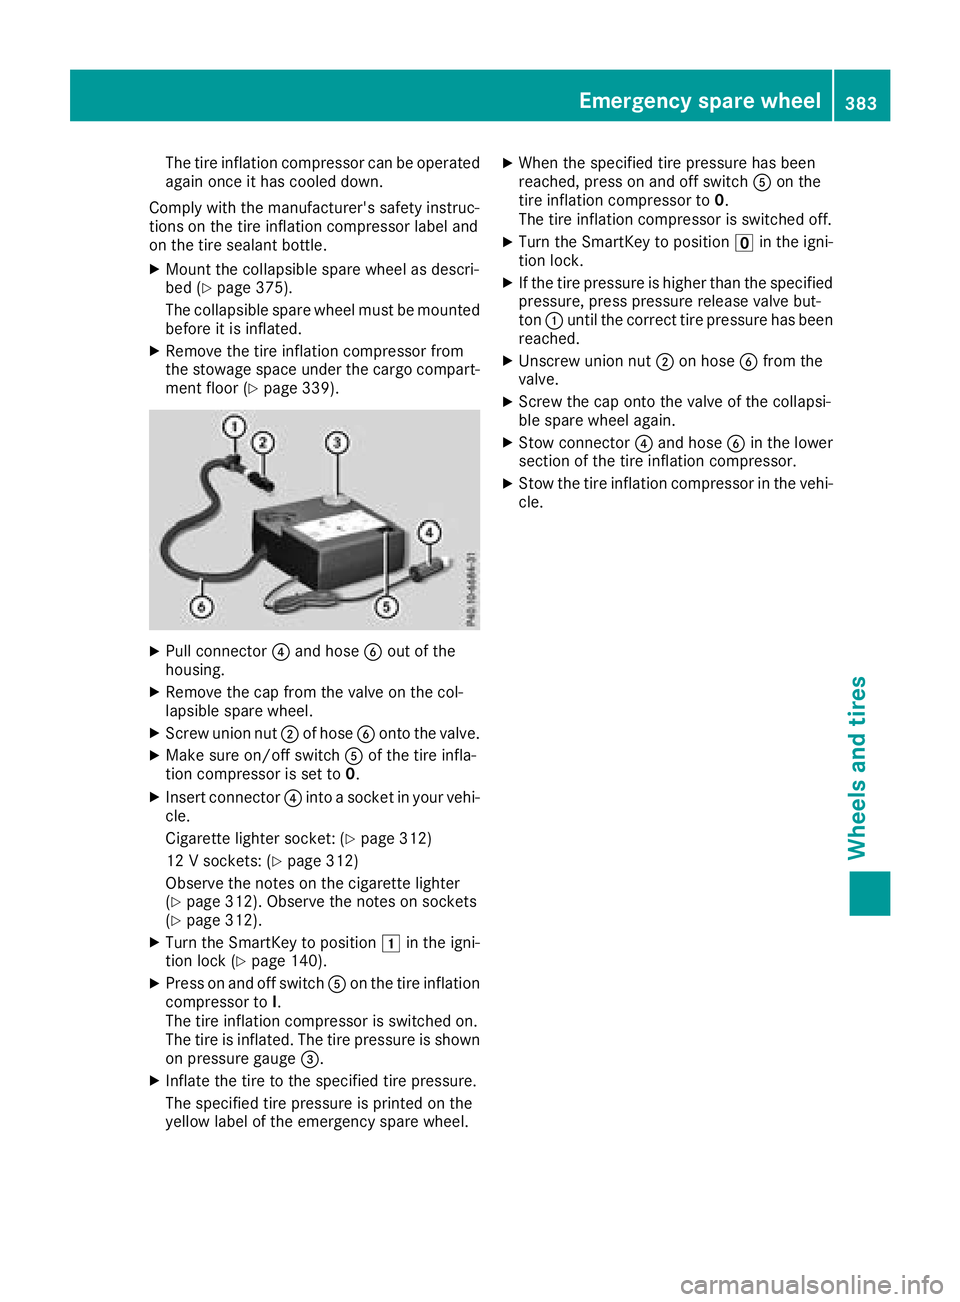
XPull connector ?and hose Bout of the
housing.
XRemove the cap from the valve on the col-
lapsible spare wheel.
XScrew union nut ;of hose Bonto the valve.
XMake sure on/off switch Aof the tire infla-
tion compressor is set to 0.
XInsert connector?into a socket in your vehi-
cle.
Cigarette lighter socket: (
Ypage 312)
12 V sockets: (
Ypage 312)
Observe the notes on the cigarette lighter
(
Ypage 312). Observe the notes on sockets
(Ypage 312).
XTurn the SmartKey to position 1in the igni-
tion lock (Ypage 140).
XPress on and off switch Aon the tire inflation
compressor to I.
The tire inflation compressor is switched on.
The tire is inflated. The tire pressure is shown
on pressure gauge =.
XInflate the tire to the specified tire pressure.
The specified tire pressure is printed on the
yellow label of the emergency spare wheel.
XWhen the specified tire pressure has been
reached, press on and off switch Aon the
tire inflation compressor to 0.
The tire inflation compressor is switched off.
XTurn the SmartKey to position uin the igni-
tion lock.
XIf the tire pressure is higher than the specified
pressure, press pressure release valve but-
ton :until the correct tire pressure has been
reached.
XUnscrew union nut ;on hose Bfrom the
valve.
XScrew the cap onto the valve of the collapsi-
ble spare wheel again.
XStow connector ?and hose Bin the lower
section of the tire inflation compressor.
XStow the tire inflation compressor in the vehi-
cle.
Emergency spare wheel383
Wheels and tires
Z
Page 393 of 398

The coolant is a mixture of water and anti-
freeze/corrosion inhibitor. It is responsible for
the following:
Ranti-corrosion protection
Rantifreeze protection
Rraising the boiling point
If the coolant has antifreeze protection down to -35 ‡ (-37 †), the boiling point of the coolant
during operation is approximately 266 ‡
(130 †).
The antifreeze concentrate/corrosion inhibitor
concentration in the engine cooling system
should:
Rbe at least 50%. This will protect the engine
cooling system against freezing down to
approximately -35 ‡ (-37 †).
Rnot exceed 55% (antifreeze protection down
to -49 ‡[-45 †]) .Otherwise ,hea twill no tbe
dissipated as effectively.
Mercedes-Ben zrecommends an antifreeze/
corrosion inhibitor concentrat ein accordance
wit hMB Specification sfo rServic eProducts
310.1.
iWhe nth evehicle is first delivered, it is filled
wit h a coolan tmixture that ensures adequat e
antifreez ean danti-corrosio nprotection .
iThe coolan tis checke dat specifie dintervals
at aqualifie dspecialis tworkshop .
Filling capacities
ModelCapacity
Mercedes ‑AMG
vehiclesApprox .11.9 US qt
(11. 3l)
GLS 350 d4MATICApprox .12.2 US qt
(11. 5l)
GLS 550 4MATICApprox .12.0 US qt
(11. 4l)
All other modelsApprox .10.3 US qt
(9.7 l)
Windshield washer syste m
Importan tsafet ynotes
GWARNING
Windshield washer concentrat ecould ignit eif
it come sinto contact wit hhot engin ecompo-
nent sor th eexhaus tsystem. There is aris kof
fir ean dinjury.
Mak esur ethat no windshield washer con-
centrat eis spilled next to th efiller neck .
!Only MB SummerFit an dMB WinterFit
washer fluid should be mixed together .The
spray nozzles may otherwise becom e
blocked.
Do no tuse distilled or de-ionized water .Other -
wise ,th elevel sensor may giv e afalse reading.
Whe nhandlin gwasher fluid, observe th eimpor -
tant safet ynote son servic eproducts
(
Ypage 386).
At temperature sabov efreezing:
XFill th ewasher fluid reservoir wit h amixture of
water an dwindshield washer fluid, e.g. MB
SummerFit .
Ad d 1 partMB SummerFit to 10 0parts water .
At temperature sbelow freezing:
XFill th ewasher fluid reservoir wit h amixture of
water an dwasher fluid, e.g. MB WinterFit .
Fo rth ecorrec tmixin gratio refe rto th einfor-
mation on th eantifreez ereservoir.
iAd dwindshield washer fluid, e.g. MB Sum -
merFit or MB WinterFit ,to th ewasher fluid all
year rou
nd.
Climat econtro lsyste m refrigerant
Important safety notes
The climate control system of your vehicle is fil-
led with refrigerant R ‑134a.
The instruction label regarding the refrigerant
type used can be found on the radiator cross
member.
!Only the refrigerant R ‑134a and the PAG oil
approved by Mercedes-Benz may be used.
The approved PAG oil may not be mixed with
any other PAG oil that is not approved for
Service products and filling capacities391
Technical data
Z