2018 MERCEDES-BENZ GLS SUV fold seats
[x] Cancel search: fold seatsPage 19 of 398

Sensor range ................................. 193
Towing a trailer .............................. 192
Warning display ............................. 194
Parking assistance
see Driving system
Parking brake
Applying automatically ................... 163
Applying or releasing manually ...... 163
Display message ............................ 251
Electric parking brake .................... 162
Emergency braking ........................ 164
General notes ................................ 162
Releasing automatically ................. 163
Warning lamp ................................. 287
Parking lamps
Switching on/off ........................... 116
Parking Pilot
Canceling ....................................... 199
Detecting parking spaces .............. 196
Display Message ............................ 269
Exiting a parking space .................. 198
Function/notes ............................. 195
Important safety notes .................. 195
Parking .......................................... 197
PASSENGER AIR BAG
Display message ............................ 258
Indicator lamps ................................ 45
Problem (malfunction) ................... 258
Pets in the vehicle ............................... 65
Phone book
see also Digital Operator's Man-
ual .................................................. 292
Plastic trim (cleaning instruc-
tions) .................................................. 335
Power locks ......................................... 84
Power washers .................................. 331
Power windows
see Side windows
PRE-SAFE
®(anticipatory occupant
protection)
Display message ............................ 255
Operation ......................................... 58
PRE-SAFE
®PLUS (anticipatory
occupant protection PLUS)
Display message ............................ 255
Operation ......................................... 59 Protection against theft
ATA (Anti-Theft Alarm system) ......... 75
Immobilizer ...................................... 75
Protection of the environment
General notes .................................. 27
Pulling away
Automatic transmission ................. 143
General notes ................................ 143
Hill start assist ............................... 143
Trailer ............................................ 143
Q
QR codeMercedes-Benz Guide App ................. 1
Rescue card ..................................... 32
Qualified specialist workshop ........... 31
R
RACE TIMER (on-board computer,
Mercedes-AMG vehicles).................. 246
Radiator cover ................................... 326
Radio
Selecting a station ......................... 239
Radio mode
see also Digital Operator's Man-
ual .................................................. 292
Radio-controlled devices (instal-
ling) ..................................................... 324
Radio-wave reception/transmis-
sion in the vehicle
Declaration of conformity ................ 30
Reading lamp ..................................... 119
Rear bench seat
Folding forwards/back .................. 304
Rear compartment
Exit/entry position (3rd row of
seats) ............................................. 103
Setting the air vents ...................... 137
Setting the temperature ................ 132
Rear fog lamp
Display message ............................ 260
Switching on/off ........................... 116
Rear Seat Entertainment System
AUX jacks ...................................... 299
AUX jacks CD/DVD drive .............. 299
Index17
Page 21 of 398

Seat beltsAdjusting the driver's and front-
passenger seat belt .........................4 8
Adjusting the height ......................... 48
Cleaning ......................................... 336
Correct usage .................................. 47
Fastening ......................................... 48
Important safety guidelines ............. 46
Introduction .....................................4 5
Releasin g ......................................... 48
Switching belt adjustment on/off
(on-board computer) ...................... 244
Warning lamp ................................. 280
Warning lamp (function) ................... 48
Seats
Adjusting (electrically) ..................... 98
Adjusting the 4-way lumbar sup-
port ................................................ 106
Adjusting the head restraint ............ 99
Calling up a stored setting (mem-
ory function) .................................. 114
Cleaning the cover ......................... 336
Entry position (3rd row of seats) .... 103
Exit position (3rd row of seats) ...... 104
Folding down/up (third row of
seats) ............................................. 101
Folding the 2nd row of seats
forward electrically ........................ 105
Folding the 2nd row of seats
forward manually ........................... 103
Folding the rear bench seat for-
wards/back ................................... 303
Important safety notes .................... 97
Overview .......................................... 97
Seat heating problem .................... 108
Seat ventilation problem ................ 108
Storing settings (memory func-
tion) ............................................... 113
Switching seat heating on/off ....... 106
Switching seat ventilation on/off .. 107
Section
Sliding sunroof ................................. 92
Selector lever
Cleaning ......................................... 336
Sensors (cleaning instructions) ....... 334
Service menu (on-board com-
puter) .................................................. 242 Service message
see ASSYST PLUS
Service products
Brake fluid ..................................... 390
Coolant (engine) ............................ 390
DEF special add
itives ..................... 389
Engine oil ....................................... 389
Fuel ................................................ 387
Important safety notes .................. 386
Refrigerant (air-conditioning sys-
tem) ............................................... 391
Washer fluid ................................... 391
Setting the air distribution ............... 133
Setting the airflow ............................ 133
Setting the date/time format
see also Digital Operator's Man-
ual .................................................. 292
Setting the language
see also Digital Operator's Man-
ual .................................................. 292
Setting the time
see also Digital Operator's Man-
ual .................................................. 292
Settings
Factory (on-board computer) ......... 245
On-board computer ....................... 243
SETUP (on-board computer,
Mercedes-AMG vehicles) .................. 246
Side impact air bag ............................. 51
Side marker lamp (display mes-
sage) ................................................... 260
Side windows
Cleaning ......................................... 333
Convenience closing feature ............ 90
Convenience opening feature .......... 90
Hinged side windows ....................... 89
Important safety information ........... 88
Opening/closing .............................. 89
Overview .......................................... 88
Problem (malfunction) ..................... 92
Resetting ......................................... 91
Reversing feature ............................. 89
SIRIUS services
see also Digital Operator's Man-
ual .................................................. 292
Sliding sunroof
Important safety notes .................... 92
Index19
Page 45 of 398
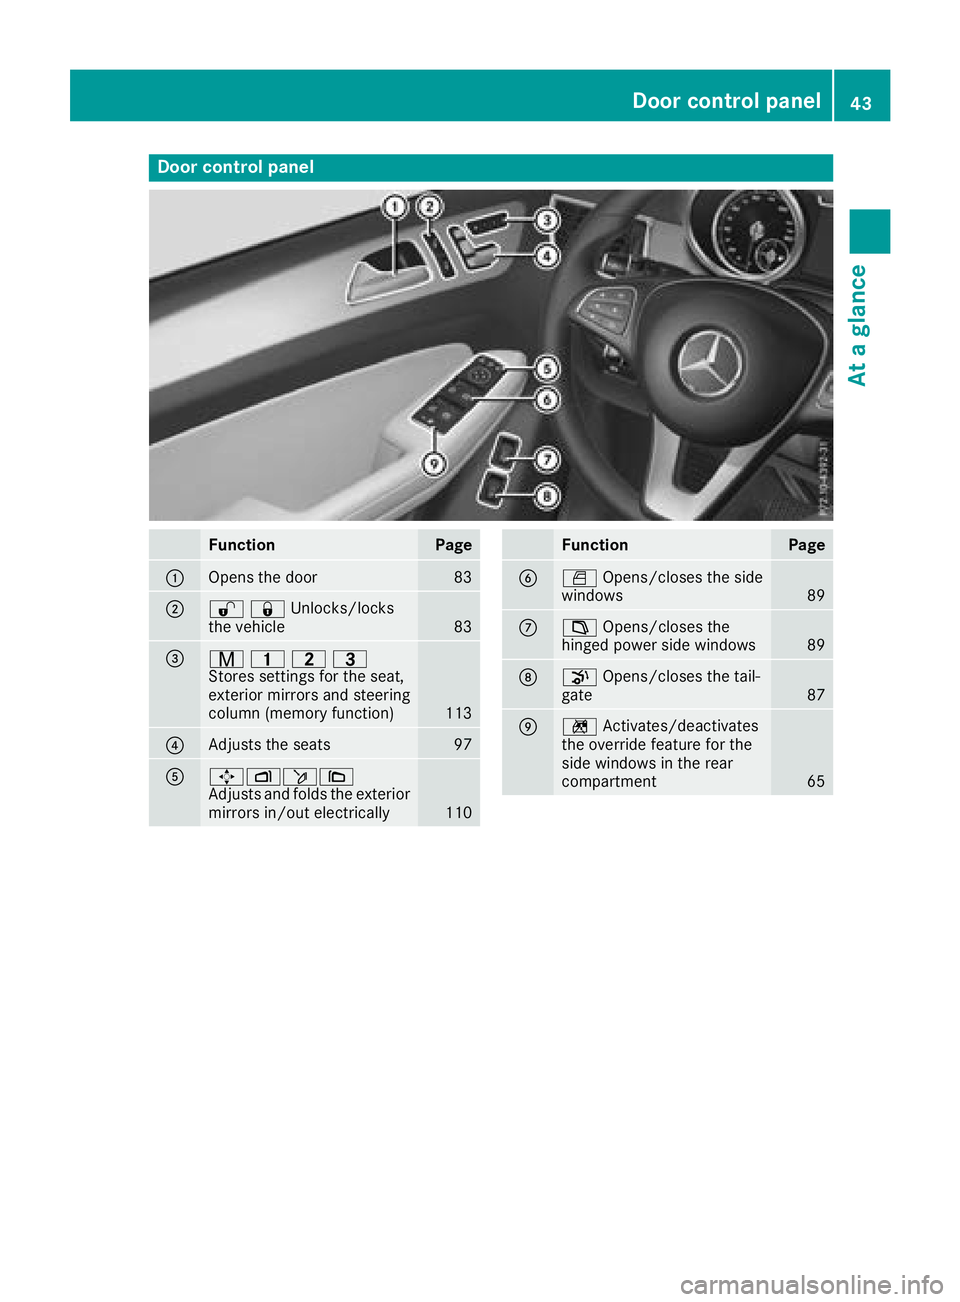
Door controlpanel
FunctionPage
:Opens th edoo r83
;%&Unlocks/locks
the vehicle83
=r 45=
Stores settings for the seat,
exterior mirrors and steering
column (memory function)
113
?Adjusts the seats97
A7Zö\
Adjusts and folds the exterior
mirrors in/out electrically
110
FunctionPage
BW Opens/closes the side
windows89
C± Opens/closes the
hinged power side windows89
Dp Opens/closes the tail-
gate87
En Activates/deactivates
the override feature for the
side windows in the rear
compartment
65
Door control panel43
At a glance
Page 65 of 398
Non-LATCH-type (ISOFIX) child seats may also
be used and can be installed using the vehicle's
seat belt system. Install the child seat according
to the manufacturer's instructions.
Top Tether
Introduction
Top Tether provides an additional connection
between the child restraint system secured with
a LATCH-type (ISOFIX) system and the vehicle.
This helps reduce the risk of injury even further.
If the child restraint system is equipped with a
Top Tether belt, this should always be used.
Important safety notes
GWARNING
If the rear seat backrests are not locked, they
could fold forwards in the event of an acci-
dent, heavy braking or sudden changes of
direction. As a result, child restraint systems
cannot perform their intended protective
function. Rear seat backrests that are not
locked can also cause additional injuries, e.g.
in the event of an accident. This poses an
increased risk of injury or even fatal injury.
Always lock rear seat backrests after instal-
ling a Top Tether belt. Adjust the rear seat
backrests so that they are in an upright posi-
tion.
Make sure that the backrest in the rear com-
partment engages fully. To do so, pull firmly on
the seat backrest.
Top Tether anchorages
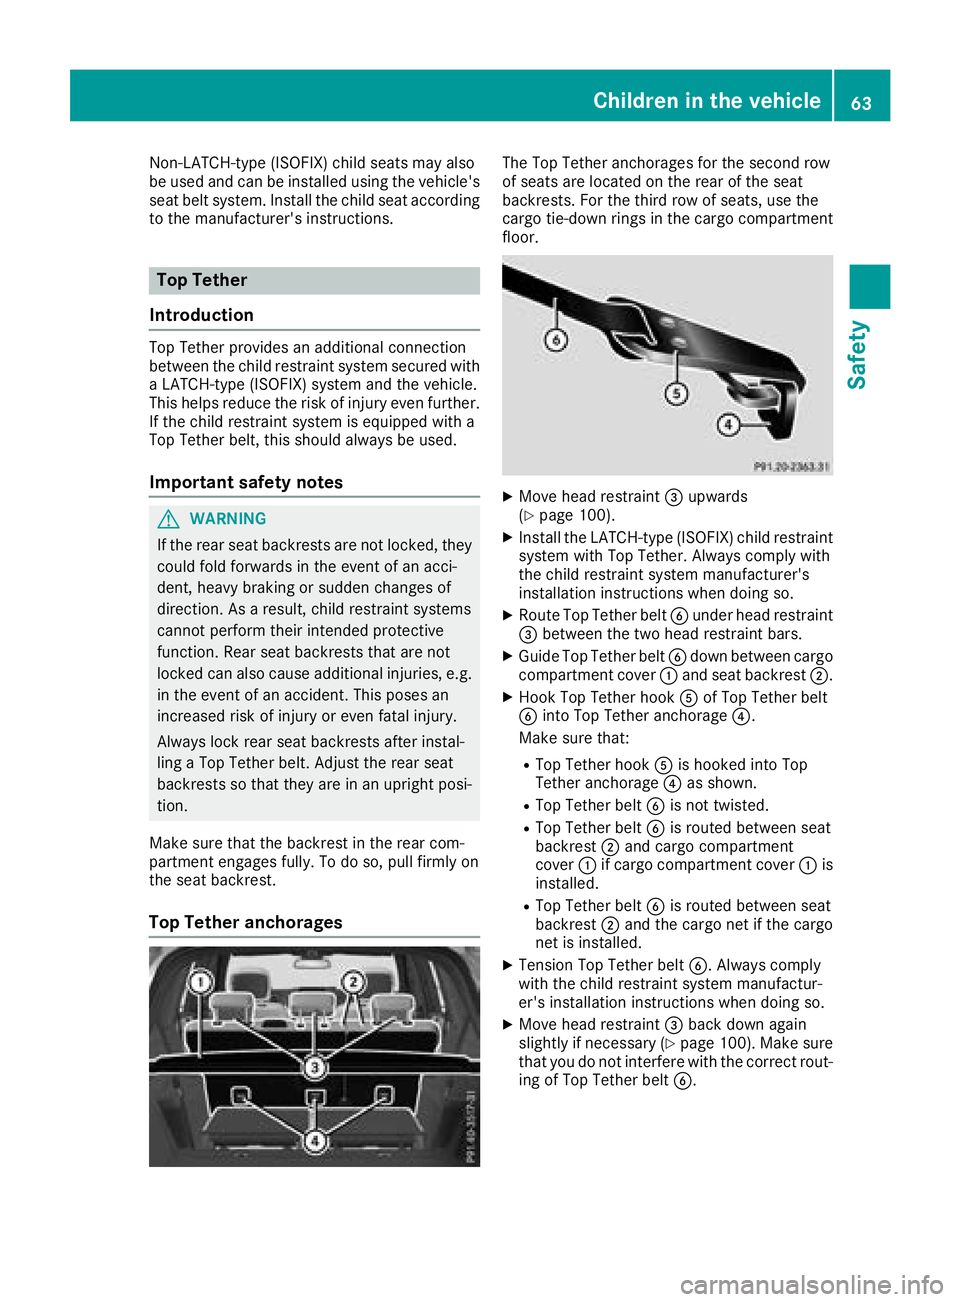
The Top Tether anchorages for the second row
of seats are located on the rear of the seat
backrests. For the third row of seats, use the
cargo tie-down rings in the cargo compartment
floor.
XMove head restraint =upwards
(Ypage 100).
XInstall the LATCH-type (ISOFIX) child restraint
system with Top Tether. Always comply with
the child restraint system manufacturer's
installation instructions when doing so.
XRoute Top Tether belt Bunder head restraint
= between the two head restraint bars.
XGuide Top Tether belt Bdown between cargo
compartment cover :and seat backrest ;.
XHook Top Tether hook Aof Top Tether belt
B into Top Tether anchorage ?.
Make sure that:
RTop Tether hook Ais hooked into Top
Tether anchorage ?as shown.
RTop Tether belt Bis not twisted.
RTop Tether belt Bis routed between seat
backrest ;and cargo compartment
cover :if cargo compartment cover :is
installed.
RTop Tether belt Bis routed between seat
backrest ;and the cargo net if the cargo
net is installed.
XTension Top Tether belt B. Always comply
with the child restraint system manufactur-
er's installation instructions when doing so.
XMove head restraint =back down again
slightly if necessary (Ypage 100). Make sure
that you do not interfere with the correct rout-
ing of Top Tether belt B.
Children in the vehicle63
Safety
Z
Page 100 of 398
GWARNING
You could lose control of your vehicle if you do the following while driving:
Radjust the driver's seat, head restraint,
steering wheel or mirrors
Rfasten the seat belt
There is a risk of an accident.
Adjust the driver's seat, head restraint, steer-
ing wheel and mirror and fasten your seat belt before starting the engine.
GWARNING
If you adjust the seat height carelessly, you or
other vehicle occupants could be trapped and
thereby injured. Children in particular could
accidentally press the electrical seat adjust-
ment buttons and become trapped. There is a
risk of injury.
While moving the seats, make sure that your
hands or other body parts do not get under the
lever assembly of the seat adjustment sys-
tem.
GWARNING
If the head restraints are not installed or not
adjusted correctly, they cannot provide pro-
tection as intended. There is an increased risk
of injury in the head and neck area, e.g. in the event of an accident or when braking.
Always drive with the head restraints instal-
led. Before driving off, make sure for every
vehicle occupant that the center of the head
restraint supports the back of the head at
about eye level.
GWARNING
The seat belt does not offer the intended level of protection if you have not moved the back-
rest to an almost vertical position. When brak-
ing or in the event of an accident, you could
slide underneath the seat belt and sustain
abdomen or neck injuries, for example. This
poses an increased risk of injury or even fatal injury.
Adjust the seat properly before beginning
your journey. Always ensure that the backrest
is in an almost vertical position and that the
shoulder section of your seat belt is routed
across the center of your shoulder.
!To avoid damage to the seats and the seat
heating, observe the following information:
Rkeep liquids from spilling on the seats. If
liquid is spilled on the seats, dry them as
soon as possible.
Rif the seat covers are damp or wet, do not
switch on the seat heating. The seat heat-
ing should also not be used to dry the seats.
Rclean the seat covers as recommended;
see "Interior care".
Rdo not transport heavy loads on the seats.
Do not place sharp objects on the seat
cushions, e.g. knives, nails or tools. The
seats should only be occupied by passen-
gers, if possible.
Rwhen the seat heating is in operation, do
not cover the seats with insulating materi-
als, e.g. blankets, coats, bags, seat covers,
child seats or booster seats.
!Make sure that there are no objects in the
footwell under or behind the seats when mov-
ing the seats back. There is a risk that the
seats and/or the objects could be damaged.
iFurther related subjects:
RCargo compartment enlargement (folding
down the rear bench seat) (Ypage 303)
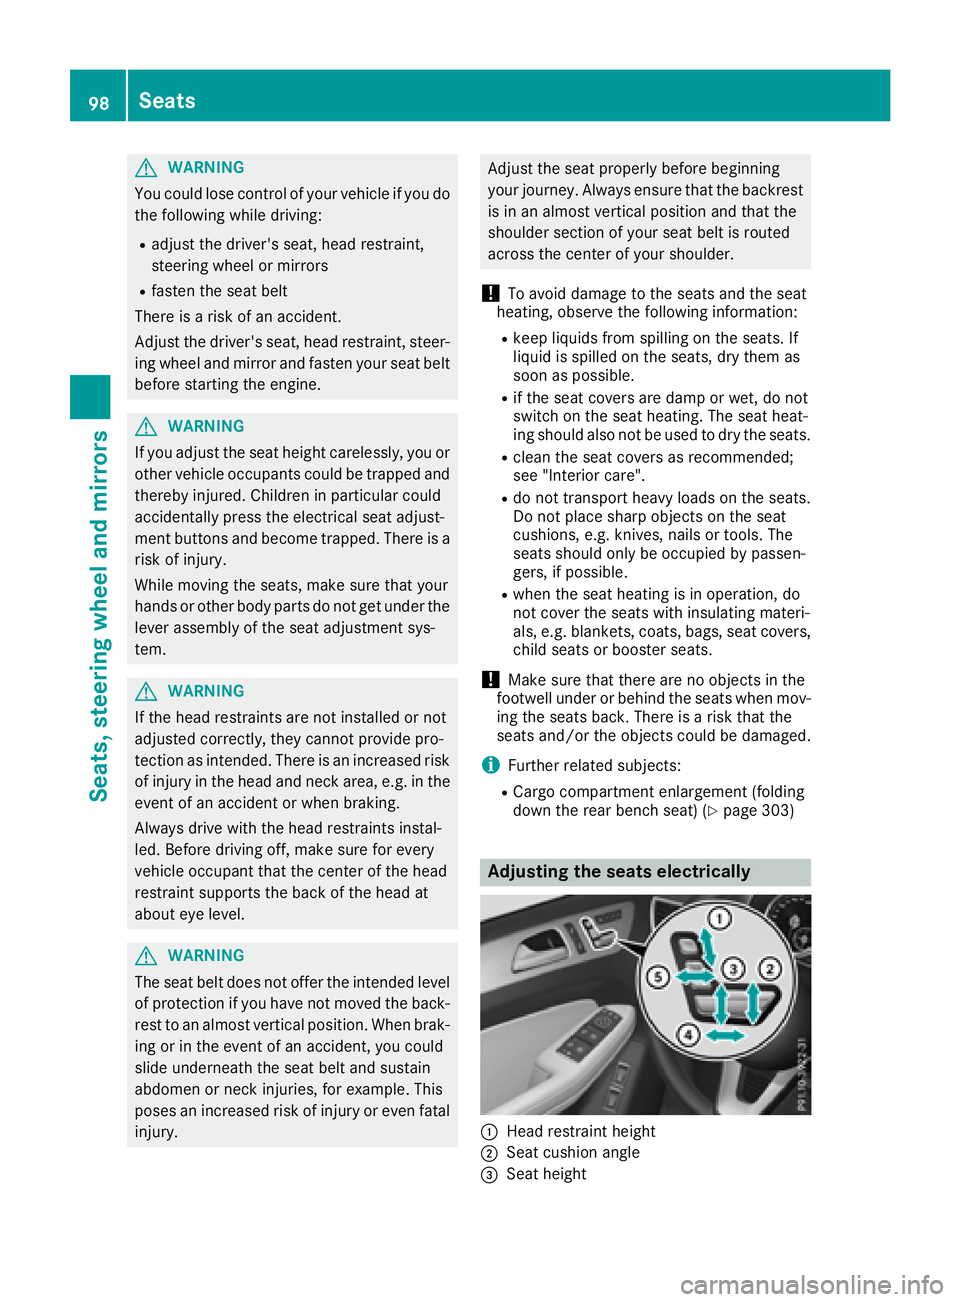
Adjusting the seats electrically
:Head restraint height
;Seat cushion angle
=Seat height
98Seats
Seats, steering wheel and mirrors
Page 103 of 398
Rafter the EASY-ENTRY/EXIT feature has
been used
Rafter the cargo compartment enlargement
has been folded forwards
GWARNING
The seat does not engage in the entry/exit
position. The seat could fold back suddenly,
e.g. when accelerating, braking, changing
direction suddenly or in the event of an acci-
dent. Persons in the sweep of the seat could
become trapped. There is a risk of injury.
Always fold back a seat which has been folded
forwards before you pull away. Make sure that
the seat and backrest engage fully.
GWARNING
Children could become trapped if they adjust
the seats, particularly when unattended.
There is a risk of injury.
When leaving the vehicle, always take the
SmartKey with you and lock the vehicle. Never
leave children unsupervised in the vehicle.
GWARNING
When you adjust a seat, you or other vehicle
occupants could become trapped, e.g. on the seat guide rail. There is a risk of injury.
Make sure when adjusting a seat that no one
has any body parts in the sweep of the seat.
Adjusting the backrest angle (second
row of seats)
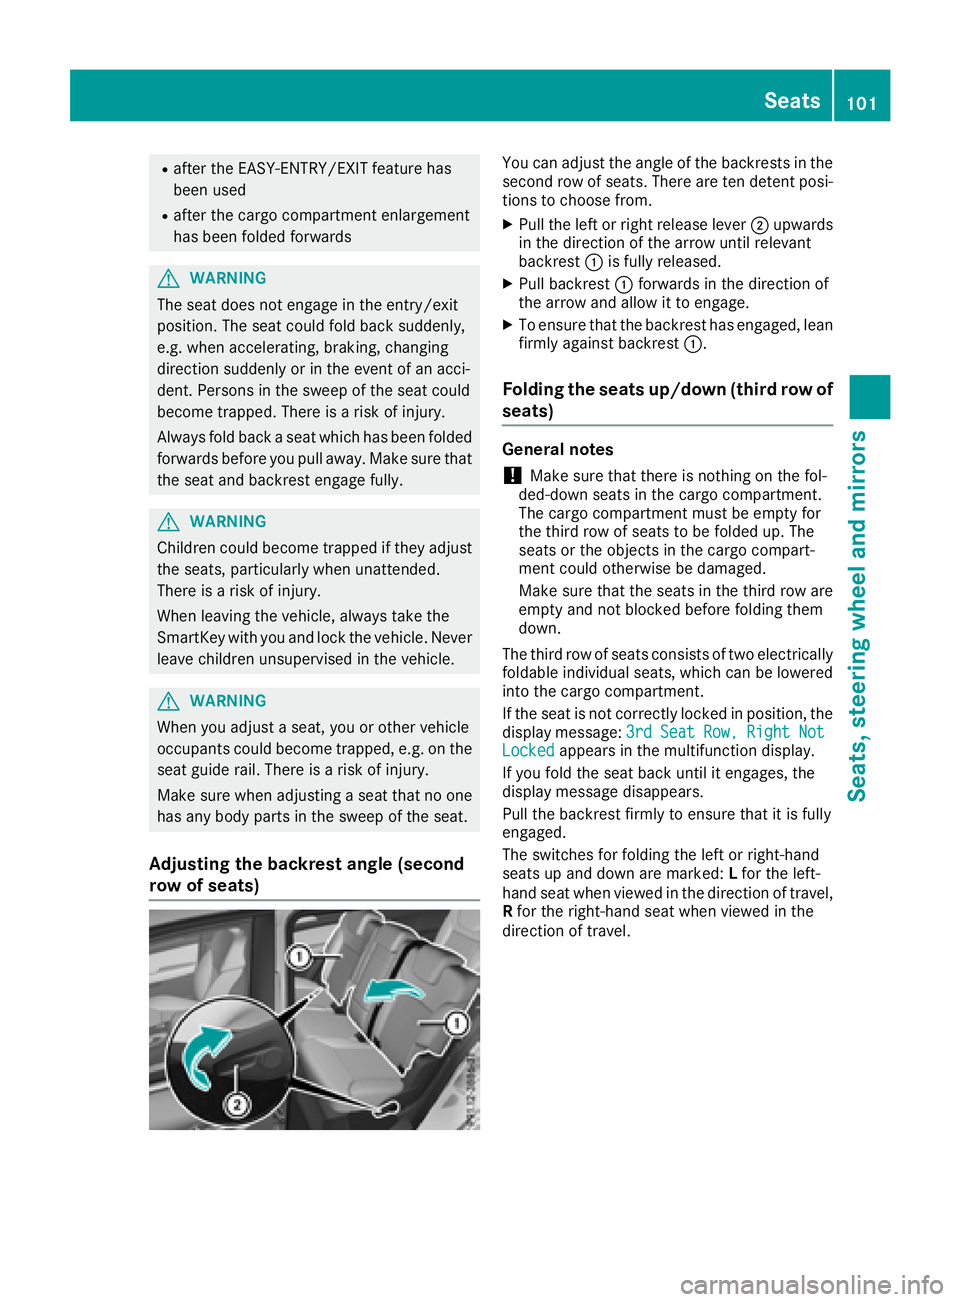
You can adjust the angle of the backrests in the
second row of seats. There are ten detent posi-
tions to choose from.
XPull the left or right release lever ;upwards
in the direction of the arrow until relevant
backrest :is fully released.
XPull backrest :forwards in the direction of
the arrow and allow it to engage.
XTo ensure that the backrest has engaged, lean
firmly against backrest :.
Folding the seats up/down (third row of
seats)
General notes
!Make sure that there is nothing on the fol-
ded-down seats in the cargo compartment.
The cargo compartment must be empty for
the third row of seats to be folded up. The
seats or the objects in the cargo compart-
ment could otherwise be damaged.
Make sure that the seats in the third row are
empty and not blocked before folding them
down.
The third row of seats consists of two electrically
foldable individual seats, which can be lowered
into the cargo compartment.
If the seat is not correctly locked in position, the
display message: 3rd
SeatRow,RightNotLockedappears in the multifunction display.
If you fold the seat back until it engages, the
display message disappears.
Pull the backrest firmly to ensure that it is fully
engaged.
The switches for folding the left or right-hand
seats up and down are marked: Lfor the left-
hand seat when viewed in the direction of travel,
R for the right-hand seat when viewed in the
direction of travel.
Seats101
Seats, steering wheel and mirrors
Z
Page 104 of 398
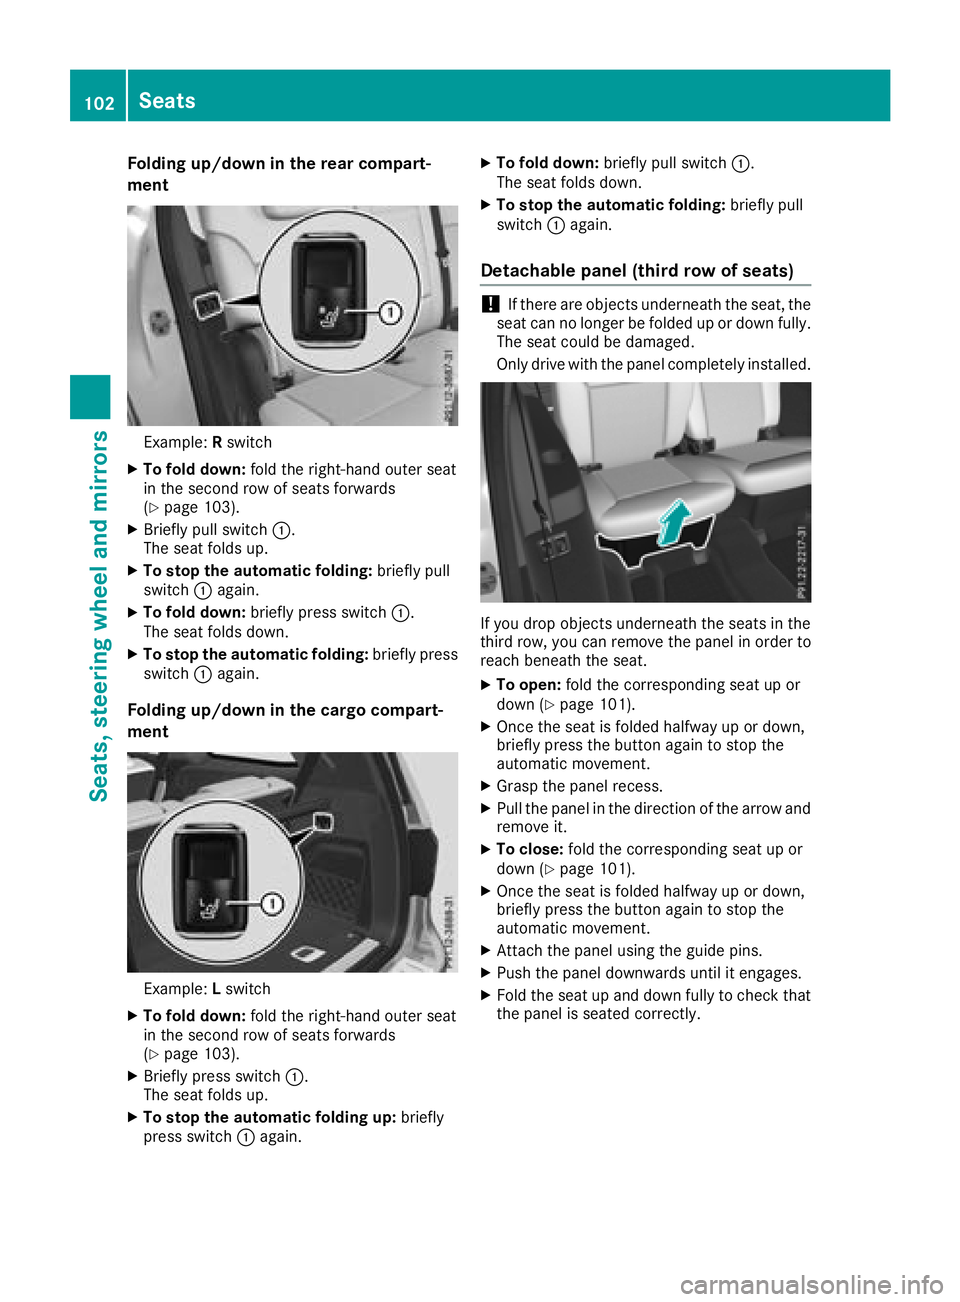
Folding up/down in the rear compart-
ment
Example:Rswit ch
XTo fold down: fold the right-hand outer seat
in the second row of seats forwards
(
Ypage 103).
XBriefly pull swit ch:.
The seat fol dsup.
XTo stop the automatic folding: brieflypull
swit ch: again.
XTo fold down: briefly press switch:.
The seat fol ds down.
XTo stopthe automatic folding: briefly press
swit ch: again.
Folding up/down in the cargo compart-
ment
Example: Lswit ch
XTo fold down: fold the right-hand outer seat
in the second row of seats forwards
(
Ypage 103).
XBriefly press switch:.
The seat fol dsup.
XTo stop the automatic folding up: briefly
press switch: again.
XTo fold down: briefly pullswitch:.
The seat folds down.
XTo stop the automatic folding: briefly pull
swit ch: again.
Detachable panel (third row of seats)
!Ifthere are objects underneath the seat, the
seat can no longer befolded up or downfully.
The seat could bedamaged.
Only drive with the panel co mpletely installed.
Ifyou drop objects underneath the seats in the
third row, you can remove the panel in order to
reach beneath the seat.
XTo open: fold the corresponding seat up or
down (Ypage 101).
XOnce the seat is folded halfway up or down,
briefly press the button again to stop the
automat icmovement.
XGrasp the panel recess.
XPull the panel in the direction of the arrow and
remove it.
XTo close: fold the corresponding seat up or
down (Ypage 101).
XOnce the seat is folded halfway up or down,
briefly press the button again to stop the
automatic movement.
XAttach the panel using the guide pins.
XPush the panel downwards until it engages.
XFold the seat up and down fully to check that
the panel is seated correctly.
102Seats
Seats, steering wheel and mirrors
Page 105 of 398
Folding down the seats in the second
row manually
Important safety notes
GWARNIN G
If th eseat and backrest are no tengaged, they
can fol dforwards ,e.g. in th eevent of sudde n
braking or an accident.
RThis will caus eth evehicl eoccupant sto be
forced int oth eseat belt by aseat or back-
res twhic his no tengaged. The seat belt can
no longer offer th eintended leve lof pro -
tection and could eve ncaus einjuries.
RA child restrain tsystem would no longer be
anchored or positioned correctly and would
no tbe able to perfor mits require dfunction .
RThe seat backrest scanno trestrain object s
or loads in th ecargo compartment.
Ther eis an increased ris kof injury.
Always mak esure that th eseat and backrest
are engage das described:
Rbefore traveling wit h apassenger on aseat
wit hth eEASY-ENTRY/EXIT feature
Rafter you have adjusted th eseat
Rafter th eEASY-ENTRY/EXIT feature has
been used
Rafter th ecargo compartmen tenlargement
has been folded forwards
GWARNIN G
The seat does no tengage in th eentry/exit
position .The seat could fol dbac ksuddenly,
e.g. when accelerating ,braking ,changing
direction suddenly or in th eevent of an acci-
dent. Person sin th eswee pof th eseat could
become trapped .Ther eis aris kof injury.
Always fol dbac k aseat whic hhas been folded
forwards before you pull away. Mak esure that
th eseat and backrest engage fully.
General notes
Getting int oor out of th ethird row of seats: you
can fol dforward th eright outer seat in th esec -
on drow of seats. If th
eright outer rear seat in th esecon drow of
seat sis in th eentry/exit position :th edisplay
message :2nd
Sea tRow,RightNotLockedappear sin th emultifunction display, for exam-
ple.
If you fol dth eseat bac kuntil it engages, th e
display message disappears.
Pull th ebackrest firmly to ensure that it is fully
engaged.
iFurther relate dsubjects:
RCargo compartmen tenlargement (foldin g
th esecon drow of seat sforwards )
(
Ypage 303)
RFoldin gth eseat sin th ethird row forwards /
bac k (Ypage 101)
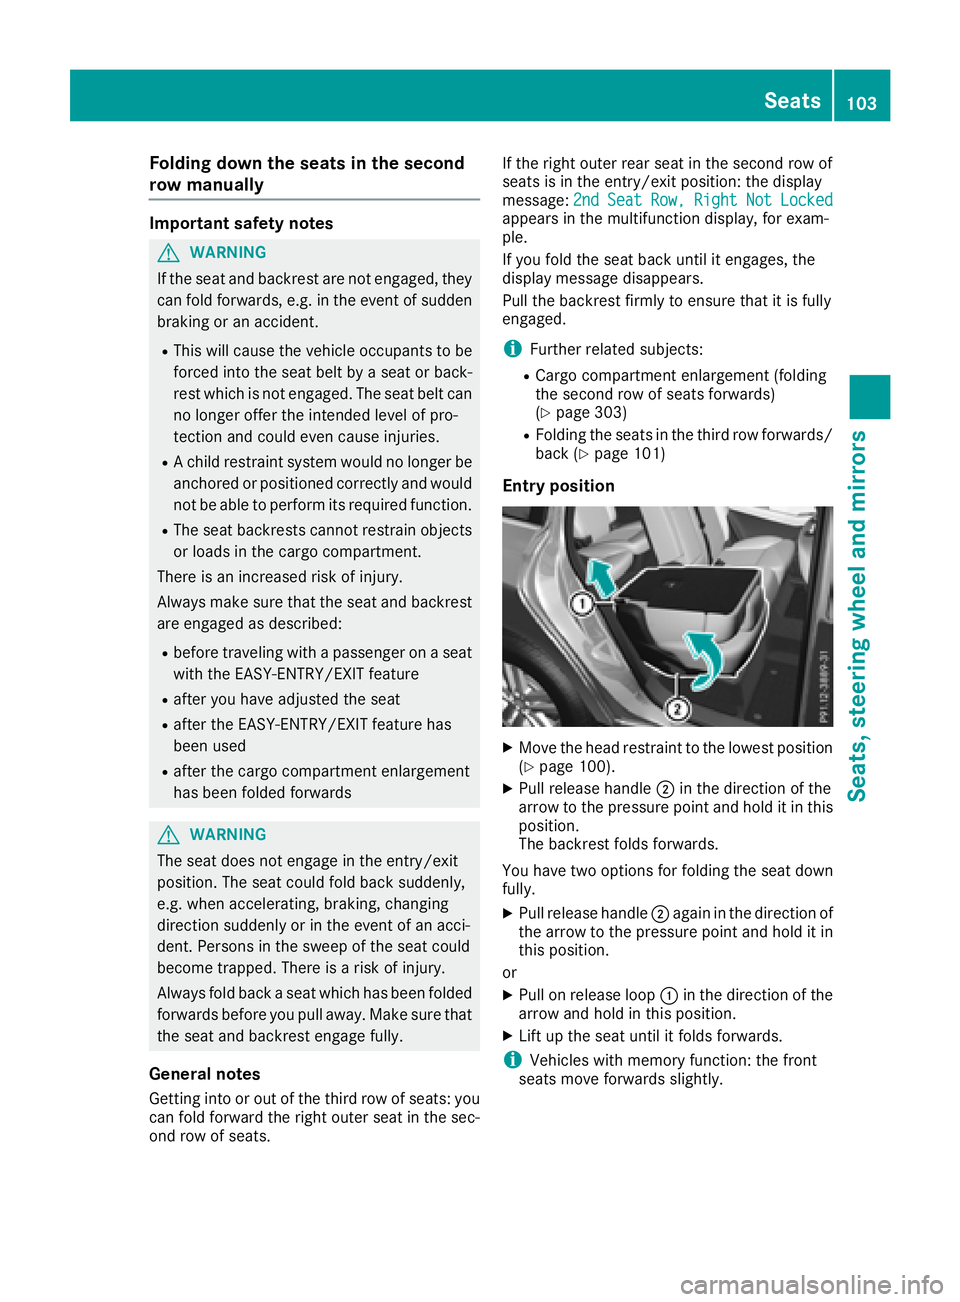
Entry position
XMoveth ehead restraint to th elowes tposition
(Ypage 100).
XPull release handle ;in th edirection of th e
arrow to th epressur epoin tand hold it in this
position .
The backrest folds forwards .
You have two option sfor foldin gth eseat down
fully.
XPull release handle ;again in th edirection of
th earrow to th epressur epoin tand hold it in
this position .
or
XPull on release loop :in th edirection of th e
arrow and hold in this position .
XLiftup th eseat until it folds forwards .
iVehicles withmemory function :th efron t
seat smov eforwards slightly.
Seats103
Seats, steering wheel and mirrors
Z