2018 MERCEDES-BENZ GLS SUV rear entertainment
[x] Cancel search: rear entertainmentPage 19 of 398

Sensor range ................................. 193
Towing a trailer .............................. 192
Warning display ............................. 194
Parking assistance
see Driving system
Parking brake
Applying automatically ................... 163
Applying or releasing manually ...... 163
Display message ............................ 251
Electric parking brake .................... 162
Emergency braking ........................ 164
General notes ................................ 162
Releasing automatically ................. 163
Warning lamp ................................. 287
Parking lamps
Switching on/off ........................... 116
Parking Pilot
Canceling ....................................... 199
Detecting parking spaces .............. 196
Display Message ............................ 269
Exiting a parking space .................. 198
Function/notes ............................. 195
Important safety notes .................. 195
Parking .......................................... 197
PASSENGER AIR BAG
Display message ............................ 258
Indicator lamps ................................ 45
Problem (malfunction) ................... 258
Pets in the vehicle ............................... 65
Phone book
see also Digital Operator's Man-
ual .................................................. 292
Plastic trim (cleaning instruc-
tions) .................................................. 335
Power locks ......................................... 84
Power washers .................................. 331
Power windows
see Side windows
PRE-SAFE
®(anticipatory occupant
protection)
Display message ............................ 255
Operation ......................................... 58
PRE-SAFE
®PLUS (anticipatory
occupant protection PLUS)
Display message ............................ 255
Operation ......................................... 59 Protection against theft
ATA (Anti-Theft Alarm system) ......... 75
Immobilizer ...................................... 75
Protection of the environment
General notes .................................. 27
Pulling away
Automatic transmission ................. 143
General notes ................................ 143
Hill start assist ............................... 143
Trailer ............................................ 143
Q
QR codeMercedes-Benz Guide App ................. 1
Rescue card ..................................... 32
Qualified specialist workshop ........... 31
R
RACE TIMER (on-board computer,
Mercedes-AMG vehicles).................. 246
Radiator cover ................................... 326
Radio
Selecting a station ......................... 239
Radio mode
see also Digital Operator's Man-
ual .................................................. 292
Radio-controlled devices (instal-
ling) ..................................................... 324
Radio-wave reception/transmis-
sion in the vehicle
Declaration of conformity ................ 30
Reading lamp ..................................... 119
Rear bench seat
Folding forwards/back .................. 304
Rear compartment
Exit/entry position (3rd row of
seats) ............................................. 103
Setting the air vents ...................... 137
Setting the temperature ................ 132
Rear fog lamp
Display message ............................ 260
Switching on/off ........................... 116
Rear Seat Entertainment System
AUX jacks ...................................... 299
AUX jacks CD/DVD drive .............. 299
Index17
Page 301 of 398

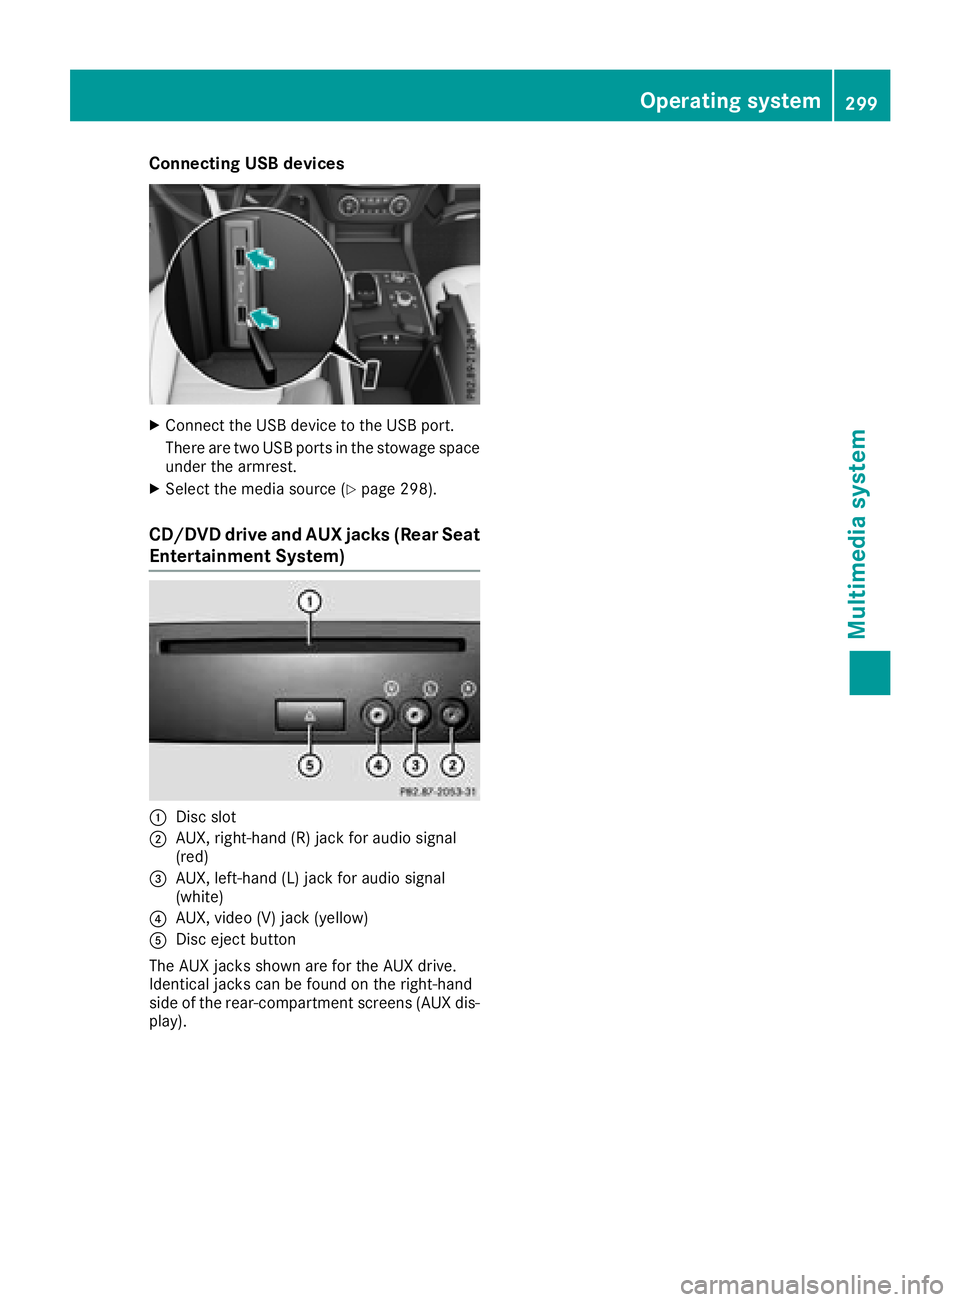
Connecting USB devices
XConnect the USB device to the USB port.
There are two USB ports in the stowage space
under the armrest.
XSelect the media source (Ypage 298).
CD/DVD drive and AUX jacks (Rear Seat
Entertainment System)
:Disc slot
;AUX, right-hand (R) jack for audio signal
(red)
=AUX, left-hand (L) jack for audio signal
(white)
?AUX, video (V) jack (yellow)
ADisc eject button
The AUX jacks shown are for the AUX drive.
Identical jacks can be found on the right-hand
side of the rear-compartment screens (AUX dis-
play).
Operating system299
Multimedia system
Z
Page 313 of 398

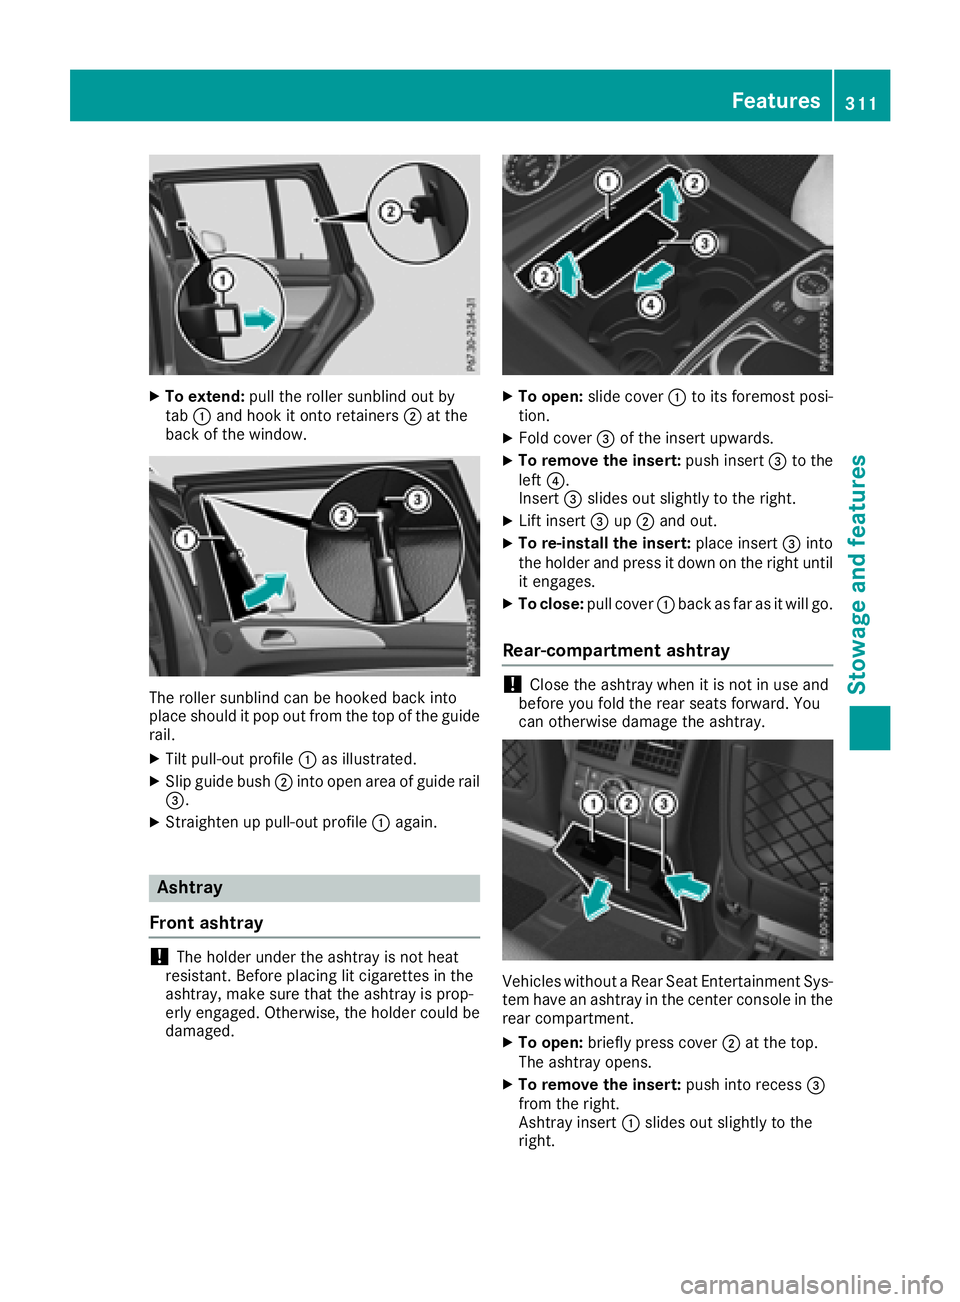
XTo extend:pull the roller sunblind out by
tab :and hook it onto retainers ;at the
back of the window.
The roller sunblind can be hooked back into
place should it pop out from the top of the guide
rail.
XTilt pull-out profile :as illustrated.
XSlip guide bush ;into open area of guide rail
=.
XStraighten up pull-out profile :again.
Ashtray
Front ashtray
!The holder under the ashtray is not heat
resistant. Before placing lit cigarettes in the
ashtray, make sure that the ashtray is prop-
erly engaged. Otherwise, the holder could be
damaged.
XTo open: slide cover :to its foremost posi-
tion.
XFold cover =of the insert upwards.
XTo remove the insert: push insert=to the
left ?.
Insert =slides out slightly to the right.
XLift insert =up; and out.
XTo re-install the insert: place insert=into
the holder and press it down on the right until
it engages.
XTo close: pull cover :back as far as it will go.
Rear-compartment ashtray
!Close the ashtray when it is not in use and
before you fold the rear seats forward. You
can otherwise damage the ashtray.
Vehicles without a Rear Seat Entertainment Sys-
tem have an ashtray in the center console in the
rear compartment.
XTo open: briefly press cover ;at the top.
The ashtray opens.
XTo remove the insert: push into recess=
from the right.
Ashtray insert :slides out slightly to the
right.
Features311
Stowag ean d features
Z
Page 314 of 398

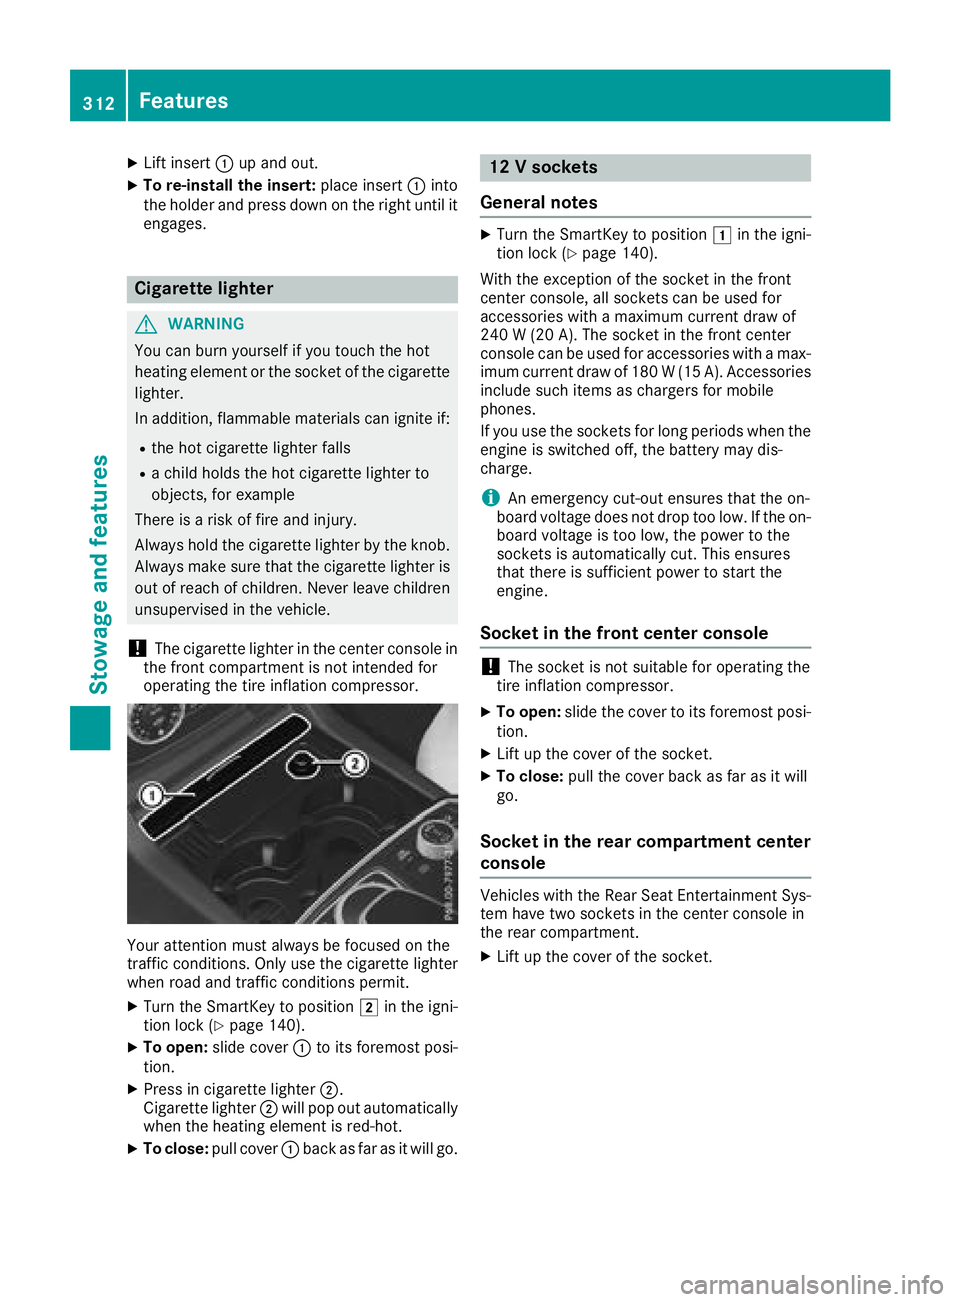
XLift insert:up and out.
XTo re-install the insert: place insert:into
the holder and press down on the right until it
engages.
Cigarette lighter
GWARNING
You can burn yourself if you touch the hot
heating element or the socket of the cigarette lighter.
In addition, flammable materials can ignite if:
Rthe hot cigarette lighter falls
Ra child holds the hot cigarette lighter to
objects, for example
There is a risk of fire and injury.
Always hold the cigarette lighter by the knob.
Always make sure that the cigarette lighter is
out of reach of children. Never leave children
unsupervised in the vehicle.
!The cigarette lighter in the center console in
the front compartment is not intended for
operating the tire inflation compressor.
Your attention must always be focused on the
traffic conditions. Only use the cigarette lighter
when road and traffic conditions permit.
XTurn the SmartKey to position 2in the igni-
tion lock (Ypage 140).
XTo open: slide cover :to its foremost posi-
tion.
XPress in cigarette lighter ;.
Cigarette lighter ;will pop out automatically
when the heating element is red-hot.
XTo close: pull cover :back as far as it will go.
12 V sockets
General notes
XTurn the SmartKey to position 1in the igni-
tion lock (Ypage 140).
With the exception of the socket in the front
center console, all sockets can be used for
accessories with a maximum current draw of
240 W (20 A). The socket in the front center
console can be used for accessories with a max-
imum current draw of 180 W(15 A). Accessories
include such items as chargers for mobile
phones.
If you use the sockets for long periods when the
engine is switched off, the battery may dis-
charge.
iAn emergency cut-out ensures that the on-
board voltage does not drop too low. If the on-
board voltage is too low, the power to the
sockets is automatically cut. This ensures
that there is sufficient power to start the
engine.
Socket in the front center console
!The socket is not suitable for operating the
tire inflation compressor.
XTo open: slide the cover to its foremost posi-
tion.
XLift up the cover of the socket.
XTo close: pull the cover back as far as it will
go.
Socket in the rear compartment center
console
Vehicles with the Rear Seat Entertainment Sys-
tem have two sockets in the center console in
the rear compartment.
XLift up the cover of the socket.
312Features
Stowage and features