2018 MERCEDES-BENZ CLA COUPE lock
[x] Cancel search: lockPage 104 of 326
XTo switchoff the high-beam headlamps:
move the combinatio nswitch back to its nor-
malp osition.
The blue Kindicator lamp in the instru-
ment cluster goe sout.
Vehicles with Adaptive Highbeam Assist:
when Adaptive Highbeam Assist is active, it
controls activation and deactivation of the
high-bea mheadlamps (
Ypage 102).
XTo switc honthe high-beam flasher: pull
the combinatio nswitch in the direction of
arrow =.
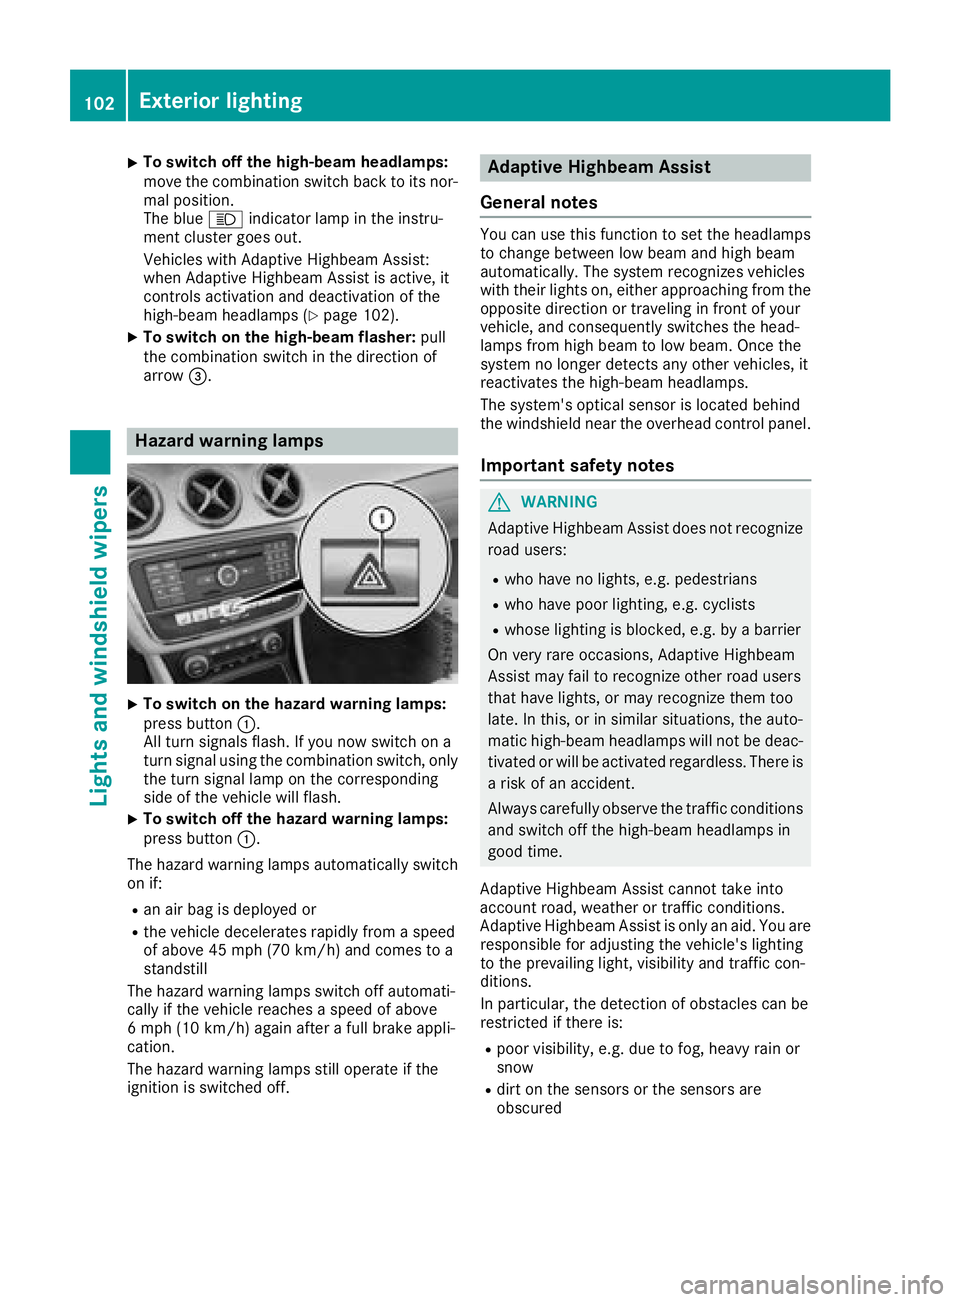
Hazard warning lamps
XTo switc honthe hazard warning lamps:
press button :.
All turn signals flash. If yo unow switch on a
turn signalu sing the combinatio nswitch ,only
the turn signall ampont he corresponding
side of the vehicl ewillf lash.
XTo switc hoff the hazard warning lamps:
press button :.
The hazard warning lamps automaticall yswitch
on if:
Ran ai rbag is deployed or
Rthe vehicl edecelerates rapidly from aspeed
of above 45 mph (70 km/h )and comestoa
standstill
The hazard warning lamps switch off automati-
cally if the vehicl ereachesas peed of above
6m ph (10 km/h )again afteraf ullb rake appli-
cation.
The hazard warning lamps stil lope rate if the
ignition is switched off.
Adaptiv eHighbeam Assist
General notes
Yo uc an us ethisf unctio ntoset the headlamps
to change between lo wbeama nd high beam
automatically. The system recognizes vehicles
with thei rlights on, either approaching from the
opposite direction or traveling in front of your
vehicle, and consequentlys witches the head-
lamps from high beam to lo wbeam. Once the
system no longer detects any otherv ehicles, it
reactivates the high-bea mheadlamps.
The system's optica lsensor is locate dbehin d
the windshield nea rthe overhead controlp anel.
Important safety notes
GWARNING
Adaptive Highbeam Assist does not recognize
roadu sers:
Rwh oh avenol ights ,e.g.p edes trians
Rwhoh avep oorlighting, e.g .cyclists
Rwhose lighting is blocked, e.g .byab arrier
On very rar eoccasions, Adaptive Highbeam
Assist mayf ailtor ecognize othe rroadu sers
thath avel ights ,orm ayrecognize them too
late. In this, or in similar situations, the auto-
matic high-bea mheadlamps will not be deac-
tivated or will be activate dregardless. There is
ar iskofana ccident.
Alway scarefull yobserve the traffic conditions
and switch off the high-bea mheadlamps in
goo dtime.
Adaptive Highbeam Assist canno ttake into
account road, weather or traffic conditions.
Adaptive Highbeam Assist is onlyana id.Y ou are
responsibl efor adjusting the vehicle's lighting
to the prevailing light, visibility and traffic con-
ditions.
In particular, the detection of obstacle scan be
restricte difthereis:
Rpoor visibility ,e.g.d ue to fog,h eavy rainor
snow
Rdirt on the sensors or the sensors are
obscured
102Exterior lighting
Lights and windshield wiper s
Page 106 of 326
Interior lighting control
General notes
In order to preven tthe vehicle's battery from
discharging ,the interio rlighting function sare
automatically deactivated after som etime
except when th eSmartKey is in position 2in
th ei gnition lock.
The color and brightness for th eambien tlighting
may be set via th emultimedia system; see th e
separat eoperating instructions.
Automati cinterior lighting control
XTo switch on: set theswitch to center posi-
tion B.
XTo switch off :set th eswitch to th e|
position .
The interio rlighting automatically switches on if
you:
Runlock th evehicl e
Ropen adoor
Rremove th eSmartKey from th eignition loc k
The interio rligh tisa ctivated for ashort while
when th eSma rtKey is remove dfromt heignition
lock. This delaye dswitch-off can be adjusted via
th em ultimedia system; see th eseparat eoper -
ating instructions.
Replacin gbulbs
Important safety notes
GWARNIN G
Bulbs, lamp sand connectors can get ver yhot
when operating .Ifyou chang eabulb, you
could burn yourself on these components.
Ther eisar iskofi njury.
Allow these component stocooldown before
changing abulb.
Do no tuse ab ulb if it has been dropped or if it s
glass tub ehas been scratched.
The bulb may explod eif:
Ryou touch it
Rit is hot
Ryou dro pit
Ryou scratch it Use bulbs only in closed lamp
sthath aveb een
designed for this purpose .Onlyi nstal lspar e
bulbs of th esam etypea nd th especifie dvolt-
age.
Mark sont heglass tub ereduce th eservic elife
of th ebulbs .Don ottouch th eglass tub ewith
your bare hands. If necessary, clean th eglass
tub ew hen cold wit halcohol or spirit and rub it
off wit halint-free cloth .
Protect bulbs from moisture during operation .
Do no tallow bulbs to come int ocontac twith
liquids.
Replac eonlyt he bulbs listed (
Ypage 104).
Hav ethe bulbs that you canno tchang ey ourself
replace dataq ualified specialist workshop.
If you require assistanc ereplacing bulbs ,con -
sult aqualified specialist workshop.
If th enew bulb still does no tligh tup, consult a
qualified specialist workshop.
Headlamps and lights are an important aspect of
vehicl esafety. You must therefor emakes ure
that these function correc tl
y
ata ll times .Have
th eh eadlamp setting checke dregularly.
Vehicles with LED headlamps: thef ront and
rear lamp clusters of your vehicl eare equipped
wit hL ED bulbs .Don otreplace th ebulbs your-
self .Contac taqualified specialist workshop
wit hthe necessar yspecialist knowledge and
tools to carry out th eworkr equired.
Overview of bul btypes
You can replace th efollowin gbulbs .The bulb
typ ecan be foun dinthelegend .
104Replacingb ulbs
Lightsand windshield wipers
Page 107 of 326
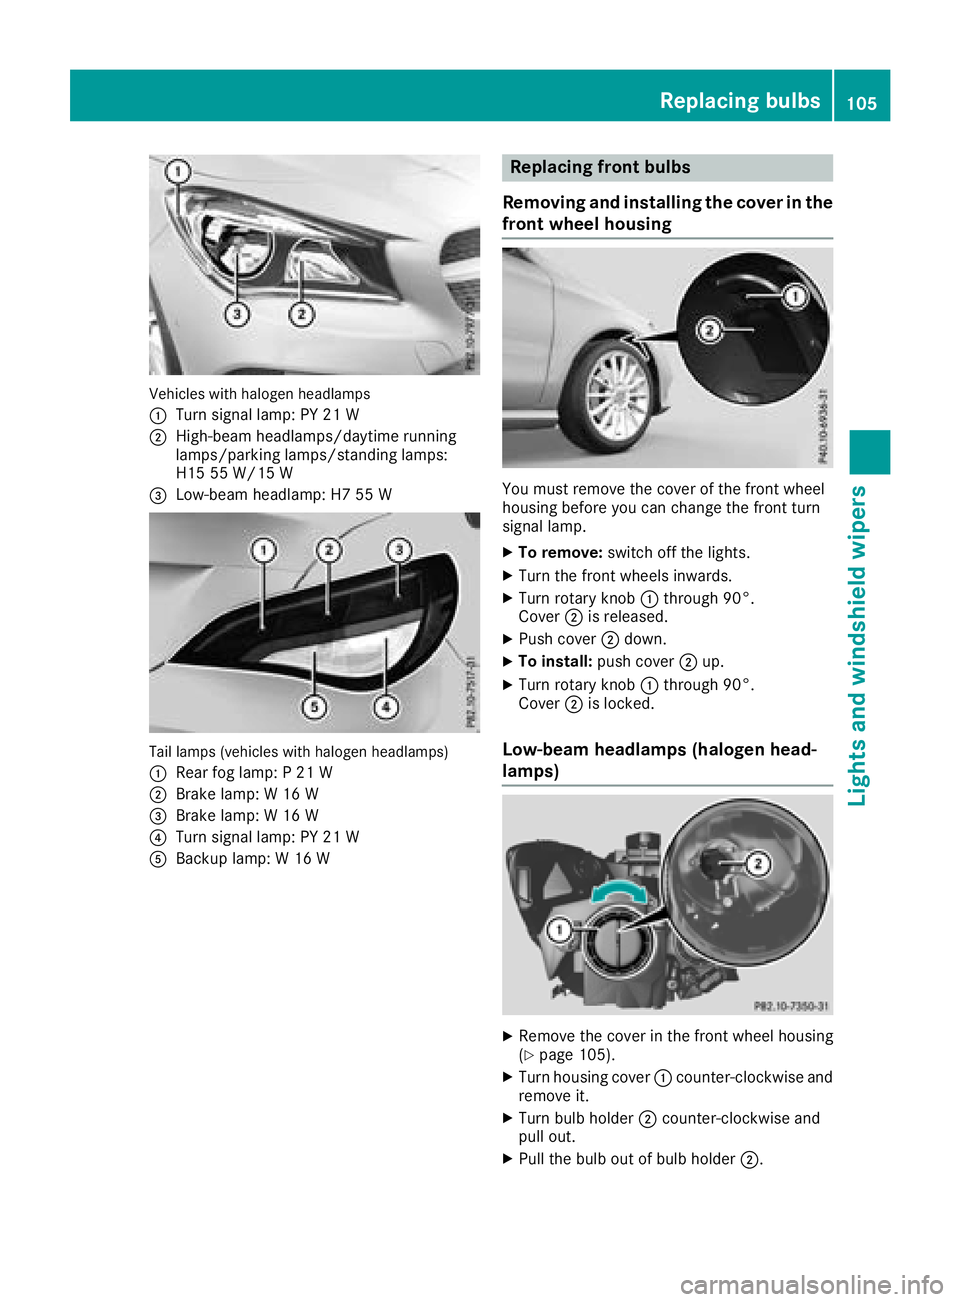
Vehicles with halogenheadlamps
:
Turn signal lamp: PY 21 W
;High-beam headlamps/daytime running
lamps/parking lamps/standing lamps:
H15 55 W/15 W
=Low-beam headlamp: H7 55 W
Tail lamps (vehicles with halogenh eadlamps)
:
Rearf og lamp: P21W
;Brake lamp: W16W
=Brake lamp:W16W
?Turn signal lamp: PY 21 W
ABackup lamp: W16W
Replacing front bulbs
Removing and installingt he coverinthe
front wheelh ousing
You must remove the cover of the front wheel
housing before you can change the front turn
signal lamp.
XTo remove:switch off the lights.
XTurn the front wheelsi nwards.
XTurn rotary knob:through 90°.
Cover ;is released.
XPush cover ;down.
XTo install: push cover ;up.
XTurn rotary knob :through 90°.
Cover ;is locked.
Low-beam headlamps (halogenh ead-
lamps)
XRemove the cover in the front wheel housing
(Ypage 105).
XTurn housing cover :counter-clockwise and
remove it.
XTurn bulb holder ;counter-clockwise and
pull out.
XPull the bulb out of bulb holder ;.
Replacing bulbs105
Lights and windshieldwipers
Z
Page 108 of 326
XInsert the new bulbinto bulbholder;.
XInsert bulbh older;and turn it clockwise.
XPress on housing cover :and turn it to the
right.
XReplace the cover in the front wheel housing
(Ypage 105).
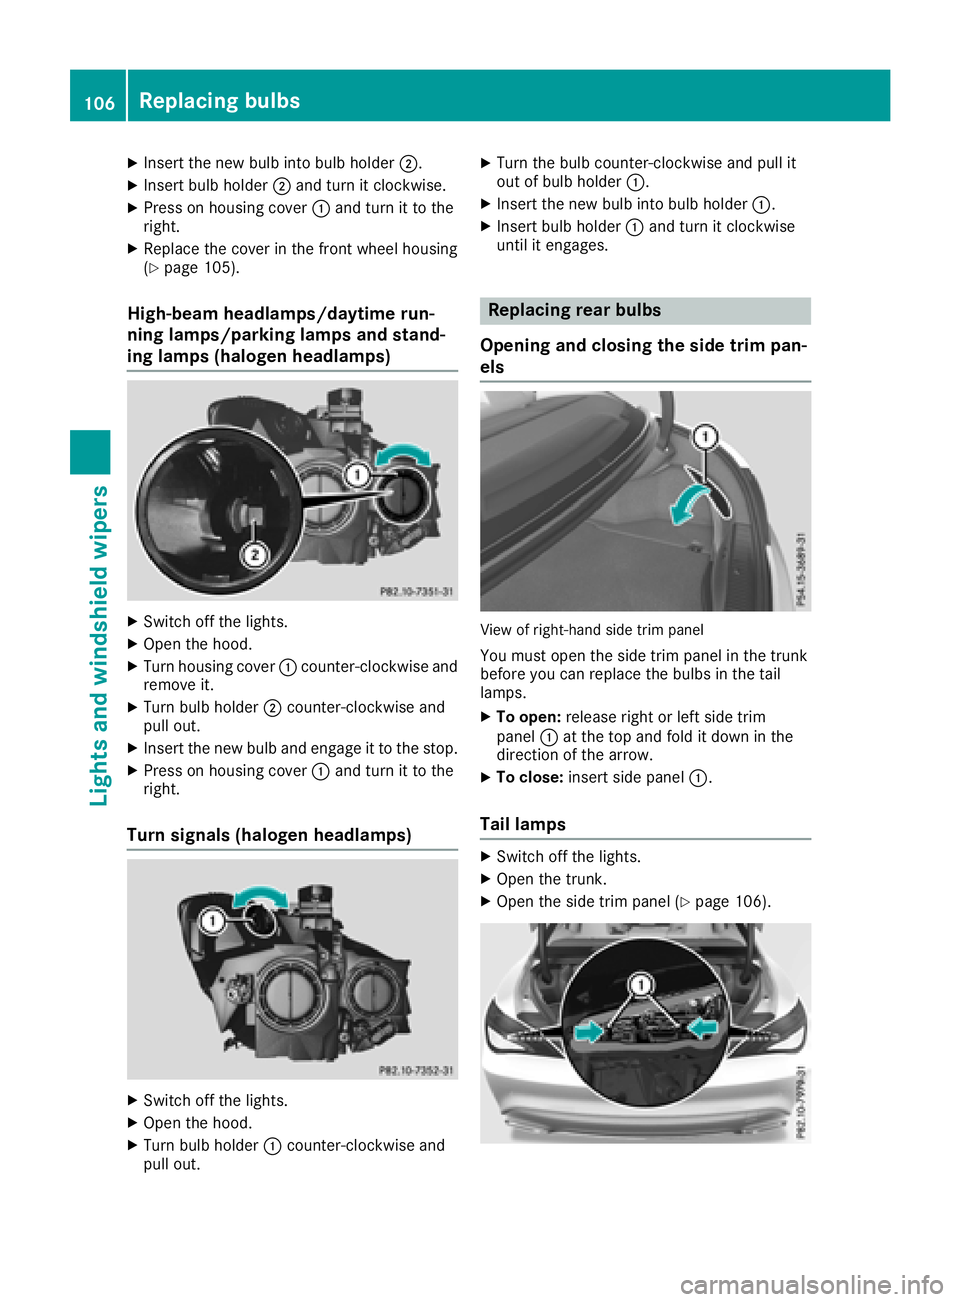
High-beam headlamps/daytime run-
ning lamps/parking lamps and stand-
ing lamps (halogen headlamps)
XSwitch off the lights.
XOpen the hood.
XTurn housing cover :counter-clockwise and
remove it.
XTurn bulbh older;counter-clockwise and
pullo ut.
XInsert the new bulba nd engage it to the stop.
XPress on housing cover :and turn it to the
right.
Turn signals (halogen headlamps)
XSwitch off the lights.
XOpen the hood.
XTurn bulbh older:counter-clockwise and
pullo ut.
XTurn the bulbc ounter-clockwise and pulli t
out of bulbh older:.
XInsert the new bulbi nto bulbholder:.
XInsert bulbh older:and turn it clockwise
until it engages.
Replacing rear bulbs
Openinga nd closing the side trim pan-
els
View of right-hand side trim panel
You must open the side trim panel in the trunk
before you can replace the bulbs in the tail
lamps.
XTo open: release right or left side trim
panel :at the top and fold it down in the
direction of the arrow.
XTo close: insert side panel :.
Tail lamps
XSwitch off the lights.
XOpen the trunk.
XOpen the side trim panel (Ypage 106).
106Replacing bulbs
Lights and windshield wipers
Page 109 of 326

XPress retainingclips :at the same time in
the direction of the arrows.
XCarefully remove the bulb holder together
with the connected plug and the bulbs.
Bulb holder
;
Brake lamp
=Brake lamp
?Rear fog lamp
ABackup lamp
BTurn signals
XBrake lamp and backup lamp: remove the
corresponding bulb from the bulb holder.
XInsert the new bulb into the bulb holder.
XRear fog lamp and turns ignal:press the
bulb gently into the bulb holder, turn it coun-
ter-clockwise and remove it from the bulb
holder.
XInsert the new bulb into the bulb holder and
turn it clockwise.
XReinsert the bulb holder and engage on
retainin gclips :.
XClose the side trim panel (Ypage 106).
Windshield wipers
Switching the windshield wipers
on/off
!
Do not operate the windshield wipers when
the windshield is dry, as this could damage
the wiper blades. Moreover, dust that has col-
lected on the windshield can scratch the glass
if wiping takes place when the windshield is
dry.
If it is necessary to switch on the windshield
wipers in dry weather conditions, alwaysu se
washer fluid when operating the windshield
wipers.
!If the windshield wipers leave smears on the
windshield after the vehicle has been washed
in an automatic car wash, wax or other resi-
dues may be the reason for this. Clean the
windshield using washer fluid after washing
the vehicle in an automatic car wash.
Combination switch
1
$ Windshield wiper off
2ÄIntermittent wipe, low (rain sensor set
to low sensitivity)
3Å Intermittent wipe, high (rain sensor
set to high sensitivity)
4° Continuous wipe, slow
5¯Continuous wipe, fast
BíSingle wipe/î Wipes the wind-
shield using washer fluid
XSwitc hont he ignition.
XTurn the combination switch to the corre-
sponding position.
!Vehicles with arain sensor: if the windshield
becomes dirty in dry weather conditions, the
windshield wipers may be activated inadver-
tently. This could then damage the windshield
wiper blades or scratch the windshield.
For this reason, you should alwayss witch off
the windshield wipers in dry weather.
Vehicles with arain sensor: in the ÄorÅ
position, the appropriate wiping frequency is
automatically set accordingtot he intensity of
the rain. In the Åposition, the rain sensor is
more sensitive than in the Äposition, caus-
ing the windshield wiper to wipe more fre-
quently.
If the wiper blades are worn, the windshield will
no longer be wiped properly. This could prevent
you from observing the traffic conditions.
Windshield wipers107
Lights and windshield wipers
Z
Page 110 of 326
Replacing the wiper blades
Important safety notes
GWARNING
If the windshield wiper sbegin to move while
yo ua re changing the wiper blades, yo ucould
be trapped by the wiper arm .There is arisko f
injury.
Alway sswitch off the windshield wiper sand
ignition before changing the wiper blades.
!To avoid damaging the wiper blades, make
sure that yo utouch only the wiper arm of the
wiper.
!Nevero pent he hoodifaw indshield wiper
arm hasb eenf olded away from the wind-
shield.
Neverf oldawindshield wiper arm withouta
wiper blad ebacko nto the windshield.
Holdt he windshield wiper arm firmly when
yo uc hange the wiper blade. If yo urelease the
windshield wiper arm withoutaw iper blade
and it falls onto the windshield ,the windshield
may be damaged by the force of the impact.
Mercedes-Benz recommendst hat youhave
the wiper blades changed at aquali fied spe-
cialist workshop.
Changin gthe windshield wiper blades
Removin gthe wiper blades
XVehicles without KEYLESS-GO or KEY-
LESS-GOs tart function: remove the Smart-
Key from the ignition lock.
XVehicles with KEYLESS-GO or KEYLESS-
GO start function: switch off the engine.
XFoldthe wiper arm away from the windshield.
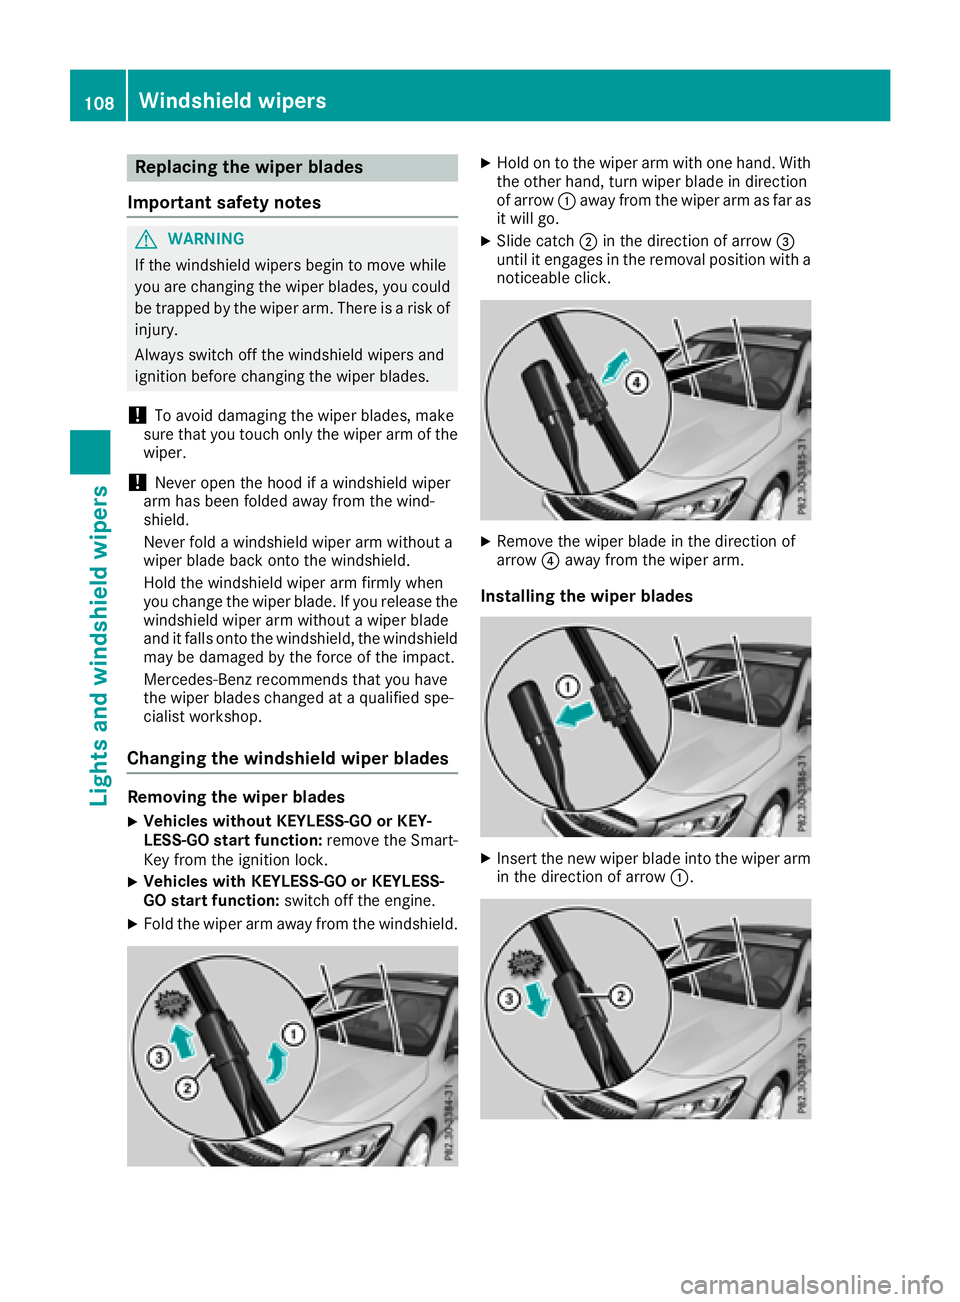
XHoldontot he wiper arm with one hand. With
the otherh and, turn wiper blad eindirection
of arrow :away from the wiper arm as far as
it will go.
XSlide catch ;in the direction of arrow =
unti lite ngages in the removal position with a
noticeable click.
XRemove the wiper blad einthe direction of
arrow ?away from the wiper arm.
Installing the wiper blades
XInsert the new wiper blad einto the wiper arm
in the direction of arrow :.
108Windshieldwipers
Lights and windshield wipers
Page 111 of 326
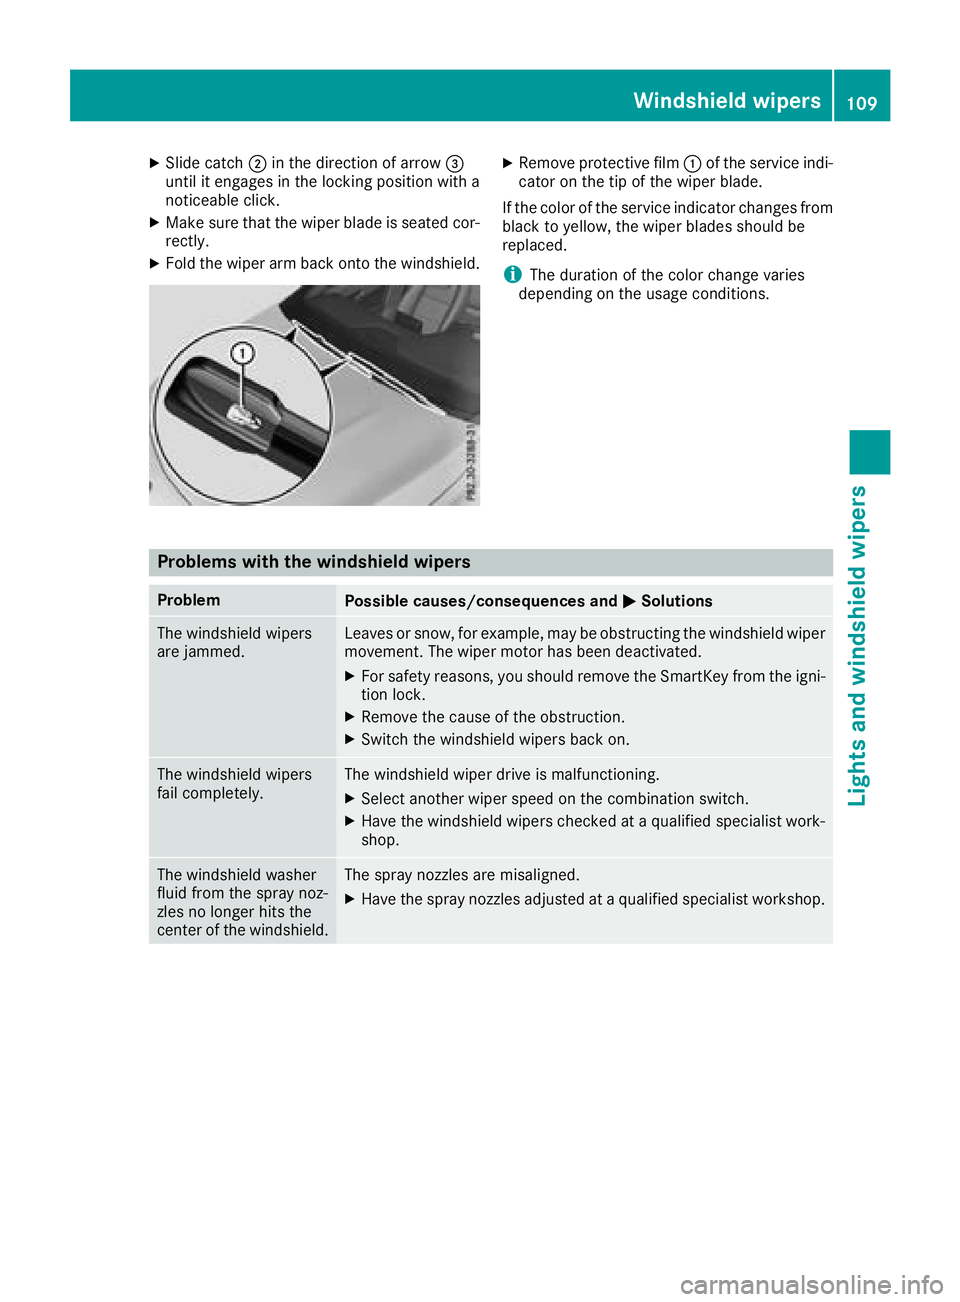
XSlide catch;in the direction of arrow =
unti lite ngages in the locking position with a
noticeable click.
XMake sure that the wiper blad eisseated cor-
rectly.
XFoldt he wiper arm back onto the windshield.
XRemove protectiv efilm :of the service indi-
cato ront he tip of the wiper blade.
If the color of the service indicator changes from
black to yellow,t he wiper blades shoul dbe
replaced.
iThe duration of the color change varies
depending on the usag econditions.
Problems with the windshield wipers
ProblemPossiblec auses/consequence sand MSolutions
The windshield wipers
are jammed.Leaves or snow,f or example, may be obstructing the windshield wiper
movement. The wiper motor hasb eend eactivated.
XFor safety reasons,y oushoul dremove the SmartKey from the igni-
tion lock.
XRemove the cause of the obstruction.
XSwitch the windshield wiper sbacko n.
The windshield wipers
failcompletely.The windshield wiper drive is malfunctioning.
XSelect another wiper speed on the combination switch.
XHave the windshield wiper scheckedataq ualified specialist work-
shop.
The windshield washer
fluid from the spray noz-
zles no longer hits the
center of the windshield.The spray nozzle sare misaligned.
XHave the spray nozzle sadjuste dataq ualified specialist workshop.
Windshiel dwipers109
Lights and windshield wipers
Z
Page 114 of 326

BSwitches cooling with airdehumidification on/off (Ypage 115)
CSwitches the rearw indow defrostero n/off (Ypage 118)
Notesonusing the air-conditioning
system
Air-conditioning system
Below,y oucan find anumber of notes and rec-
ommendations to helpy ouuset he air-condi-
tioning system optimally.
RSwitch on the air-conditioning system by turn- ing control knob Aclockwise to the desired
position (except position 0).
RSet the temperature to 72 ‡(22 †).
RRecommendation for avoiding misted
windows at lo wexteriort emperatures or
in rain: switch on the ¿cooling with dehu-
midification function (
Ypage 115).
Set ai rdistribution to ¯and if possible
switch off PandO (
Ypage 116).
Deactivate air-recirculation mode e
(
Ypage 119).
Set airflo wcontrol Atoas etting between 3
and 6(
Ypage 117).
RRecommendation for rapid coolin gor
heating of the vehicle interior: brieflyset
airflo wcontrol Atoas etting between 3and
6 (
Ypage 117).
RRecommendation for aconstan tvehicle
interior temperature: set airflowcontrol A
to as etting between 1and 3(
Ypage 117).
RRecommendation for air distributio nin
winter: select the Oand¯ settings
(
Ypage 116).
Recommendation for air distributio nin
summer: select the PorP and¯
settings (
Ypage 116).
ROnly us ethe "Windshieldd efrosting" function
brieflyu ntilthe windshield is clear again.
ROnly us eair-recirculation modeb riefly, e.g. if
there are unpleasant outsid eodors or when in
at unnel .The w
indow
scould otherwise fog up,
since no fresha iris drawn into the vehicl ein
air-recirculation mode.
RIf yo uchange the settings of the climate con-
trol system, the climate statu sdisplay
appears for approximately three seconds at
the botto mofthe screen in the multimedia
system display ;see separate operating
instructions .You will see the current settings
of the various climate control functions.
DYNAMI CSELECT button( except
Mercedes-AMG vehicles)
You can choose between various drive programs
with the DYNAMIC SELECT button
(
Ypage 128).
If yo uhaves elected drive program E:
Rwhen heating, the electrical heater booster is
deactivated and in the warming-up phase
heato utputi sreduced
Rthe rearw indow defrosterr unning time is
reduced
Depending on the configuration, climate set-
tings may also be influenced in the drive pro-
gram I.
If yo uhaves elected drive program Cor S,c li-
mate settings are not influenced.
EC Os tart/stop function
During automatic engine switch-off, the climate
control system only operate satareducedcapa-
city .Ify ourequire the ful lclimate control output,
yo uc an switch off the ECO start/stop function
by pressing the ECO button (
Ypage 127).
112Overviewofc limate control systems
Climate control