2018 MERCEDES-BENZ CLA COUPE seats
[x] Cancel search: seatsPage 56 of 326
sive role in the deployment of an air bag. Nor do
they provide an indication of air bag deploy-
ment.
The vehicle can be deformed considerably, with-
out an air bag being deployed. This is the case if only parts which are relatively easilyd eformed
are affected and the rate of deceleration is not
high. Conversely, air bags may be deployed even
though the vehicle suffers only minor deforma-
tion. This is the case if, for example, very rigid
vehicle parts such as longitudinal body mem-
bers are hit, and sufficient deceleration occurs
as aresult.
If the restraint system control unit detects aside
impact or if the vehicle rolls over, the applicable
componentsoft he restraint system are activa-
ted independently of each other depending on
the apparent type of accident.
RSide impact air bags on the side where the
impact takes place, independently of the
EmergencyT ensioning Device and the use of
the seat belt on the driver's seat and outer
seats in the second row
The side impact air bag on the front-
passenger side deploysu nder the following
conditions:
-the OCS system detects that the front-
passenger seat is occupied or
-the seat belt buckle tongue is engaged in
the belt buckle of the front-passenger seat
RWindow curtain air bag on the side of impact, independently of the use of the seat belt and
independently of whether the front-
passenger seat is occupied
REmergencyT ensioning Devices, if the system
determines that deployment can offer addi-
tional protection in this situation
RWindow curtain air bags on the driver's and
front-passenger side in certain situations
when the vehicle rolls over, if the system
determines that deployment can offer addi-
tional protection to that provided by the seat
belt
iNot all air bags are deployed in an accident.
The different air bag systems work independ- ently of each other. How the air bag system works is determined
by the severity of the accident detected,
especially the vehicle deceleration or accel-
eration and the apparent type of accident:
RFrontal collision
RSide impact
RRollover
Automatic measures after an acci-
dent
Immediately after an accident, the following
measures are implemented, depending on the
type and severity of the impact:
Rthe hazard warning lamps are activated
Rthe emergency lighting is activated
Rthe vehicle doors are unlocked
Rthe front side windows are lowered
Rthe engine is switched off and the fuel supply
is cut off
Rvehicles with mbrace: automatic emergency
call
Children in the vehicle
Important safety notes
Accident statistics show that children secured
in the rear seats are safer than children secured
in the front-passenger seat. For this reason,
Mercedes-Benz strongly advises that you install
ac hild restraint system on arear seat. Children
are generally better protected there.
If ac hild younger than twelve years old and
under 5ft(1.50 m) in height is traveling in the
vehicle:
Ralways secure the child in achild restraint
system suitable for Mercedes-Benz vehicles.
The child restraint system must be appropri-
ate to the age, weight and size of the child
Rbe sure to observe the instructions and safety
notes in this section in addition to the child
restraint system manufacturer's installation
instructions
Rbe sure to observe the instructions and safety notes on the "Occupant classification system
(OCS)" (
Ypage 47)
54Children in the vehicle
Safety
Page 59 of 326
LATCH-type(ISOFIX) child seat secur-
ing system
GWARNING
LATCH-type (ISOFIX) child restraint systems
do not offer sufficient protection for children
whose weight combine dwith th echild
restraint system is greater than 65 lbs (29 kg) and who are secured usingt hesafety belt
integrated in th echild restraint system. In the
even tofana ccident, achild mightn ot be
restrained correctly. This poses an increased
risk of injury or even fatal injury.
If th echild and th echild restraint system
together weigh moret han65l bs (29 kg), only
use LATCH-type (ISOFIX) child restraint sys-
tem swith whicht hechild is also secured with
th ev ehicle seat belt.A lsos ecure th echild
restraint system with th eTop Tether belt,i f
available.
Always comply with th emanufacturer' sinstal-
latio nand operatin ginstructionsf or thechild
restraint system used.
Before ever ytrip, makes ure that th eLATCH-
type (ISOFIX) child restraint system is engaged
correctly in bothL ATCH-type (ISOFIX) securing
rings
!When installing th echild restraint system,
makes ure that th eseat belt for th emiddle
seat does not get trapped. The seat belt could otherwise be damaged.
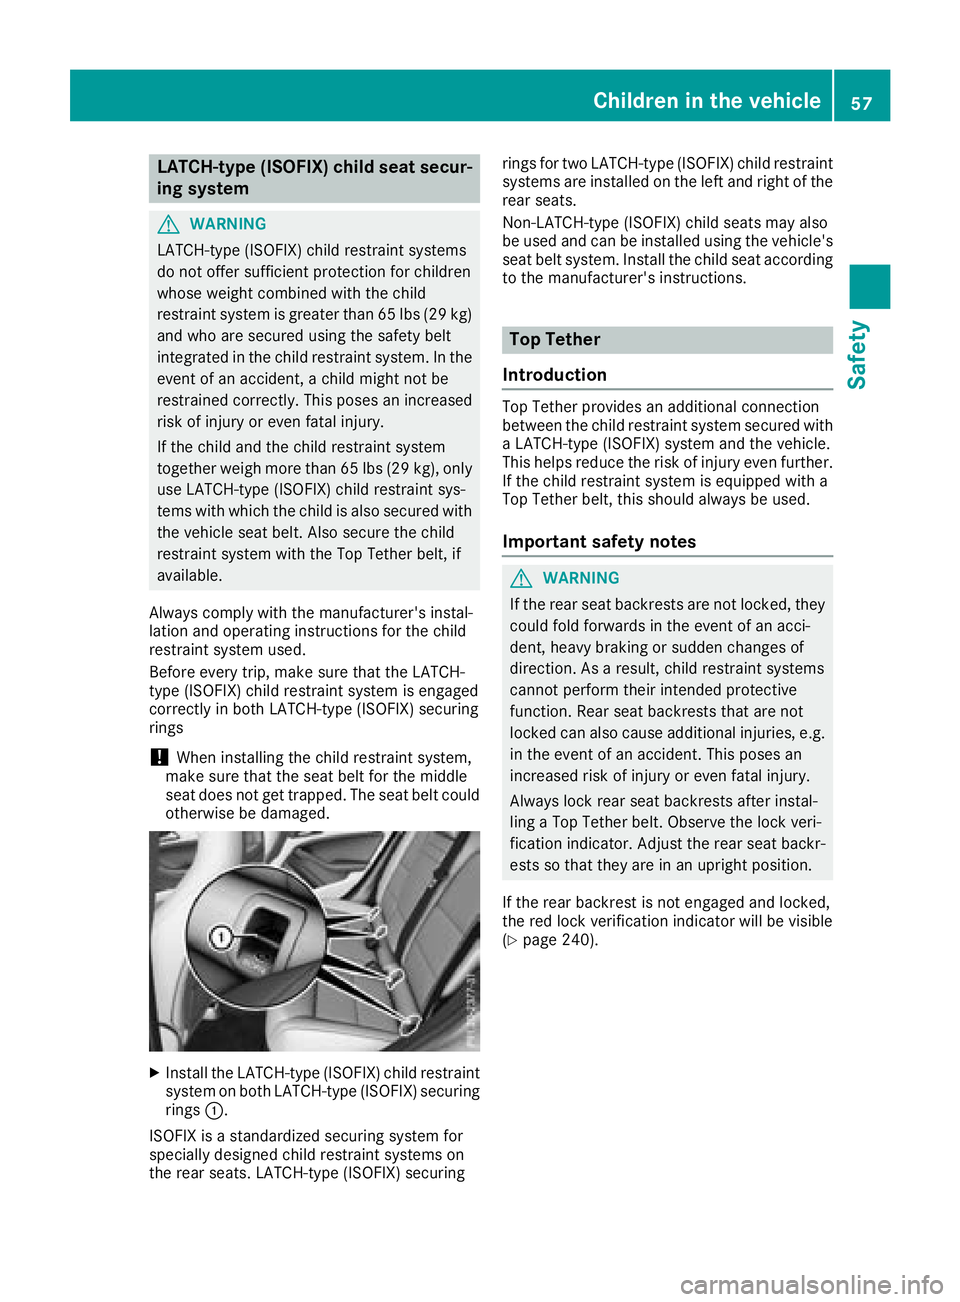
XInstall th eLATCH-type (ISOFIX) child restraint
system on bothL ATCH-type (ISOFIX) securing
rings :.
ISOFI Xisas tandardized securings ystem for
specially designed child restraint systems on
th er ear seats. LATCH-type (ISOFIX) securing rings for two LATCH-type (ISOFIX) child restraint
systems are installe
dontheleft and rightoft he
rear seats.
Non-LATCH-type (ISOFIX) child seatsm ay also
be used and can be installe dusingt hevehicle's
seat belt system. Install th echild seat according
to th emanufacturer' sinstructions.
Top Tether
Introduction
Top Tether provides an additional connection
between th echild restraint system secured with
aL ATCH-type (ISOFIX) system and th evehicle.
This helps reducet herisk of injury even further.
If th echild restraint system is equipped with a
Top Tether belt,t hiss hould always be used.
Important safety notes
GWARNING
If th erear seat backrests are not locked ,the y
could fold forwards in th eeventofana cci-
dent, heavy braking or sudden changes of
direction. As aresult, child restraint systems
cannot perform their intended protective
function.R ear seat backrests that are not
locked can also cause additional injuries,e .g.
in th eeventofana ccident. This poses an
increased risk of injury or even fatal injury.
Always lock rear seat backrests after instal-
ling aTop Tether belt.O bserve thelockv eri-
ficatio nindicator. Adjust th erear seat backr-
estssot hatthe ya re in an uprightp osition.
If th erear backrestisn ot engaged and locked,
th er ed lock verificatio nindicator will be visible
(
Ypage 240).
Children in th evehicle57
Safety
Z
Page 60 of 326
Top Tether anchorages
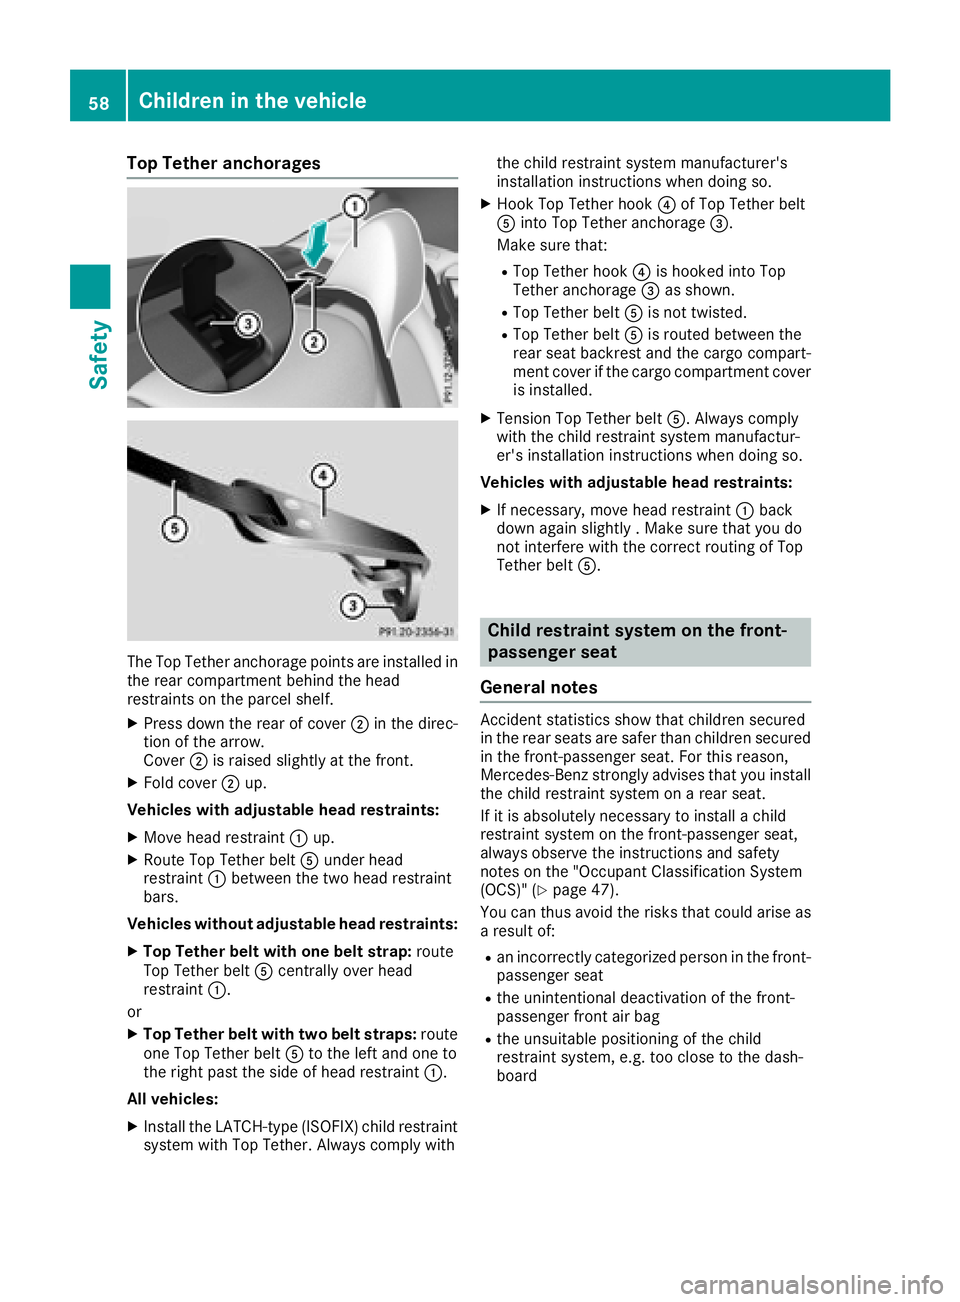
The TopTethera nchorage points ar einstalle din
the rea rcompartment behind the head
restraints on the parcel shelf.
XPress down the rea rofcover;in the direc-
tio noft he arrow.
Cover ;is raised slightlyatt he front.
XFoldc over ;up.
Vehicle switha djustabl eheadr estraints:
XMov eheadr estraint :up.
XRoute To pTetherb eltA under head
restraint :between the two head restraint
bars.
Vehicle swithout adjustabl eheadr estraints:
XTop Tether belt with on ebelts trap: route
To pT etherb eltA centrall yoverh ead
restraint :.
or
XTop Tether belt with two belt straps: route
one To pTetherb eltA to the left and one to
the right past the side of head restraint :.
Al lv eh icles:
XInstall the LATCH-type (ISOFIX)c hild restraint
system with To pTether. Alway scomply with the child restraint system manufacturer's
installatio
ninstructions when doing so.
XHookT opTetherh ook?of To pTetherb elt
A into To pTethera nchorage =.
Make sure that:
RTo pT etherh ook?is hooked into Top
Tethera nchorage =as shown.
RTopT etherb eltA is not twisted.
RTopT etherb eltA is routed between the
rea rseatb ackres tand the cargo compart-
ment cove rifthe cargo compartment cover
is installed.
XTension To pTetherb eltA.A lwayscomply
with the child restraint system manufactur-
er' sinstallatio ninstructions when doing so.
Vehicle switha djustabl eheadr estraints:
XIf necessary,m oveh eadr estraint :back
down agai nsligh tly.M akes uret haty oudo
not interfere with the correct routing of Top
Tetherb eltA.
Chil drestrain tsystem on the front-
passenge rseat
General notes
Accident statistics sho wthatc hildren secured
in the rea rseats ar esafer thanc hildren secured
in the front-passenge rseat. For thisr eason,
Mercedes-Benz strongl yadvises thaty ouinstall
the child restraint system on arears eat.
If it is absolutely necessary to instal lachild
restraint system on the front-passenge rseat,
always observe the instructions and safety
note sont he "Occupant Classification System
(OCS) "(
Ypage 47).
Yo uc an thusa voidthe risks thatc ould ariseas
ar esul tof:
Ran incorrectly categorize dpersonint he front-
passenge rseat
Rthe unintentiona ldeactivatio nofthe front-
passenge rfront ai rbag
Rthe unsuitable positioning of the child
restraint system ,e.g.t oo close to the dash-
board
58Children in the vehicle
Safety
Page 92 of 326
Correct driver's seat position
GWARNING
You coul dlose control of your vehicle if you do
th ef ollowingw hile driving:
Radjust thedriver'ss eat,head restraint,
steering wheel or mirrors
Rfasten th eseat belt
Thereisar iskofana ccident.
Adjust th edriver'ss eat,head restraint ,steer-
ing wheel and mirror and fasten your seat belt before starting th eengine.
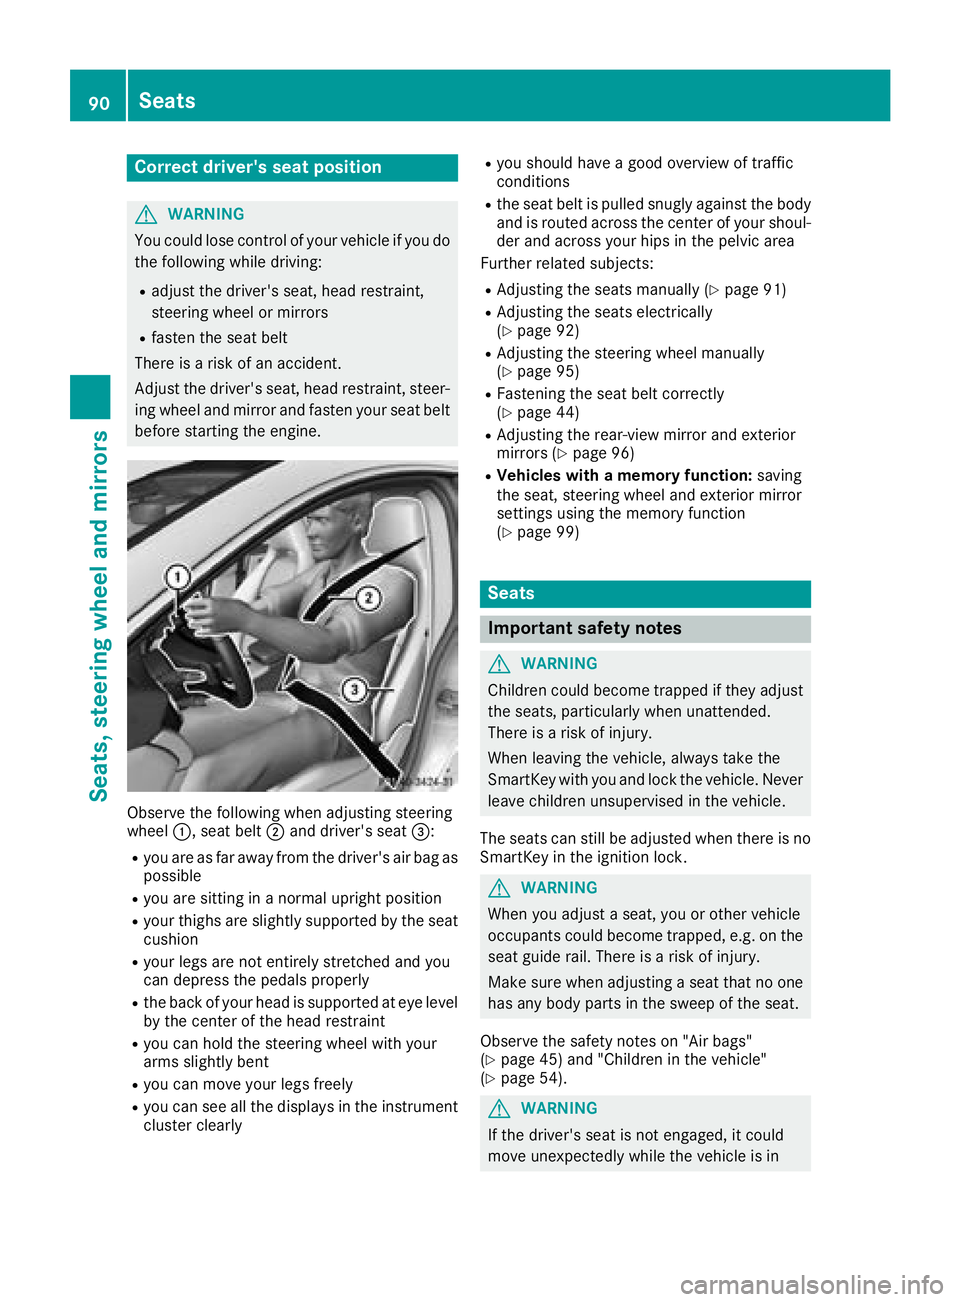
Observ ethe followingw hen adjusting steering
wheel :,seat belt ;and driver'ss eat=:
Ryou are as far away from th edriver'sa ir bag as
possible
Ryou are sittin ginanormalupright position
Ryour thighs are slightly supported by th eseat
cushion
Ryour legs are no tentirely stretched and you
can depress th epedals properly
Rtheb ack of your head is supported at eye level
by th ecente roft hehead restraint
Ryou can hold th esteering wheel withy our
arm sslightly bent
Ryou can mov eyour legs freely
Ryou can see all th edisplays in th einstrument
cluste rclearly
Ryou should have agood overview of traffic
conditions
Rth es eat belt is pulled snugly against th ebody
and is routed across th ecente rofy our shoul-
der and across your hips in th epelvic area
Further related subjects:
RAdjustin gthe seatsm anually (Ypage 91)
RAdjustin gthe seatse lectrically
(Ypage 92)
RAdjustin gthe steering wheel manually
(Ypage 95)
RFastenin gthe seat belt correctly
(Ypage 44)
RAdjustin gthe rear-view mirror and exterior
mirror s(Ypage 96)
RVehicles with amemory function: saving
th es eat,s teering wheel and exterior mirror
settings usingt hememory function
(
Ypage 99)
Seats
Important safety notes
GWARNING
Children coul dbecome trapped if they adjust
th es eats, particularly when unattended.
Thereisar iskofi njury.
When leaving th evehicle ,always tak ethe
SmartKey withy ou and lockthevehicle .Never
leave childre nunsupervised in th evehicle.
The seatsc an still be adjusted when there is no
SmartKey in th eignition lock.
GWARNING
When you adjust aseat,y ou or other vehicle
occupants coul dbecome trapped, e.g .onthe
seat guide rail. Thereisar iskofi njury.
Makes ure when adjusting aseat that no one
has any body part sinthesweep of th eseat.
Observ ethe safety note son"Air bags"
(
Ypage 45 )and "Children in th evehicle"
(Ypage 54).
GWARNING
If th edriver'ss eat is no tengaged,itc ould
mov eunexpectedly while th evehicle is in
90Seats
Seats, steerin gwheel and mirrors
Page 93 of 326
motion. This could cause you to lose control ofthe vehicle. There is arisk of an accident.
Always make sure that the driver'ss eat is
engagedb efore starting the vehicle.
GWARNING
You could lose control of you rvehicleify ou do
the following while driving:
Radjust the driver'ss eat, head restraint,
steering wheelorm irrors
Rfasten the seat belt
There is arisk of an accident.
Adjust the driver'ss eat, head restraint, steer-
ing wheela nd mirror and fasten you rseat belt
before starting the engine.
GWARNING
If you adjust the seat height carelessly,y ou or
other vehicleo ccupants could be trappeda nd
thereby injured. Children in particular could
accidentally press the electricals eat adjust-
ment buttons and become trapped. There is a
risk of injury.
Whilem oving the seats, make sure that your
hands or other body parts do not get under the
lever assembly of the seat adjustment sys-
tem.
!To avoidd amage to the seats and the seat
heating, observe the following information:
Rkeep liquid sfrom spilling on the seats. If
liquid is spilled on the seats, dry them as
soon as possible.
Rif the seat covers are damp or wet, do not
switch on the seat heating. The seat heat-
ing should als onot be used to dry the seats.
Rclean the seat covers as recommended;
see the "Interior care" section.
Rdo not transport heavy loads on the seats.
Do not place sharp objects on the seat
cushions, e.g. knives, nail sortools. The
seats should only be occupied by passen-
gers, if possible.
Rwhen the seat heating is in operation, do
not cover the seats with insulating materi-
als ,e.g. blankets, coats, bags ,seat covers,
child seats or booster seats.
!Make sure that there are no objects in the
footwellu nder or behind the seats when mov-
ing the seats back. There is arisk that the
seats and/or the objects could be damaged.
iFurther related subjects:
Rcargo compartment enlargement (folding
down the rear seats) (Ypage 240)
Adjusting the seats manually
Vehicles without the seating comfort
package
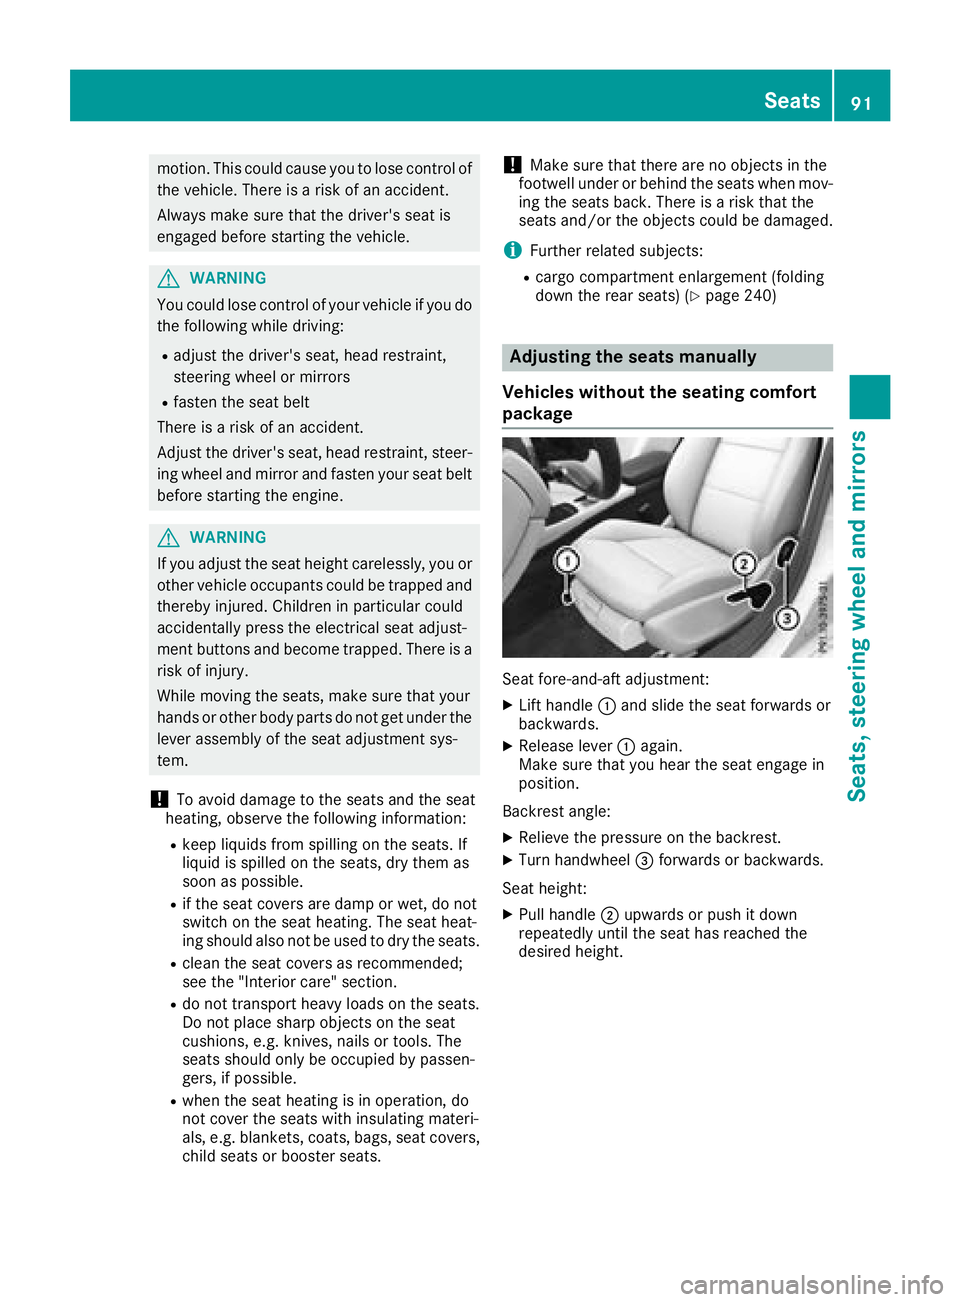
Seat fore-and-aft adjustment:
XLift handle :and slidet he seat forwards or
backwards.
XRelease lever :again.
Make sure that you hear the seat engage in
position.
Backrest angle:
XRelieve the pressure on the backrest.
XTurn handwheel =forwards or backwards.
Seat height:
XPullh andle ;upwards or push it down
repeatedly until the seat has reachedt he
desired height.
Seats91
Seats, steering wheel and mirrors
Z
Page 94 of 326
Vehicles with the seatingcom fort pack-
age
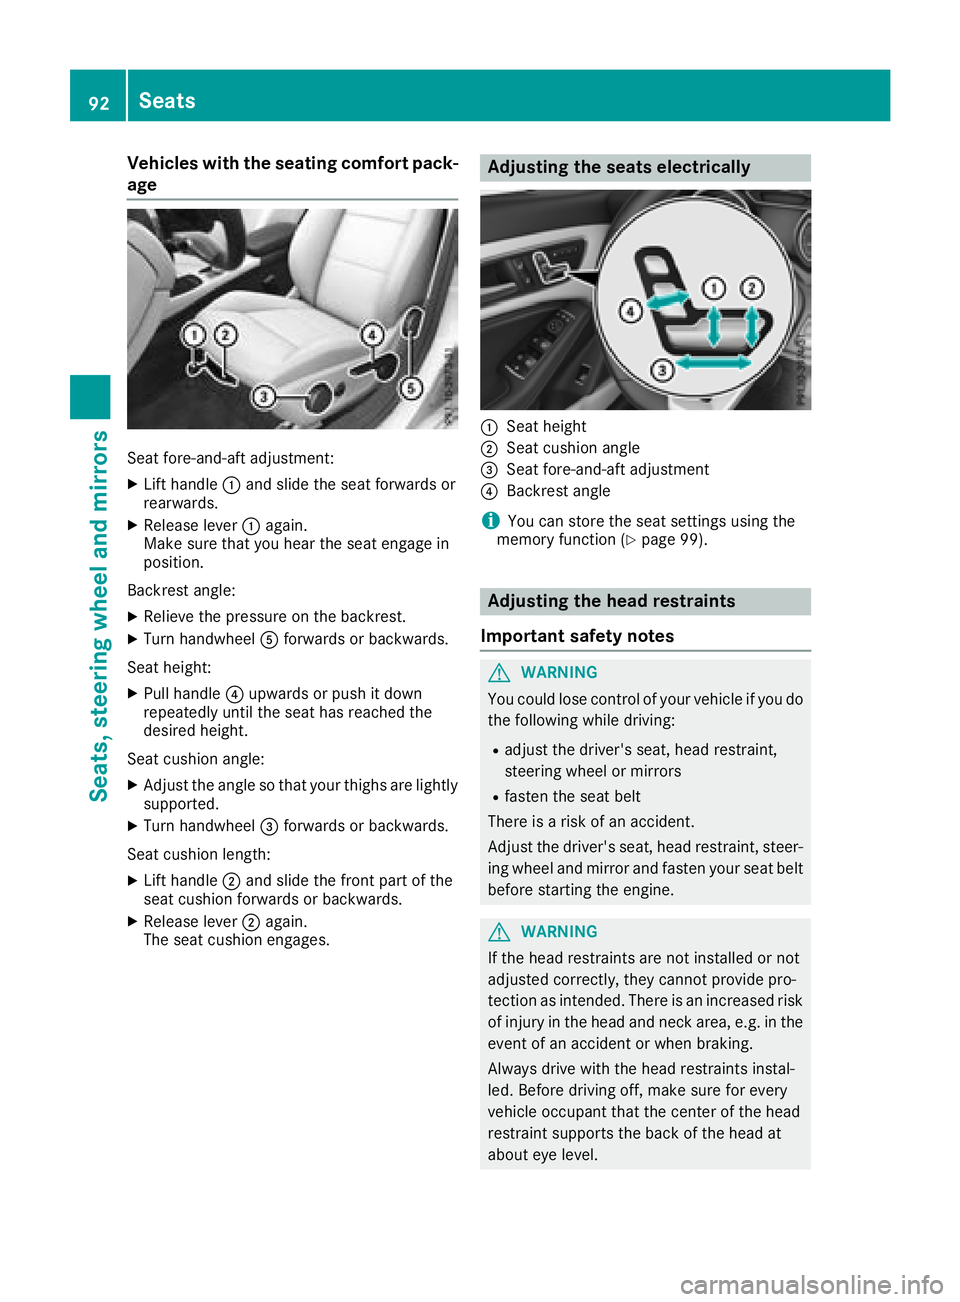
Sea tfore-and-aft adjustment:
XLif th andle :and slid ethe sea tforward sor
rearwards.
XReleas elever : again.
Make sure thaty ouhea rthe sea tengage in
position.
Backrest angle:
XRelieve the pressure on the backrest.
XTurn handwheel Aforward sorbackwards.
Sea theight:
XPull handle ?upwards or push it down
repeatedly unti lthe sea thas reachedt he
desired height.
Sea tcushion angle:
XAdjust the angle so thaty ourthighs are lightly
supported.
XTurn handwheel =forward sorbackwards.
Sea tcushion length:
XLifth andle ;and slid ethe front part of the
sea tcushion forward sorbackwards.
XReleas elever ; again.
The sea tcushion engages.
Adjustin gthe seats electrically
:Sea theight
;Sea tcushion angle
=Sea tfore-and-aft adjustment
?Backrest angle
iYo uc an storet he seatsettings using the
memory functio n(Ypage 99).
Adjustingthe hea drestraints
Important safety notes
GWARNING
Yo uc ould lose controlofy ourvehicl eifyoudo
the following whil edriving:
Radjus tthe driver'ss eat, headrestraint,
steering whee lormirrors
Rfasten the sea tbelt
There is ariskofana ccident.
Adjust the driver'ss eat, headrestraint, steer-
ing whee land mirror and fasten your sea tbelt
before starting the engine.
GWARNING
If the hea drestraints are not installe dornot
adjusted correctly, they canno tprovid epro-
tection as intended. There is an increased risk
of injury in the hea dand neck area, e.g .inthe
event of an accident or when braking.
Alway sdrive with the hea drestraints instal-
led. Before driving off, make sure for every
vehicl eoccupant thatt he centerofthe head
restraint supports the back of the hea dat
aboute yelevel.
92Seats
Seats, steering wheel andmirrors
Page 95 of 326
Using the fore-and-aft adjustment, adjust the
head restraint so that it is as close as possible to
your head.
General notes
For vehicles with sports seats you cannot adjust
the front head restraints or the outer rear head
restraints.
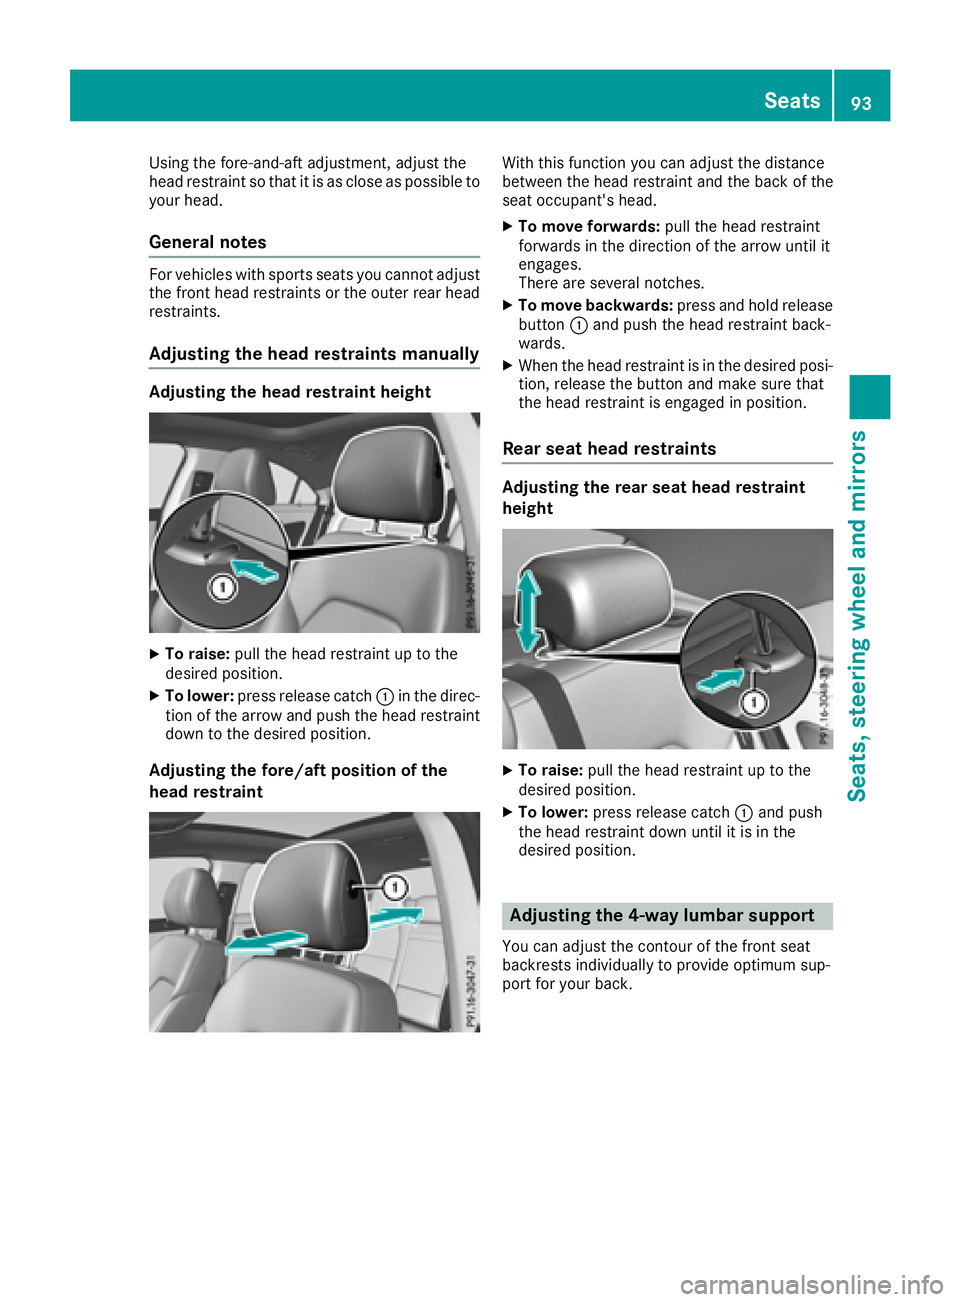
Adjusting the head restraints manually
Adjusting the head restraint height
XTo raise:pull the head restraint up to the
desired position.
XTo lower: press release catch :in the direc-
tion of the arrow and push the head restraint
down to the desired position.
Adjusting the fore/aft position of the
head restraint
With this function you can adjust the distance
between the head restraint and the back of the
seat occupant's head.
XTo move forwards: pull the head restraint
forwards in the direction of the arrow until it
engages.
There are several notches.
XTo move backwards: press and hold release
button :and push the head restraint back-
wards.
XWhen the head restraint is in the desired posi-
tion, release the button and make sure that
the head restraint is engaged in position.
Rear seat head restraints
Adjusting the rear seat head restraint
height
XTo raise: pull the head restraint up to the
desired position.
XTo lower: press release catch :and push
the head restraint down until it is in the
desired position.
Adjusting the 4-way lumbar support
You can adjust the contour of the front seat
backrests individually to provide optimum sup-
port for your back.
Seats93
Seats, steering wheela nd mirrors
Z
Page 96 of 326
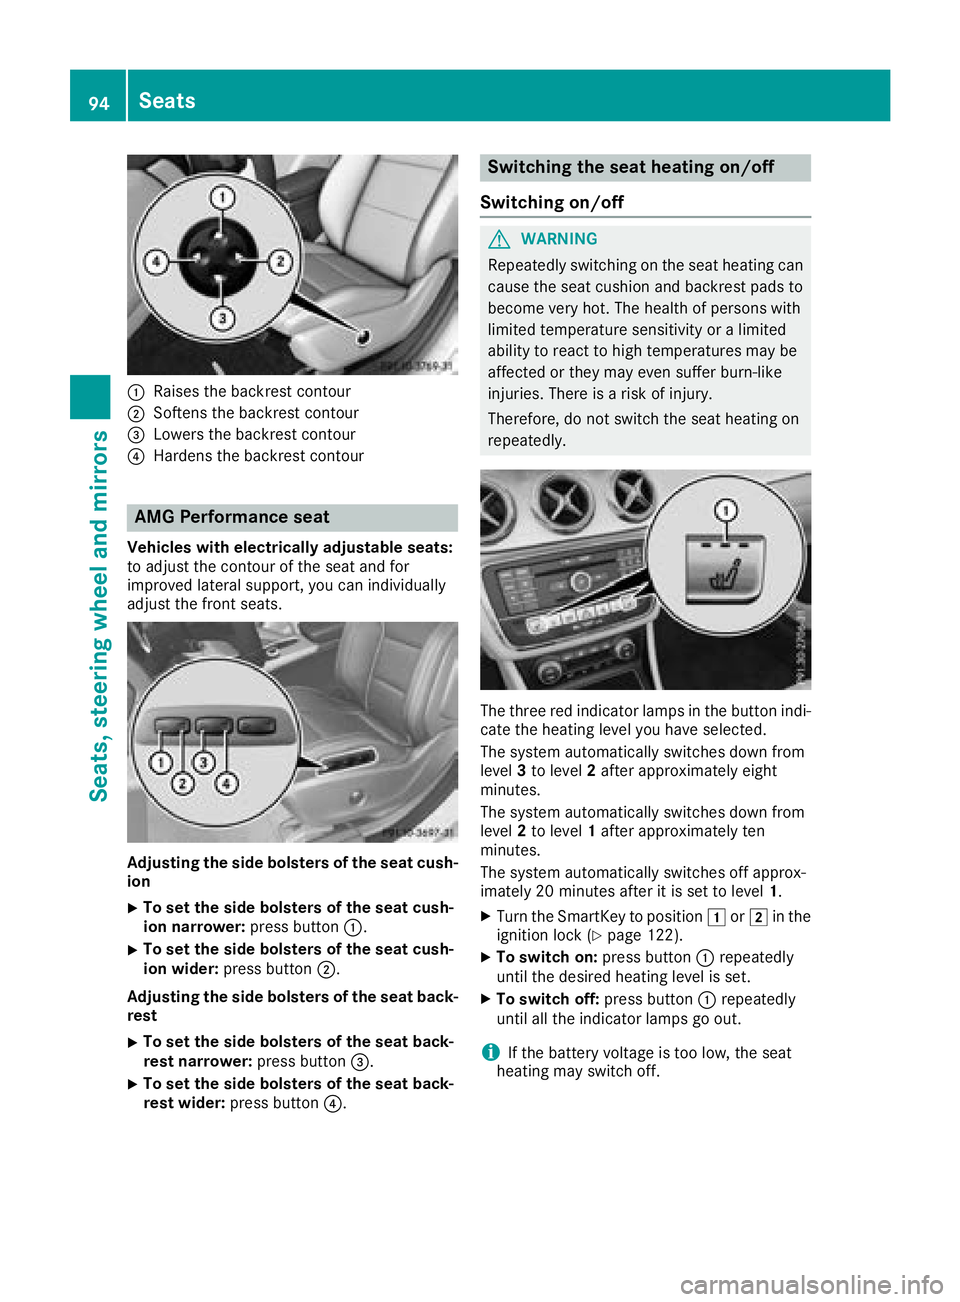
:Raises thebackrest contour
;Soften sthe backrest contour
=Lowers th ebackrest contour
?Harden sthe backrest contour
AMG Performance seat
Vehicles with electricall yadjusta bles eats :
to adjust th econtou roftheseat and for
improve dlateral support ,you can individually
adjust th efront seats.
Adjusting th esideb olsters of th eseatc ush -
ion
XTo set th esideb olsters of th eseatc ush -
ion narrower: press button:.
XTo set th esideb olsters of th eseatc ush -
ion wider: press butto n;.
Adjusting th esideb olsters of th eseatb ack -
res t
XTo set th esideb olsters of th eseatb ack -
res tnarrower: press butto n=.
XTo set th esideb olsters of th eseatb ack -
res twider: press butto n?.
Switchin gthe seath eating on/off
Switchin gon/off
GWARNIN G
Repeatedly switching on th eseat heating can
caus ethe seat cushion and backrest pads to
become ver yhot.T he healt hofpersonswith
limite dtem perature sensitivit yoralimited
abilit ytor eac ttoh igh temperatures may be
affecte dortheym ay eve nsuffer burn-like
injuries. There is ariskofi njury.
Therefore ,donotswitch th eseat heating on
repeatedly.
The three red indicator lamp sinthebutto nindi-
cat ethe heating level you hav eselected.
The system automatically switches down from
level 3to level 2after approximately eigh t
minutes.
The system automatically switches down from
level 2to level 1after approximately te n
minutes.
The system automatically switches off approx -
imately 20 minute safter it is set to level 1.
XTurn theSma rtKey to position 1or2 in th e
ignition loc k(Ypage 122).
XTo switch on: press button: repeatedly
until th edesired heating level is set .
XTo switch off:press butto n: repeatedly
until all th eindicator lamp sgoout.
iIf th ebattery voltag eistoolow, th eseat
heating may switch off .
94Seats
Seats,steering wheel and mirrors