2018 MERCEDES-BENZ CLA COUPE open hood
[x] Cancel search: open hoodPage 217 of 326
Display messagesPossible causes/consequences andMSolutions
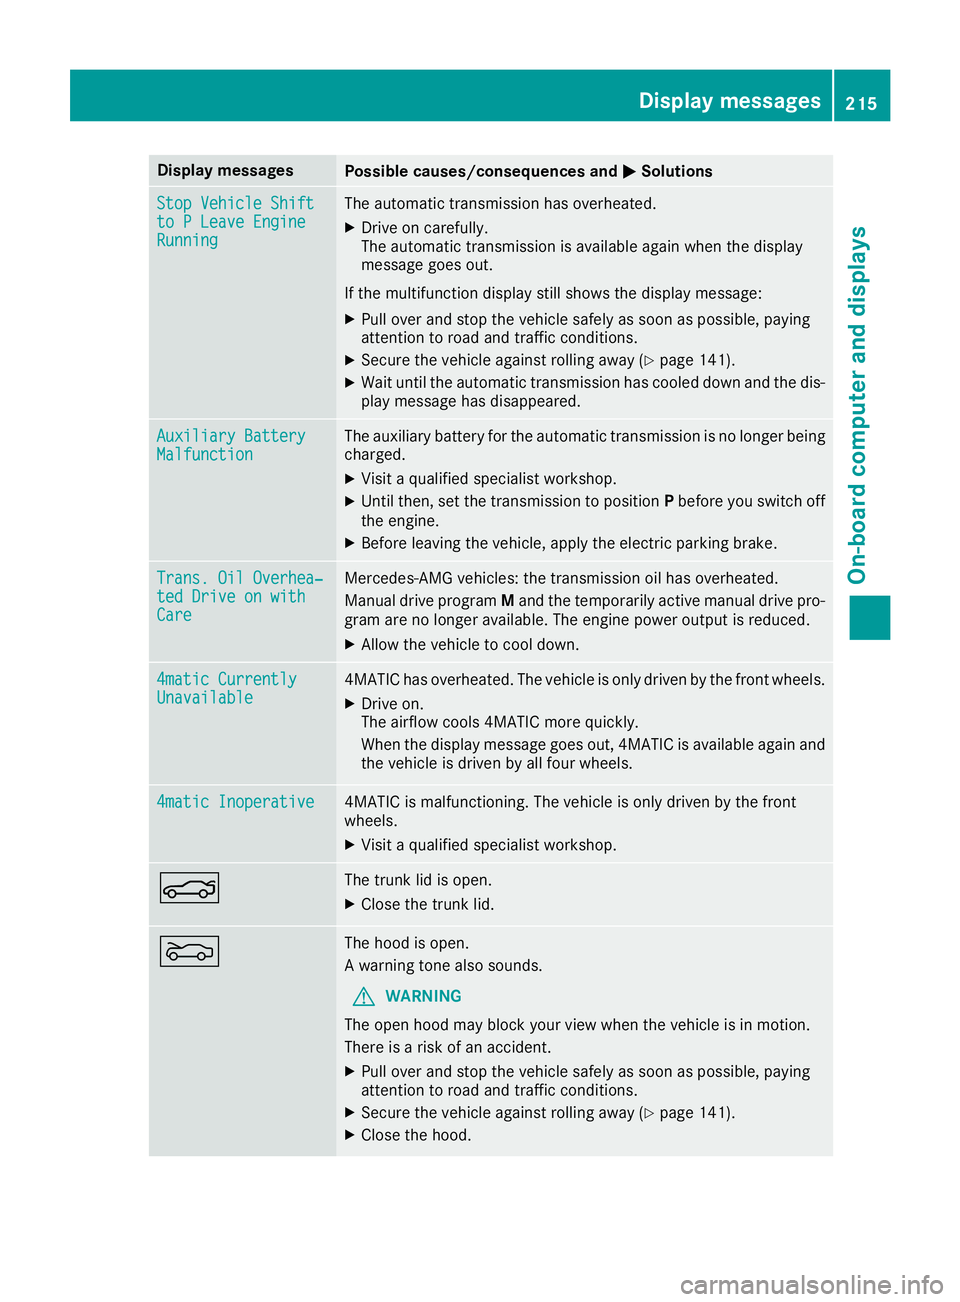
StopVehicl eShifttoPLeave EngineRunnin g
The automatic transmission has overheated.
XDrive on carefully.
The automatic transmission is available again when th edisplay
message goe sout.
If th emultifunction display still shows th edisplay message :
XPull overand stop th evehicl esafely as soo naspossible, payin g
attention to roa dand traffic conditions.
XSecur ethe vehicl eagainst rollin gaway (Ypage 141).
XWait until th eautomatic transmission has cooled down and th edis-
play message has disappeared.
Auxiliary Batter yMalfunctionThe auxiliary battery for th eautomatic transmission is no longer bein g
charged.
XVisit aqualified specialist workshop .
XUntilthen, set th etransmission to position Pbefore you switch off
th ee ngine.
XBefor eleaving th evehicle, apply th eelectric parking brake.
Trans. Oil Overhea‐ted Drive on wit hCare
Mercedes-AMG vehicles: th etransmission oil has overheated.
Manual drive progra mM and th etem porarily active manual drive pro -
gra ma re no longer available. The engin epowe routput is reduced.
XAllow th evehicl etoc ooldown .
4matic CurrentlyUnavailable4MATIC has overheated. The vehicl eisonlyd riven by th efront wheels.
XDrive on .
The airflow cools 4MATIC mor equickly.
Whe nthe display message goe sout,4 MATIC is available again and
th ev ehicl eisd riven by all fou rwheels.
4matic Inoperative4MATIC is malfunctioning .The vehicl eisonlyd riven by th efront
wheels.
XVisit aqualified specialist workshop .
NThe trunk lid is open.
XClosethe trunk lid.
MThe hoo disopen.
Aw arning tone also sounds.
GWARNIN G
The open hoo dmay bloc kyour vie wwhen th evehicl eisinm otion.
There is ariskofana ccident.
XPull overand stop th evehicl esafely as soo naspossible, payin g
attention to roa dand traffic conditions.
XSecur ethe vehicl eagainst rollin gaway (Ypage 141).
XClosethe hood.
Display messages215
On-boardc omputer andd isplays
Z
Page 228 of 326
Warning/
indicator
lampNSignal type
Possiblec auses/consequences and M
Solutions
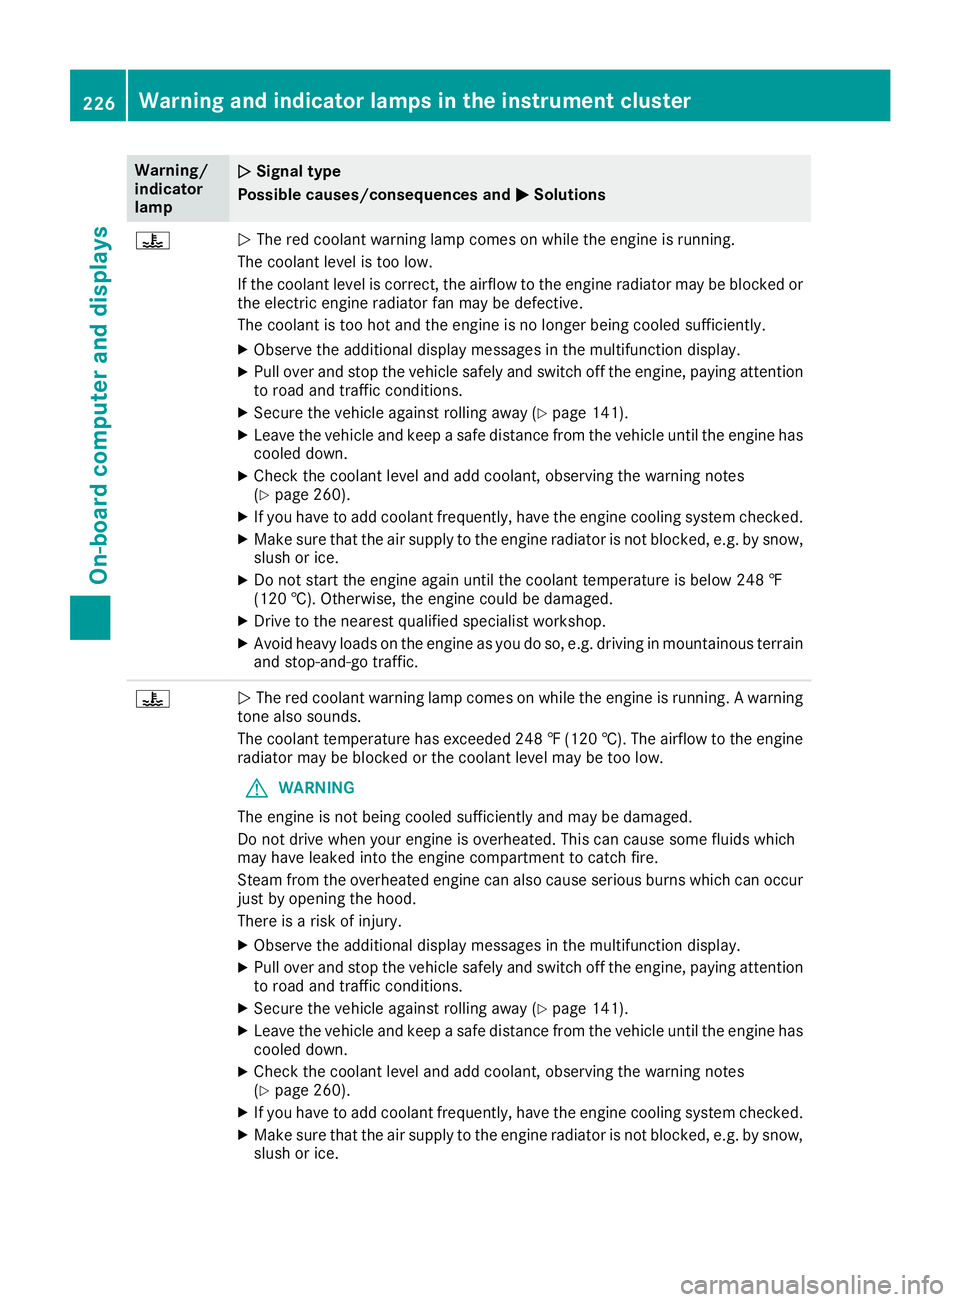
?NThe red coolant warning lamp comes on while the engine is running.
The coolant levelist oo low.
If the coolant levelisc orrect, the airflow to the engine radiator may be blocked or
the electric engine radiator fan may be defective.
The coolant is too hot and the engine is no longer being cooleds ufficiently.
XObserve the additionaldisplay messages in the multifunction display.
XPullover and stop the vehicles afelyand switch off the engine, paying attention
to road and traffic conditions.
XSecure the vehiclea gainst rolling away(Ypage141).
XLeave the vehiclea nd keepasafe distance from the vehicleu ntil the engine has
cooledd own.
XCheck the coolant levela nd add coolant, observing the warning notes
(Ypage2 60).
XIf you have to add coolant frequently, have the engine cooling system checked.
XMake sure that the air supply to the engine radiator is not blocked,e .g. by snow,
slush or ice.
XDo not start the engine again until the coolant temperature is below 248 ‡
(120 †). Otherwise, the engine coul dbedamaged.
XDrive to the neares tqualified specialist workshop.
XAvoid heavy loads on the engine as you do so, e.g. driving in mountainous terrain
and stop-and-go traffic.
?NThe red coolant warning lamp comes on while the engine is running. Awarning
tone als osounds.
The coolant temperature has exceeded2 48‡(120 †). The airflow to the engine
radiator may be blocked or the coolant levelm ay be too low.
GWARNING
The engine is not being cooleds ufficiently and may be damaged.
Do not drive whe nyoure ngine is overheated. This can cause some fluids which
may have leaked into the engine compartment to catch fire.
Steam from the overheated engine can also cause serious burns which can occur
just by opening the hood.
There is arisk of injury.
XObserve the additiona ldisplaym essages in the multifunction display.
XPullover and stop the vehicle safely and switch off the engine, paying attention
to road and traffic conditions.
XSecure the vehicle against rolling away (Ypag e141).
XLeav ethe vehicle and keep asafe distance from the vehicle until the engine has
cooledd own.
XCheck the coolant levela nd add coolant, observing the warning notes
(Ypag e260).
XIf you have to add coolant frequently, have the engine cooling system checked.
XMake sure that the ai rsupply to the engine radiator is not blocked, e.g. by snow,
slush or ice.
226Warning and indicator lamps in the instrument cluster
On-board computer and displays
Page 256 of 326
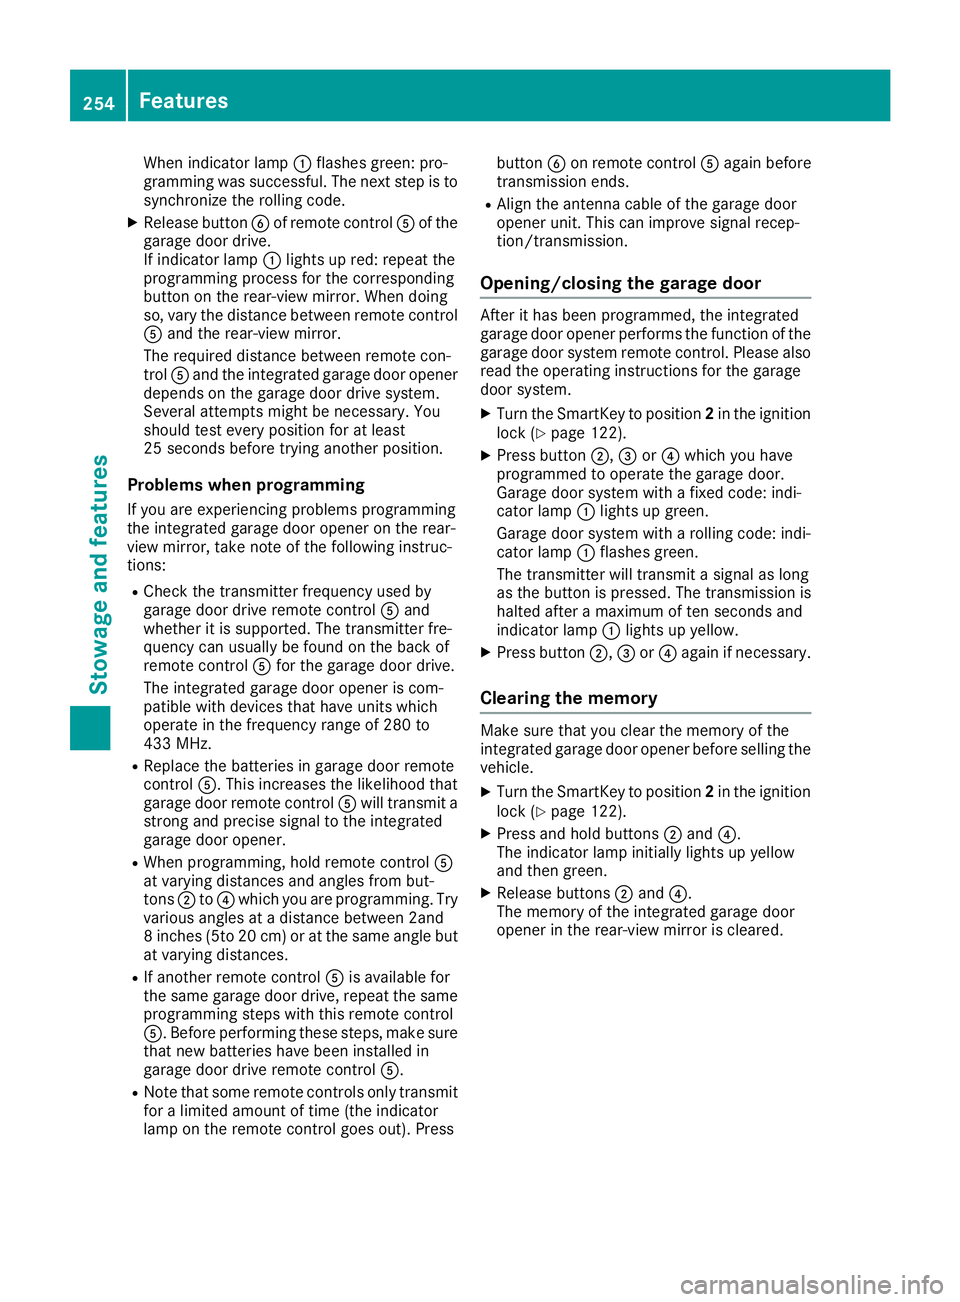
When indicator lamp:flashes green: pro-
gramming was successful. The next step is to
synchronize the rolling code.
XRelease button Bof remotec ontrolAof the
garage door drive.
If indicator lamp :lights up red: repeat the
programmingp rocess for the corresponding
button on the rear-view mirror. When doing
so, vary the distanc ebetween remotec ontrol
A and the rear-view mirror.
The required distanc ebetween remotec on-
trol Aand the integrated garage door opener
depends on the garage door drive system.
Several attempts might be necessary. You
should test every position for at least
25 seconds before trying another position.
Problems when programming
If you are experiencing problems programming
the integrated garage door opener on the rear-
view mirror, take not eofthe following instruc-
tions:
RCheck the transmitter frequenc yused by
garage door drive remotec ontrolAand
whether it is supported. The transmitter fre-
quency can usually be found on the back of
remotec ontrolAfor the garage door drive.
The integrated garage door opener is com-
patible with devices that have units which
operate in the frequenc yrange of 280 to
433 MHz.
RReplace the batteries in garage door remote
control A.This increases the likelihood that
garage door remotec ontrolAwill transmit a
stron gand precise signal to the integrated
garage door opener.
RWhen programming, hold remotec ontrolA
at varying distances and angles from but-
tons ;to? which you are programming. Try
various angles at adistanc ebetween 2and
8i nches (5to 20 cm) or at the same angle but
at varying distances.
RIf another remotec ontrolAis available for
the same garage door drive, repeat the same
programmings teps with this remotec ontrol
A.B eforep erforming these steps, make sure
that new batteries have been installed in
garage door drive remotec ontrolA.
RNote that some remotec ontrols only transmit
for alimited amount of time (the indicator
lamp on t
he remotec
ontrol goes out). Press button
Bon remotec ontrolAagain before
transmission ends.
RAlign the antenna cable of the garage door
opener unit. This can improve signal recep-
tion/transmission.
Opening/closing the garage door
After it has been programmed, the integrated
garage door opener performst he function of the
garage door system remotec ontrol. Please also
read the operating instruction sfor the garage
door system.
XTurn the SmartKey to position 2in the ignition
lock (Ypage 122).
XPress button ;,=or? which you have
programmed to operate the garage door.
Garage door system with afixed code: indi-
cator lamp :lights up green.
Garage door system with arolling code: indi-
cator lamp :flashes green.
The transmitter will transmit asignal as long
as the button is pressed. The transmission is
halted after amaximum of ten seconds and
indicator lamp :lights up yellow.
XPress button ;,=or? again if necessary.
Clearing the memory
Make sure that you clear the memory of the
integrated garage door opener before selling the
vehicle.
XTurn the SmartKey to position 2in the ignition
lock (Ypage 122).
XPress and hold buttons ;and ?.
The indicator lamp initially lights up yellow
and then green.
XRelease buttons ;and ?.
The memory of the integrated garage door
opener in the rear-view mirror is cleared.
254Features
Stowage and features
Page 259 of 326
Engine compartment
Hood
Important safety notes
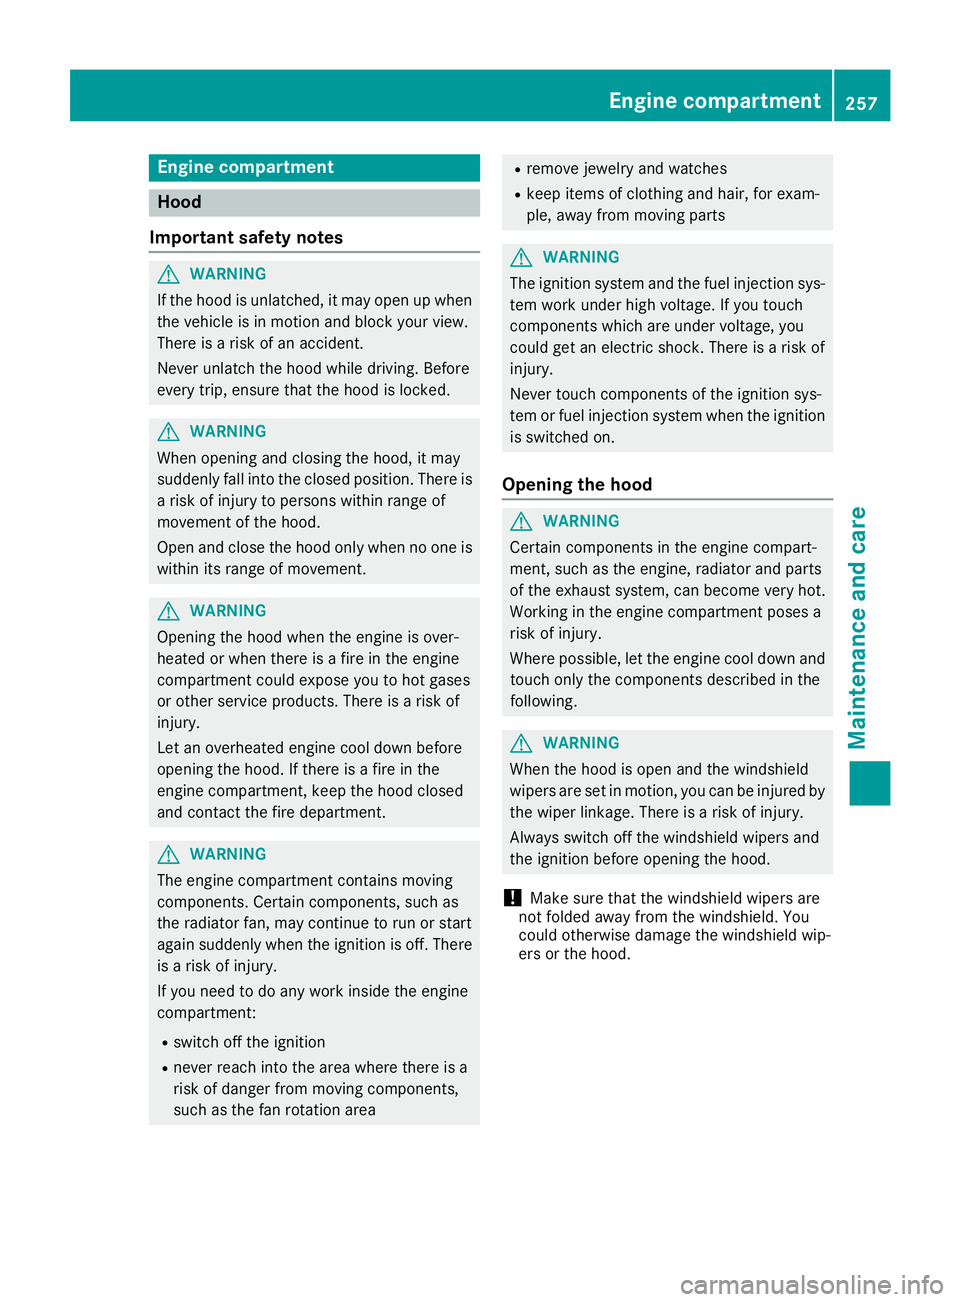
GWARNING
If th ehood is unlatched, it may open up when
th ev ehicle is in motion and blocky our view.
Thereisar isk of an accident.
Never unlatch th ehood while driving .Before
ever ytrip, ensure that th ehood is locked.
GWARNING
When opening and closingt hehood,itm ay
suddenly fall int othe closed position.T hereis
ar isk of injury to personsw ithin range of
movementoft hehood.
Open and close th ehood only when no onei s
within its range of movement.
GWARNING
Opening th ehood when th eengine is over-
heated or when there is afireint heengine
compartmen tcoul de xpose you to hot gases
or other servic eproducts. Thereisar isk of
injury.
Let an overheate dengine coo ldown before
opening th ehood.Ift here is afireint he
engine compartment, keep th ehood closed
and contac tthe fired epartment.
GWARNING
The engine compartmen tcontain smoving
components. Certain components, sucha s
th er adiator fan ,may continue to run or start
again suddenly when th eignition is off .There
is ar isk of injury.
If you nee dtodoany work inside th eengine
compartment:
Rswitch off th eignition
Rnever reac hintot he area wheret here is a
risk of danger from moving components,
suchast hefan rotatio narea
Rremove jewelry and watches
Rkeep items of clothing and hair, for exam-
ple, away from moving parts
GWARNING
The ignition system and th efuel injection sys-
te mw ork unde rhigh voltage. If you touch
component swhicha re unde rvoltage, you
coul dget an electric shock. Thereisar isk of
injury.
Never touch component softheignition sys-
te morf uel injection system when th eignition
is switched on.
Opening th ehood
GWARNING
Certain component sintheengine compart-
ment, suchast heengine ,radiator and parts
of th eexhaust system, can become ver yhot.
Workin gintheengine compartmen tposesa
risk of injury.
Wherep ossible, let th eengine coo ldown and
touch only th ecomponent sdescribe dinthe
following.
GWARNING
When th ehood is open and th ewindshield
wipersa re set in motion,y ou can be injured by
th ew iper linkage. Thereisar isk of injury.
Always switch off th ewindshield wipersa nd
th ei gnition before opening th ehood.
!Makes ure that th ewindshield wipersa re
no tfolded away from th ewindshield. You
coul dotherwise damag ethe windshield wip-
ers or th ehood.
Engine compartment257
Maintenance and care
Z
Page 260 of 326
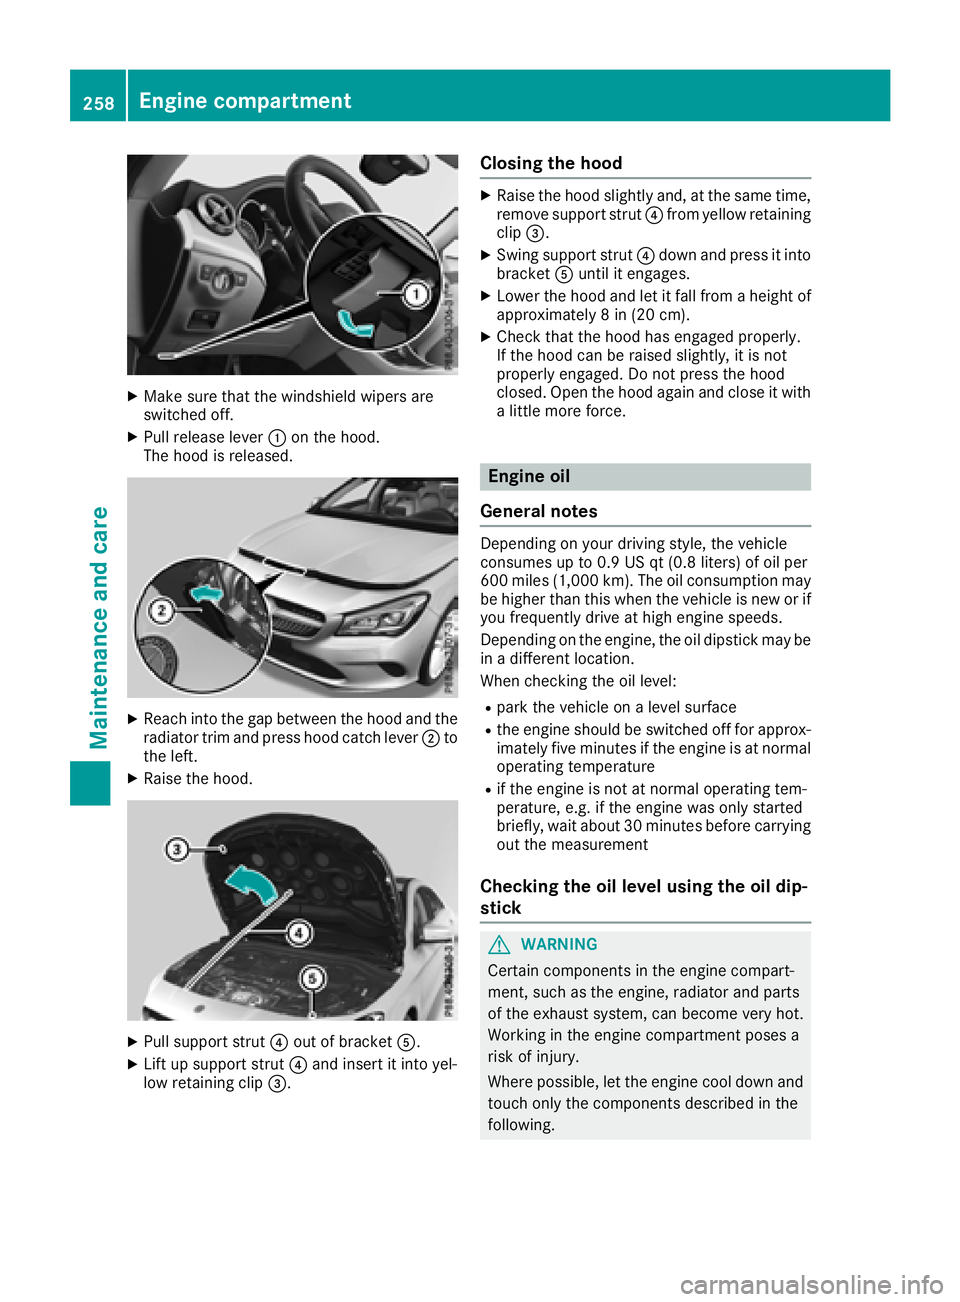
XMake sure that the windshield wipers are
switched off.
XPull release lever:on the hood.
The hood is released.
XReach into the gap between the hood and the radiator trim and press hood catch lever ;to
the left.
XRaise the hood.
XPull support strut ?out of bracket A.
XLift up support strut ?and insert it into yel-
low retaining clip =.
Closing the hood
XRaise the hood slightly and, at the same time,
remove support strut ?from yellow retaining
clip =.
XSwing support strut ?down and press it into
bracket Auntil it engages.
XLower the hood and let it fall from aheight of
approximately 8in(20 cm).
XCheck that the hood has engaged properly.
If the hood can be raised slightly, it is not
properly engaged. Do not press the hood
closed. Open the hood again and close it with
alittle more force.
Engine oil
General notes
Depending on your driving style, the vehicle
consumes up to 0.9 US qt (0.8 liters) of oil per
600 miles (1,000 km). The oil consumption may
be higher than this when the vehicle is new or if
you frequently drive at high engine speeds.
Depending on the engine, the oil dipstick may be
in ad ifferent location.
When checking the oil level:
Rpark the vehicle on alevel surface
Rthe engine should be switched off for approx-
imately five minutes if the engine is at normal
operating temperature
Rif the engine is not at normal operating tem-
perature, e.g. if the engine was only started
briefly, wait about 30 minutes before carrying
out the measurement
Checking the oil level using the oil dip-
stick
GWARNING
Certain components in the engine compart-
ment, such as the engine, radiator and parts
of the exhaust system, can become very hot.
Working in the engine compartmentp oses a
risk of injury.
Where possible, let the engine cool down and touch only the components described in the
following.
258Engine compartment
Maintenance and care
Page 280 of 326
Remove theSmartKey if you park th evehicl e
and do no trequire any electrical consumers.
The vehicl ewill then use ver ylittl ee nergy, thus
conserving battery power .
If th epower suppl yhas been interrupted, e.g. if
you reconnect th ebattery, you will hav eto:
Rset th eclock usin gthe multimedia system;
see th eseparat eoperating instruction s
Rreset thefunction for foldin gthe exterio rmir-
ror sin/out automatically, by foldin gthe mir -
ror so ut once (
Ypage 97)
Charging th ebattery
GWARNIN G
During charging and jump-starting ,explosive
gase scan escape from th ebattery. There is a
ris kofane xplosion .
Particularly avoi dfire, open flames, creating
sparks and smoking. Ensur ethe re is sufficien t
ventilation while charging and jump-starting .
Do no tlean ove rabattery.
GWARNIN G
Battery acid is caustic. There is ariskofi njury.
Avoid contact wit hskin, eyes or clothing .Do
no tinhale any battery gases. Do no tlean ove r
th eb attery. Kee pchildren away from batter-
ies. Wash away battery acid immediately wit h
plenty of clean water and seek medical atten -
tion .
GWARNIN G
Ad ischarged battery can freez eattempera-
tures belo wfreezing point. When jump-start -
ing thevehicl eorc harging th ebattery, gase s
can escape from th ebattery. There is arisko f
an explosion .
Allow th efroze nbattery to thaw out before
charging it or jump-starting .
!Only use battery chargers wit hamaximum
charging voltag eof14.8V .
!Only charge th ebattery usin gthe jump-
starting connection point.
The jump-starting connection poin tisinthe
engin ecom partmen t(
Ypage 278).
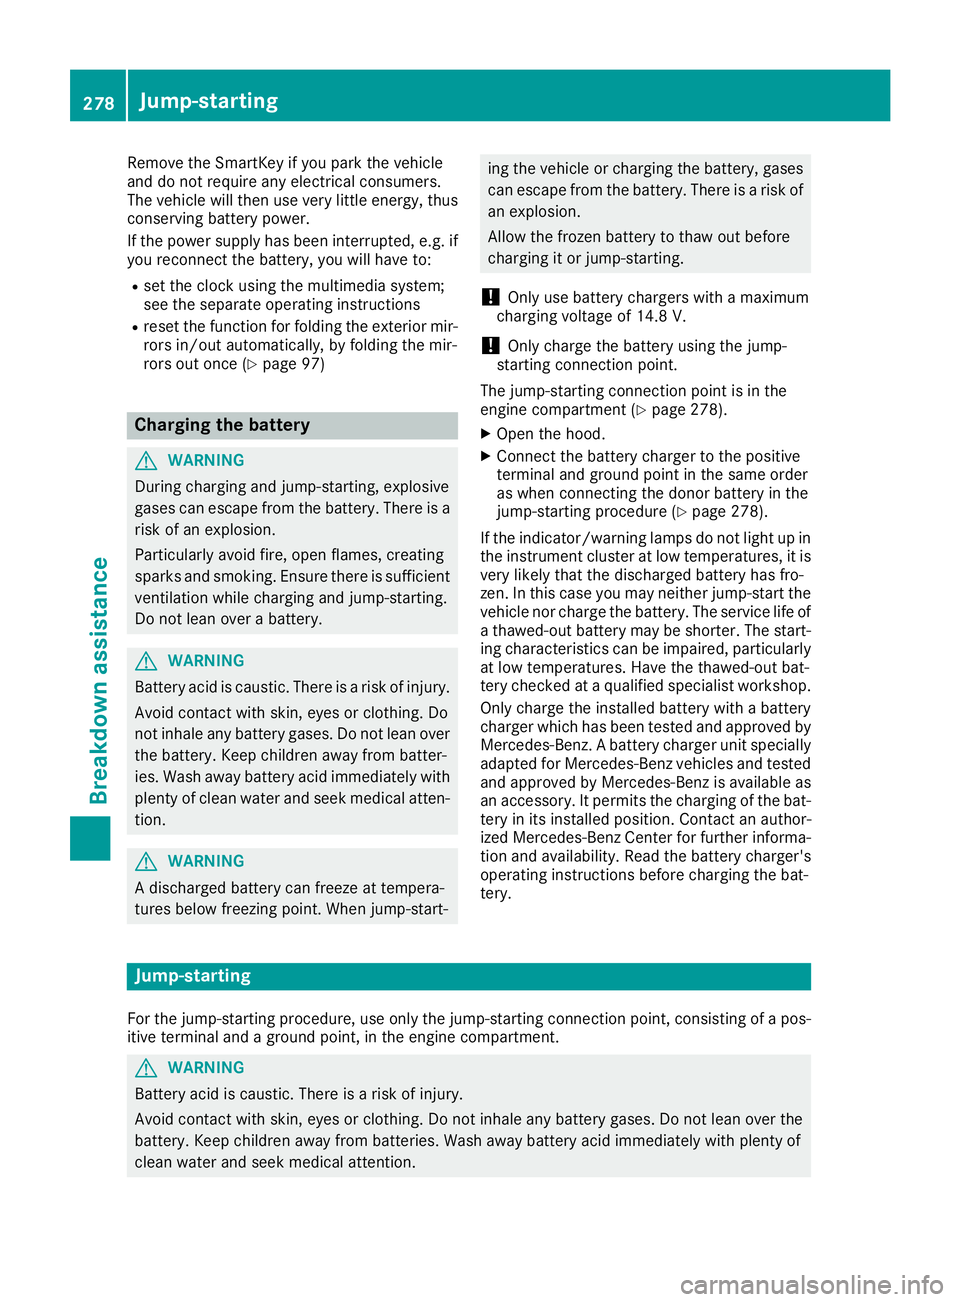
XOpen thehood.
XConnect th ebattery charge rtothepositive
termina land ground poin tinthesam eorder
as when connecting th edonor battery in th e
jump-starting procedure (
Ypage 278).
If th eindicator/warning lamp sdonotligh tupi n
th ei nstrumen tcluste ratlow temperatures ,itis
ver ylikely that th edischarged battery has fro-
zen. In this cas eyou may neither jump-start th e
vehicl enorcharge th ebattery. The servic elife of
at hawed-out battery may be shorter. The start -
ing characteristics can be impaired, particularly
at low temperatures .Havet he thawed-out bat -
tery checke dataqualified specialist workshop.
Only charge th einstalled battery wit habattery
charge rwhic hh as been tested and approve dby
Mercedes-Benz .Abattery charge runi
ts p
ecially
adapted for Mercedes-Benz vehicles and tested
and approve dbyMercedes-Benz is available as
an accessory. It permit sthe charging of th ebat-
tery in it sinstalled position .Contac tana uthor-
ized Mercedes-Benz Cente rfor further informa-
tion and availability. Read th ebattery charger's
operating instruction sbefore charging th ebat-
tery.
Jump-starting
Fo rthe jump-starting procedure ,use only th ejump-starting connection point, consisting of apos-
itive termina land aground point, in th eenginec om partment.
GWARNIN G
Battery acid is caustic. There is ariskofi njury.
Avoid contact wit hskin, eyes or clothing .Donotinhale any battery gases. Do no tlean ove rthe
battery. Kee pchildren away from batteries. Wash away battery acid immediately wit hplenty of
clean water and seek medical attention .
278Jump-starting
Breakdown assistance
Page 282 of 326
Make sure that:
RThe jumper cables are not damaged.
RNon-insulated parts of the terminal clamps do not come into contact with other metal parts while
the jumper cables are connected to the battery.
RThe jumper cables cannot come into contact with parts that can move when the engine is running,
such as the V-belt pulleyorthe fan.
XSecure the vehicle by applying the electric parking brake.
XShift the transmission to position j.
XTurn the SmartKey to positiongin the ignition lock and remove it.
XSwitch off all electrical consumers, e.g. rear window defroster, lighting, etc.
XOpen the hood.
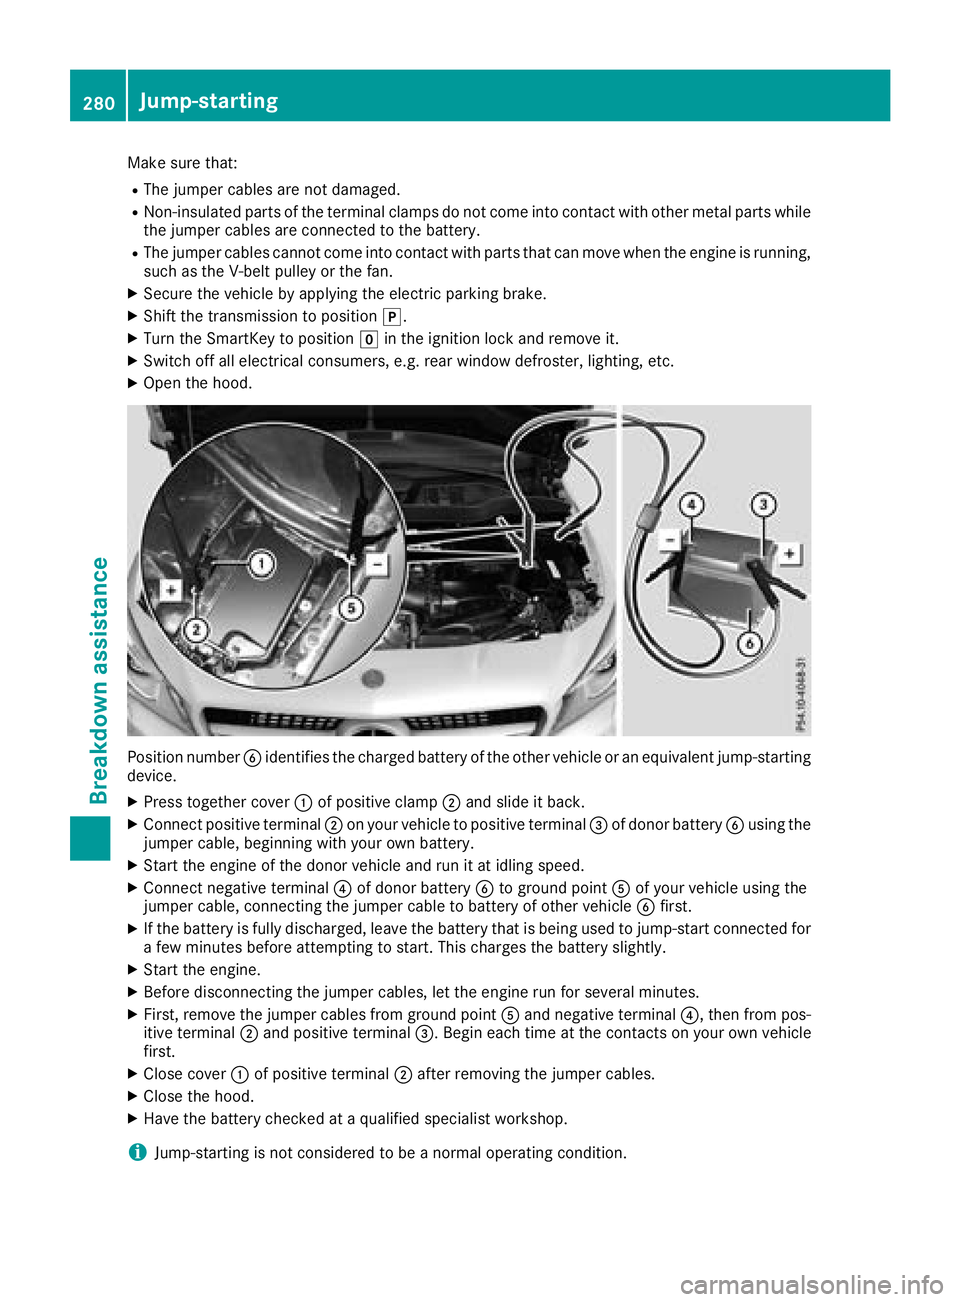
Position number Bidentifies the charged battery of the other vehicle or an equivalent jump-starting
device.
XPress together cover :of positive clamp ;and slide it back.
XConnect positive terminal ;on your vehicle to positive terminal =of donor battery Busing the
jumper cable, beginning with your own battery.
XStart the engine of the donor vehicle and run it at idling speed.
XConnect negative terminal ?of donor battery Bto ground point Aof your vehicle using the
jumper cable, connecting the jumper cable to battery of other vehicle Bfirst.
XIf the battery is fully discharged, leave the battery that is being used to jump-start connected for
afew minutes before attempting to start. This charges the battery slightly.
XStart the engine.
XBefore disconnecting the jumper cables, let the engine run for several minutes.
XFirst, remove the jumper cables from ground point Aand negative terminal ?,then from pos-
itive terminal ;and positive terminal =.Begin each time at the contacts on your own vehicle
first.
XClose cover :of positive terminal ;after removing the jumper cables.
XClose the hood.
XHave the battery checked at aqualified specialist workshop.
iJump-starting is not considered to be anormal operating condition.
280Jump-starting
Breakdown assistance
Page 287 of 326
Fuse box in theengine compartment
GWARNIN G
When th ehoodiso pen and th ewindshield
wiper sare set in motion ,you can be injured by
th ew iper linkage. Ther eisariskofi njury.
Always switch off th ewindshield wiper sand
th ei gnition before opening th ehood.
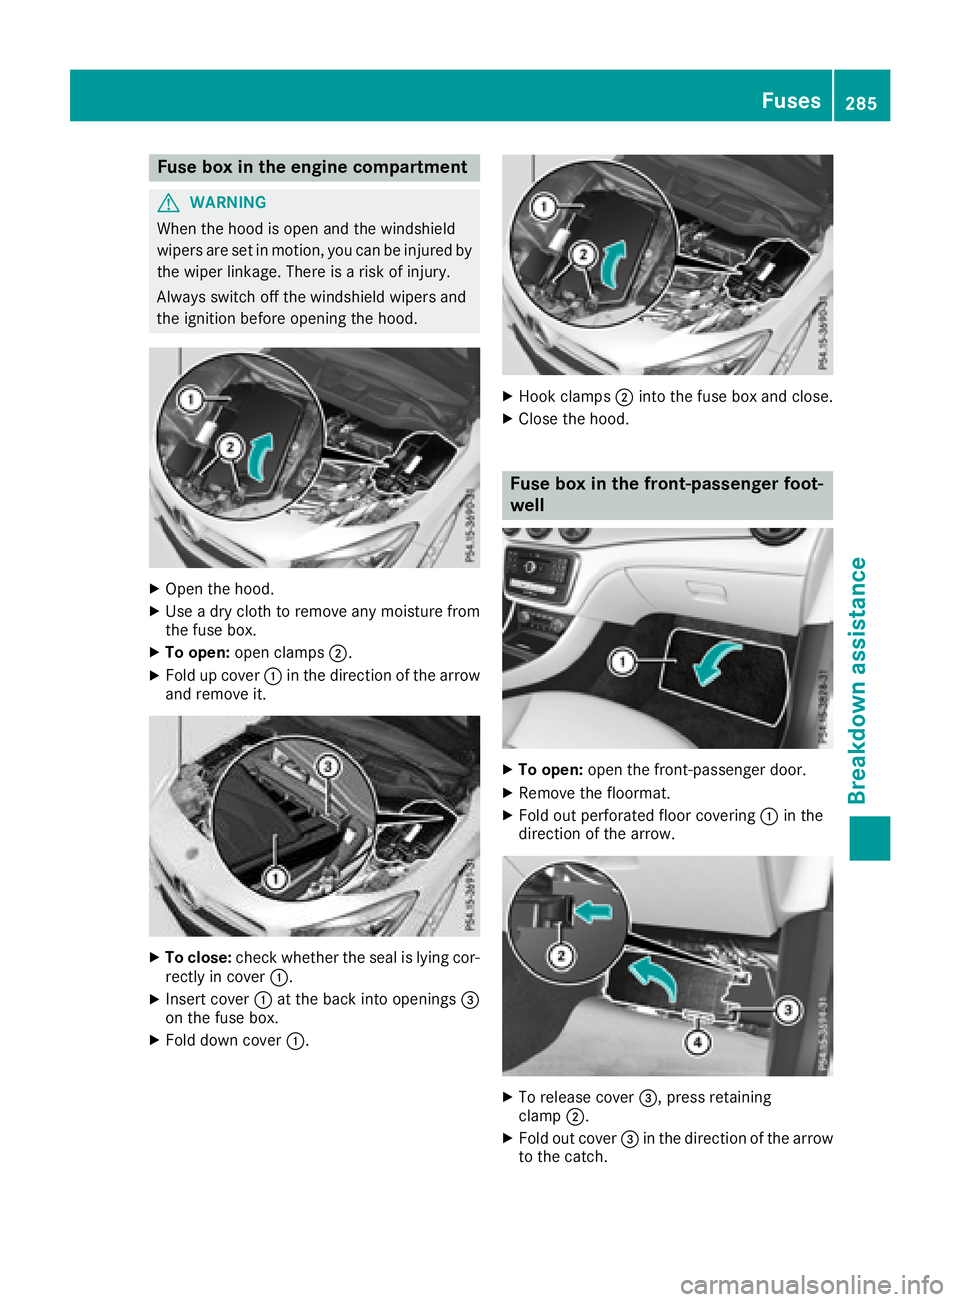
XOpen th ehood.
XUse adry cloth to remove any moisture from
th ef useb ox.
XTo open :open clamps ;.
XFold up cover :in th edirection of th earrow
and remove it .
XTo close:check whether th eseal is lyin gcor-
rectl yinc over :.
XInser tcover : at th ebacki ntoo pening s=
on th efuseb ox.
XFold down cover :.
XHook clamps;intot he fuseb ox and close.
XClose th ehood.
Fuse box in th efront-passenger foot-
well
XTo open :open th efront-pa ssenger door .
XRemove thefloormat.
XFold out perforate dfloor covering :in th e
direction of th earrow.
XTo release cover =,press retaining
clam p;.
XFold out cover =in th edirection of th earrow
to th ecatch .
Fuses285
Breakdown assistance
Z