2018 MERCEDES-BENZ CLA COUPE flat tire
[x] Cancel search: flat tirePage 274 of 326
system (Canadaonly) or tire pressure monitor
(USA only).
If ap ressure loss warning message appears
in the multifunction display:
Robserve the instructions in the displaym es-
sages (Ypage 211).
Rcheck the tire for damage
Rif driving on, observe the following notes
The driving distance possible in run-flat mode is
approximately 50 miles (80 km) when the vehi-
cle is partiallyl aden. When the vehicle is fully
laden it is approximately 19 miles (30 km).
In addition to the vehicle load, the driving dis-
tance possible depends upon:
Rvehicle speed
Rroad condition
Routside temperature
The driving distance possible in run-flat mode
may be reduced by extreme driving conditions
or maneuvers, or it can be increased through a
moderate style of driving.
The driving distance possible in run-flat mode is
counted from the moment the tire pressure loss
warning appears in the multifunction display.
You must not exceed amaximum speed of
50 mph (80 km/h).
When replacing one or all tires, please observe
the following specifications for your vehicle's
tires:
Rsize
Rtype and
Rthe "MOExtended" marking
If at ire has gone flat and cannot be replaced
with aMOExtended tire, astandard tire may be
used as atemporary measure. Make sure that
you use the proper size and type (summer or
winter tire).
Vehicles equipped with MOExtended tires are
not equipped with aTIREFIT kit at the factory. It
is therefore recommended that you additionally
equip your vehicle with aTIREFIT kit if you mount
tires that do not feature run-flat properties, e.g.
winter tires. ATIREFIT kit may be obtained from
aq ualified specialist workshop.
Important safety notes
GWARNING
When driving in emergency mode, the driving
characteristics deteriorate, e.g. when corner-
ing, accelerating quickly and when braking.
There is arisk of an accident.
Do not exceed the stated maximum speed.
Avoid abrupt steering and driving maneuvers, and driving over obstacles (curbs, potholes,
off-road). This applies in particular to aladen
vehicle.
Stop driving in emergency mode if:
Ryou hear banging noises.
Rthe vehicle starts to shake.
Ryou see smoke and smell rubber.
RESP®is intervenin gconstantly.
Rthere are tears in the sidewalls of the tire.
After driving in emergency mode, have the
wheel rims checked at aqualified specialist
workshop with regard to their further use. The
defective tire must be replaced in every case.
TIREFIT kit
Important safety notes
TIREFIT is atire sealant.
Only valid for USA: You can use TIREFIT to seal
punctures of up to 0.16 in (4 mm), particularly
those in the tire tread. You can use TIREFIT at
outside temperatures down to Ò4‡(Ò20 †).
GWARNING
In the following situations, the tire sealant is
unable to provide sufficient breakdown assis-
tance, as it is unable to seal the tire properly:
Rthere are cuts or punctures in the tire larger
than those mentioned above.
Rthe wheel rim is damaged.
Ryou have driven at very low tire pressures or on aflat tire.
There is arisk of an accident.
Do not drive the vehicle. Contact aqualified
specialist workshop.
GWARNING
The tire sealant is harmful and causes irrita-
tion. It must not come into contact with your
skin, eyes or clothing or be swallowed. Do not
272Flat tire
Breakdown assistance
Page 275 of 326
inhale TIREFIT fumes.Keep tiresealant away
fromc hildren. There is arisk of injury.
If you com eintoc ontac twith the tir esealant,
observe the following:
RRinse off the tir esealant fromy our skin
immediately with water.
RIf the tir esealant comes int ocontac twith
your eyes, immediately rinse the mthor-
oughly with clean water.
RIf tir esealant is swallowed, immediately
rinse your moutho ut thoroughly and drink
plent yofw ater.Don ot induc evomiting,
and seek medical attention immediately.
RImmediately change out of clothing which
has com eintoc ontac twith tir esealant.
RIf an allergic reaction occurs, seek medical
attention immediately.
!Residue fromt he tiresealant may com eout
of the filler hose after use. This could cause
stains.
Therefore, place the filler hose in the plastic
bag which contained the TIREFIT kit.
HEnvironmental note
Have the used tir esealant bottle disposedo f
professionally, e.g. at aqualified specialist
workshop.
!Do not operatet he tireinflation compressor
for longer than ten minutes at atimew ithout
ab reak.Itm ay otherwise overheat.
The tir einflation compressor can be operated
again onc eithas coole ddown.
Comply with the manufacturer’s safetyi nstruc-
tion sont he sticker on the tir einflation com-
pressor.
Using th eTIREFIT kit
XDo not remove any foreign object swhich have
penetrate dthe tire, e.g. screws or nails.
XUSA only: Remove the tir esealant bottle, the
accompanying TIREFIT sticker and the tire
inflation compressor fromt he stowage space
under the trunk floor (
Ypage 271).
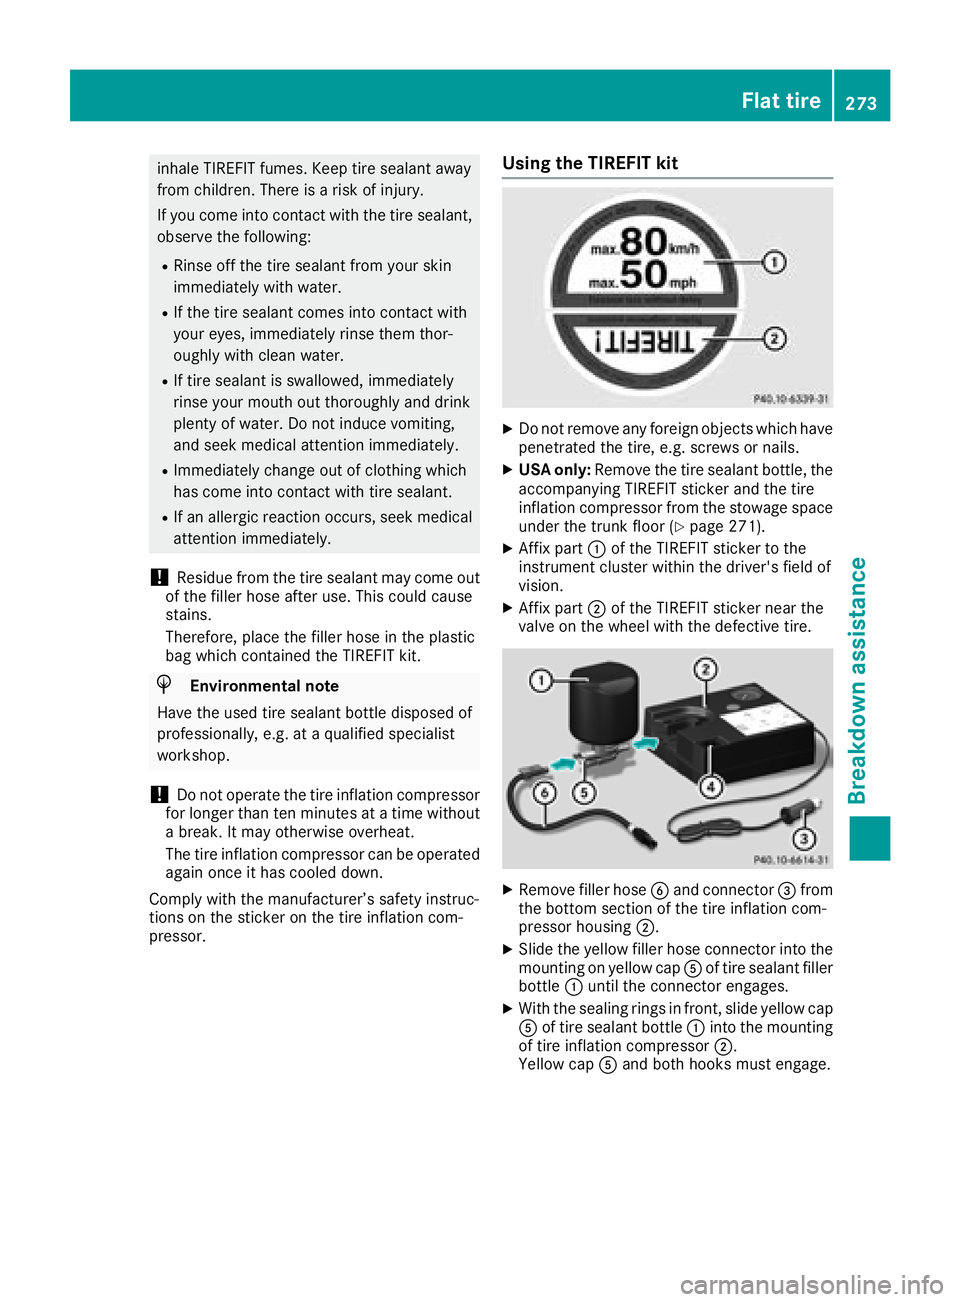
XAffix part :of the TIREFIT sticker to the
instrumentc luster within the driver's field of
vision.
XAffix part ;of the TIREFIT sticker near the
valve on the wheel with the defectiv etire.
XRemove filler hose Band connector =from
the bottom section of the tir einflation com-
pressor housing ;.
XSlide the yellow filler hose connector int othe
mountin gonyellow cap Aof tir esealant filler
bottle :until the connector engages.
XWith the sealing rings in front ,slide yellow cap
A of tir esealant bottle :intothe mounting
of tir einflation compressor ;.
Yellow cap Aand both hooksm ust engage.
Flat tire273
Breakdown assistance
Z
Page 276 of 326
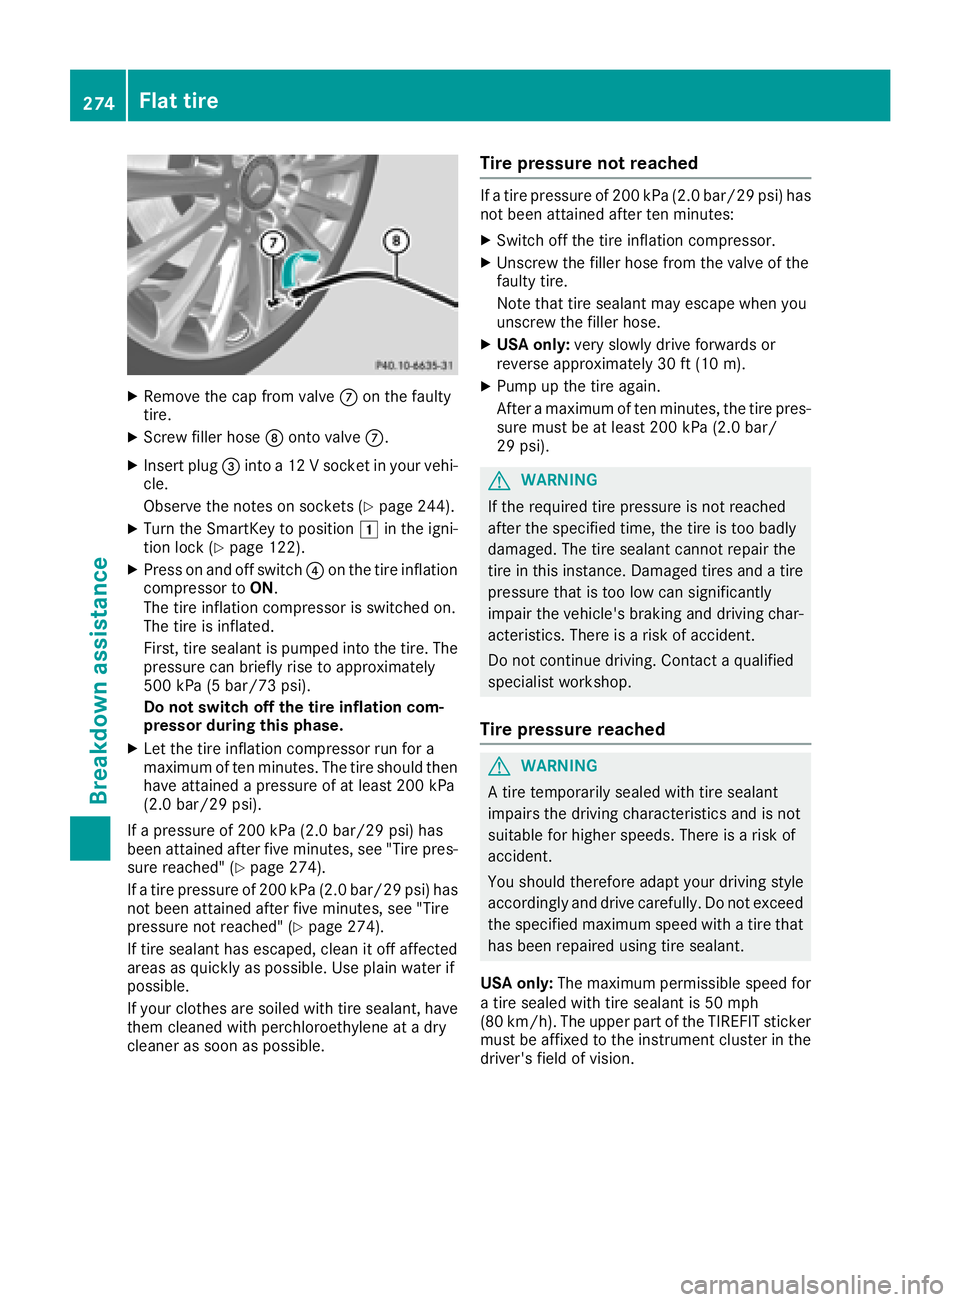
XRemove thecap from valv eC on th efault y
tire.
XScrew filler hos eD onto valv eC.
XInser tplug =intoa12Vs ocketinyour vehi-
cle .
Observ ethe note sons ockets (
Ypage 244).
XTurn theSmartKey to position 1in th eigni-
tion loc k(Ypage 122).
XPress on and off switch ?on th etirei nflation
compressor to ON.
The tire inflation compressor is switched on .
The tire is inflated.
First ,tires ealan tispumped int othe tire. The
pressur ecan briefly ris etoapproximately
50 0k Pa(5 bar/73 psi) .
Do not switch off th etirei nflation com -
pressor during this phase .
XLet thetirei nflation compressor run for a
maximum of te nminutes. The tire should then
hav eattained apressur eofatl east 200kPa
(2.0 ba r/29 psi) .
If ap ressur eof200 kP a(2.0 ba r/29 psi) ha s
been at tained after fiv eminutes, see" Tire pres-
sure reached" (
Ypage 274).
If at ire pressure of 200 kPa (2.0 bar/29 psi) has
not been attaine dafter fiv eminutes, see" Tire
pressure not reached" (
Ypage 274).
If tire sealant hase scaped ,clean it off affected
area sasq uickl yasp ossible. Use plai nwater if
possible.
If your clothesa resoile dwitht ire seala
nt, have
themc leanedwithp erchloroethylene at adry
cleane rassoona spossible.
Tire pressure no treached
Ifat ire pressure of 200 kPa (2.0 bar/29p si)h as
not been attaine dafter ten minutes:
XSwitch off the tire inflatio ncompressor.
XUnscrew the fille rhosef romt he valve of the
faulty tire.
Note thatt ire sealant maye scap ew heny ou
unscrew the fille rhose.
XUS Ao nly: veryslowl ydrive forwards or
revers eapproximately 30 ft (10 m).
XPump up the tire again.
After amaximum of ten minutes, the tire pres-
sure must be at leas t200 kPa (2.0 ba r/
29 psi) .
GWARNING
If the required tire pressure is not reached
afte rthe specified time ,the tire is too badly
damaged. The tire sealant cannot repai rthe
tire in this instance. Damaged tire sand atire
pressure that is too low can significantly
impai rthe vehicle's braking and driving char-
acteristics. There is ariskofa ccident.
Do not continu edriving .Contact aquali fied
specialist workshop.
Tire pressure reached
GWARNING
At ire temporaril yseale dwitht ire sealant
impairs the driving characteristics and is not
suitablef or higher speeds .There is arisko f
accident.
You shoul dtherefore adap tyou rd riving style
accordingly and drive carefully .Donot exceed
the specified maximum speed with atire that
hasb eenr epaired using tire sealant.
USA only: The maximum permissible speed for
at ire seale dwitht ire sealant is 50 mph
(80 km/h). The upper part of the TIREFIT sticker
mus tbea ffixed to the instrument cluster in the
driver'sf ield of vision.
274Flat tire
Breakdown assistance
Page 277 of 326
Ifat ire pressure of 200 kPa (2.0 bar/29 psi) has
been attained after ten minutes:
XSwitch off the tire inflation compressor.
XUnscrew the fillerh ose from the valve of the
faulty tire.
Note that tire sealant may escape when you
unscrew the fillerh ose.
XUSA only:Stow the tire sealant bottle and the
tire inflation compressor.
XPull away immediately.
XStop after driving for approximately ten
minutes and check the tire pressure with the
tire inflation compressor.
The tire pressure must now be at least
130 kPa (1.3 bar/19 psi).
GWARNING
If the required tire pressure is not reached
after driving for ashort period,t he tire is too
badlyd amaged. The tire sealant cannot repair
the tire in this instance. Damaged tires and a
tire pressure that is too low can significantly
impair the vehicle's braking and driving char-
acteristics. There is arisk of accident.
Do not continue driving. Contact aqualified
specialist workshop.
iUSA only: In cases such as the one men-
tioned above,c ontact an authorized
Mercedes-Benz Center. Or call
1-800-FOR-MERCedes (in the USA) or
1-800-387-0100 (in Canada).
XUSA only: Correct the tire pressure if it is still
at least 130 kPa (1.3 bar/19 psi). See the Tire
and Loading Information placard on the driv-
er's side B-pillarort he tire pressure table in
the fuel fillerf lap for values.
XTo increase the tire pressure: switch on the
tire inflation compressor.
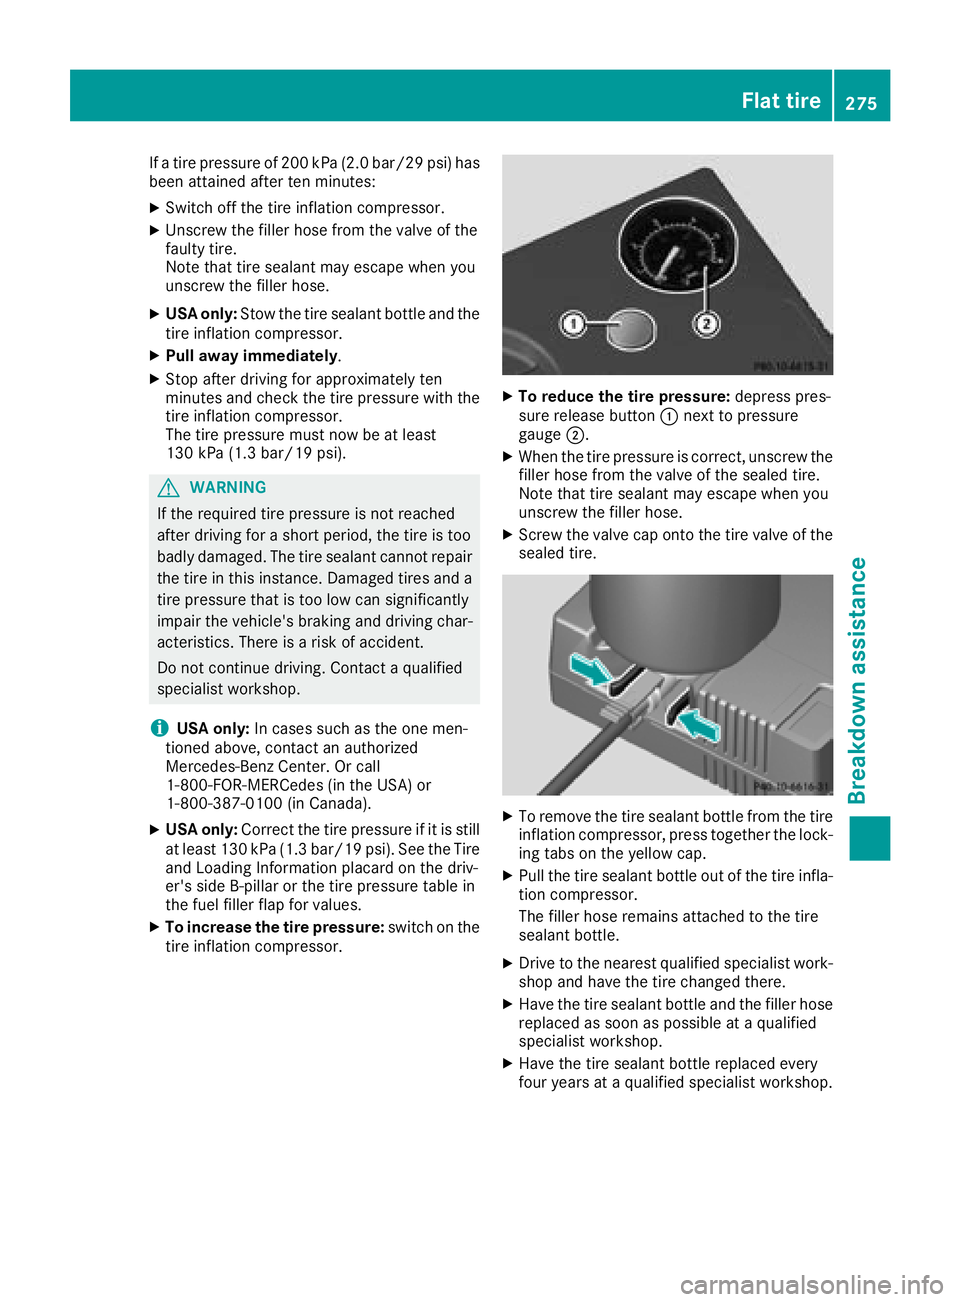
XTo reduce the tire pressure: depresspres-
sure release button :next to pressure
gauge ;.
XWhen the tire pressure is correct, unscrew the
fillerhose from the valve of the sealed tire.
Note that tire sealant may escape when you
unscrew the fillerh ose.
XScrew the valve cap onto the tire valve of the
sealed tire.
XTo remove the tire sealant bottle from the tire
inflation compressor, press together the lock-
ing tabs on the yellow cap.
XPullthe tire sealant bottle out of the tire infla-
tion compressor.
The fillerh ose remains attached to the tire
sealant bottle.
XDrive to the nearest qualifieds pecialist work-
shop and have the tire changed there.
XHave the tire sealant bottle and the fillerh ose
replaced as soon as possible at aqualified
specialist workshop.
XHave the tire sealant bottle replaced every
four years at aqualifieds pecialist workshop.
Flat tire275
Breakdowna ssistance
Z
Page 284 of 326
Asarule, yous houl dhavet he vehicl etrans-
ported.
RTowing the vehicl ewithat ow ropeort ow bar.
Onlyt ow the vehicl einexceptionalc ases.
The battery must be connected and charged.
Otherwise, you:
Rcanno tturn the SmartKeytop osition2in
the ignition lock.
Rcanno trelease the electri cparking brake.
Rcanno tshift the transmission to position i.
The functio nofthe electri cparking brake and
the parking lock is dependent on the on-board
voltage.
If the on-board voltag eislowor if ther eisasys-
tem malfunction:
Rthe electri cparking brake mayn ot be applied
in certain circumstances ,or
Rit maynol ongerbep ossibl etos hift the trans-
mission to position j
Switch off non-essentia lconsumers, e.g .the
radio.
Disar mthe automatic locking feature before the
vehicl eistowed (
Ypage 187). Yo ucould other-
wise be locked outw henp ushing or towing the
vehicle.
Installing/removin gthe towin geye
Installing the towin geye
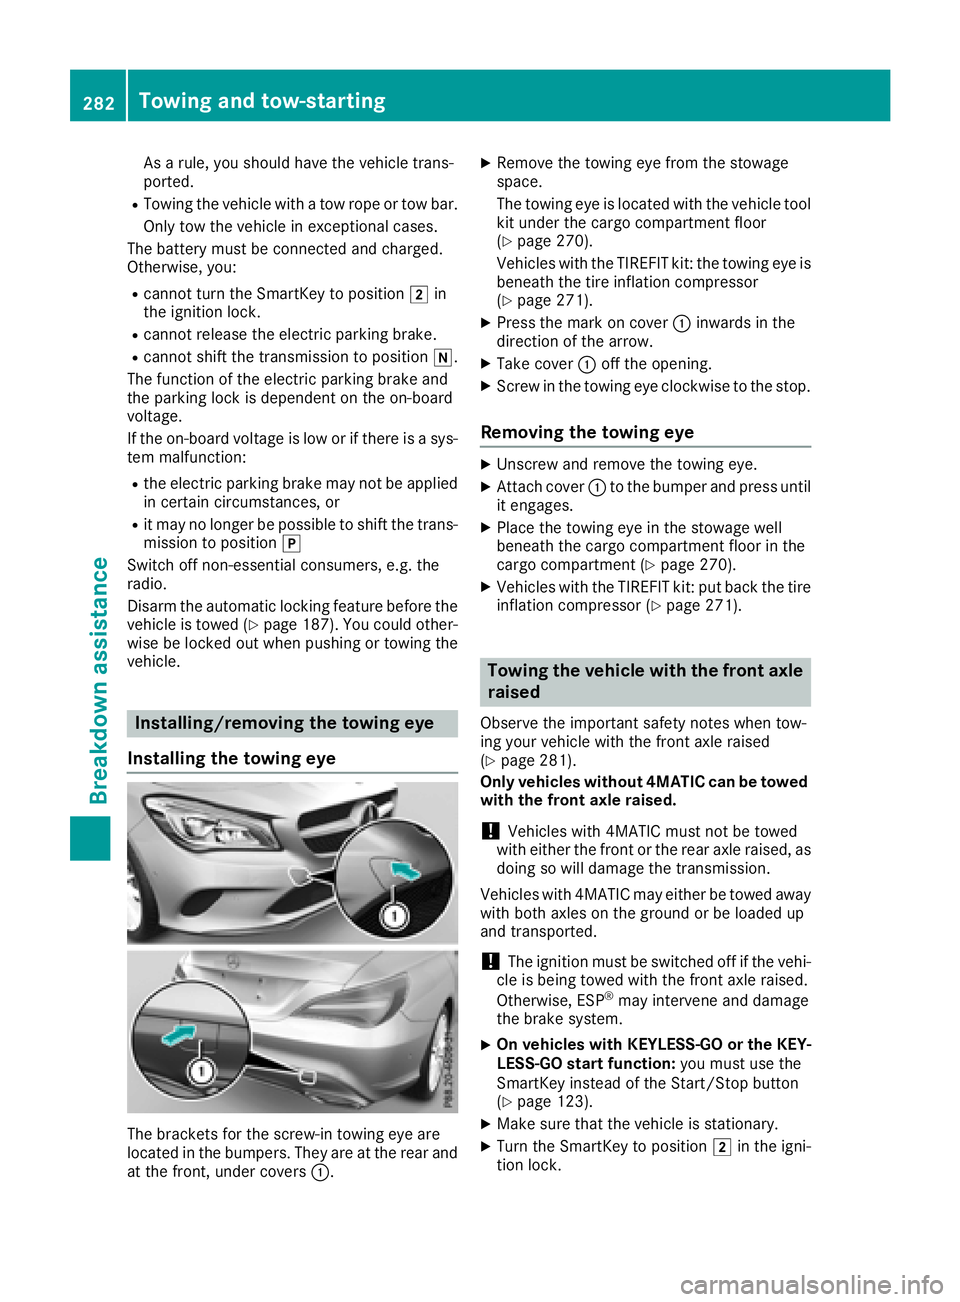
The brackets for the screw-i ntowing ey eare
locate dinthe bumpers. The yareat the rea rand
at the front, under covers :.
XRemove the towing eyefrom the stowage
space.
The towing ey eislocate dw itht he vehicl etool
kit under the cargo compartment floor
(
Ypage 270).
Vehicles with the TIREFIT kit: the towing ey eis
beneath the tire inflation compressor
(
Ypage 271).
XPress the mark on cover :inwards in the
direction of the arrow.
XTake cover :off the opening.
XScrew in the towing ey eclockwise to the stop.
Removing the towin geye
XUnscrew and remove the towing eye.
XAttach cover :to the bumpe rand press until
it engages.
XPlace the towing ey einthe stowag ewell
beneath the cargo compartment floor in the
cargo compartment (
Ypage 270).
XVehicles with the TIREFIT kit: pu tbackt he tire
inflation compressor (Ypage 271).
Towin gthe vehicle with the fron taxle
raised
Observ ethe important safety notes when tow-
ing your vehicl ewitht he front axl eraised
(
Ypage 281).
Only vehicle swithou t4MATIC can be towed
with the fron taxler aised.
!Vehicles with 4MATIC must not be towed
with either the front or the rea raxler aised, as
doing so will damage the transmission.
Vehicles with 4MATIC maye ither be towed away
with both axles on the ground or be loaded up
and transported.
!The ignition must be switched off if the vehi-
cle is being towed with the front axl eraised.
Otherwise, ESP
®mayi ntervene and damage
the brake system.
XOn vehicle swithK EYLESS -GO or the KEY-
LESS-GO start function: youm ustu se the
SmartKeyi nsteadofthe Start/Stop button
(
Ypage 123).
XMake sure thatt he vehicleisstationary.
XTurn the SmartKeytop osition 2in the igni-
tio nlock.
282Towin gand tow-starting
Breakdo wn assis tance
Page 289 of 326
Important safety notes
GWARNING
If wheels and tires of th ewrong siz eare used,
th ew hee lbrakes or suspension component s
may be damaged. Ther eisariskofana cci-
dent.
Always replace wheels and tires wit hthose
that fulfill th especification softheoriginal
part .
When replacing wheels, mak esuretou se the
correct:
Rdesignation
Rmodel
When replacing tires ,makes uretou se the
correct:
Rdesignation
Rmanufacturer
Rmodel
GWARNIN G
Af lat tire severely impairs th edriving ,steer -
ing and braking characteristics of th evehicle.
Ther eisar iskofa ccident.
Tires without run-flat characteristics :
Rdo notdrivew ithaf lat tire.
Rimmediately replace th eflat tire wit hyour
emergenc yspar ew hee lors parew heel, or
consult aqualified specialist workshop.
Tires wit hrun-flat characteristics :
Rpay attention to theinformation and warn -
ing notice sonMOExtended tires (tire swith
run-flat characteristics).
Accessories that are no tapprove dfor your vehi-
cle by Mercedes-Ben zorare notbein gused cor-
rectl ycan impair th eoperating safety.
Before purchasing and usin gnon-ap proved
accessories, visit aqualified specialist work-
sho pand inquire about :
Rsuitability
Rlegal stipulation s
Rfactory recommendation sFurther information regarding wheels and tires
can be foun
dunder "Wheel/tire combinations"
(
Ypage 312).
You can ask for information regarding permitte d
wheel/tire combination satanauthorized
Mercedes-Ben zCenter.
Information on tire pressur ecan be found:
Ron th eTirea nd Loading Information placard
on th eB-pillar on th edriver' sside
(
Ypage 298)
Rin th etirep ressur etable in th efuel filler flap
(Ypage 139)
Runder "Tir epressure" (Ypage 290)
Operation
Information on driving
Checkthe tire pressur ewhen th evehicl eis
heavily laden and adjust prio rtoatrip.
While driving ,pay attention to vibrations, noises
and unusual handlin gcharacteristics ,e.g.p ull-
ing to on eside .This may indicat ethatthe
wheels or tires are damaged. If you suspec ttha t
at ireisd efective, reduce your spee dimmedi-
ately. Stop th evehicl eass oonasp ossible to
chec kthe wheels and tires for damage. Hidden
tire damag ecould also be causing th eunusual
handlin gcharacteristics .Ifyou fin dnos ignsof
damage, hav ethe tires and wheels checke data
qualified specialist workshop.
When parking your vehicle, mak esuret hatthe
tires do no tget deformed by th ecurboro ther
obstacles. If they canno tbeavoided, driv eover
obstacles suc hascurbs slowly and at an obtuse
angle. Otherwise, you may damag ethe wheels
or tires .
Regula rchecking of wheels and tires
GWARNIN G
Damaged tires can caus etirei nflation pres-
sur eloss .Asar esult,you could lose control of
your vehicle. Ther eisariskofa ccident.
Chec kthe tires regularly for sign sofdamage
and replace any damaged tires immediately.
Operation287
Wheels and tires
Z
Page 290 of 326
Checkwheelsand tires for damag eatleast once
am onth .Checkw heelsa nd tires after driving
off-road or on roug hroads. Damaged wheels
can caus ealoss of tir epressure. Pay particular
attentio ntodamagesucha s:
RCutsinthet ires
RPunctures inthet ires
RTearsint hetires
RBulges on tires
RDeformation or severe corrosiononw heels
Regularly check thetiret read dept hand the
conditio nofthetread across th ewhole widthof
th et ire(
Ypage 288). Ifnecessary, tur nthe
frontw heelstof ull lockino rder to inspectt he
inner sideof thetires urface.
All wheelsm ust haveavalvec ap to protect the
valv eagainst dirtand moisture. Do no tmount
anythingo ntot he valv eother than th estandard
valv ecap or other valv ecaps approved by
Mercedes-Ben zfor your veh icle.Don otuse any
other valv ecaps or systems ,e.g.t irep ressure
monitorin gsystems.
Regularly check thepressureofa llth et ires par-
ticularly priortol ongt rips. Adjus tthe tirep res-
sure as necessary (
Ypage 290).
Observ ethe note sont heemergenc yspare
wheel (
Ypage 312).
The servic elife of tires depends, amon gother
things, on th efollowin gfactors:
RDrivin gstyle
RTire pressure
RDistance covered
Notes on tir etread
GWAR NING
In suff icient tir etread will reduce tir etraction.
The tir eisnol ongerabletodissipat ewater.
This mean stha tonw et road surfaces ,the risk
of hydroplaning increases, inparticular where
speedisn otadapted to suit th edriving con-
dit ions. Thereisar iskofa cciden t.
If th et irep ressureist oohigh or to olow, tires
may exhibit diff erent levelsof wear at differ-
entl ocations on th etiret read. Thus,y ou
should regularly check th etread dept hand
th ec onditio noft hetread across th eentire
widt hofa lltires.
Minimum tir etread depthf or:
RSummer tires: âin(3 mm)
RM+S tires: ãin(4 mm)
For safety reasons, replace th etires before
th el egally prescribe dlimit for th eminimum
tir et read depthisr eached.
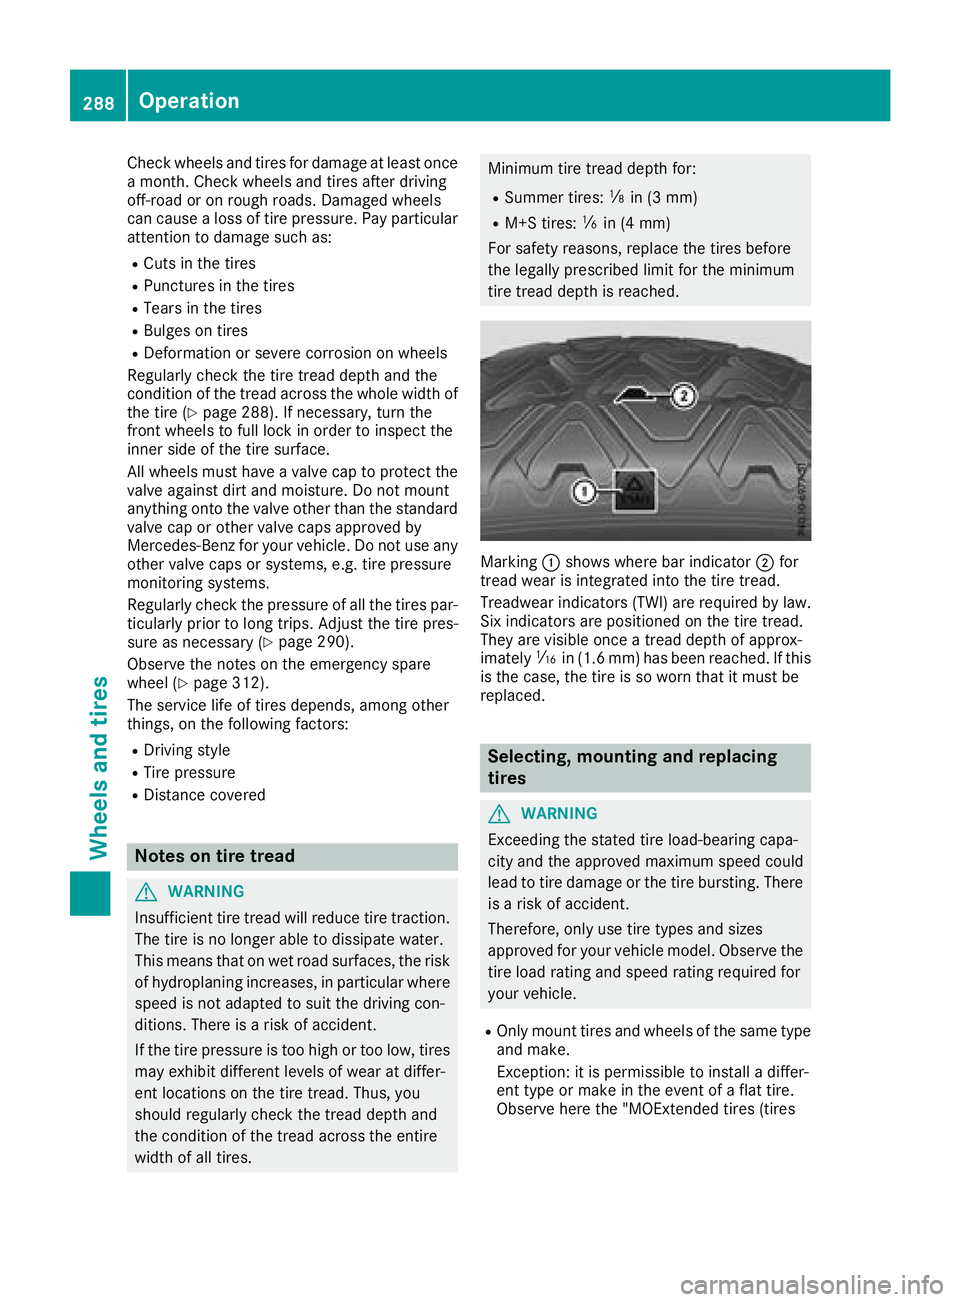
Marking:shows whereb ar indicator ;for
tread wear is integrate dintot he tiret read.
Treadwear indicators (TWI)a re requiredbylaw.
Six indicators are positione donthetiret read.
They are vis ibleonce atread depthofa pprox-
imately áin(1. 6m m) has been reached. Ifthis
is thec ase, th etireissow orn that it must be
replace d.
Selecting, mounting and replacing
tires
GWARNING
Exceedingt hestate dtirel oad-bearing capa-
cit ya nd th eapprove dmaximum speedc ould
lead to tir edamag eorthetireb ursting. There
is ar iskofa ccident.
Therefore, only use tiretype sand sizes
approve dfor your vehicle model. Observ ethe
tir el oad rating and speedr ating required for
your vehicle.
ROnly moun ttires and wheelsoft hesame type
and make.
Exception: itis permissible to install adiffer-
entt ype or mak eintheevent of aflat tire.
Observ eheret he"MOExtended tires (tires
288Operation
Wheels and tires
Page 291 of 326

with run-flat characteristics)"section
(Ypage 271).
ROnly mountt ires of thecorrects izeontot he
wheels.
RBreak in new tires at moderates peeds for the
first6 0miles (100km).The newt ires only
reacht heir full performanc eafter this dis-
tance.
RDo not drivew ith tires which have too little
tread depth, as this significantly reduces the
traction on wet roads (hydroplaning).
RReplace th etires after six years at th elatest,
regardless of wear.
Observe th enotes on th eemergency spare
wheel (
Ypage 312).
MOExtended tires (tires with run-flat
properties)
With MOExtended tires (tires with run flat char-
acteristics) ,you can continue to drivey our vehi-
cle even if there is atotal loss of pressure in one
or moret ires.
MOExtended tires may only be used in conjunc-
tio nw ith an activated tir epressure loss warning
system (Canada only) or tir epressure monitor
(USAo nly) and only on wheels specifically tes-
ted by Mercedes-Benz.
Notes on driving with MOExtended tires with a
flat tir e(
Ypage 271).
Vehicles equipped with MOExtended tires are
not equipped with aTIREFIT kit at th efactory. It
is therefore recommended that you additionally
equip your vehicle with aTIREFIT kit if you mount
tires that do not feature run-flat properties, e.g.
winter tires. ATIREFI Tkit may be obtained from
aq ualified specialist workshop.
Winter operation
General notes
Have your vehicle winter-proofed at aqualified
specialist workshop at th eonset of winter.
Observe th enotes in th e"Changing awheel"
sectio n(
Ypage 307).
Driving with summer tires
At temperatures below 45 ‡(+7 †) ,summe r
tire slos ee lasticit ya nd therefore traction and
braking power.C hange thetires on your vehicle
to M+S tires. Usings ummer tires at verycold
temperatures coul dcaus ecrack stof orm,
therebyd amaging th etires permanently.
Mercedes-Ben zcanno taccept responsibilityf or
this type of damage.
GWARNING
Damaged tires can caus etirei nflation pres-
sure loss.Asar esult, you couldlose control of
your vehicle .Thereisar isk of accident.
Checkt hetires regularly for signsofd amage
and replace any damage dtires immediately.
M+S tires
GWARNING
M+S tires with atiret read depthofl ess than
ã in(4 mm )are no tsuitable for use in winter
and do no tprovide sufficient traction.T hereis
ar isk of an accident.
M+S tires with atread depthofl ess thanãin
(4 mm) must be replaced immediately.
At temperatures below 45 ‡(+7 †), use winter
tires or all-season tires. Both type softire are
identified by the M+S marking.
Only winter tires bearing the isnowflake
symbol in addition to the M+S marking provide
the best possibleg rip in wintry road conditions.
Only these tires wil lallow driving safety systems
such as ABS and ESP
®to function optimally in
winter. Theset ires have beend eveloped specif-
ically for driving in snow.
Use M+S tires of the same make and tread on all
wheels to maintain safe handling characteris-
tics.
Always observe the maximu mpermissible
speeds pecified for the M+S tires you have
mounted.
Wintero peration289
Wheels and tires
Z