2018 MERCEDES-BENZ CLA COUPE clock
[x] Cancel search: clockPage 119 of 326

iYou can also activate several air distribution
settings simultaneously. To do this ,press
multiple air distribution buttons .The air is
the ndirected through various vents.
iRegardless of the air distribution setting,
airflow is always directed through the side air
vents. The side air vents can only be close dif
the adjusters are turned clockwise until they
engage.
Setting th eair distribution
XTurn the SmartKey to position 2in the igni-
tion lock (Ypage 122).
XPress one or more of the P,O, ¯
buttons.
The corresponding indicator lamp lightsu p
briefly.
Dual-zone automatic climate control
Air distribution settings
¯ Directsair through the defroste rvents
P Directsair through the center and side air
vents
O Directsair through the footwell air vents
S Directsair through the center ,side and
footwell vents
b Directsair through the defroster, center
and side air vents
a Directsair through the defroste rand
footwell vents
_ Directsair through the defroster, center,
side and footwell vents
iRegardless of the air distribution setting,
airflow is always directed through the side air
vents. The side air vents can only be close dif
the adjusters are turned clockwise until they
engage.
Setting th eair distribution
XTurn the SmartKey to position 2in the igni-
tion lock (Ypage 122).
XPress the ÉorË button repeatedly
until the desired symbol appears in the dis-
play.
Setting th eairflow
Air-conditioning system
XTurn the SmartKey to position 2in the igni-
tion lock (Ypage 122).
XTo increase or reduce: turn controlAcoun-
ter-clockwise or clockwise (Ypage 111).
Dual-zone automatic climate control
XTurn the SmartKey to position 2in the igni-
tion lock (Ypage 122).
XTo increase or reduce: press theKor
I button.
Switching th eZONEf unction on/off
This function is only available with dual-zone
automatic climat econtrol.
XTo activate: press theábutton.
The indicator lamp in the ábutton lights
up.
The temperature settin gfor the driver's side
is not adopte dfor the front-passenger side.
XTo deactivate: press theábutton.
The indicator lamp in the ábutton goes
out.
The temperature settin gfor the driver's side
is adopte dfor the front-passenger side.
Defrosting th ewindshield
Genera lnotes
You can use this function to defrost the wind-
shield or to clear afoggedupw indshield and
side windows.
iYou should only selectt he "Windshield
defrosting" function until the windshield is
clear again.
Switching th e"Windshield defrosting"
function on or off
XTurn the SmartKey to position 2in the igni-
tion lock (Ypage 122).
XTo activate: press the¬button.
The indicator lamp in the ¬button lights
up.
Operating th eclimat econtrol systems117
Climat econtrol
Page 120 of 326

The climate control system switches to the
following functions:
Rhigh airflow
Rhigh temperature
Rair distribution to the windshield and front
side windows
Rair-recirculation mode off
iThe "Windshield defrosting" function auto-
matically sets the blower level to the optimum
defrosting effect.Asar esult, the airflow may
increase or decrease automatically after the
¬ button is pressed.
iYou can adjust the blower level manually
while the "Windshield defrosting" function is
in operation:
RAir-conditioning system: turn airflow con-
trol Acounter-clockwise or clockwise
(
Ypage 111).
RDual-zon eautomatic climate control: press
the ó orô button.
XTo deactivate: press the¬button.
The indicator lamp in the ¬button goes
out. The previously selected settings are
restored. Air-recirculation mode remains
deactivated.
or
XDual-zon eclimate control: press the Ã
button.
The indicator lamp in the ¬button goes
out. Airflow and air distribution are set to
automatic mode.
or
XAir-conditioning system: turn temperature
control :counter-clockwise or clockwise
(
Ypage 111).
Dual-zon eautomatic climate control: turn
temperature control :orE counter-clock-
wise or clockwise (
Ypage 113).
MAX COOL maximum cooling
The MAX COOL function is only availableinv ehi-
cles for the USA.
MAX COOL is only operational when the engine
is running.
XTo activate: press theÙbutton.
The indicator lamp in the button lights up.
XTo deactivate: press theÙbutton.
The indicator lamp goes out. The previously
selected settings are restored.
When you activate MAX COOL, climate control
switches to the following functions:
Rmaximum cooling
Rmaximum airflow
Rair-recirculation mode on
Defrosting the windows
Windows fogged up on the inside
Air-conditioning system
XActivate the ¿"Cooling with air dehumid-
ification" function.
XIf the windows continue to fog up, activate the
¬ "Windshield defrosting" function.
iYou should only select this setting until the
windshield is clear again.
Dual-zone automatic climate control
XActivate the ¿"Cooling with air dehumid-
ification" function.
XActivate automatic mode Ã.
XIf the windows continue to fog up, activate the
¬ "Windshield defrosting" function.
iYou should only select this setting until the
windshield is clear again.
Windows fogged up on the outside
XActivate the windshield wipers.
XSet the air distribution to PorO.
iYou should only select this setting until the
windshield is clear again.
Rear window defroster
General notes
The rear window defroster has ahigh current
draw. You should therefor eswitch it off as soon
as the rear window is clear. Otherwise, the rear window defroster switches off automatically
after several minutes.
118Operating the climate control systems
Climate control
Page 122 of 326

iIf you activate the residual heat function at
high temperatures, only the ventilation willb e
activated. The blower runs at mediums peed.
iYou cannot use the ventilation to cool the
vehicle interior to atemperature lowert han
the outsidet emperature.
Activating/deactivating
XTurn the SmartKey to position gin the igni-
tion lock or remove it (Ypage 122).
XPress the Ìbutton.
The indicator lamp in the Ìbutton lights
up or goes out.
The indicator lamp in the button indicates that
the respective function is activated.
iResidualh eat is deactivated automatically:
Rafter approximately 30 minutes
Rwhen the ignition is switched on
Rif the battery voltage drops
Air vents
Important safety notes
GWARNING
Very hot or very cold air can flow from the air
vents. This could resultinb urns or frostbite in
the immediate vicinity of the air vents. There
is ar isk of injury.
Make sure that all vehicle occupants always
maintain asufficient distance to the air out-
lets. If necessary ,redirect the airflow to
another area of the vehicle interior.
In order to ensure the direct flow of fresh air
through the air vents into the vehicle interior,
please observe the following notes:
Rkeep the air inlet between the windshield and
the hood free of blockages, such as ice, snow or leaves.
Rnever cover the air vents or air intake grilles in
the vehicle interior.
iFor optimal climate control in the vehicle,
open the air vents completely and set the
adjusters to the central position.
Setting the air vents
:Side window defroster vent
;Side air vent
XTo open aside air vent: turn the adjuster in
side air vent ;to the left.
XTo close aside air vent: turn the adjuster in
side air vent ;clockwise as far as it willg o.
iThe center and rear air vents are adjusted in
the same way.
120Airv ents
Climate control
Page 142 of 326
XTurn the fuel filler cap counterclockwise and
remove it.
XInsert the fuel filler cap into the holder on theinside of fuel filler flap =.
XCompletely insert the filler neck of the fuel
pump nozzle into the tank ,hook in place and
refuel.
XOnly fill the tank until the pump nozzle
switches off.
Do not add any more fuel after the pump stops
filling for the first time. Otherwise, fuel may leak
out.
Closing the fuel filler flap
XReplace the cap on the filler neck and turn
clockwise until it engages audibly.
XClose the fuel filler flap. Close the fuel filler flap before lockingt
he vehi-
cle.
If you are driving with the fuel filler cap open, the
8 reserve fuel warning lamp flashes. Ames-
sage appears in the multifunction display
(
Ypage 206).
In addition, the ;Check Engine warning
lamp may light up (
Ypage 224).
For further information on warning and indicator
lamps in the instrument cluster, see
(
Ypage 224).
Problems with fuel and the fuel tank
ProblemPossible causes/consequences and MSolutions
Fuel is leaking from the
vehicle.The fuel line or the fuel tank is faulty.
GWARNING
Risk of explosion or fire.
XApply the electric parking brake.
XSwitch off the engine.
XRemove the SmartKey from the ignition lock.
or, in vehicles with KEYLESS-GO start-function or KEYLESS ‑GO
XOpen the driver's door.
The vehicle electronics are now in positiong.This is the same as
the SmartKey being removed from the ignition.
XDo not restart the engine under any circumstances.
XConsult aqualified specialist workshop.
The fuel filler flap cannot
be opened.The fuel filler flap is not unlocked.
XUnlock the vehicle (Ypage 70).
The SmartKey battery is discharged or nearly discharged.
XUnlock the vehicle using the mechanical key (Ypage 77).
The fuel filler flap is unlocked, but the opening mechanism is jammed.
XConsult aqualified specialist workshop.
140Refueling
Driving and parking
Page 178 of 326
Important safety notes
GWARNING
If you operate information systems and com-
munication equipmen tintegrate dinthevehi-
cle when driving ,you may be distracte dfrom
th et raffic situation .You could also lose con-
trol of th evehicle. Ther eisariskofana cci-
dent.
Only operate this equipmen twhen th etraffic
situation permits. If you are no tsuret hatthis
is possible ,park th evehicl epayin gattention
to traffic condition sand operate th eequip-
men twhen th evehicl eiss tationary.
You must observ ethe legal requirements for th e
country in whic hyou are currentl ydriving when
operating th eon-bo ard computer.
GWARNIN G
If th einstrumen tcluste rhas faile dormal-
functioned, you may no trecognize function
restriction sinsystems relevan ttosafety. The
operating safet yofyour vehicl emay be
impaired .Ther eisar iskofana ccident.
Drive on carefully. Hav ethe vehicl echecked
at aq ualified specialist workshop immedi-
ately.
The on-board computer only shows message sor
warning sfromc ertai nsystems in th emultifunc-
tion display. You should therefor emakes ure
your vehicl eisoperating safely at all times .
If th eoperating safet yofyour vehicl eis
impaired ,pull ove rassoonasitiss afetodos o.
Contac taqualified specialist workshop.
Fo rano verview, see th einstrumen tpanel illus-
tration (
Ypage 33).
Display sand operation
Instrumen tcluster lighting
The ligh tsensor in th einstrumen tcluste rauto -
matically control sthe brightness of th emulti-
function display. In daylight, th edisplays in th e
instrumen tcluste rare no tilluminated. The lighting in th
einstrumen tcluster, in th edis-
plays and th econtrols in thevehicl einterior can
be adjusted usin gthe brightness control knob.
The brightness control knob is locate donthe
botto mleftoft heinstrumen tcluste r
(
Ypage 33).
XTurn th ebrightness control knob clockwise or
counter-clockwise.
If th eligh tswitch is set to th eÃ, Tor
L position ,the brightness is dependen t
upon th ebrightness of th eambien tlight.
Speedometer with segments
The speedometer is divided int osegments on
vehicles wit hDistance Pilot DISTRONIC.
The segments in th espeedometer indicat e
whic hspee drange is available.
RDistanc ePilot DISTRONI Cisactivated
(Ypage 151):
On eort wo segments in th eset spee drange
ligh tup.
RDistanc ePilot DISTRONI Cdetects avehicl ein
fron tmoving mor eslowly than th estored
speed:
The segments between th espee doft hevehi-
cle in fron tand th estoreds pee dligh tup.
Tachometer
!
Do no tdriveint heoverrevving range, as this
could damag ethe engine.
The red ban dinthetachometer indicates th e
engine's overrevving range.
The engin eislimite dwithin arange to protect
th ee nginew hen th ered ban disreached.
Outsidet emperatur edisplay
You should pay special attention to road condi-
tion swhen temperatures are aroun dfreezing
point.
Bea rinm indt hatthe outside temperature dis-
play indicates th etem perature measured and
does no trecord th eroad temperature.
The outside temperature display is in th emulti-
function display (
Ypage 179).
176Displaysand operation
On-boardc omputer and displays
Page 189 of 326
RDistance PilotDISTRONIC
RASSYST PLU Sservic eintervald isplay
Switchin gthe additional speedometer
on/off
If the additional speedomete risswitched on,
the spee disshown in the status ba rinthe mul-
tifunctio ndisplay insteadofthe outside tem-
perature.
The spee ddisplay is invers etothe speedome-
ter.
XPress the =or; button on the steering
whee ltoselect the Sett.menu.
XPress the :or9 button to select the
InstrumentC lustersubmenu.
XPressato confirm.
XPress the :or9 button to select the
Speedometer [km/h]or Speedometer[mph]function.
Yo uw ills ee the selecte dsetting: OnorOff.
XPress the abutton to save the setting.
Selecting permanent display
ThePermanent Display:functio nallow syou
to choose whether the multifunctio ndisplay
always shows the outside temperatur eorthe
speed.
The spee ddisplay is invers etothe speedome-
ter.
XPress the =or; button on the steering
whee ltoselect the Sett.menu.
XPress the :or9 button to select the
Instr. Clustersubmenu.
XPress ato confirm.
XPress the :or9 button to select the
Permanent Display:function.
The current setting, OutsideTemperature
orSpeedometer [km/h]/Speedometer[mph],a ppears .
XPress the abutton to save the setting.
Lights
Switchin gthe daytime runnin glamps on/
off
Thi sfun ctio nisn ot availabl einCanada.
XPress the =or; button on the steering
whee ltoselect the Sett.menu.
XPress the :or9 button to select the
Lightsubmenu.
XPress ato confirm.
XPress the :or9 button to select the
DaytimeR unningLightsfunction.
If the DaytimeRunningLightsfunctio nhas
been switched on, the multifunctio ndisplay
shows the cone of light and the Wsymbol
in orange.
XPress the abutton to save the setting.
Furtheri nformatio nondaytime running lamps
(
Ypage 100).
Vehicle
Activating/deactivating the automatic
doo rlocking mechanism
XPress the =or; button on the steering
whee ltoselect the Sett.menu.
XPress the :or9 button to select the
Vehiclesubmenu.
XPress ato confirm.
XPress the :or9 button to select the
Automatic DoorL ockfunction.
If the Automatic DoorL ockfunctionis
switched on, the multifunctio ndisplay shows
the doors in orange.
XPress the abutton to save the setting.
If yo uactivate the Automatic
DoorLockfunc-
tion, the vehicl eiscentrall yloc ked above a
spee dofa round 9mph (15 km/h).
For furtheri nformationonthe automatic locking
feature, see (
Ypage 77).
Activating/deactivating the acoustic
lockin gverificatio nsigna l
If youswitch on the AcousticLockfunction, an
acoustic signa lsounds when yo uloc kt he vehi-
cle.
XPress the =or; button on the steering
whee ltoselect the Sett.menu.
XPress the :or9 button to select the
Vehiclesubmenu.
XPress ato confirm.
XPress the :or9 button to select the
Acoustic Lockfunction.
If the Acoustic Lockfunctio nisa ctivated,
the multifunctio ndisplay shows the &
symbo linorange.
XPress the abutton to save the setting.
Menus and submenus187
On-board computer and displays
Z
Page 261 of 326
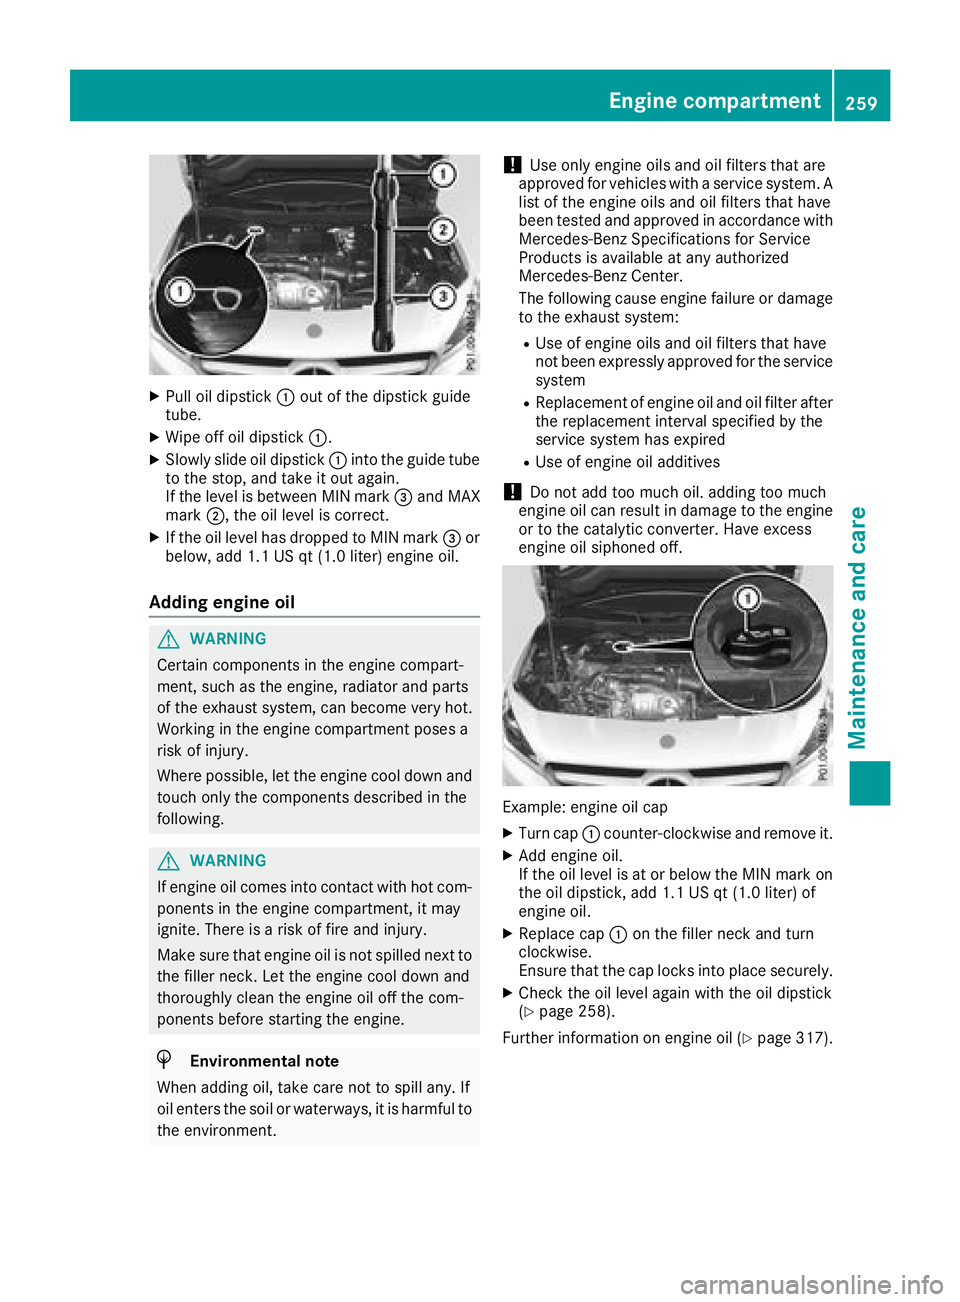
XPull oil dipstick:out of the dipstick guide
tube.
XWipe off oil dipstick :.
XSlowly slide oil dipstick :into the guide tube
to the stop, and take it out again.
If the level is between MIN mark =and MAX
mark ;,the oil level is correct.
XIf the oil level has dropped to MIN mark =or
below, add 1.1 US qt (1.0 liter) engine oil.
Adding engine oil
GWARNING
Certain components in the engine compart-
ment ,such as the engine, radiator and parts
of the exhaust system, can become very hot.
Workingint he engine compartment poses a
risk of injury.
Where possible, let the engine cool down and touch only the components described in the
following.
GWARNING
If engine oil comes into contact with hot com- ponentsint he engine compartment ,itmay
ignite. There is arisk of fire and injury.
Make sure that engine oil is not spilled next to
the filler neck.L et the engine cool down and
thoroughly clean the engine oil off the com-
ponentsb efore starting the engine.
HEnvironmenta lnote
When adding oil, take care not to spill any. If
oil enter sthe soil or waterways, it is harmful to
the environment.
!Use only engine oils and oil filters that are
approved for vehicles with aservice system. A
list of the engine oils and oil filters that have
been tested and approved in accordancew ith
Mercedes-Benz Specifications for Service
Products is availableata ny authorized
Mercedes-Benz Center.
The following cause engine failure or damage
to the exhaust system:
RUse of engine oils and oil filters that have
not been expressly approved for the service
system
RReplacement of engine oil and oil filter after
the replacement interval specified by the
service system has expired
RUse of engine oil additives
!Do not add too much oil. adding too much
engine oil can result in damage to the engine
or to the catalytic converter. Have excess
engine oil siphoned off.
Example: engine oil cap
XTurn cap :counter-clockwise and remove it.
XAdd engine oil.
If the oil level is at or below the MIN mark on
the oil dipstick ,add 1.1 US qt (1.0 liter) of
engine oil.
XReplace cap :on the filler neck and turn
clockwise.
Ensure that the cap locks into place securely.
XCheck the oil level again with the oil dipstick
(Ypage 258).
Further information on engine oil (
Ypage 317).
Engine compartment259
Maintenance and care
Z
Page 262 of 326
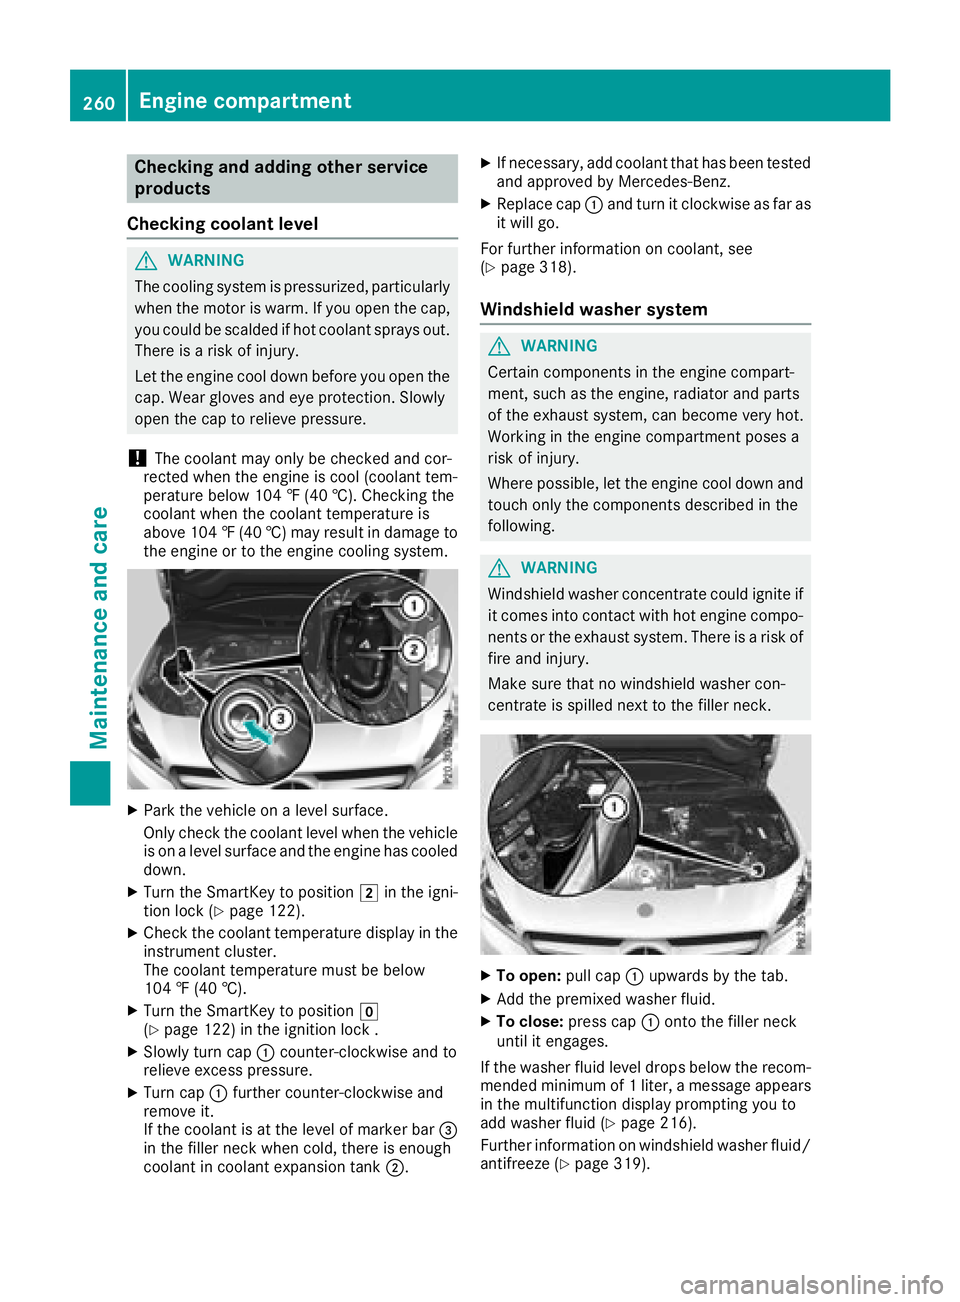
Checking and addingother service
products
Checking coolan tlevel
GWARNING
The coolings ystem is pressurized, particularly
when th emotor is warm .Ifyou open th ecap,
you coul dbescalded if hot coolant sprays out.
Thereisar iskofi njury.
Let th eenginec ooldown before you open the
cap. Wear gloves and eye protection.S lowly
open th ecap to relieve pressure.
!The coolant may only be checked and cor-
recte dwhen th eengineisc ool(coolantt em-
peratur ebelow 10 4‡(40 †) .Checkin gthe
coolantw hen thecoolantt emperatur eis
above1 04‡(40 †) ma yresult in damage to
th ee ngineortot heengin ecoolings ystem.
XPar kthe vehicl eonal evel surface.
Only chec kthe coolan tlevel when th evehicl e
is on alevel surfac eand th eengineh as cooled
down .
XTurn th eSmartKey to position 2in th eigni-
tion loc k(Ypage 122).
XCheckthe coolan ttem perature display in th e
instrumen tcluster.
The coolan ttem perature mus tbebelow
10 4‡ (40 †).
XTurn th eSmartKey to position g
(Ypage 122) in th eignition loc k.
XSlowly turncap : counter-clockwise and to
reliev eexces spressure.
XTurn cap :further counter-clockwise and
remove it .
If th ecoolan tisatt helevel of marke rbar=
in th efiller neck when cold, there is enough
coolan tincoolan texpansion tan k;.
XIf necessary, add coolan ttha thas been tested
and approve dbyMercedes-Benz.
XReplacecap : and tur nitclockwise as far as
it will go.
Fo rfurther information on coolant, see
(
Ypage 318).
Windshiel dwasher system
GWARNIN G
Certain component sintheengin ecom part-
ment, suc hastheengine, radiato rand part s
of th eexhaust system, can become ver yhot.
Working in th eenginec om partmen tposes a
ris kofi njury.
Where possible, let th eenginec ooldown and
touch only th ecom ponent sdescribed in th e
following.
GWARNIN G
Windshield washer concentrate could ignit eif
it comes into contact wit hhot engin ecom po-
nent sort heexhaust system. There is arisko f
fir ea nd injury.
Mak esuret hatnow indshield washer con-
centrat eisspilled next to th efiller neck .
XTo open: pull cap:upwards by th etab.
XAd dthe premixed washer fluid.
XTo close: press cap :onto th efiller neck
until it engages.
If th ewasher flui dlevel drops belo wthe recom-
mended minimum of 1liter, amessage appears
in th emultifunction display promptin gyou to
add washer flui d(
Ypage 216).
Further information on windshield washer fluid/
antifreez e(
Ypage 319).
260Engine compartment
Maintenance and care