Page 225 of 370

Activating/deactivating Active Brake
Assist
XPress theò buttonon th esteering whee l
to open th emen ulist .
XPress th e: or9 buttonon th esteering
whee lto select th eSettingsmenu.
XConfir mby pressin ga on thesteering
wheel.
XUse : or9 to select th eDriveAssistsubmenu.
XPress ato confirm .
XSelectBrake Assistby pressin g9
or :.
XPress ato confirm .
The curren tselection appears.
XTo act ivate/deact ivate:pressaagain.
When Activ eBrake Assist is deactivated, th e
æ symbol appear son th eAssistanc e
Graphicmenuof th emultifunction display.
Further information on Activ eBrake Assist
(
Ypage 67) .
Activating ordeactivating Active Brake
Assist with cross-traffic function
Activ eBrake Assist wit hcross-traffic function is
available only in vehicles wit hth eDrivin gAssis-
tance package.
XPress th eò buttonon th esteering whee l
to open th emen ulist .
XPress th e: or9 buttonon th esteering
whee lto select th eSettingsmenu.
XConfir mby pressin ga on thesteering
wheel.
XUse : or9 to select th eDriveAssistsubmenu.
XPress ato confirm .
XSelectBrake Assistby pressin g: or
9.
XPress ato confirm .
The curren tselection appears.
XTo act ivate/deact ivate:press th ea but-
to nagain .
When Activ eBrake Assist wit hcross-traffic
function is deactivated, th eæ symbol
appear son th eAssistanc eGraphi c
menu
of th emultifunction display.
Further information about Activ eBrake Assist
wit hcross-traffic function (
Ypage 73).
Activating/deactivating Blind Spot Assist
XPress theò buttonon th esteering whee l
to open th emen ulist .
XPress :or9 on thesteering whee lto
select th eSettingsmenu.
XConfir mby pressin ga on thesteering
wheel.
XPress :or9 to select th eDriveAs‐sis tsubmenu.
XPress ato confirm .
XPress:or9 to select Blind Spo tAssist.
XPressato confirm .
The curren tselection appears.
XTo act ivate/deact ivate:press th ea but-
to nagain .
Fo rfurther information about Blin dSpo tAssist ,
see (
Ypage 200).
Fo rfurther information about Activ eBlin dSpo t
Assist ,see (
Ypage 204).
Setting ATTENTION ASSIST
XPress th eò buttonon th esteering whee l
to open th emen ulist .
XPress th e: or9 buttonon th esteering
whee lto select th eSettingsmenu.
XConfir mby pressin ga on thesteering
wheel.
XUse : or9 to select th eDriveAssistsubmenu.
XPress ato confirm .
XSelectAttention Assistby pressin g:
or 9.
XPress ato confirm .
XPress:or9 to select Off,Standardor Sensitive.
XPress th ea buttonto confirm th eselec-
tion.
When ATTENTI ONASSIST is deactivated, th e
é symbol appear sin th eAssistanc e
Graphicmenuin th emultifunction display.
Fo rfurther information about ATTENTI ON
ASSIST ,see (
Ypage 198).
Setting Lane Keeping Assist
XPress th eò buttonon th esteering whee l
to open th emen ulist .
XPress :or9 on thesteering whee lto
select th eSettingsmenu.
Menus and submenus223
On-board computer and displays
Z
Page 226 of 370

XConfirmbypressing aon the steering
wheel.
XPress :or9 to select the DriveAs‐sistsubmenu.
XPressato confirm.
XPress :or9 to select LaneKeepingAssist.
XPressato confirm.
The current selection StandardorAdaptiveappears.
XTo change the setting: pressaagain.
For further information about Lane Keeping
Assist, see (
Ypage 202).
For further information about Active Lane Keep-
ing Assist, see (
Ypage 207).
Head-up display submenu
Selecting other displays
:Vehicle speeddisplay
;Vehicle speed and navigation instruction
displ ay
=Vehicle speeddisplay and Traffic Sign Assist
Using the Display Content
function, you can
choose from up to four display options depend-
ing on the veh icle'sequipm ent. The selected
contents appear inthe head-up display.
In Mercedes-AMG veh icles, you can also choose
between two AMG displays.Ifyou select an
AMG display, the head-up display shows AMG-
specific contents.
If you select a displaywit h traff icsigns, detected
traff icsigns from Traffic Sign Assist appear in
the head-up display.
XPress the òbutton on the steering wheel
to open the menu list.
XPress :or9 on the steering wheel to
select the Settingsmenu.
XConfirmbypressing aon the steering
wheel.
XPress :or9 to select the Head-upDisplaysubmenu.
XPressato confirm.
XSelect DisplayContentbypressing :or
9.
XPress ato confirm.
A graphic selection list appears.
XPress :or9 to select the desired dis-
play.
XPress the abutton to confirm the selec-
tion.
You can find more information on the navigation
displays inthe multimedia system (see Digital
Operator's Manual).
In formation on displays of Traffic Sign Assist
(
Ypage 200).
Setting the position
You can adjust the position of the head-up dis-
play on the windshield. You can compensate for
height differences ifthe seat positions are
changed, for example.
XSwit ch on the head-up display (Ypage 213).
XPress the òbutton on the steering wheel
to open the menu list.
XPress the :or9 button on the steering
wheel to select the Settingsmenu.
XConfirm by pressing aon the steering
wheel.
XUse : or9 to select the Head-upDisplaysubmenu.
XPressato confirm.
XPress :or9 to select the Positionfunction.
XPress theabutton to save the setting.
XPress :or9 to adjust the position to a
leve l from Level+5(up) to Level-5(down).
XPress the aor% button to save the
setting.
Using the Memory function, you can save and
call up the set position of the head-up display as
a single memory preset (
Ypage 111).
Setting the brightness
The brightness of the head-up display is auto-
matically adjusted to the surrounding ambient
light. You can also ind ividually adjust the bright-
ness of the head-up display.
224Menus and submenus
On-board computer and displays
Page 227 of 370

XSwitch on the head-up display (Ypage 213).
XPress theòbutton on the steering wheel
to open the menu list.
XPress the :or9 button on the steering
wheel to select the Settingsmenu.
XConfirm by pressing aon the steering
wheel.
XUse : or9 to select the Head-upDisplaysubmenu.
XPressato confirm.
XPress :or9 to select the Brightnessfunction.
XPress theabutton to save the setting.
XPress the :or9 button to adjust the
brightness to a level from Level+5(bright) to
Level -5(dark).
XPress the aor% button to save the
setting.
Light submenu
Switching the daytime running lamps on/
off
This function is not available in Canada.
XPress òon the steering wheel to open the
menu list.
XPress :or9 on the steering wheel to
select the Settingsmenu.
XConfirm by pressing aon the steering
wheel.
XPress :or9 to select the Lightssubmenu.
XPressato confirm.
XUsing :or9, select the DaytimeRunning Lightsfunction.
If the DaytimeRunningLightsfunction has
been switched on, the multifunction display
shows the cone of light and the Wsymbol
in yellow.
XPress the abutton to save the setting.
Further information on daytime running
lampsDaytime
RunningLights(Ypage 113).
Instrument cluster submenu
Selecting the distance unit
The DisplayUnitSpeed-/Odometerfunction
allows you to choose whether certain displays
appear in kilometers or miles in the multifunc-
tion display.
XPress the òbutton on the steering wheel
to open the menu list.
XPress the :or9 button on the steering
wheel to select the Settingsmenu.
XConfirm by pressing aon the steering
wheel.
XUse : or9 to select the InstrumentClustersubmenu.
XPressato confirm.
XPress :or9 to select the DisplayUnit Speed-/Odometerfunction.
The current setting kmorMilesappears.
XPress the abutton to save the setting.
The selected unit of measurement for distance
applies to:
RDigital speedometer in the Tripmenu
ROdometer and the trip odometer
RTrip computer
RCurrent consumption and the range
RRange
RNavigation instructions in the Navimenu
RCruise control
RDistance Pilot DISTRONIC with Steering Pilot
RASSYST PLUS service interval display
Switching the additional speedometer
on/off
If the additional speedometer is switched on,
the speed is shown in the status bar in the mul-
tifunction display instead of the outside tem-
perature.
The speed display is inverse to the speedome-
ter.
XPress theòbutton on the steering wheel
to open the menu list.
XPress the :or9 button on the steering
wheel to select the Settingsmenu.
XConfirm by pressing aon the steering
wheel.
XUse : or9 to select the InstrumentClustersubmenu.
XPressato confirm.
XUsing :or9, select the AdditionalSpeedometer [km/h]function.
The current selection appears.
XTo activate/deactivate: press theabut-
ton again.
Menus and submenus225
On-board computer and displays
Z
Page 228 of 370

Restoring the factory settings
XPress theòbutton on the steering wheel
to open the menu list.
XPress the :or9 button on the steering
wheel to select the Settingsmenu.
XConfirm by pressing aon the steering
wheel.
XUse : or9 to select the FactorySettingssubmenu.
XPressato confirm.
The Reset All Settings?function
appears.
XPress :or9 to select NoorYes.
XPress ato confirm the selection.
If you have selected Yes, the multifunction
display shows a confirmation message.
For safety reasons, the Daytime Running
Lightsfunction in theLightssubmenu is only
reset when the vehicle is stationary.
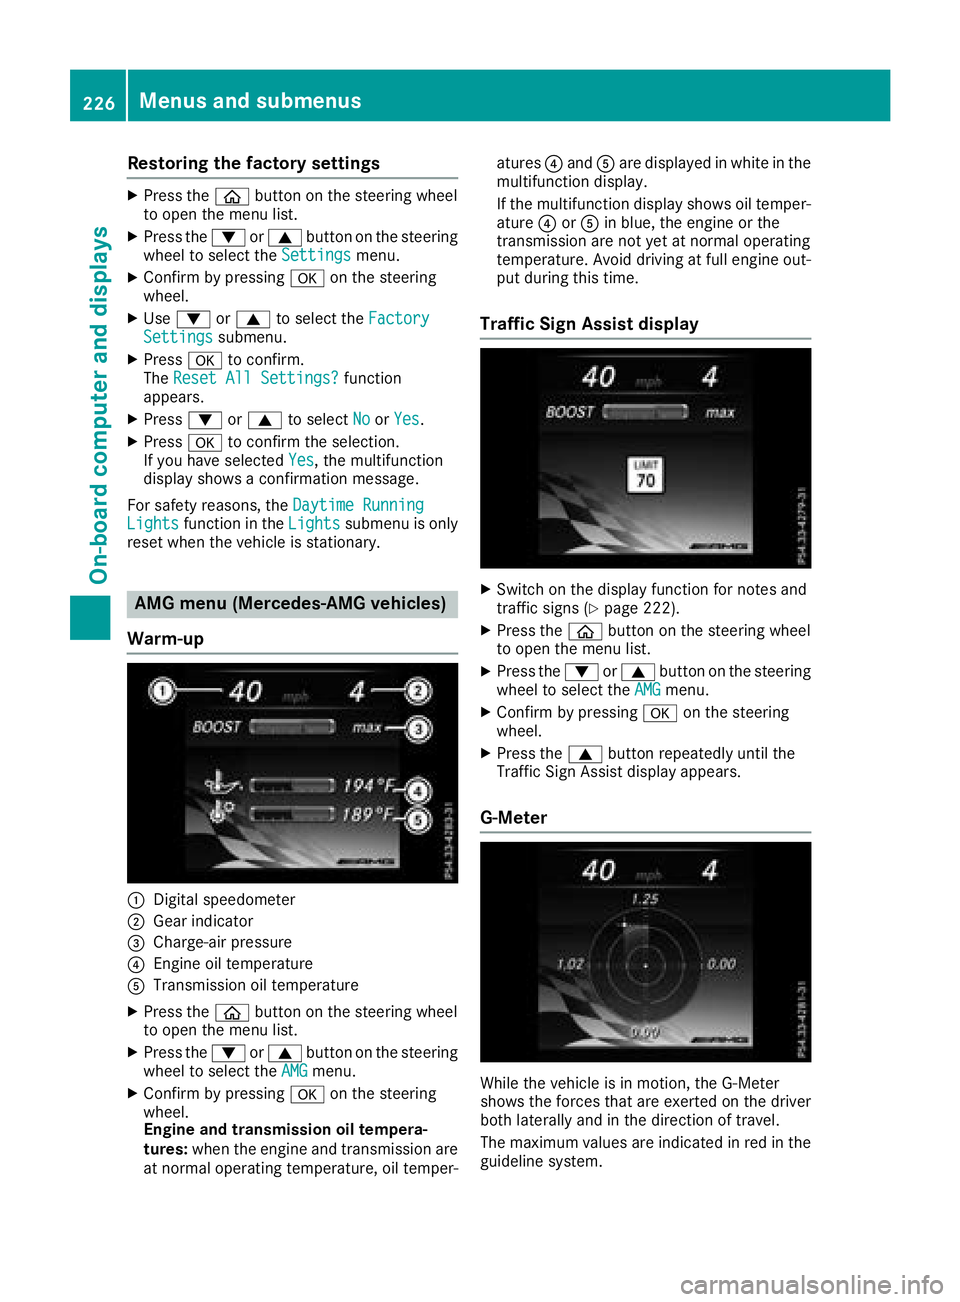
AMG menu (Mercedes-AMG vehicles)
Warm-up
:Digital speedometer
;Gear indicator
=Charge-air pressure
?Engine oil temperature
ATransmission oil temperature
XPress the òbutton on the steering wheel
to open the menu list.
XPress the :or9 button on the steering
wheel to select the AMGmenu.
XConfirm by pressing aon the steering
wheel.
Engine and transmission oil tempera-
tures: when the engine and transmission are
at normal operating temperature, oil temper- atures
?and Aare displayed in white in the
multifunction display.
If the multifunction display shows oil temper-
ature ?orA in blue, the engine or the
transmission are not yet at normal operating
temperature. Avoid driving at full engine out-
put during this time.
Traffic Sign Assist display
XSwitch on the display function for notes and
traffic signs (Ypage 222).
XPress the òbutton on the steering wheel
to open the menu list.
XPress the :or9 button on the steering
wheel to select the AMGmenu.
XConfirm by pressing aon the steering
wheel.
XPress the 9button repeatedly until the
Traffic Sign Assist display appears.
G-Meter
While the vehicle is in motion, the G-Meter
shows the forces that are exerted on the driver
both laterally and in the direction of travel.
The maximum values are indicated in red in the
guideline system.
226Menus and submenus
On-board computer and displays
Page 229 of 370

XPressòon the steering wheel to open the
menu list.
XPress the :or9 button on the steering
wheel to select the AMGmenu.
XConfirm by pressing aon the steering
wheel.
XPress the 9button repeatedly until the G-
Meter appears.
The maximum values of the G-Meter are
saved.
XTo reset the G-Meter: pressaagain.
XUsing :or9 select Yeson the steer-
ing wheel.
XPress ato confirm.
The maximum values of the G-Meter are
deleted.
If the ignition remains switched off for longer
than four hours, the G-Meter will be automati-
cally reset.
SETUP
Mercedes-AMG C 63/AMG C 63 S
(Example)
:
Mercedes-AMG C 63: drive program Com‐fort/Sport/Sport +
Mercedes-AMG C 63 S: drive program Com‐fort/Sport/Sport +/Race
;ChassisComfort/Sport/Sport +
=Transmission D/M
?Exhaust system Comfort/Sport +
AESP®On/Offor SPORT handling mode
Sport
SETUP shows the following functions and set-
tings:
Rthe gear indicator
Rthe digital speedometer
Rthe drive system setting
Rthe suspension mode
Rthe transmission position
Rthe exhaust flap position
Rthe ESP®(Electronic Stability Program) status
Mercedes-AMG C 43 4MATIC
(Example)
:
Drive Eco/Comfort/Sport/Sport +
;Suspension Comfort/Sport/Sport +
=Steering Comfort/Sport
?ECO Start/Stop Active/Inactive/Off
AESP®On/Offor SPORT handling mode
Sport
SETUP shows the following functions and set-
tings:
Rthe gear indicator
Rthe digital speedometer
Rthe drive system setting
Rthe suspension mode
Rthe steering setting
Rthe setting of the ECO start/stop function
Rthe ESP®(Electronic Stability Program) status
Select SETUP
XUse ò on the steering wheel to call up the
list of menus.
XPress :or9 on the steering wheel to
select the AMGmenu.
XConfirm by pressing aon the steering
wheel.
XPress 9repeatedly until SETUP appears.
Menus and submenus227
On-board computer and displays
Z
Page 230 of 370
RACE TIMER
Displaying and starting RACETIMER
:Lap
;RACETIMER
The RACETIMER is only intended for use on a
closed race circuit. Do not use the function on
public roads.
You can start the RACETIMER when the engine is
running or the ignition is switched on.
XUse ò on the steering wheel to call up the
list of menus.
XPress the :or9 button on the steering
wheel to select the AMGmenu.
XConfirm by pressing aon the steering
wheel.
XPress :or9 repeatedly until the
RACETIMER appears.
XTo start: press the abutton to start the
RACETIMER.
Starting a new lap
:Lap
;RACETIMER
=Quickest lap time
XPress the :or9 button to select NewLap.
XPressato confirm.
A maximum of 32 laps may be stored.
Stopping the RACETIMER
XPress :or9 to select Stop.
XPressato confirm.
Continuing the RACETIMER
XPress :or9 to select Continue.
XPressato confirm.
Resetting the RACETIMER
228Menus and submenus
On-board computer and displays
Page 231 of 370

XPress:or9 to select Stop.
The RACETIMER is stopped.
XPress :or9 to select Reset.
XPressato confirm.
All laps are deleted.
Lap statistics
:Lap
;Lap time
=Average lap speed
?Lap length
This function is only available if you have stored
at least two laps and have stopped the RACE-
TIMER.
XUse ò on the steering wheel to call up the
list of menus.
XPress the :or9 button on the steering
wheel to select the AMGmenu.
XConfirm by pressing aon the steering
wheel.
XPress the :or9 button to select LapList.
XPressato confirm.
The lap evaluation appears.
XPress the 9or: button to select a dif-
ferent lap evaluation.
The fastest lap is indicated by flashing sym-
bol :.
Display messages
Introduction
General notes
Display messages appear in the multifunction display.
Display messages with graphic displays may be shown in simplified form in the Operator's Manual
and may therefore differ from the multifunction display.
Please respond in accordance with the display messages and follow the additional notes in this
Operator's Manual.
With certain display messages, you will also hear a warning tone.
You can hide the display messages. The display messages are then stored in the message memory.
Rectify the cause of a display message as soon as possible.
When you stop and park the vehicle, please observe the notes on:
RHOLD function (Ypage 179)
RParking (Ypage 161)
Hiding display messages
XPress the aor% button on the steering wheel.
The multifunction display hides the display message.
High-priority display messages are shown in red in the multifunction display. Some high-priority
display messages cannot be hidden.
The multifunction display shows these messages continuously until the causes for the messages
have been remedied.
Display messages229
On-board computer and displays
Z
Page 232 of 370
Message memory
The on-board computer saves certain display messages in themessage memory. You can call up
the display messages:
XPress the òbutton on the steering wheel to open the menu list.
XPress :or9 on the steering wheel to select the Servicemenu.
XConfirm by pressingaon the steering wheel.
XPress the :or9 button to select the message memory.
If there are no display messages, the No Messagesdisplay appears in the multifunction display.
When there are display messages, the number of stored messages appears.
XPress ato confirm.
XPress the :or9 button to scroll through the display messages.
230Display messages
On-board computer and displays