Page 375 of 614
NOTE:
•To avoid inadvertent Electric Park Brake engagement,
you must ensure that the Auto Park Brake feature is
disabled before towing this vehicle (if rear wheels are on
the ground). The Auto Park Brake feature is enabled or
disabled via the customer programmable features in the
Uconnect Settings.
• When towing your vehicle, always follow applicable
state and provincial laws. Contact state and provincial
Highway Safety offices for additional details.
• If your vehicle is disabled and in need of commercial
towing service, please refer to “Towing A Disabled
Vehicle” in “In Case Of Emergency”.
Recreational Towing — All Models
DO NOT flat tow this vehicle. Damage to the drivetrain
will result.
CAUTION!
• DO NOT flat tow this vehicle. Damage to the drive-
train will result. If this vehicle requires towing,
make sure the drive wheels are OFF the ground.
(Continued)
CAUTION! (Continued)
•Ensure that the Electric Park Brake is released, and
remains released, while being towed.
• Towing this vehicle in violation of the above require-
ments can cause severe transmission damage. Dam-
age from improper towing is not covered under the
New Vehicle Limited Warranty.
Recreational towing is allowed ONLY if the front wheels
are OFF the ground. This may be accomplished using a tow
dolly (front wheels off the ground) or vehicle trailer (all
four wheels off the ground). If using a tow dolly, follow this
procedure:
1. Properly secure the dolly to the tow vehicle, following the dolly manufacturer’s instructions.
2. Drive the front wheels onto the tow dolly.
3. Apply the park brake.
4. Place the transmission in PARK.
5. Turn the ignition OFF.
6. Properly secure the front wheels to the dolly, following the dolly manufacturer’s instructions.
6
STARTING AND OPERATING 373
Page 376 of 614

7. Turn the ignition to the ON/RUN mode, but do not startthe vehicle.
8. Press and hold the brake pedal.
9. Release the park brake.
10. Turn the ignition OFF.
11. Release the brake pedal.
DRIVING TIPS
Driving On Slippery Surfaces
Information in this section will aid in safe controlled
launches in adverse conditions.
Acceleration
Rapid acceleration on snow covered, wet, or other slippery
surfaces may cause the driving wheels to pull erratically to
the right or left. This phenomenon occurs when there is a
difference in the surface traction under the front (driving)
wheels.
WARNING!
Rapid acceleration on slippery surfaces is dangerous.
Unequal traction can cause sudden pulling of the front
wheels. You could lose control of the vehicle and
possibly have a collision. Accelerate slowly and care-
fully whenever there is likely to be poor traction (ice,
snow, wet, mud, loose sand, etc.).
Traction
When driving on wet or slushy roads, it is possible for a
wedge of water to build up between the tire and road
surface. This is hydroplaning and may cause partial or
complete loss of vehicle control and stopping ability. To
reduce this possibility, the following precautions should be
observed:
• Slow down during rainstorms or when the roads are
slushy.
• Slow down if the road has standing water or puddles.
• Replace the tires when tread wear indicators first be-
come visible.
• Keep tires properly inflated.
374 STARTING AND OPERATING
Page 381 of 614
WARNING!
ALWAYS obey traffic laws and pay attention to the
road. ALWAYS drive safely with your hands on the
steering wheel. You have full responsibility and as-
sume all risks related to the use of the features and
applications in this vehicle. Only use the features and
applications when it is safe to do so. Failure to do so
may result in an accident involving serious injury or
death.
NOTE:
• Your vehicle may be transmitting data as authorized by
the subscriber.
• The SOS and ASSIST buttons will only function if you
are connected to an operable LTE (voice/data) or 4G
(data) network. Other Uconnect services will only be
operable if your SiriusXM Guardian service is active and
you are connected to an operable LTE (voice/data) or 4G
(data) network.
ASSIST Call
The ASSIST Button is used to automatically connect you to
any one of the following support centers: •
Roadside Assistance – If you get a flat tire, or need a tow,
just push the ASSIST button and you’ll be connected to
someone who can help. Roadside Assistance will know
what vehicle you’re driving and its location. Additional
fees may apply for roadside assistance.
• SiriusXM Guardian Customer Care – In-vehicle support
for SiriusXM Guardian.
• Vehicle Customer Care – Total support for all other
vehicle issues.
SOS Call
1. Push the SOS Call button on the Rearview Mirror.
NOTE: In case the SOS Call button is pushed in error, there
will be a ten second delay before the SOS Call system
initiates a call to a SOS operator. To cancel the SOS Call
connection, push the SOS call button on the Rearview
Mirror or press the cancellation button on the Device
Screen. Termination of the SOS Call will turn off the green
LED light on the Rearview Mirror.
2. The LED light located between the ASSIST and SOS buttons on the Rearview Mirror will turn green once a
connection to a SOS operator has been made.
7
IN CASE OF EMERGENCY 379
Page 382 of 614
3. Once a connection between the vehicle and a SOSoperator is made, the SOS Call system may transmit the
following important vehicle information to a SOS op-
erator:
• Indication that the occupant placed a SOS Call.
• The vehicle brand.
• The last known GPS coordinates of the vehicle.
4. You should be able to speak with the SOS operator through the vehicle audio system to determine if addi-
tional help is needed.
WARNING!
ALWAYS obey traffic laws and pay attention to the
road. ALWAYS drive safely with your hands on the
steering wheel. You have full responsibility and as-
sume all risks related to the use of the features and
applications in this vehicle. Only use the features and
applications when it is safe to do so. Failure to do so
may result in an accident involving serious injury or
death. NOTE:
•Your vehicle may be transmitting data as authorized
by the subscriber.
• Once a connection is made between the vehicle’s SOS
Call system and the SOS operator, the SOS operator
may be able to open a voice connection with the
vehicle to determine if additional help is needed. Once
the SOS operator opens a voice connection with the
vehicle’s SOS Call system, the operator should be able
to speak with you or other vehicle occupants and hear
sounds occurring in the vehicle. The vehicle’s SOS Call
system will attempt to remain connected with the SOS
operator until the SOS operator terminates the connec-
tion.
5. The SOS operator may attempt to contact appropriate emergency responders and provide them with impor-
tant vehicle information and GPS coordinates.
WARNING!
•If anyone in the vehicle could be in danger (e.g., fire
or smoke is visible, dangerous road conditions or
location), do not wait for voice contact from an
(Continued)
380 IN CASE OF EMERGENCY
Page 384 of 614
WARNING!
•Ignoring the Rearview Mirror light could mean you
will not have SOS Call services. If the Rearview
Mirror light is illuminated, have your authorized
dealer service the SOS Call system immediately.
• The Occupant Restraint Control module turns on the
air bag Warning Light on the instrument panel if a
malfunction in any part of the system is detected. If
the Air Bag Warning Light is illuminated, have your
authorized dealer service the Occupant Restraint
Control system immediately.
Even if the SOS Call system is fully functional, factors
beyond FCA US LLC’s control may prevent or stop the SOS
Call system operation. These include, but are not limited
to, the following factors:
• Delayed accessories mode is active.
• The ignition is in the OFF position.
• The vehicle’s electrical systems are not intact.
• The SOS Call system software and/or hardware are
damaged during a crash. •
The vehicle battery loses power or becomes discon-
nected during a vehicle crash.
• LTE (voice/data) or 4G (data) network and/or Global
Positioning Satellite signals are unavailable or ob-
structed.
• Equipment malfunction at the SOS operator facility.
• Operator error by the SOS operator.
• LTE (voice/data) or 4G (data) network congestion.
• Weather.
• Buildings, structures, geographic terrain, or tunnels.
WARNING!
ALWAYS obey traffic laws and pay attention to the
road. ALWAYS drive safely with your hands on the
steering wheel. You have full responsibility and as-
sume all risks related to the use of the features and
applications in this vehicle. Only use the features and
applications when it is safe to do so. Failure to do so
may result in an accident involving serious injury or
death.
382 IN CASE OF EMERGENCY
Page 390 of 614
Front And Rear Side Marker Lamps
1. Remove the three fasteners from the inner wheel linerand carefully peel back liner for access.
2. Firmly grasp the front side marker lamp socket and rotate 1/4 turn counterclockwise to remove it from the
lamp assembly. 3. Remove bulb from the front side marker lamp socket
and replace with a new bulb.
4. Install front side marker lamp socket in lamp assembly and rotate 1/4 turn clockwise to lock into place.
5. Position the inner wheel liner in place and install the three fasteners.
Inner Wheel Liner Fasteners
Front Side Marker Lamp Bulb Removal
388 IN CASE OF EMERGENCY
Page 391 of 614
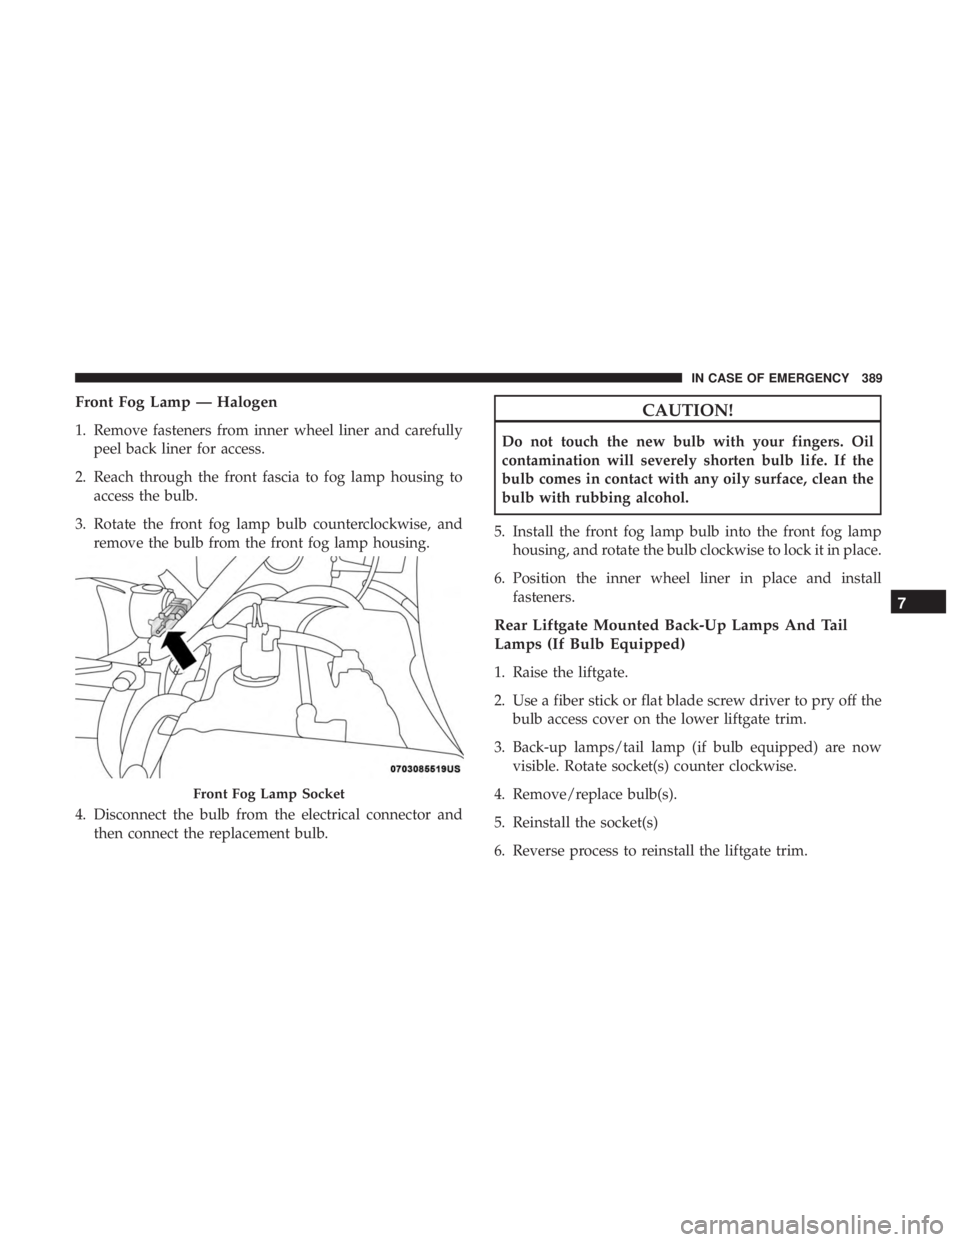
Front Fog Lamp — Halogen
1. Remove fasteners from inner wheel liner and carefullypeel back liner for access.
2. Reach through the front fascia to fog lamp housing to access the bulb.
3. Rotate the front fog lamp bulb counterclockwise, and remove the bulb from the front fog lamp housing.
4. Disconnect the bulb from the electrical connector and then connect the replacement bulb.
CAUTION!
Do not touch the new bulb with your fingers. Oil
contamination will severely shorten bulb life. If the
bulb comes in contact with any oily surface, clean the
bulb with rubbing alcohol.
5. Install the front fog lamp bulb into the front fog lamp housing, and rotate the bulb clockwise to lock it in place.
6. Position the inner wheel liner in place and install fasteners.
Rear Liftgate Mounted Back-Up Lamps And Tail
Lamps (If Bulb Equipped)
1. Raise the liftgate.
2. Use a fiber stick or flat blade screw driver to pry off thebulb access cover on the lower liftgate trim.
3. Back-up lamps/tail lamp (if bulb equipped) are now visible. Rotate socket(s) counter clockwise.
4. Remove/replace bulb(s).
5. Reinstall the socket(s)
6. Reverse process to reinstall the liftgate trim.
Front Fog Lamp Socket
7
IN CASE OF EMERGENCY 389
Page 401 of 614
CavityCartridge Fuse Blade FuseDescription
F84 ––Not Used
F85 –20 Amp Yellow Cigar Lighter
F86 ––Not Used
F87 ––Not Used
F88 –20 Amp Yellow Front Heated Seats
F89 –20 Amp Yellow Rear Heated Seats
F90 –5 Amp Tan EBCM - ECU
F91 –15 Amp Blue Front Ventilated Seats/
Heated Steering Wheel
F92A –5 Amp Tan Security Gateway
F92B ––Not Used
F93 ––Not Used
F94 40 Amp Green –ESC - Motor Pump
F95A –10 Amp Red USB Charge Only Port
F95B – Selectable Fuse Location
F96 –10 Amp Red Occupant Restraint Control-
ler (ORC) (Airbag)
F97 –10 Amp Red Occupant Restraint Control-
ler (ORC) (Airbag)
F98 ––Not Used
7
IN CASE OF EMERGENCY 399