Page 67 of 614
WARNING!
Personal injury or cargo damage may occur if caught in
the path of the sliding door. Make sure the door path is
clear before closing the door.
WARNING!
Before driving off, check the instrument cluster for a
sliding door or door open message or warning indica-
tor. Failure to do this could result in unintentionally
leaving the sliding door open while driving.
Hands-Free Sliding Doors — If Equipped
To open the Hands-Free Sliding Doors, use a straight in
and out kicking motion under the vehicle in the general
Passenger Side Power Sliding Side Door Switch
Hands-Free Sliding Doors
3
GETTING TO KNOW YOUR VEHICLE 65
Page 69 of 614

3. Repeat Steps 1 and 2 on the opposite sliding door.
NOTE:
•After engaging (or disengaging) the Child Protection
Door Lock, always test the inside door handle with the
sliding door closed to make certain the Child Protection
Door Lock is in the desired position. The inside door
handle will not open the sliding door when the Child
Protection Door Lock is engaged.
• The power sliding door will operate from the switch
located just inside the sliding door, regardless of the
Child Protection Door Lock lever position. •
To avoid unintentional operation of the power sliding
door from the rear seats, push the Sliding Door Power
Off button, located in the overhead console. When the
overhead console power OFF LED is lit, the sliding door
may not be power opened or closed by pushing the
buttons just inside the sliding doors or pulling on the
handles.
WARNING!
Avoid trapping anyone in the vehicle in a collision.
Remember that the sliding doors cannot be opened
from the inside door handle when the Child Protection
Door Locks are engaged.
To Disengage The Child Protection Door Lock
1. Open the sliding side door.
2. Slide the Child Protection Door Lock control outward (away from the vehicle) to disengage the Child Protec-
tion Door Lock.
3. Repeat Steps 1 and 2 on the opposite sliding door.
NOTE:
• After disengaging (or engaging) the Child Protection
Door Lock, always test the inside door handle with the
Child Protection Door Locks
3
GETTING TO KNOW YOUR VEHICLE 67
Page 70 of 614

sliding door closed to make certain the Child Protection
Door Lock is in the desired position. The inside door
handle will open the sliding door when the Child
Protection Door Lock is disengaged.
SEATS
Seats are a part of the Occupant Restraint System of the
vehicle.
WARNING!
•It is dangerous to ride in a cargo area, inside or
outside of a vehicle. In a collision, people riding in
these areas are more likely to be seriously injured or
killed.
• Do not allow people to ride in any area of your
vehicle that is not equipped with seats and seat belts.
In a collision, people riding in these areas are more
likely to be seriously injured or killed.
• Be sure everyone in your vehicle is in a seat and
using a seat belt properly.
Manual Adjustment (Front Seats) — If Equipped
WARNING!
• Adjusting a seat while the vehicle is moving is
dangerous. The sudden movement of the seat could
cause you to lose control. The seat belt might not be
adjusted properly and you could be injured. Adjust
the seat only while the vehicle is parked.
• Do not ride with the seatback reclined so that the
shoulder belt is no longer resting against your chest.
In a collision you could slide under the seat belt and
be seriously or even fatally injured. Use the recliner
only when the vehicle is parked.
Manual Front Adjuster
Both front seats are adjustable forward or rearward. The
manual seat adjustment handle is located under the seat
cushion at the front edge of each seat.
68 GETTING TO KNOW YOUR VEHICLE
Page 71 of 614

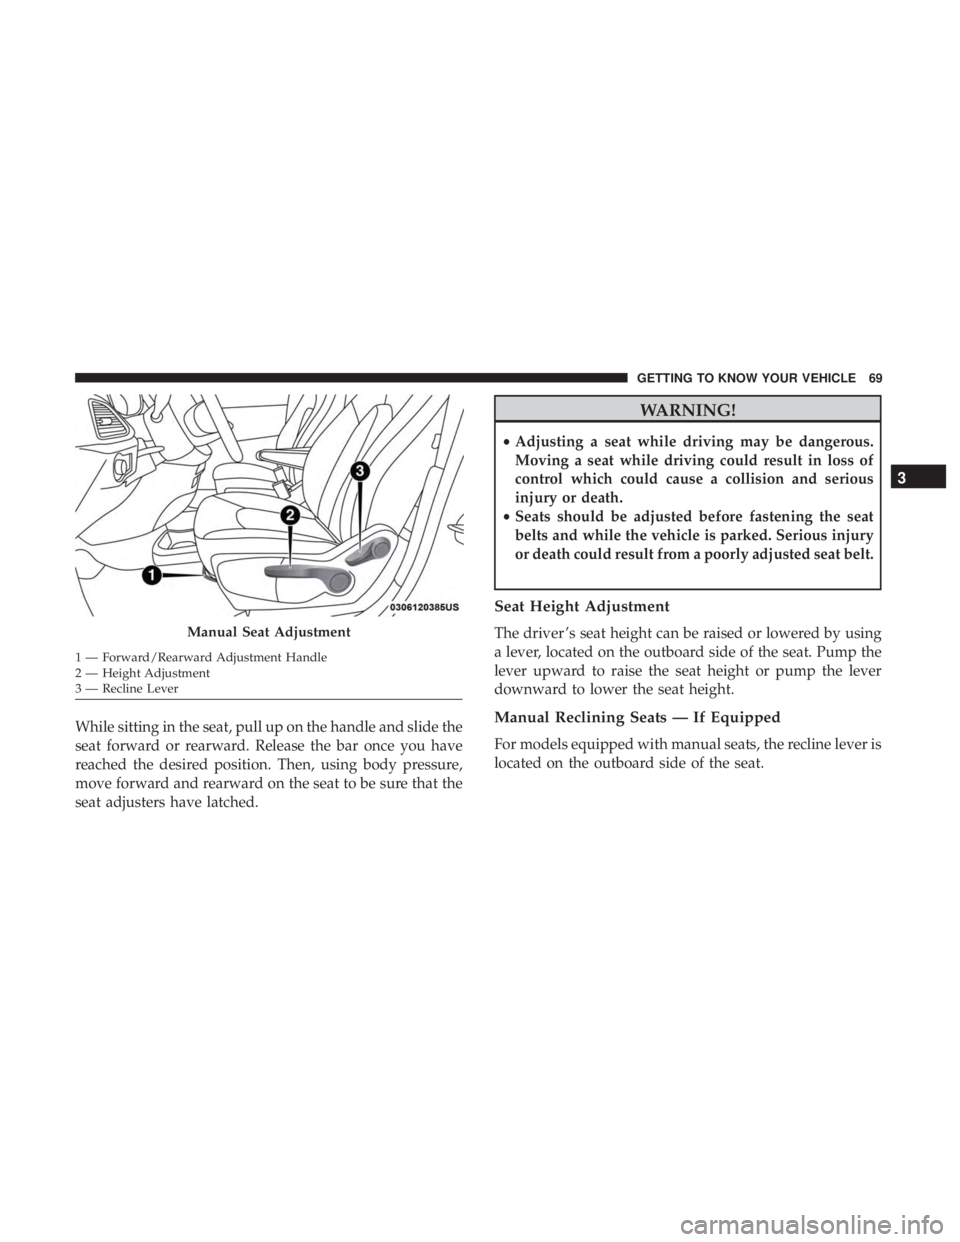
While sitting in the seat, pull up on the handle and slide the
seat forward or rearward. Release the bar once you have
reached the desired position. Then, using body pressure,
move forward and rearward on the seat to be sure that the
seat adjusters have latched.
WARNING!
•Adjusting a seat while driving may be dangerous.
Moving a seat while driving could result in loss of
control which could cause a collision and serious
injury or death.
• Seats should be adjusted before fastening the seat
belts and while the vehicle is parked. Serious injury
or death could result from a poorly adjusted seat belt.
Seat Height Adjustment
The driver ’s seat height can be raised or lowered by using
a lever, located on the outboard side of the seat. Pump the
lever upward to raise the seat height or pump the lever
downward to lower the seat height.
Manual Reclining Seats — If Equipped
For models equipped with manual seats, the recline lever is
located on the outboard side of the seat.
Manual Seat Adjustment
1 — Forward/Rearward Adjustment Handle
2 — Height Adjustment
3 — Recline Lever
3
GETTING TO KNOW YOUR VEHICLE 69
Page 72 of 614

To recline, lean forward slightly, lift the lever and push
back to the desired position and release the lever. Lean
forward and lift the lever to return the seatback to its
normal position. Using body pressure, lean forward and
rearward on the seat to be sure the seatback has latched.
WARNING!
Do not ride with the seatback reclined so that the
shoulder belt is no longer resting against your chest. In
a collision you could slide under the seat belt, which
could result in serious injury or death.
Manual Adjustment (Rear Seats)
WARNING!
•Adjusting a seat while the vehicle is moving is
dangerous. The sudden movement of the seat could
cause you to lose control. The seat belt might not be
adjusted properly and you could be injured. Adjust
the seat only while the vehicle is parked.
• Do not ride with the seatback reclined so that the
shoulder belt is no longer resting against your chest.
In a collision you could slide under the seat belt and
be seriously or even fatally injured. Use the recliner
only when the vehicle is parked.
Manual Rear Seat Adjuster
Both second row seats are adjustable forward or rearward.
The manual seat adjustment handle is located under the
seat cushion at the front edge of each seat.
Manual Recline Lever
70 GETTING TO KNOW YOUR VEHICLE
Page 73 of 614
While sitting in the seat, pull up on the handle and slide the
seat forward or rearward. Release the bar once you have
reached the desired position. Then, using body pressure,
move forward and rearward on the seat to be sure that the
seat adjusters have latched.
WARNING!
•Adjusting a seat while driving may be dangerous.
Moving a seat while driving could result in loss of
control which could cause a collision and serious
injury or death.
•
Seats should be adjusted before fastening the seat
belts and while the vehicle is parked. Serious injury or
death could result from a poorly adjusted seat belt.
Manual Recline
To recline, lean forward slightly, lift the lever, and push
back to the desired position and release the lever. Lean
forward and lift the lever to return the seatback to its
normal position. Using body pressure, lean forward and
rearward on the seat to be sure the seatback has latched.
Manual Seat Adjuster
3
GETTING TO KNOW YOUR VEHICLE 71
Page 74 of 614
WARNING!
Do not ride with the seatback reclined so that the
shoulder belt is no longer resting against your chest. In
a collision you could slide under the seat belt, which
could result in serious injury or death.
Power Adjustment (Front Seats) — If Equipped
Some models may be equipped with eight-way power seats
for the driver and front passenger. The power seat switches
are located on the outboard side of the seat. The switches
control the movement of the seat cushion and the seatback.
Recline Lever
Driver Power Seat Switches
1 — Seat Switch
2 — Seatback Switch
3 — Lumbar Switch
72 GETTING TO KNOW YOUR VEHICLE
Page 75 of 614

WARNING!
•Adjusting a seat while driving may be dangerous.
Moving a seat while driving could result in loss of
control which could cause a collision and serious
injury or death.
• Seats should be adjusted before fastening the seat
belts and while the vehicle is parked. Serious injury
or death could result from a poorly adjusted seat belt.
• Do not ride with the seatback reclined so that the
shoulder belt is no longer resting against your chest.
In a collision you could slide under the seat belt,
which could result in serious injury or death.
CAUTION!
Do not place any article under a power seat or impede
its ability to move as it may cause damage to the seat
controls. Seat travel may become limited if movement
is stopped by an obstruction in the seat’s path.
Adjusting The Seat Forward Or Rearward
The seat can be adjusted both forward and rearward. Push
the seat switch forward or rearward, and the seat will move in the direction of the switch. Release the switch
when the desired position has been reached.
Adjusting The Seat Up Or Down
The height of the seats can be adjusted up or down. Pull
upward or push downward on the rear of seat switch, the
seat will move in the direction of the switch. Release the
switch when the desired position has been reached.
Tilting The Seat Up Or Down
The angle of the seat cushion can be adjusted in two
directions. Pull upward or push downward on the front of
the seat switch, the front of the seat cushion will move in
the direction of the switch. Release the switch when the
desired position has been reached.
Reclining The Seatback
The angle of the seatback can be adjusted forward or
rearward. Push the seatback switch forward or rearward,
the seat will move in the direction of the switch. Release the
switch when the desired position is reached.
3
GETTING TO KNOW YOUR VEHICLE 73