Page 1 of 20
1
2018 SILVERADO
GETTING TO KNOW YOUR
chevrolet.com
Review this Quick Reference Guide for an overview of some important feat\
ures in your Chevrolet Silverado. Some optional equipment described in this guide may\
not be included in your vehicle. More information can be found in your Owner’s Manual and at \
my.chevrolet.com/learn. For easy reference, keep this guide with your Owner’s Manual in your \
glove box.
Certain restrictions, precautions, and safety procedures apply to your v\
ehicle. Please read your Owner’s Manual for complete instructions.
Page 2 of 20
2
Memory Seat ControlsF4WD ControlF
Instrument Panel Illumination Control/Exterior Lamp ControlTow/Haul Button
Driver Information Center
Turn Signal/Windshield Wipers Lever
Audio Next/Previous Favorite Station Controls (behind steering wheel)
Integrated Trailer Brake ControlF
Cruise Control/ Collision AlertF/Heated Steering WheelF Buttons
Power Mirror ControlF/Door Lock Switch/Window Buttons
Voice Recognition Buttons/Driver Information Center Controls
Audio Volume Controls (behind steering wheel)
Tilt Steering Wheel Lever
Telescoping Steering Wheel ControlF
Low Fuel
Traction Control Off
Brake System
Cruise Control Set
StabiliTrak Active
StabiliTrak Off
Security
Tow/Haul Mode
Hill Descent Control
Diesel Exhaust Brake (diesel models only)
Lights On Reminder
Airbag Readiness
INSTRUMENT PANEL
SYMBOLS
Page 3 of 20
3
Refer to your Owner’s Manual to learn about the information being relayed by the lights, gauges and indicators on the instrument cluster.
See In Brief in your Owner’s Manual.
Driver’s Heated/Vented Seat ButtonsFClimate ControlsF
Passenger’s Heated/Vented Seat ButtonsF
Accessory Power OutletsF
Adjustable Pedals SwitchF/Traction Control and StabiliTrak Button/ Cargo Box Lamp Button
Infotainment System (8-inch* screen shownF)
Front and Rear Parking AssistF/ Lane Keep AssistF(LD models)/ Lane Departure WarningF(HD models)/Hill Descent ControlF/Diesel Exhaust Brake (if equipped) Buttons
110V OutletFUSB PortsF
Note: Diesel model shown.
USB PortF (in glove box; LT and LTZ bench seat models only)
Check Engine
Antilock Brake System
Low Tire Pressure (single rear wheel models only)
Door Ajar
Oil Pressure
Charging System
Safety Belt Reminder
F Optional equipment *Screen measured diagonally
Page 4 of 20
F
DOOR LOCKS
Unlock
Press to unlock the driver’s door. Press again to unlock all doors and tailgate. Press and hold to lower all windows.
Lock
Pre")
4
REMOTE KEYLESS ENTRY TRANSMITTER (KEY FOB)F
DOOR LOCKS
Unlock
Press to unlock the driver’s door. Press again to unlock all doors and tailgate. Press and hold to lower all windows.
Lock
Press to lock all doors and tailgate.
Vehicle Locator/Panic Alarm
Press and release to locate your vehicle. The turn signal lamps will flash and the horn will sound.
Press and hold to activate the alarm. The turn signal lamps will flash and the horn will sound until the button is pressed again or the ignition is turned on.
Note: To change the remote lock, unlock, and remote start settings, go to Settings > Vehicle > Remote Lock, Unlock, Start.
POWER MIRRORSF
DOOR LOCKS
To lock or unlock all doors, press the power door Lock/ Unlock button, located on the front doors.
Note: To change the lock and unlock settings, go to Settings > Vehicle > Power Door Locks.
To open a locked door from inside, pull the inside door handle to unlock\
the door and then pull the door handle again to open the door.
To prevent passengers from opening a rear door (if equipped) from the \
inside or opening a rear window, press the Rear Door Security Lock/Rear Window Lockout button located on the driver’s door. The button indicator will illum\
inate.
LOCKING TAILGATE
To lock or unlock the tailgate, use the door key or the key fobF.
See Keys, Doors and Windows in your Owner’s Manual.
Remote Vehicle StartF
Press and release the Lock button and then press and hold the button until the turn signal lamps flash to start the engine from outside the vehicle. After entering the vehicle, turn on the ignition.
• During a remote start, the engine will run for 10 minutes.
• Press and hold the button until the parking lamps turn off to cancel a remote start.
Note: If the remote start heated/vented seat option is selected, the heated/vented seat button indicators do not illuminate and the t emperature performance of the unoccupied seat may be reduced during the remote start. The heated/vented seat turns off when the ignition is turned on.
See Keys, Doors and Windows in your Owner’s Manual.
F Optional equipment
POWER MIRROR ADJUSTMENT
Press the Power Mirror Selector switch to select the driver’s or passenger’s
mirror; use the four-way control to adjust the mirror.
POWER FOLDING MIRROR
Press the Power Folding Mirror button to fold or unfold the mirrors.
See Keys, Doors and Windows in your Owner’s Manual.
Page 5 of 20

5
POWER SEATSF
HEAD RESTRAINTS
SEAT ADJUSTMENTS
A. Seat Cushion Adjustment
Move the front horizontal control to move the seat forward or rearward, or to tilt, raise or lower the seat.
B. Seatback Adjustment
Move the vertical control to recline or raise the seatback.
C. Lumbar Adjustment
Move the rear control to adjust the lumbar support.
SET MEMORY POSITIONS
1. With the vehicle in Park, adjust the driver’s seat, power outside mirrors and adjustable pedalsF to the desired positions.
2. Press and release the SET button and then press and hold button 1 on the driver’s door until two beeps sound.
3. Repeat the steps using button 2 for a second driver.
SET EXIT POSITION
1. Adjust the driver’s seat and adjustable pedalsF to the desired positions.
2. Press and release the SET button and then press and hold the Exit button on the driver’s door until two beeps sound.
RECALL POSITIONS
With the vehicle in Park and the ignition on, press and release button 1 or 2 or the Exit button to recall the stored position.
At any time, press and hold button 1 or 2 on the driver’s door until the stored position is reached. Releasing the button before the stored position is reached c\
ancels the recall.
The memory/exit positions can be programmed to be recalled automatically\
when the ignition is turned on/off (for exit recall, the driver’s door must b\
e opened).
To set the Auto Memory Recall or Easy Exit Options, go to Settings > Veh\
icle > Comfort and Convenience > Auto Memory Recall or Easy Exit Options.
See Seats and Restraints in your Owner’s Manual.
To raise the head restraint, pull the head restraint up.
To lower the head restraint, press the button on top of the seatback and\
push the head restraint down.
F Optional equipmentSee Seats and Restraints in your Owner’s Manual.
AC
B
Page 6 of 20
 on the left side of the steering
column to adjust the tilt position of the steering wheel. The steering wheel can the")
6
TILT/TELESCOPINGF STEERING WHEEL
With the vehicle in Park, pull the lever (A) on the left side of the steering
column to adjust the tilt position of the steering wheel. The steering wheel can then be moved up or down. Release the lever to lock the steering wheel in place.
With the vehicle in Park, push down the leverF (B) closer to the instrument panel on the left side of the steering column to move the steering wheel in or out. Pull up the lever to lock the steering wheel in place.
DRIVER INFORMATION CENTER
F Optional equipment *Screen measured diagonally
The Driver Information Center (DIC) on the instrument cluster displays\
a variety of
vehicle messages and system information.
3.5-INCH* DRIVER INFORMATION CENTER
Menu Items
Turn the reset stem on the instrument cluster to scroll through the following menu items: Digital Speedometer, Trip Odometer, Fuel Range, Average Fuel Economy, Tire Pressure, Remaining Oil Life, Transmission Fluid Temperature, Trailer Brake, Hourmeter, and Units.
Reset an Item
Press the reset stem to set a menu item or clear a message. Press and ho\
ld the stem to reset a menu item.
4.2-INCH* COLOR DRIVER INFORMATION CENTERF
Use the control pad on the right side of the steering wheel to view the Info (includes the trip odometers and fuel information), Audio, Phone, Navigation, and Settings menus.
Menu Items
Press the or button to move between the display zones.
Press the or button to move through the menus.
Press to open a menu or select/deselect a setting. Press and hold to reset/cl\
ear an item.
See Instruments and Controls in your Owner’s Manual.
See Instruments and Controls in your Owner’s Manual.
B
A
Page 7 of 20
 or the headlamps and oth")
7
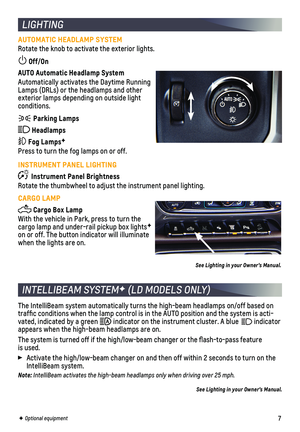
AUTOMATIC HEADLAMP SYSTEM
Rotate the knob to activate the exterior lights.
Off/On
AUTO Automatic Headlamp System
Automatically activates the Daytime Running Lamps (DRLs) or the headlamps and other exterior lamps depending on outside light conditions.
Parking Lamps
Headlamps
Fog LampsF
Press to turn the fog lamps on or off.
INSTRUMENT PANEL LIGHTING
Instrument Panel Brightness
Rotate the thumbwheel to adjust the instrument panel lighting.
CARGO LAMP
Cargo Box Lamp
With the vehicle in Park, press to turn the cargo lamp and under-rail pickup box lightsF on or off. The button indicator will illuminate when the lights are on.
See Lighting in your Owner’s Manual.
LIGHTING
F Optional equipment
INTELLIBEAM SYSTEMF (LD MODELS ONLY)
The IntelliBeam system automatically turns the high-beam headlamps on/of\
f based on traffic conditions when the lamp control is in the AUTO position and t\
he system is acti-vated, indicated by a green indicator on the instrument cluster. A blue indicator appears when the high-beam headlamps are on.
The system is turned off if the high/low-beam changer or the flash-to-\
pass feature is used.
Activate the high/low-beam changer on and then off within 2 seconds to t\
urn on the IntelliBeam system.
Note: IntelliBeam activates the high-beam headlamps only when driving over 25 mph.
See Lighting in your Owner’s Manual.
Page 8 of 20
8
CLIMATE CONTROLS
RECIRCULATION MODE
Press Recirculation Mode to quickly cool the air inside the vehicle or prevent
outside odors from entering the vehicle.
Note: When the Recirculation Mode is used without air conditioning, the air hu\
midity increases and the windows may fog.
See Climate Controls in your Owner’s Manual.
F Optional equipment
Defog Mode
Defrost Mode
Recirculation Mode
Floor ModeTEMP Temperature Control
Bi-level ModeREAR Rear Window DefoggerF
Fan Speed Control/Off Vent Mode
A/C Air Conditioning Control