Page 9 of 20

9
AUTOMATIC CLIMATE CONTROLSF
AUTOMATIC OPERATION
1. Press AUTO.
2. Set the temperature for the driver and front passenger. The system autom\
atically
controls the fan speed, air delivery, air conditioning and recirculation\
to reach the set temperature. Allow time for the system to reach the desired temperature.\
If the functions are manually adjusted, automatic operation is turned of\
f.
RECIRCULATION MODE
Press Recirculation Mode to quickly cool the air inside the vehicle or prevent
outside odors from entering the vehicle.
Note: When the Recirculation Mode is used without air conditioning, the air hu\
midity increases and the windows may fog.
SYNC TEMPERATURE SETTINGS
Press SYNC to link the passenger’s temperature setting to the driver’s setti\
ng. If the passenger’s setting is adjusted, the different passenger’s tempera\
ture setting is displayed.
See Climate Controls in your Owner’s Manual.
Driver’s Temperature Control Defog Mode
Defrost Mode
Passenger’s Temperature Control
AUTO Automatic Operation Driver’s Heated/Vented Seat ButtonsF
Passenger’s Heated/Vented Seat ButtonsF
Recirculation Mode
Floor Mode
SYNC Link passenger’s temperature setting to driver’s temperature setting
Bi-level Mode
REAR Rear Window/ Outside Mirror DefoggerF
Fan Speed Control/On/Off Vent Mode
A/C Air Conditioning Control
F Optional equipment
Page 10 of 20

10
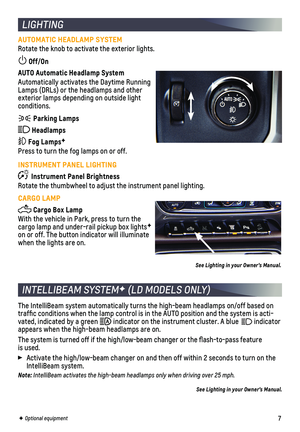
WINDSHIELD WIPERS
Rotate the band on the lever to activate the wipers.
Fast Wipes
Slow Wipes
INT Intermittent
Adjust the delay between wipes. The wipers activate more often as the band is rotated upward.
OFF
Single Wipe
Washer Fluid
Push the paddle forward to spray washer fluid on the windshield.
See Instruments and Controls in your Owner’s Manual.
AUDIO STEERING WHEEL CONTROLSF
Push to Talk
Press to answer an incoming call or to use natural voice recognitionF with the audio, BluetoothF, navigationF or OnStar® system.
Press and hold to activate Voice Pass-Thru (Siri® Eyes Free or Voice Command) on a paired, compatible cell phone.
End Call/Mute
Press to end or decline a call. Press to mute/unmute the vehicle speakers.
Volume (behind right side of steering wheel)
Press the top or bottom button to adjust the volume.
Next/Previous Favorite Station (behind left side of steering wheel)
Press the top or bottom button to go to the next or previous favorite radio station or track.
Next/Previous Favorite Station button shown. Volume button is located behind the right side of the steering wheel.
F Optional equipment
See your Infotainment System Manual.
Page 11 of 20

11
CHEVROLET MYLINK RADIO WITH 7-INCH* COLOR SCREEN
SETTING THE TIME
1. Touch Settings on the home page.
2. Touch Time and Date.
3. Touch Set Time.
4. Touch the arrows to adjust the hours, minutes and AM or PM.
5. Touch BACK to exit the menu.
STORING FAVORITES
Up to 25 AM, FM and SiriusXMF radio
stations can be stored, in any order, on up to five pages.
1. Tune in the desired radio station.
2. Touch the or button to display where the station is to be stored.
3. Touch and hold one of the preset screen buttons until a beep is heard.
4. Repeat the steps for each desired station.
Refer to your Owner’s Manual for important information about using the infotainment system while driving.
F Optional equipment *Screen measured diagonally
For assistance with the MyLink system, contact Customer Assistance at 1-855-4-SUPPORT (1-855-478-7767) or visit my.chevrolet.com/learn.
See Infotainment System in your Owner’s Manual.
Press to view Phone screen or answer a call/Press and hold to access Push to Talk
Home page
Power/Volume
Applications: Touch the screen icon to access the application
SEEK Previous radio station or track
SEEK Next radio station or track
Page 12 of 20

12
CHEVROLET MYLINK RADIO WITH 8-INCH* COLOR SCREENF
BACK Move back one level in the menus
Home page
Eject disc
Interaction Selector: Touch to display the favorites list
TUNE/MENU Tune radio stations/Open and select menus
ApplicationsF: Touch the screen icon to access the application
Additional Pages: Touch to view additional pages of applications (if available)
Power/ Volume
MEDIA Select the media source
RADIO Select AM, FM, SiriusXMF
SEEK Previous/Next radio station or track
Refer to your Owner’s Manual for important information about using the infotainment system while driving.
F Optional equipment *Screen measured diagonally
MANAGING HOME PAGE ICONS
1. Press the Home button.
2. To enter edit mode, touch and hold the home page icon to move.
3. Continue holding the icon and drag it to the desired position, and then release.
4. Press the Home button to exit edit mode.
For assistance with the MyLink system, contact Customer Assistance at 1-855-4-SUPPORT (1-855-478-7767) or visit my.chevrolet.com/learn.
Page 13 of 20

13
SETTING THE TIME
1. Touch Settings on the home page.
2. Touch Time and Date.
3. Touch Set Time.
4. Touch the arrows to adjust the hours, minutes and AM or PM.
5. Touch BACK to exit the menu.
STORING FAVORITES
Up to 60 radio stations from all bands (AM, FM or SiriusXMF), media (song, artist, album, and genre when connected to a USB port), phone contacts and navigation \
destinationsF can be stored in any order.
1. Select the desired radio station, media favorite, navigation destination\
or contact.
2. Touch and drag up the Interaction Selector at the bottom of the screen to display the favorite screen buttons.
3. Touch and hold one of the favorite screen buttons until a beep is heard,\
indicating it is stored.
4. Repeat the steps to store another favorite item.
To change the number of favorites displayed, go to Settings > Radio.
NATURAL VOICE RECOGNITION
Control the music source and make phone calls hands-free (after pairing\
your Bluetooth-enabled phone) using the natural voice recognition system.
1. Press the Push to Talk button on the steering wheel.
2. The radio will play a prompt followed by a beep.
3. After the beep, say what you want it to do using natural speech. (Example: “Call Amanda” or “Tune FM 104.3.” Say “Help”\
for assistance.)
CHEVROLET SHOP
In-vehicle apps, connecting to music, news, weather, travel information \
and more, are available for download to the radio through the SHOP icon on the home page.
Downloading and using the apps requires internet connectivity and a data\
plan accessed through the vehicle’s OnStar 4G LTE Wi-Fi hotspot, if active, or a mo\
bile device hotspot.
PORTABLE AUDIO DEVICES
An accessory power outlet, dual USB ports and auxiliary jack are located\
in the center seat console (bench seat) or center console storage compartment (buck\
et seats).
An iPod®, iPhone®, MP3 Player, a USB flash drive or a USB mass storage device can be connected to the USB port. Chevrolet MyLink will read the device and bui\
ld a list of songs. Search for music on-screen or by voice commands.
Press the MEDIA button to select a portable device as the audio source.
See your Infotainment System Manual.
CHEVROLET MYLINK RADIO WITH 8-INCH* COLOR SCREENF
F Optional equipment *Screen measured diagonally
Page 14 of 20
 can be connected to high-speed internet through the vehicle’s built-in Wi-Fi\
hotspot.
To retrieve the SSID an")
14
With OnStar 4G LTE and Wi-Fi, up to 7 devices (smartphones, tablets and\
laptops) can be connected to high-speed internet through the vehicle’s built-in Wi-Fi\
hotspot.
To retrieve the SSID and password for the hotspot, press the OnStar Voic\
e Command button on the overhead console or rearview mirror, wait for the prompt, \
and then say “Wi-Fi settings.” The information will be displayed on the screen.\
For assistance, press the blue OnStar button or call 1-888-4-ONSTAR (1-\
888-466-7827).
Note: See onstar.com for a detailed instruction guide, vehicle availability, details, and system l imitations. See your Infotainment System Manual.
APPLE CARPLAY™ AND ANDROID AUTO™F
ONSTAR® WITH 4G LTE AND WI-FI®F
The Wireless Charging system is located on the storage tray on top of th\
e center console. To check mobile device compatibility, visit my.chevrolet.com/learn. See your phone
retailer for details on required phone accessories.
1. The vehicle must be on or Retained Accessory Power must be active.
2. Remove all objects from the charging pad.
3. Place the device, face up, on the symbol on the pad, aligned with the rear rib.
4. Move the device slowly until the battery charging symbol displays on the\
infotainment screen. If not charging, remove the device for 3 seconds and rotate it 1\
80 degrees.
See your Infotainment System Manual.
WIRELESS CHARGINGF
Apple CarPlay or Android Auto capability may be available through a comp\
atible smart-phone. If available, a Projection icon will appear on the home page of the infotain-ment display.
1. No app is required for Apple CarPlay. Download the Android Auto app to y\
our phone from the Google Play Store.
2. Connect your compatible phone by plugging the phone USB cable into a USB\
data port. Use your device’s factory-provided USB cable. Aftermarket cables may \
not work.
3. The Projection icon will change to Apple CarPlay or Android Auto, depending on the phone. Apple CarPlay or Android Auto may launch automatically upo\
n USB
connection. If not, touch the Apple CarPlay or Android Auto icon on the \
home page.
For more information on using Apple CarPlay or Android Auto, call 1-855-\
4-SUPPORT (1-855-478-7767) or visit my.chevrolet.com/learn.
See your Infotainment System Manual.
F Optional equipment
Page 15 of 20

15
Refer to your Owner’s Manual for important information about using th\
e Bluetooth system while driving.
Before using a Bluetooth-enabled device in the vehicle, it must be paire\
d with the in- vehicle Bluetooth system. The pairing process is disabled when the vehic\
le is moving. Not all devices will support all functions. Bluetooth streaming audio is ava\
ilable with the MyLink system.F For more information, visit my.chevrolet.com/learn.
PAIR A PHONE
1. To use voice recognition, press the Push to Talk button; after the beep, say “Pair phone,” or
Use the MENU knob or the touch screen to select the Phone icon > Phones > Pair Device.
2. Start the pairing process on the phone. Locate Chevrolet MyLink on the phone.
3. Enter the four-digit code that appears on the touch screen into the phone or, if a six-digit code appears on the phone, confirm it on the touch screen.
4. If your phone prompts you to accept the
connection or phone book download, select Always Accept and Allow.
STREAMING AUDIO
With a paired device connected via Bluetooth, press the MEDIA button until Bluetooth is displayed on the touch screen to stream audio from the device. Contro\
l audio
operation using the device controls.See your Infotainment System Manual.
BLUETOOTH® SYSTEMF
F Optional equipment
TEEN DRIVER
UNIVERSAL REMOTE SYSTEM
Teen Driver allows multiple keys to be registered for beginning drivers.\
When active, the system automatically activates certain safety systems, allows setting of\
some features, and limits the use of others. A Report Card records vehicle data about d\
riving behavior. When the vehicle is started with a registered key, a Driver Information \
Center message displays that Teen Driver is active.
To create a Personal Identification Number, register a key, change Tee\
n Driver
settings, or access the Report Card, go to Settings > Teen Driver.
See your Infotainment System Manual.
The Universal Remote System on the overhead console enables your vehicle\
to control 3 different devices, ranging from garage doors and gates to home lightin\
g. Go to www.homelink.com for detailed videos and instructions on how to program the Universal Remote System. For additional assistance, call 1-800-355-3515.\
See Instruments and Controls in your Owner’s Manual.
Page 16 of 20

16
Some vehicle features can be customized using the audio controls and men\
us or the touch screen buttonsF.
CHANGING VEHICLE SETTINGS
The Vehicle Settings menu may include Climate and Air Quality, Collision/Detection Systems, Comfort and Convenience, Lighting, Power Door Locks, and Remote Lock/ Unlock/Start.
Use the MENU knob or the touch screen to:
1. Select Settings on the home page.
2. Select Vehicle.
3. Select the desired menu item.
4. Select the desired feature and setting. Settings are saved automatically.
5. Select BACK to exit each menu.
VEHICLE PERSONALIZATION
SETTING CRUISE CONTROL
1. Press the On/Off button. The Cruise Control symbol will illuminate in white on the instrument cluster.
2. When traveling at the desired speed, press the SET– button to set the speed. The symbol will illuminate in green on the instrument cluster.
ADJUSTING CRUISE CONTROL
RES+ Resume/Accelerate
Press to resume a set speed.
When the system is active, press once to increase speed 1 mph; press and\
hold to
continue increasing the speed.
SET– Set/Coast
When the system is active, press once to decrease speed 1 mph; press and\
hold to
continue decreasing the speed.
Cancel
Press to cancel the cruise control without erasing the set speed from me\
mory.
Pressing the brake pedal also will cancel the cruise control.
The set speed is erased when cruise control or the vehicle ignition is t\
urned off.
CRUISE CONTROL
F Optional equipment
See Instruments and Controls in your Owner’s Manual.
See Driving and Operating in your Owner’s Manual.