2018 CHEVROLET SILVERADO light
[x] Cancel search: lightPage 2 of 20

2
Memory Seat ControlsF4WD ControlF
Instrument Panel Illumination Control/Exterior Lamp ControlTow/Haul Button
Driver Information Center
Turn Signal/Windshield Wipers Lever
Audio Next/Previous Favorite Station Controls (behind steering wheel)
Integrated Trailer Brake ControlF
Cruise Control/ Collision AlertF/Heated Steering WheelF Buttons
Power Mirror ControlF/Door Lock Switch/Window Buttons
Voice Recognition Buttons/Driver Information Center Controls
Audio Volume Controls (behind steering wheel)
Tilt Steering Wheel Lever
Telescoping Steering Wheel ControlF
Low Fuel
Traction Control Off
Brake System
Cruise Control Set
StabiliTrak Active
StabiliTrak Off
Security
Tow/Haul Mode
Hill Descent Control
Diesel Exhaust Brake (diesel models only)
Lights On Reminder
Airbag Readiness
INSTRUMENT PANEL
SYMBOLS
Page 3 of 20

3
Refer to your Owner’s Manual to learn about the information being relayed by the lights, gauges and indicators on the instrument cluster.
See In Brief in your Owner’s Manual.
Driver’s Heated/Vented Seat ButtonsFClimate ControlsF
Passenger’s Heated/Vented Seat ButtonsF
Accessory Power OutletsF
Adjustable Pedals SwitchF/Traction Control and StabiliTrak Button/ Cargo Box Lamp Button
Infotainment System (8-inch* screen shownF)
Front and Rear Parking AssistF/ Lane Keep AssistF(LD models)/ Lane Departure WarningF(HD models)/Hill Descent ControlF/Diesel Exhaust Brake (if equipped) Buttons
110V OutletFUSB PortsF
Note: Diesel model shown.
USB PortF (in glove box; LT and LTZ bench seat models only)
Check Engine
Antilock Brake System
Low Tire Pressure (single rear wheel models only)
Door Ajar
Oil Pressure
Charging System
Safety Belt Reminder
F Optional equipment *Screen measured diagonally
Page 7 of 20

7
AUTOMATIC HEADLAMP SYSTEM
Rotate the knob to activate the exterior lights.
Off/On
AUTO Automatic Headlamp System
Automatically activates the Daytime Running Lamps (DRLs) or the headlamps and other exterior lamps depending on outside light conditions.
Parking Lamps
Headlamps
Fog LampsF
Press to turn the fog lamps on or off.
INSTRUMENT PANEL LIGHTING
Instrument Panel Brightness
Rotate the thumbwheel to adjust the instrument panel lighting.
CARGO LAMP
Cargo Box Lamp
With the vehicle in Park, press to turn the cargo lamp and under-rail pickup box lightsF on or off. The button indicator will illuminate when the lights are on.
See Lighting in your Owner’s Manual.
LIGHTING
F Optional equipment
INTELLIBEAM SYSTEMF (LD MODELS ONLY)
The IntelliBeam system automatically turns the high-beam headlamps on/of\
f based on traffic conditions when the lamp control is in the AUTO position and t\
he system is acti-vated, indicated by a green indicator on the instrument cluster. A blue indicator appears when the high-beam headlamps are on.
The system is turned off if the high/low-beam changer or the flash-to-\
pass feature is used.
Activate the high/low-beam changer on and then off within 2 seconds to t\
urn on the IntelliBeam system.
Note: IntelliBeam activates the high-beam headlamps only when driving over 25 mph.
See Lighting in your Owner’s Manual.
Page 15 of 20

15
Refer to your Owner’s Manual for important information about using th\
e Bluetooth system while driving.
Before using a Bluetooth-enabled device in the vehicle, it must be paire\
d with the in- vehicle Bluetooth system. The pairing process is disabled when the vehic\
le is moving. Not all devices will support all functions. Bluetooth streaming audio is ava\
ilable with the MyLink system.F For more information, visit my.chevrolet.com/learn.
PAIR A PHONE
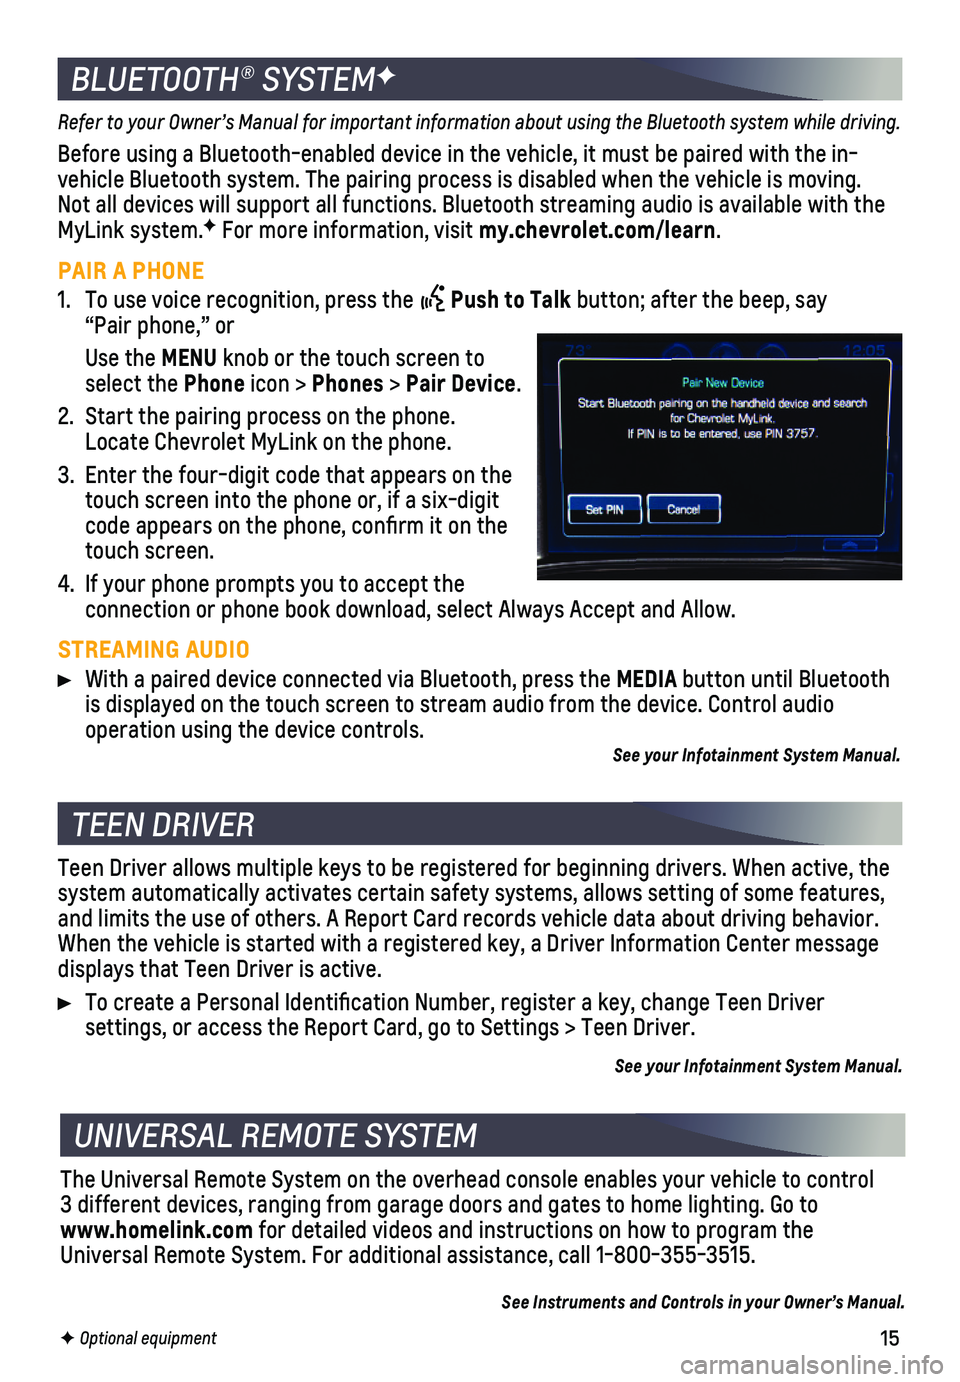
1. To use voice recognition, press the Push to Talk button; after the beep, say “Pair phone,” or
Use the MENU knob or the touch screen to select the Phone icon > Phones > Pair Device.
2. Start the pairing process on the phone. Locate Chevrolet MyLink on the phone.
3. Enter the four-digit code that appears on the touch screen into the phone or, if a six-digit code appears on the phone, confirm it on the touch screen.
4. If your phone prompts you to accept the
connection or phone book download, select Always Accept and Allow.
STREAMING AUDIO
With a paired device connected via Bluetooth, press the MEDIA button until Bluetooth is displayed on the touch screen to stream audio from the device. Contro\
l audio
operation using the device controls.See your Infotainment System Manual.
BLUETOOTH® SYSTEMF
F Optional equipment
TEEN DRIVER
UNIVERSAL REMOTE SYSTEM
Teen Driver allows multiple keys to be registered for beginning drivers.\
When active, the system automatically activates certain safety systems, allows setting of\
some features, and limits the use of others. A Report Card records vehicle data about d\
riving behavior. When the vehicle is started with a registered key, a Driver Information \
Center message displays that Teen Driver is active.
To create a Personal Identification Number, register a key, change Tee\
n Driver
settings, or access the Report Card, go to Settings > Teen Driver.
See your Infotainment System Manual.
The Universal Remote System on the overhead console enables your vehicle\
to control 3 different devices, ranging from garage doors and gates to home lightin\
g. Go to www.homelink.com for detailed videos and instructions on how to program the Universal Remote System. For additional assistance, call 1-800-355-3515.\
See Instruments and Controls in your Owner’s Manual.
Page 16 of 20

16
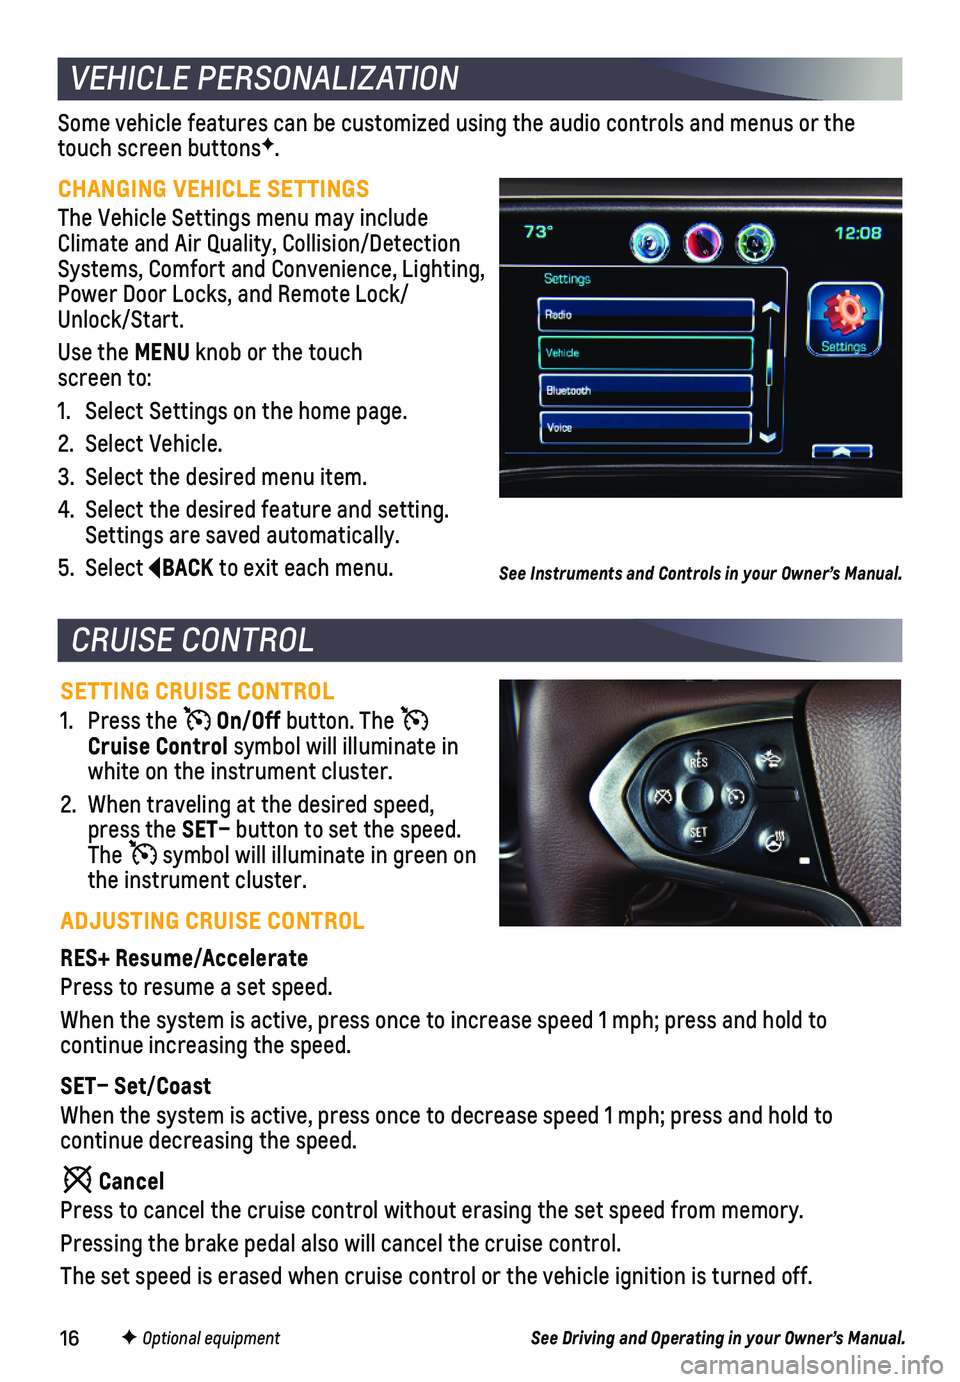
Some vehicle features can be customized using the audio controls and men\
us or the touch screen buttonsF.
CHANGING VEHICLE SETTINGS
The Vehicle Settings menu may include Climate and Air Quality, Collision/Detection Systems, Comfort and Convenience, Lighting, Power Door Locks, and Remote Lock/ Unlock/Start.
Use the MENU knob or the touch screen to:
1. Select Settings on the home page.
2. Select Vehicle.
3. Select the desired menu item.
4. Select the desired feature and setting. Settings are saved automatically.
5. Select BACK to exit each menu.
VEHICLE PERSONALIZATION
SETTING CRUISE CONTROL
1. Press the On/Off button. The Cruise Control symbol will illuminate in white on the instrument cluster.
2. When traveling at the desired speed, press the SET– button to set the speed. The symbol will illuminate in green on the instrument cluster.
ADJUSTING CRUISE CONTROL
RES+ Resume/Accelerate
Press to resume a set speed.
When the system is active, press once to increase speed 1 mph; press and\
hold to
continue increasing the speed.
SET– Set/Coast
When the system is active, press once to decrease speed 1 mph; press and\
hold to
continue decreasing the speed.
Cancel
Press to cancel the cruise control without erasing the set speed from me\
mory.
Pressing the brake pedal also will cancel the cruise control.
The set speed is erased when cruise control or the vehicle ignition is t\
urned off.
CRUISE CONTROL
F Optional equipment
See Instruments and Controls in your Owner’s Manual.
See Driving and Operating in your Owner’s Manual.
Page 19 of 20

19
HILL DESCENT CONTROLF (Z71)
Hill Descent Control sets and maintains vehicle speed from 2–14 mph w\
hile descending a steep incline in a forward or reverse gear.
1. Press the Hill Descent Control button on the center of the instrument panel. Vehicle speed must be below 31 mph to enable the system. The Hill Descen\
t Control symbol will illuminate on the instrument cluster.
2. Increase or decrease speed by applying the accelerator or brake pedal or\
use the Cruise Control +/– buttons on the steering wheel. The adjusted speed \
becomes the new set speed. The symbol flashes when the system is actively applying the brakes to maintain vehicle speed.
See Driving and Operating in your Owner’s Manual.
The traction control system limits wheelspin and the StabiliTrak® stability control system assists with directional control of the vehicle in difficult driving conditions. Both systems turn on automatically every time the vehicle is started.
Turn off traction control if the vehicle is stuck and rocking the vehicl\
e is required.
Press the Traction Control/StabiliTrak Off button on the center of the instrument panel to turn traction control off or back on. The Traction Control Off light will
illuminate on the instrument cluster when the system is off.
See Driving and Operating in your Owner’s Manual.
TIRE PRESSURE MONITOR (SINGLE REAR WHEEL MODELS ONLY)
The Low Tire Pressure warning light on the instrument cluster illuminates wh\
en one or more of the vehicle’s tires is significantly underinflated. Fi\
ll the tires to the proper tire pressures listed on the Tire and Loading Information label, located belo\
w the driver’s door latch. Current tire pressures can be viewed on the Driver Information Center.
The Tire Fill Alert provides visual and audible alerts to help when inflating a tire to th\
e recommended tire pressure.
Refer to your Owner’s Manual for information about normal monthly tire maintenance.
See Vehicle Care in your Owner’s Manual.
TRACTION CONTROL AND STABILITRAK SYSTEMS
F Optional equipment
DRIVER ASSISTANCE SYSTEMS
FRONT AND/OR REAR PARKING ASSISTF – During low-speed parking maneuvers, the
system provides “distance to closest object” information on the Driver Information Center and the Safety Alert Seat pulses or a beep sounds (if selected)\
. When an object is very close, the Safety Alert Seat pulses 5 times or beeps sound (if sel\
ected).
To turn the system on or off, press the Parking Assist button on the center of the instrument panel.
See Driving and Operating in your Owner’s Manual.
Page 20 of 20

20
MYCHEVROLET MOBILE APP
ROADSIDE ASSISTANCE
1-800-CHEV-USA TTY Users: 1-888-889-2438 (1-800-243-8872)
As the owner of a new Chevrolet, you are automatically enrolled in the C\
hevrolet Roadside Assistance program for up to 5 years/60,000 miles, whichever oc\
curs first, at no expense to you. Chevrolet’s Roadside Assistance toll-free numbe\
r is staffed by a team of trained advisors who are available 24 hours a day, 365 days a ye\
ar, to contact a
service provider for light services (fuel delivery, jump-starts, flat\
tire and lock-outs) or make arrangements to tow your vehicle to the nearest Chevrolet dealer fo\
r any repairs.
Roadside Assistance and OnStar®
If you require roadside service and have a current OnStar service plan, \
press the OnStar button and the vehicle will send your current GPS location to an OnStar \
Advisor who will speak to you, assess your problem, contact Roadside Assistance and relay\
your exact
location so you will get the help you need.
To learn more about OnStar services, press the blue OnStar button, visit onstar.com, call 1-888-4-ONSTAR (1-888-466-7827), or refer to your Owner’s Manual.
CHEVROLET OWNER CENTER
MYCHEVROLET MOBILE APP
Get to know your vehicle inside and out with the Chevrolet Owner Center.\
Check out
personalized information, including an online Owner’s Manual and helpful how-to videos, track your service history and warranty status, review your current OnSt\
ar Vehicle Diagnostics report (active OnStar account required) and more. Create a\
n account today at my.chevrolet.com.
The myChevrolet mobile app connects owners with a compatible mobile devi\
ce to a variety of vehicle information and services, such as a searchable O\
wner’s Manual, real-time fuel information, OnStar Vehicle Diagnostic informatio\
n and Roadside Assistance.
The myChevrolet mobile app also enables users to send remote commands —\
including remotely starting the vehicle and locking/unlocking the doors \
— as well as to locate the vehicle on a map and send destinations to the navigation syst\
em (vehicles must be properly equipped).
Download the mobile app from your compatible mobile device’s app stor\
e.
84016526 A!84016526=A!
Certain restrictions, precautions and safety procedures apply to your ve\
hicle. Please read your Owner’s Manual for complete instructions. All information contained in this guide is ba\
sed on the latest information available at the time of printing and is subject to change without notice. Copyright \
2017 General Motors. All rights reserved.
We recommend always using ACDelco or genuine GM service parts.