Page 97 of 310

Cl co .... N ,-... N ...... 0 ,-... Vl co
Selection menu: through the selection menu,
you can open additional functions within a men u
i tem (such as
Radio ).
Req uireme nt: the select io n menu symbol mus t
be disp layed in the In fota inment system display
¢ fig . 100 .
Opening /closing the selection menu : press the
l eft contro l bu tton
¢ fig. 100 . Then you c an se
lect and conf irm a function usi ng the control
knob.
Options menu : using the opt io ns menu, you can
se lec t a nd con firm con tex t-depen den t fu nct ions
as we ll as settings within a men u item (such as
Radio ).
Re qui rement : the options menu symbol G must
be disp layed in the In fota inme nt system di splay
¢ fig . 100 .
Opening /closing the options menu : press the
right contr ol
bu tton ¢ fig. 100. Then yo u can se
lec t an d con firm a func tion usi ng the cont rol
knob.
Information about menu paths
T his guide shows you a t a glan ce the path s for
opening a desired menu and its se ttings and
functions.
Example of a path
"' Se lect : I RADIO ! bu tton> left cont rol bu tton>
FM .
Following the path
"'Press th e I RADIO I button .
"' Press the left control button .
"'Turn the con trol knob to the FM menu item to
sele ct i t.
"'P ress th e c ont rol knob to confi rm the se le cte d
FM me nu item .
"'The selected and conf irmed funct ion is execut
ed . In this e xam ple, the
FM frequency band is
set .
Multi Media Inte rface
MMI touch
MMI touch control pad
App lies to: vehicles wi th MMI to uch
You can enter data using handwri ting recogni
tion on the
MMI touch control pad .
Fig . 10 1 En ter ing a nav igatio n destin atio n
The M MI touch cont rol pa d@ ¢ page 93, fig . 96
is located on the contro l kno b (D ¢ page 93,
fig . 96 .
Entering letters, numbers and symbols
App lies to : vehicles wit h MMI to uch
The MMI touch allows you to enter data on the
MMI touch control pad using handwriting recog
nition.
Fig. 102 Disp la y when MMI to uch is act ive
95
Page 98 of 310

Multi Media Interface
Requirement: it must be possible to enter text or
numbers and the
symbol @<=:> fig. 102 must ap
pear in the Infotainment system display.
-Initial entry: write an individua l upper case or
lower case letter or number/symbol on the
MMI touch control pad using your finger . A
symbol that is recognized clearly by the system
is displayed in the Infotainment system display
@ c:::> page 95, fig. 101, confirmed with an audi
ble signal if necessary, and transferred to the
input field.
-Entering spaces : move your finger across the
MMI touch control pad from left to right .
-Deleting characters: move your finger across
the MMI touch control pad from right to left.
-Deleting characters quickly: move your finger
quick ly across the MMI touch control pad from
right to left .
-Selecting the input suggestion : press the con
trol knob .
-Switching directly to the results list: turn the
control knob to the right
- Opening the speller: select the right control
button>
Open speller . Text or numbers are en
tered using the speller
c:::> page 99 .
96
Moving the crosshairs
Applies to: vehicles with MMI touch
l.
Fig. 103 Moving the cro ssha irs
Requirement: a map must be displayed
c:::> page 142, fig. 12 7.
-Showing/hiding the crosshairs: press the con
trol knob to show the crosshairs
©¢fig . 103 .
Press the I BACKI button (!) c:::> page 93, fig. 96
to hide the crosshairs again .
-Moving the crosshairs on a map : move the
crosshairs shown in the desired direction using
your finger on the MMI touch control pad
c:::> fig. 103.
-Moving the crosshairs quickly : when the cross
ha irs are
visible © c:::> fig. 103, slide your finger
quickly ac ross the
MMI touch control pad in the
desired direction
c:::> fig. 103. The crosshairs will
come to a stop after several seconds .
Page 99 of 310

Cl co .... N ,....
N ...... 0 ,....
Vl co
Moving the map
Applies to: vehicles with MMI touch
Fig . 104 Mov ing th e map
Req uirement: a map must be d isp layed
¢ page 142, fig. 127 .
-Showing /hiding the cro sshair s: press the con
t rol knob to show the crossha irs
CD ¢ fig. 104 .
-Moving the map : when the crosshairs are v is i
ble
CD ¢ fig. 104 pull two fingers in the desired
direction ac ross the
M MI touch cont rol pad
¢ fig. 104.
- Moving the map quickly : when the crosshairs
are visible
CD ¢ fig. 10 4, pull two finge rs ac ross
the
M MI to uc h con trol pad q uic kly in the de
s ired
dire ct io n ¢ fig . 104. The ma p will come to
a stop a fter severa l seconds.
Multi Media Inte rface
Zooming in/out on the map
Applies to: vehicles with MMI touch
Fig . 105 Zoo ming in and out o n th e ma p
Requirement: a map must be displayed
¢page 142 , fig. 127 .
-Zooming in /out on the map : press the control
knob to show the crossha irs . Touch the
MMI
touc h cont rol pad with two f ingers and pull
your fi ngers apart or
together ¢ fig. 105 .
Press t he I BA CK I button (J) to hide the crosshairs
¢ page 93, fig. 96.
Adjusting the sound focus
Applies to : vehicles with MMI to uch
Requireme nt: the Balance /fader funct io n must
be se lected
¢ page 177 .
-Moving the crosshairs for sound focus : move
your finger in the desired di rect ion on t he
MMI
to uch control pad .
-Storing the crosshairs location : press the con
trol knob tw ice.
Or : press the I BACK I button (J)
¢ page 93, fig . 96 .
Using the DVD main menu
Applies to : vehicles with MMI touch
Requireme nt: a DVD m ust be playing
¢ page 162. The DV D main menu is s hown .
-Selecting a menu item: move your finger up/
down or left/rig ht on the
M MI touch cont rol
pad .
-Confirming a selection : press the contro l knob . ..,.
97
Page 100 of 310

Multi Media Int erface
(D Tips
The volume of the prompts for the MMI touch
can be adjusted
separate ly ¢ page 178.
Control knob with
joystick function
Operating
F ig . 106 Ope rat ing concept fo r th e co ntrol knob w ith joy
s ti ck f unct ion
You can push the contro l knob up or down (D
¢ fig. 106 or to the right or left @.
Opening and closing the selection menu
Push the contro l knob toward the left to open the
selection menu
¢ page 94.
P ress the I BACKI b utton (J) ¢ page 93, fig. 96 to
ret urn to the funct io n one level up.
Or : push the
control knob to the right to close the selection
menu.
Opening and closing the options menu
P ush the contro l knob to t he r ight to open the
options menu
¢ page 94 .
Press the I BACKI button (J) ¢ page 93, fig . 96 to
ret urn to the funct io n one level up .
Or: push the
cont rol knob to the left to close the op tions
menu .
Displaying the input field *
Push the control knob up to reach the beginn ing
of a list in t he central area/ input f ield .
Switching to speller input*
When the inp ut fie ld is a lready open, switch di
rectly to the spelle r in the input fie ld by pushing
98
t h e control knob up again ¢ page 99, Letter/
number speller.
On the map
Requireme nt: a map must be d isplayed
¢ page 142 , fig. 127.
- Di splaying the input field* :
push the control
knob upwa rd .
- Displaying route guidanc e: when route guid
ance is active, you can also d isplay the route
guidance by pus hing t he cont rol knob up
¢ page 135 .
- Zooming in /out on the map (zoom) :
turn the
cont rol knob to the right/le ft to zoom in/out on
t he map.
Adjusting the sound focus*
Requirement: the balance/fader function must
be se lected ¢
page 177 . The crosshairs are
shown .
-Moving the sound focus using the crosshairs :
the crosshairs can be moved horizontally. T ur n
the co ntro l knob to t he left o r right . T o move
the c rosshairs vert ically , p ress the control
knob . Turn the cont ro l knob to the left or r ight.
To sto re the set ting, press the co ntrol knob
aga in .
Using the DVD main menu
Requireme nt: a DVD must be playing
¢ page 162. The DVD ma in menu is s hown .
-Select ing a menu item : move the contro l knob
w ith joys tick function up or down or to the left
or r ight.
- Confirming a selection: press the control knob .
Page 101 of 310

Cl co .... N ,....
N ...... 0 ,....
Vl co
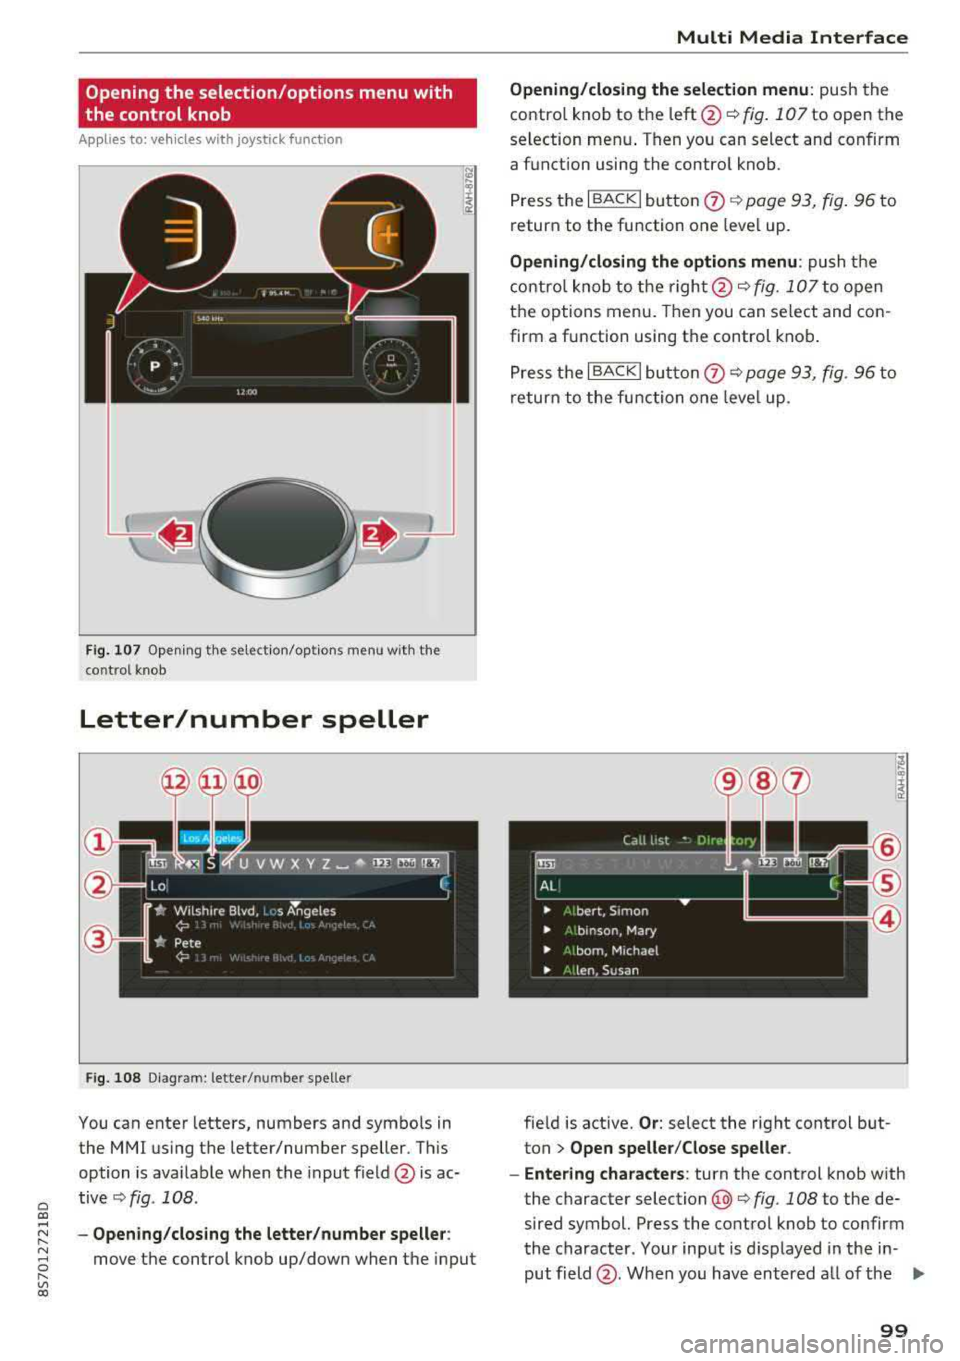
Opening the selection/options menu with
the control knob
Applies to: vehicles with joystick function
Fig. 10 7 Opening the sele ctio n/op tion s m enu wit h the
co ntrol knob
Letter/number speller
F ig . 1 08 Diagram: letter/ number spe ller
You can enter letters, numbers and symbo ls in
the
MMI using the letter/number speller. Th is
option is ava ilable when the input field @is ac
tive
Q fig . 108 .
-Opening /clos ing the letter /number speller :
move the control knob up/down when the input
Multi Media Inte rface
Opening/closing the selection menu : push the
contro l knob to the
left @~ fig. 107 to open the
selection men u. Then you can select and confirm
a f unction using the contro l knob.
Press the I BACK
I button 0 Q page 93, fig . 96 to
return to the function one leve l up.
Opening/closing the options menu : push the
contro l knob to t he
ri ght @Q fig. 107 to open
the options menu . Then you can select and con
firm a function using the control knob .
P ress t he I BACKI bu tto n
0 Q page 93, fig. 96 to
return to the function o ne leve l up .
fie ld is active.
Or : select the right cont rol but
ton
> Open speller /Close speller .
- Enter ing characters :
turn the control knob with
the character
selection @¢ fig. 108 to the de
sired symbol. Press the co ntrol knob to co nfirm
the character. Your input is d isplayed in the in
put field @. When you have entered a ll of the
.,.
99
Page 102 of 310

Multi Media Interface
characters, select and confirm I LISTI(!). Or :
push the control knob down .
-Entering accented characters (such as a, ~. ii,
o)*: turn the control knob with the character
selection @¢ fig. 108 to a c haracter . To open
the se lected accented characters, press and
ho ld the control knob. Turn the control knob
with the character
selection @¢ fig. 108 to an
accented character . Press the control knob to
i nsert the accented character. To close the ac
cented cha racte rs without se lecting a c harac
te r, press and hold the control knob again.
Or:
select and confirm laou l(z) ¢fig. 108. Select
and confirm an accented character.
-Deleting characters : select and confi rm
¢fig. 108. To delete a ll characters in the input
field, press and hold the control knob on
¢ fig. 108 until a ll characters in the input field
are de leted.
- Entering special characters: select and con
firm
l !&? l@ ¢fig. 108 or !123 !@ . Select and
confirm the desired special character (for ex-
Symbol/Description Description
ample, a hyphen or period) with the number
speller .
-Input assistance : in some cases s uch as in navi
gation*, there is a word suggestion* @
¢
fig. 108 based on avai lable entries while you
are entering data. You can select this sugges
tion by push ing the control knob upward.
-Results list: in some cases, such as in the direc
tory, the system switches automatica lly to the
resu lts list based on available entries @
¢
fig. 108. Select and confirm a suggestion
from the list.
Requirement: the input
field @¢fig. 108 must
be active.
- Switching between speller and MMI touch*:
the handwriting recognition for the MMI touch
control pad* is activated automatically. Simply
start writing .
Overview of symbols in the speller
The symbols in the lette r/numbe r speller are ex
plained in the follo wing table:
CD ILIST lorB Switches to the results list.
@ Input field Displays the current input.
® Results list Displays
a list with suggest ions based on the letters already en-
tered.
@
+
Switches from lower case to upper case letters or from upper case
to lower case letters .
® E
Opens additional speller options (for example Close speller, Clear
input field )
® li&? I Punctuation marks and special characters (such as hyp hens or peri-
ads) a re shown.
0 laoul Displays accented characters (such as a,~, fi, o).
Switches from letter to number input or from number to letter i n-
® !1231/IABCI
put.
® Adds a space in the input fie ld . ..........
@ Character se lection Highlights the selected character.
@ ..
Inserts the suggested word* when you push the control knob up .
@ ~ Deletes the character to the left of the cursor.
100
Page 103 of 310

Cl 00 .-< N r-N .-< 0 r-Vl 00
(D Tips
Accented characters are not available for ev
ery letter .
Free text search
Using the free text search, you can select the or
der tha t the search terms are entered in the in
put field .
Fig. 109 Example : free text search on telep hone
Free text search is ava ilable in the Vehicle", Ra
dio, Media* , Telephone *, Navigation *
and Audi
connect*
menus .
Opening free text search
~ Select : IMENUI button> desired menu item
(such as Telephone).
~ Keep turning the control knob to the left until
the
free text search input field CD¢ fig. 109
appears . Or: if necessary , push the control knob
up to open the input fie ld
CD ¢fig . 109.
The handwriting recognit ion for the MMI touch
control pad* is automat ically act ivated . Simply
start wr it ing .
Multi Media Interface
Free text search for an entry
~ Enter one or more search terms in any order in
to the input field . The individual search terms
must be separated by spaces when entering .
An input suggest ion to comp lete the entry @
¢fig. 109 is shown based on the input. Add ition
al entries that contain the entered search terms are listed In the results
list@¢ fig. 109.
If the desired term is still not displayed, enter
additional letters until it is displayed .
It is often enough just to enter the f irst letters of
the search term in o rder fo r it to disp lay in the re
su lts list . For example, in the
Telephone * menu,
wr ite the initials of the contact being searched,
separated by a space.
Selecting the input suggestion to complete
the entry
Requirement: an inpu t sug gest io n to complete
the
entry @¢ fig. 109 must be disp layed .
~ MMI touch input* : press the control knob.
~ Speller input : push the cont rol knob up.
Selecting an entry from the results list
~ MMI touch input* : turn the control knob to the
r ight . Select and confirm an entry from the list .
~ Speller input: select and confirm I LIST! CD
¢ page 99, fig. 108. Or: push t he control knob
down. Select and confirm an entry from the
list.
101
Page 104 of 310

Multi Media Interfac e
Menus and Symbols
@
14
Fig. 110 Diagram: menus and symbols
Symbol /Description E xplanation
CD Selected text Selected function
@ ITMCI T MC/online traffic information reception c> page 145
Network coverage for the active data connection c> page 130
2 G : GSM network
3G : UMTS network
® 2G/3G/LTE* LTE *: L T E network
When a data connection is established, the symbo l for an act ive da-
ta connection appears in the status line on the Infota inment system
disp lay
c> page 130
Signal strength for the active data connection, or
@
Data connect ion signa l PIN : enter the PIN (SIM)
strength bars*
PUK: enter the PUK
SIM : insert the S IM card <=>page 124
®
Jukebox* importing proc-
Import audio/v ideo fi les to the Jukebox*
c> page 156
ess
® Repeat track The track currently playing is repeated c> page 166
(i) Shuffle All files on
the playlist are played in random order
c> page 166,
Shuffle
® Knob Setting
for the selected function by turning the control knob
® Arrow Access information by pressing the control knob
@ Roaming Leave
the mobile network for the connected cell phone or the in-
serted mini SIM card
@ Importing process Import/update the conta cts in the d irectory or the call lists
@ Bluetooth* Bluetooth device connected c> page 157 or c> page 111
@ Options menu Select and confirm context
-depende nt functions as well as set tings
with in a menu item
102