Page 81 of 310

Selecting the driving mode
App lies to: ve hicles with Audi drive select
You can choose between comfort, auto, dynamic
and individual .
Fig. 85 Center conso le: drive select button
.... 0 M 0
G'. al
.. Press the ~i~ button repeatedly until the de
sired drive mode is displayed in the instrument
cluster/Infotainment system display . Or
.. Se lect in the Infotainment system: !MENUI but
ton >
Vehicle > left contro l button >Audi drive
select.
Adjusting the Individual mode
Applies to: ve hicles with Audi drive select
Assistance systems
.. Select and confirm the desired settin g.
You can change the driv in g mode when the veh i
cl e is stationary or while driving.
If traffic per
mits, after ch anging modes, briefly ta ke your
foot off t he accelerator pedal so that the recently
se lected mode is also activated for the engine.
Comfort -res ults in a comfo rt-orien ted vehicle
calibration
Auto -provides an overa ll comfortab le yet dy
namic driving feel and is suited for everyday use.
Dynamic -gives the driver a sporty driving fee l
and is suited to a spo rty driving style .
Individual -¢ page 79.
A WARNING ...__ -
Pay attention to traffic w hen operating the
drive select to reduce the r isk of an accident .
You can adjust the vehicle settings to your personal preferences .
.. Press the button ~:/:er. > Individual > right con
tro l button, or
.. Se lect in the Infotainment system: !MENUI b ut
ton>
Vehicle > left contro l button> Audi drive
select> Individual >
right contro l button
After you have closed the sett ings, you will a uto
mat ica lly dr ive in the
Individual* mode.
Systems comfort
Engine/transmission
comfortable
Steering comfortable
Suspension control * comfortable
Engine sound* subtle
quattro * balanced
(D Tips
~ Your Individual* mode settings are automat i-
;:::: cally stored and assigned to the remote con-r--
~ trol key being used. 0 r-Vl 00
T he equipment in yo ur vehicle will determine
which settings you can adjust . The fo llowing ta
ble gives an overview of the characteristics.
auto dynamic
balanced sporty
balanced sporty
ba lanced sporty
balanced sporty
ba lanced sporty
79
Page 82 of 310

Parking syste m s
Parking systems
General information
A pplies to: ve hicles w ith rear park in g syste m/pa rk in g system
p lus
Depending on your vehicle 's equipment , various
parking aids will help you when parking and ma
neuvering.
The
r ea r p arki ng sys te m is an aud ible parking a id
that warns you of obstacles
behind the vehicle
¢ page 81.
The parki ng sys te m plu s assists you when park
ing by aud ibly and visually indicating objects de
tected
in front of and behind the veh icle
¢ page 81.
The rea rv iew ca mera shows the area behind the
veh icle in the Infotainment system d isplay . The
lines in the rearv iew camera image he lp you to
pa rk or maneuve r
¢page 82.
_& WARNING
-Always look for traff ic and check the area
around your vehicle by looking at it direct ly
as well. The parking system cannot replace
the driver's attention . The driver is always
responsib le when entering or leaving a park
ing space and during similar maneuvers.
- Please note that some surfaces, such as
clothing, are not detected by the system.
-
- Sensors and cameras have blind spots in
which people and objects cannot be detect
ed . Be especially cautious of small children
and animals.
- The sensors can be displaced by impacts or
damage to the radiator gr ille, bumper,
wheel housing and the underbody . The park
i ng system may be impa ired as a result .
Have an authorized Audi dealer or author
ized Audi Serv ice Facility check their func
t ion.
- Make su re the senso rs a re not obst ructed by
st ickers, depos its or othe r ma ter ia ls.
If they
are, the senso r funct io n could be impai red .
For additiona l information on cleaning, see
¢ page 266 .
80
@ Note
-Some objects are not detected or disp layed
by t he system under certain c ircumstances:
- objects such as barrier cha ins, tra iler draw
bars, vertical po les or fences
- objects above the sensors such as wall ex
tensions
- objects with certain surfaces or structures
such as cha in link fences or powder snow
- If you continue driving closer to a low ob
ject, it may disappear from the sensor range . Note that you will no longer be
wa rned about th is obstacle.
- Keep enough distance from the curb to re
duce the risk of damage to the rims .
(D Tips
-The system may provide a warning even
though there are no obstacles in the cover
age area in some situations, such as :
- certain road surfaces or when there is tall grass
- externa l ultrasonic sources such as from
cleaning vehicles
- in heavy rain, snow, or th ick vehicle ex
h a u st
- We recommend that you practice par king in
a traffic -free location or parking lot to be
come familiar with the system . When doing
this, there shou ld be good light and weath
er conditions.
- You can change the vo lume of the signa ls.
- What appea rs in the disp lay is slight ly de -
layed.
- Th e sensors m ust be kept clean and free of
snow and ice for the parking aid to operate .
Page 83 of 310

Cl co .... N ,....
N .... 0 ,....
Vl co
Rear parking system
Description
A pplies to: ve hicles with rear park ing system
The rear parking system is an audible parking
aid .
Desc ripti on
There is a sensor in the rear bumper cover. If
these detect an obstacle, audible signals warn
you .
Make sure the sensors are not covered by stick
ers, deposits or any other obstructions as it may
impair the sensor function. For informat ion on
cleaning, see
c::;.page 266 .
The range at which the sensors begin to measure
is approximately:
side 3 ft (0.90 m)
rear
center 5.2 ft (1.60 m)
The closer you get to the obstacle, the shorter
the interval between the audible signals . A con
tinuous tone sounds when the obstacle is less
than approximately 1 foot (0.30 meters) away.
Do not cont inue back ing up
c::;. &. in General infor
mation on page 80,
c::;. @ in General information
on page 80!
If the distance to an obstacle remains constant,
the volume of the distance warning gradually
drops after about four seconds (this does not ap ply in the continuous tone range).
Acti vat ing
The rear parking assist activates a utomatically
when the reverse gear is engaged. A brief confir
mat ion tone will sound.
Parking systems
Parking system plus
Description
App lies to: vehicles wit h parking system pl us
Parking system plus provides audio and visual
signals when parking.
Fig . 86 Illust rat io n:
Sensors are located in the front and rear bump
ers. If these detect an obstacle, audib le and visu
al signals warn you .
Make s ure the sensors are not covered by st ick
ers, deposi ts or any other obstruc tions as it may
impa ir the se nsor function. For information on
cleaning, see
c::;. page 266 .
The display fie ld beg ins approx ima tely at:
CD 4 ft (1.20 m)
0 3 ft (0.90 m)
® 5.2 ft (1.60 m)
© 3 ft (0.90 m)
T he close r you get to the obstacle, the shorter
t h e i nte rval be twee n the audible signa ls . A con
t in u ous tone sounds when the obs tacle is less
than appro ximately 1 foot (0.30 meters) away.
Do not continue dr iving forward or in reverse
c::;. &. in General information on page 80, c::;. (D in
General information on page 80!
If the distance to an obstacle remains constant,
the volume of the distance warn ing gradua lly
drops after about four seconds (this does not ap
ply in the continuous tone range).
81
Page 84 of 310

Parking systems
Switching on/off
Applies to: ve hicles w ith pa rking system p lus
F ig. 87 Center console: parking aid button
Fig. 88 opt ical distance display
Switching on
• Shift into reverse, or
.. Press the PwA button in the center console
c> fig. 87. A short confirmat ion tone sounds and
the LED in the button turns on .
Switch ing off
.. Drive faster than 6 mph (10 km/h), or
• Press the P,, ,A button, or
.. Switch the ignition off.
Activating automatically
The parking aid is activated automatically at
speeds less than 6 mph (10 km/h) and when ap
proaching an obstacle from approximately 3.1 ft (95 cm) away. There are audible signals when ap
proximately 1.6
ft (SO cm) away from the obsta
cle .
If you press the p,,1.I! button to switch the park
ing a id off, it can only be reactivated automati
cally when one of the following conditions is met :
- The vehicle speed exceeds 6 mph (10 km/h).
- The ignition is switched off and back on again.
- The parking brake is set and then re leased.
82
- The selector lever must be in the "P " position.
Segments in the visual display
The segments in front of and behind the vehicle
(vehicles with parking system plus*)
c> fig. 88
help you to determine the distance between your
vehicle and an obstacle. The red lines mark the
expected direction of travel according to the
steering ang le. A white segment indicates an
identified obstacle that is outside of the vehicle's
path. Red segments show identified obstacles
that are in your vehicle's path. As your vehicle comes closer to the obstacle, the segments move
closer to the vehicle . The collision area has been
reached when the next to last segment is dis
played. Obstacles in the collision a rea, including
those outside of the vehicle 's path, are shown in
red. Do not continue driving forward or in reverse
c> .& in General information on page 80, c>(D in
General information on page
80!
Rearview camera
Introduction
App lies to: vehicles wit h rearv iew camera
Fig. 89 Diagram: lines to ai d in parking
The rearview camera helps you to park or maneu
ver using the orientation lines .
Page 85 of 310

Cl co .... N ,....
N ...... 0 ,....
Vl co
General information
Applies to: ve hicles with rearview camera
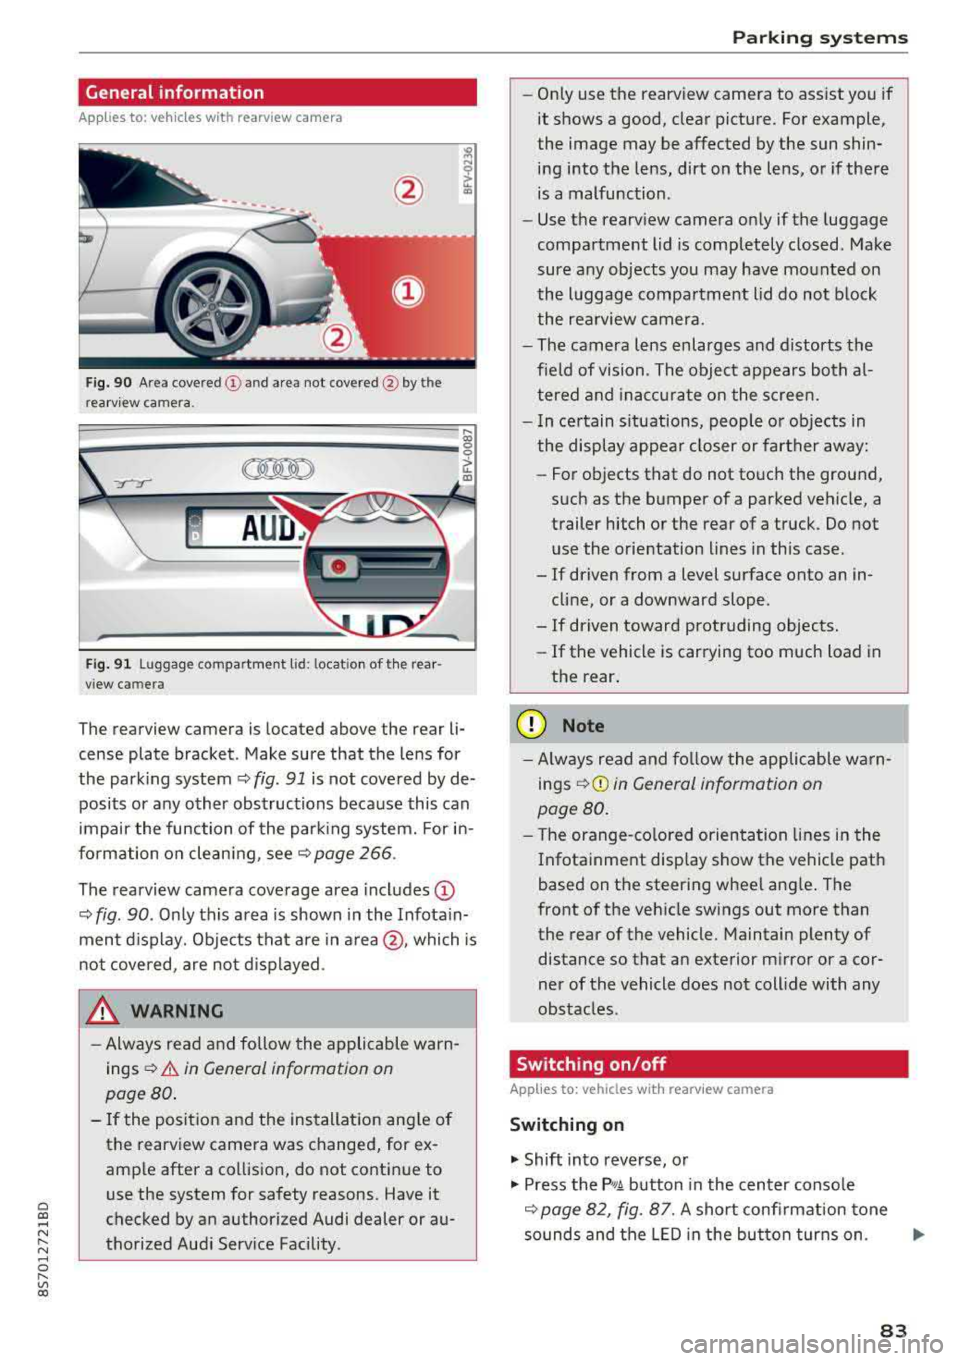
Fig . 90 Area covered (!) and area not covered @ by the
rea rview camera.
:;,
~;..------: :.·~- ---~ _.,- ,.,,.--------g
(Jo00oD ~
Fig. 91 Luggag e compartment lid: locat ion of the rear
view camera
The rearview camera is located above the rear li
cense plate bracket. Make sure that the lens for
the parking system¢
fig. 91 is not covered by de
posits or any other obstructions because this can
impair the function of the parking system. For in
formation on cleaning, see¢
page 266 .
The rearview camera coverage area includes
(D
¢ fig. 90. Only this area is shown in the Infotain
ment display. Objects that are in
area @, which is
not covered, are not displayed.
A WARNING
-Always read and follow the applicable warn
ings ¢
A in General information on
page 80.
- If the position and the installation angle of
the rearv iew camera was changed, for ex
ample after a collision, do not continue to
use the system for safety reasons. Have it
checked by an authorized Audi dealer or au
thorized Audi Service Facility .
Parking systems
-Only use the rearview camera to assist you if
it shows a good, clear picture. For example,
the image may be affected by the sun shin
ing into the lens, dirt on the lens, or if there
is a malfunction.
- Use the rearview camera only if the luggage
compartment lid is completely closed. Make
sure any objects you may have mounted on
the luggage compartment lid do not block
the rearview camera.
- The camera lens enlarges and distorts the
field of vision. The object appears both al
tered and inaccurate on the screen.
- In certain situations, people or objects in
the display appear closer or farther away:
- For objects that do not touch the ground,
such as the bumper of a parked vehicle, a
trailer hitch or the rear of a truck. Do not use the orientation lines in this case.
- If driven from a level surface onto an in cline, or a downward slope .
- If driven toward protruding objects.
- If the vehicle is carrying too much load in
the rear.
(D Note
-Always read and follow the applicable warn
ings
¢ (D in General information on
page 80.
- The orange-colored orientation lines in the
Infotainment display show the vehicle path
based on the steering wheel angle. The
front of the vehicle swings out more than
the rear of the vehicle. Maintain plenty of
distance so that an exterior mirror or a cor
ner of the vehicle does not collide with any
obstacles.
Switching on/off
App lies to : vehicles wi th rearv iew camera
Switching on
.,. Shift into reverse, or
.,. Press the P,q.A button in the center console
¢ page 82, fig. 87. A short confirmation tone
sounds and the LED in the button turns on.
..,.
83
Page 86 of 310

Parking systems
Switching off
~ Drive faster than 6 mph (10 km/h), or
~ Press the P"'il button, or
~ Switch the ignition off .
(D Tips
-The visual display in the left part of the dis
play should help you detect the critical vehi
cle areas .
- You can change the volume of the signals
and the display
¢page 84.
Perpendicular parking
Applies to: vehicles with rearview camera
This view may be used when parking in a garage
or in a parking space.
F ig. 92 Info ta in ment system: a im ing at a park ing space
Fig. 93 Infota inme nt system: aligning the vehicle
~ Turn the Infota inment system on and shift into
reverse gear.
~ The orange orientation lines (D show the vehi
cle's d irection of travel. Turn the steering wheel
until the orange or ientat ion lines appear in the
parking space
¢ fig. 92. Use the markings @to
help you estimate the distance to an obstacle.
Each marking represents app roximate ly 3 ft (1
m). The blue area represents an extension of
84
the vehicle 's out line by approximately 16 ft (5
meters) to the rear.
~ Wh ile driving in reverse gear, adjust the steer
ing wheel angle to fit the parking space using
the orange orientation lines for assistance
¢ .&. in General information on page 83, ¢(D
in General information on page 83. ® repre
sents the rear bumper. At the very latest, stop
the vehicle when the red or ientat ion
line @
borders an object.
Adjusting the display
and the warning tones
Applies to: vehicles with parking system plus
The display and warning tones can be adjusted in
the Infotainment.
~ Select in the Infotainment system : IMENU! but
ton
> Vehicle > left control button > Driver as
sistance> Parking aid.
Signal tones
Front volume -
volume for the front area
Rear volume -volume for the rear area
Entertainment fader -the volume of the audio/
video source is lowered when the parking system
i s turned on.
The new value is given briefly during the adjust ment.
{!) Tips
The settings are automat ically stored and as
signed to the remote control key that is in
use.
Error messages
App lies to: vehicles with rear park ing system/parking system
plus
Rear park assist: malfunction! Obstacles cannot
be detected
Park assist: malfunction! Obstacles cannot be
detected
There is a system malfunction if the LED in the
P'1
1 .ll button blin ks when switc hing on the system .
If the error is not corrected before you switch off Ill-
Page 87 of 310
Cl 00 .-< N r-N .-< 0 r-Vl 00
the ignition, the LED in the P•1~ button will blink
the next time you switch on the parking system
by shifting into reverse. As long as the error is ac
tive, you can display the error messages in the
second tab of the dr iver information system.
Parking system plus*
If a sensor or speaker is fau lty, t he J;l4 symbol
will appear in front of/behind the vehicle in the Infotainment disp lay. If a rear sensor is faulty,
only obstacles that are in areas
(D and @
¢ page 81, fig. 86 are shown. If a front sensor is
faulty, only obstacles that are in areas ®
and@
are shown .
Drive to an authorized Aud i dea ler or authorized
Aud i Service Facility immediately to have the
malfunct ion corrected.
Parking systems
85
Page 88 of 310

Intelligent Technology
Intelligent Technology Electronic stabilization
control (ESC)
Description
Elect ronic stabili zation control ( ESC) suppo rts
driver safety. It red uces the risk of slipping and
improves dr iving stabi lity. ESC detects crit ica l sit
uations such as the vehicle overstee ring and un
dersteeri ng or the w heels are sp inning. The vehi
cle is stabilized by app lying the brakes or reduc
i n g e ngine torque . When the ESC engages, the
liJ indicato r light bli nks in t he instr ument clus
t er.
The fo llow ing systems are in tegrated in the ESC:
Anti-lock braking system (ABS)
ABS p reve nts the whee ls from lock ing whe n brak
ing. The vehicle can st ill be steered even d uring
hard brak ing. Apply steady press ure to the bra ke
pedal. Do not pump the pedal. A puls ing in t he
b rake pedal indicates that the system is act ing to
s tabili ze the vehicle .
Brake assist system
The brake assist system can decrease brak ing dis
tance . It inc reases brak ing power when the d river
presses the brake pedal q uick ly in eme rgency sit
uations . You must press and hold t he b rake pedal
until the dangerous si tuatio n is ove r.
Anti-slip regulation (ASR)
ASR red uces eng ine power when the d rive wheels
begin sp inning a nd adapts the force to the road
conditions . This makes it easie r to start, acceler
ate and dr ive u p hill s.
Electronic differential lock (EDL)
E DL applies the brakes to a wheel that sta rts
spi nning and t ransfe rs the d rive power to the
other driving wheels. This f unction is not availa
b le at higher speeds.
In extreme cases, EDL automatically sw itches off
to keep the brake on the b raked wheel from over
heati ng. The vehicle is st ill work ing correctly. EDL
86
will swi tc h on again automatically when condi
tions have retu rned to normal.
Power steering
The ESC can also support veh icle stab ility
t hr ough stee rin g.
Selective wheel torque control
Se lective wheel to rque con trol is used when d riv
i ng on curves . The front whee l on the ins ide of
t h e curve or bo th whee ls on the i nside of th e
cu rve are braked se lective ly as needed. This al
l ows mo re pre cise dr iving in curves .
_&. WARNING
-The E SC and i ts in teg ra ted systems cannot
overcome the lim its imposed by natura l
phys ica l laws. This is es pec ially important
on s lippery or wet roa ds.
If the systems be
gin acting to stabilize yo ur vehicle, you
should immediately a lter your speed to
match the road and traffic conditions. Do
no t le t the inc reased safety p rovi ded tempt
you into taking risks. This could increase
y o ur r is k of a c oll is ion.
- Please note the r is k of a coll is ion increases
w hen dr iv in g fast, especially t hrough curves
a nd on sl ippery or wet r oads, and w hen dr iv
ing to o cl ose to obje cts ahead. T he ES C and
it s i ntegrated systems cannot a lways pre
vent co llisions
-there is st ill a risk of acci
dents!
- Press the accelerator peda l caref ully when
accelerating on even, slippery sur faces such
as ice and snow. The drive wheels can spin
even when these control systems a re instal
led and this can affect driving stability and
increase the risk of a collision.
(0 Tips
- The ABS and ASR only funct ion correctly
when a ll four wheels have a sim ila r wear
co nditio n. D iffere nt tire sizes can lead to a
red uction in engin e power.
- You may hear noises when the systems de
sc ribed are working .