Page 73 of 409

Seats and storage
General information
A WARNING
See ¢ page 258, Driving safety for important
information, tips, suggestions and warnings
that you should read and follow for your own
safety and the safety of your passengers.
Front seats
Power seat adjustment
Fig. 71 Fro nt seat: adjus ting the seat (version A)
Fig. 72 Fro nt seat: adjust ing the sea t (version B)
@ -Moving the seat fo rward/back: press the but
ton forward/back.
@ -Moving the seat up/down: press the button
up/down. To adjust the front seat cush ion, press
the front button up/down. To adjust the rear seat
cushion, press the rear button up/down.
@-Adjusting the backrest angle: press the but
ton forward/back.
~ @ -raising/lowering* the head restra int: press
~ ~ the button up/down .
N ~ 0
'° ~ co
Seats and storage
©-Lengthening/shortening the upper thigh
support•¢ fig. 71. Lift the grip handle. A spring
moves the support forward.
© -Switching the massage function* on/off
¢ fig. 72. Select the type of massage with the
multifunction
button* ¢ page 71.
(D-lumbar support or multifunction button*
¢ page 71. To adjust the lumbar support, press
the button in the applicable location.
A WARNING
- The power front seats can also be adjusted
when the ignition is switched off. To reduce
the risk of injury, children should never be left unattended in the vehicle for this rea
son .
- To reduce the risk of an accident, only adjust
the driver 's seat when the vehicle is station
ary .
- Exercise caution when adjusting the seat
height. Unsupervised or careless seat ad
justment can pinch fingers or hands, which increases the risk of injury.
- The front seat backrests must not be re
clined too far back when driving, because
this impairs the effectiveness of the safety
be lts and airbag system, which increases
the risk of injury.
, Multifunction button
Applies to: vehicles with multifunction button
You can adjust the massage function, lumbar
support and side bolsters using the multifunc tion button.
Fig . 73 Infotainment sys te m : s eat sett in gs
71
Page 74 of 409

Sea ts and stor age
Operating
.. If you turn the m ultif unction bu tton CD
¢ page 71, fig . 72 to the left or to the right,
the possible seat settings @ are shown in the
Infotainment system
~ fig . 73 .
.. To se lect a seat setting, turn the multifunction
button
CD in the corresponding direction until
the des ired seat setting is outlined in red.
• The arrows @ represent the possible adjust
ments . Fo r example, to lower the lumbar sup
po rt, p ress the m ultifunction bu tton
CD down.
T he co rresponding arrow © lights up.
The fo llowing seat sett ings @ are possible :
Massage func tion * -select the massage type
Wave, St retch , Knead or Off . You can adjust the
i n tens ity of each massage from 1 to 3 . You can
sw itch the selected massage on/off using the
button @~ fig. 73 .
Lumb ar support -you can adjust t he lumbar sup
port up/down and to be stronger/weaker .
Side bolsters * -you can increase/decrease the
side support in the seat using the side bo lsters
on the seat backrest .
(I) Tips
-The massage function switches off a uto
matically after approx imately 10 minutes.
- The air in the side bo lsters* is released as
soon as the driver's door opens. This makes
i s possible to enter and exit the vehicle
mo re comfortab ly. As soon as you sta rt driv
i ng the veh icle, the s ide bo lsters fill.
1l Requ irem en t: the ve hicl e battery m ust have a suff icien t
c ha rge le v e l.
72
Easy seat entry
App lies to: vehicles with entry ass istance
Entry assistance makes it easier for the rear pas
sengers to enter and leave the vehicle .
Fig . 7 4 Fro nt seat: © backrest re lease, @powe r entry as
s ista nce*
• Lift the hand le CD and fold the seat backrest
forward .
• Press the button@ briefly . T he seat automati
cally moves a ll the way fo rwa rd . When the seat
is moved back, it will stop in its o rig inal posi
tion . The operation will stop if t he b utton is
pressed again.
If you p ress and hold the butto n
@while the
bac kres t is in the upright posi tion, the sea t will
move unt il you release the b utton .
& WARNING
Always make su re the front seats are upright
and securely locked in p lace .
- Power entry assistance also works when the
ignit ion is switched off
1
) or when the igni
tion key is removed , so t hat rear seat pas
sengers can still move to the front of the ve
hicle in an emergency s ituation. To red uce
the risk of inj ury, childre n should never be
left unattended in the vehicle for this rea
son .
(D Note
Be very careful when adjusting the seats to
avo id damaging the head restraints, headline r
or the sunroof*.
Page 75 of 409

(D Tips
To prevent the head restraints from running into the headliner, the power ad justable head
restraints* automatically
move forward or up
ward when the seat is adjusted.
Center armrest
There is a storage compartment under the arm
rest.
Fig. 75 Comfort center armrest between the driver's seat
and front passenger's seat
.. To adjust the angle, raise the armrest from the
starting pos ition notch by notch.
.. To bring the armrest back into the starting po
sit ion, ra ise it out of the top notch and fold it
back down .
The armrest can slide forward and back.
Head restraints
Front head restraints
Applies to: vehicles with adjustable head restraints
Fig. 7 6 Front seat: adjusting the head rest raint
Adj ust the head restra ints so the uppe r edge is as
even as possible with the top of your head. If t hat
Seats and storag e
is not possible, try to adjust as close to this posi
tion as possible .
Adjusting the head re straints
Applies to: vehicles with manual adjustable head restraints
.,. To adjust the head rest raints, press the b utton
on the side and
move the he ad rest raint into
the desired position. Release the b utton and
slide the head restraint farther until it locks
i n
to p lace.
Appl ies to: vehicles with power adjustable head restraints
.,. To move the head restrain t up/down, press the
button
@ Q page 71, fig. 71 or Q page 71,
fig. 72
up/down .
.,. To adjust the head res traints* forwa rd/bac k,
press the button* on the side and
move t he
head restraint into the desired pos ition.
Re
lease the button and slide the head restraint
farther until it locks into place
Q fig. 76.
A WARNING
Always read and follow the applicable warn
in gs¢ page 261, Proper adjustment of head
restraints .
73
Page 76 of 409

Sea ts and stor age
Rear head restraints
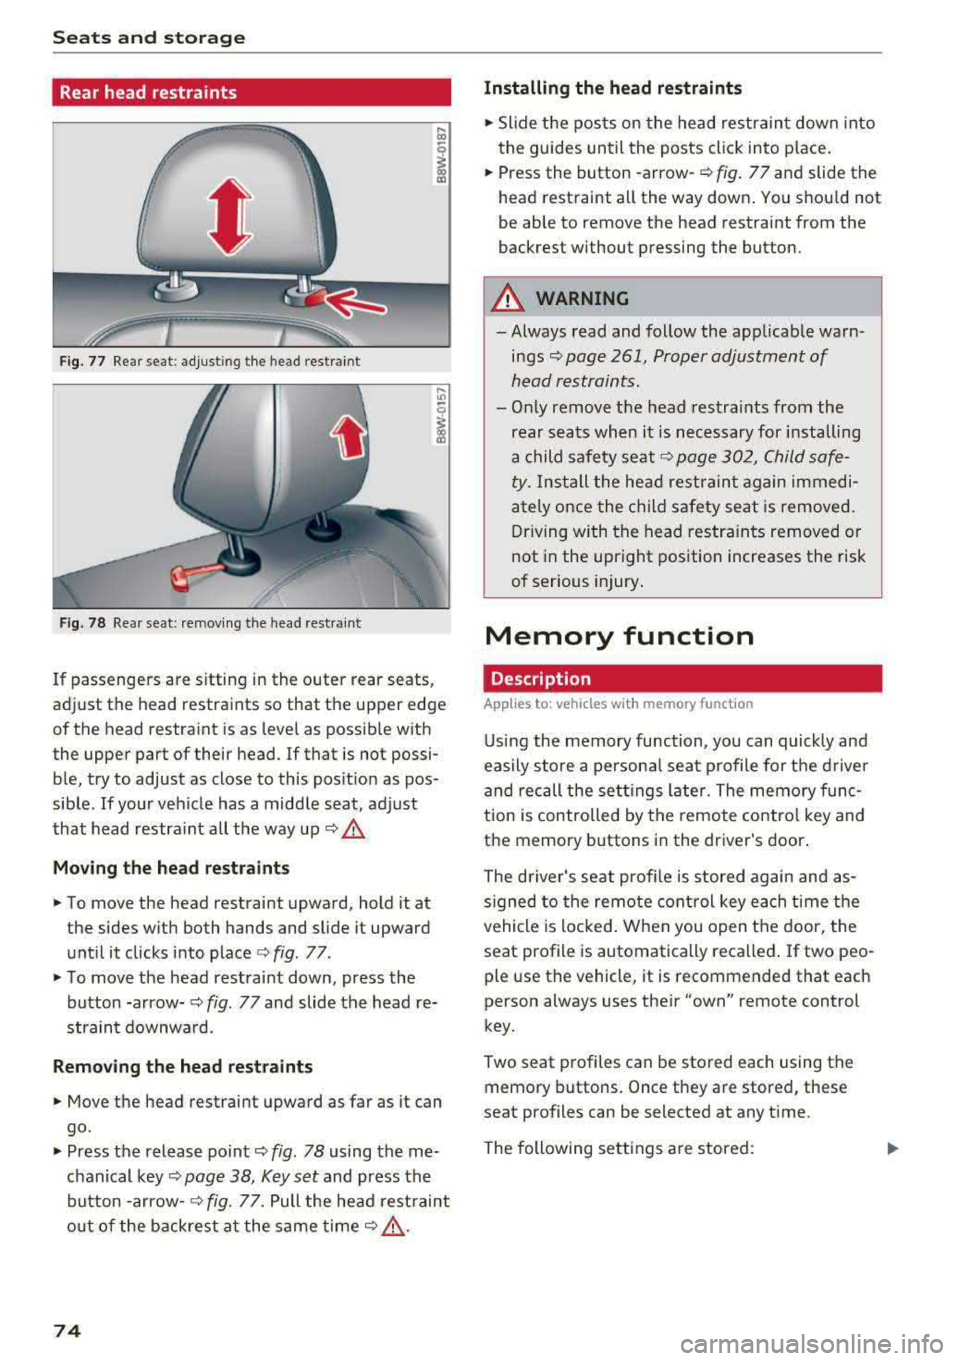
Fig. 77 Rear seat: adjust ing the head restraint
F ig. 78 Rear seat: remov ing the head rest rai nt
If passengers are s itting in the outer rear seats,
adjust the head restraints so that the upper edge
of the head restraint is as level as possible with
the upper part of their head . If that is not possi
ble, try to adjust as close to this position as pos
sible . If your vehicle has a middle seat, adjust
that head restra int all the way up
c::> .&.
Mov ing the he ad re st raints
• To move the head restraint upward, hold it at
the sides w ith both hands and slide it upward
unt il it clicks into place
c::> fig . 77.
• To move the head restraint down, press the
button -arrow-
c::> fig. 77 and slide the head re
straint downwa rd.
Remo ving the he ad rest raints
• Move the head restraint upward as far as it can
go.
• Press the release point c::> fig. 78 using the me
chanical
key~ page 38, Key set and press the
button -arrow-
c::> fig. 77. Pull the head rest raint
o ut of the backrest a t the same
time~ ,&..
74
Installing the head re straints
• Slide the posts on the head restraint down into
the guides until the posts click into place .
• Press the button -arrow-c::> fig. 77 and slide the
head restraint all the way down . You should not
be able to remove the head restraint from the
backrest without pressing the button.
A WARNING
-Always read and follow the applicable warn
ings~ page 261, Proper adjustment of
head restraints.
-Only remove the head restraints from the
rear seats when it is necessary for installing
a child safety seat
c::> page 302, Child safe
ty. Install the head restraint again immedi
ately once the ch ild safety seat is removed.
Driving w ith the head restra ints removed or
not in the upright position increases the risk
of serious injury .
Memory function
Description
Applies to: vehicles wit h memo ry funct ion
Using the memory function, you can quick ly and
easily store a persona l seat profile for t he driver
and recall the sett ings later. The memory func
tion is controlled by the remote control key and
the memory buttons in the driver's door.
The driver's seat prof ile is stored again and as
s igned to the remote control key each time the
vehicle is locked . When you open the door, the
seat profile is automatically recalled . If two peo
ple use the vehicle, it is recommended that each
person always uses their
"own" remote control
key.
Two seat profiles can be stored each using the
memory buttons. Once they are stored, these
seat profiles can be selected at any time.
The following sett ings a re stored:
Page 77 of 409

Remote con- Memory but-trol key ton
Driver Driver
Sea t X X
Both exterior
X X mirrors*
Remote control key
Applies to: vehicles with memory function
The driver's seat profile can be assigned to the
remote control key when the vehicle is locked .
.. Select in the Infotainment system: !MENUI but
ton
> Vehicle> left control button > Vehicle
settings
> Seats > Driver's seat > Store set
tings on remote control key.
@ Tips
If you do not wish to have the seat profile for
another driver assigned to the remote control
key, switch the memory function off in the In
fotainment system.
Memory buttons
Applies to: vehicles with memory function
Fig. 79 Driver's door: memory functio n buttons
Storing a seat profile
.. Press the ISET I button. The LED in the button
turns o n .
.. Press memory button IT] or~ -
A signal tone will sound when it is successfully
stored.
;:::: Accessing a seat profile ...... N
8 .. If the driver's door is open and the ignition is
'° ~ switched off, press the memory b utton. co
Seats and storage
.. If the driver's door is closed or the ignition is
switched on, press and hold the memory but
ton until the seat adjustment is complete .
_& WARNING
-For safety reasons, the seat setting can only
be recalled when the vehicle is stationary to
reduce the risk of an accident.
- In an emergency, seat adjustment operat ion
can be stopped by pressing the
ISE TI button
or the buttons @ or@
~ page 71, fig. 72.
Sockets
Fig. 80 Cen ter console : 12 vo lt socket
Fig. 81 Rear center console: 12 volt socket •
The 12-volt sockets can be used for electr ical ac
cessories . The power usage must not exceed
120 watts.
T here is an additiona l 12 volt socket* located on
the side tr im panel in the luggage compartment.
A WARNING
The sockets and the e lectrical accessories con
nected to them only function when the igni
tion is switched on. Incorrect usage can lead
to serious injuries or burns. To reduce the r isk
Ji--
75
Page 78 of 409

Sea ts and stor age
of injuries, never leave ch ildren unattended in
the vehicle with the veh icle key.
CD Note
- To reduce the risk of damage to the vehicle
electrica l system, never attempt to charge
the vehicle battery by connecting accesso ries that prov ide power, such as solar panels
or battery chargers, to the 12 Volt sockets
or the cigarette lighter.
- To reduce the risk of damage to the sockets,
only use plugs that fit correct ly.
Storage
Cup holders
F ig . 8 2 Rear cente r armrest: cup holders•
Your vehicle has cup ho lders in the front cen ter
console, in the cente r of the rear bench seat* or
in the rea r center a rm rest * as well as on the right
and left side in t he rear*.
Cup hold ers in the rear c enter armrest*
• Fold the center armrest downward.
• To open the cup ho lders, pull th e top cover on
the cup holders forward
¢ fig. 82.
• Set yo ur beverage in the holde r.
• To close the cup holder, fold the cover back un
ti l it clicks into place .
&_ WARNING
-
-Do not put any hot beverages in the cup
holder w hile the vehicle is mov ing. Hot bev
erages could spill, wh ich increases the r isk
of injury.
-Do not use any breakable beverage contain
ers (for example, made out of glass or por-
76
celain). You could be injured by them in the
event of an accident.
CD Note
Beverage containers in the cup holders should
a lways have a lid .
If not, beverages could spill
and ca use damage to veh icle equipment, such
e lectron ics or seat covers.
Cooled glove compartment
Applies to: vehicles with cooled g love co mpartment
The cooled glove compartment only functions
when the AIC system is switched on.
F ig. 83 G love compartment: sw itch ing cooling mode on/
off
• Turn the knob @ counter-clockwise to switch
the cooling on . The symbols on the knob must
appear as they do in
¢ fig. 83.
• Turn the knob @ clockwise to switch the cool
ing off .
If the heating is switched on, switching the glove
compartment cooling mode off is recommended.
Addit ional storage compartments
You w ill find a variety of storage compartments
and holders at various locat io ns in the vehicle .
- Glove compartment: the glove compartment
can be locked using the mechanical key
¢ page 38, Key set .
-In the door trim panels
- Safety vest compartment in the door trim pan-
els on the dr iver's side and front passenger's
side
-Storage compartment under the front center
armrest
.,.
Page 79 of 409

- Storage compartment* in the rear center arm-
rest
- Storage compartment* under the light switch
- Ga rmen t hooks above the rea r doors*
- Nets* on the back rests of the front seats
- Nets* on the left/r ight luggage compartment
t rim panel
- Tie-downs* on the left/right luggage compart
ment trim panel
- Bag hooks* in the luggage compartment
A WARNING
- Always keep the glove compa rtment lid
closed wh ile driving to reduce the risk of in
Jury.
- Only use the s torage compartments in the
doo r trim pa ne ls to s to re small objects that
will not st ic k out of the compa rtme nt and
im pair the range of the side airbag s.
- Make s ure tha t the view to the rear is not
obst ru cted by ha nging garments.
- Hang on ly lightwe igh t cloth ing and be su re
t ha t there a re no heavy or sha rp-edged ob
jects in the pockets.
- Do not use coat hangers to hang ga rments,
because t his co uld reduce t he effe ct iveness
o f the side curt ain airb ags*.
Luggage compartment
General information
A WARNING
Rea d and follow the important safe ty p recau
t ion s in
~p age 263, S toring cargo co rrec tly.
Seats and storag e
Luggage compartment cover
Applies to : vehicles wit h lu ggage compartment cover
Fig. 84 Luggage compa rtment: cove r w hen the luggage
compart ment lid is open
Fig. 85 Luggage compa rtment: cover beh ind the rear
bench seat
Removing and installing the luggage
compartment lid cover
., To remove the cover, turn the knob to a hor i
zontal position .
., Pull the cover o ut of t he retainers in the direc
tion of the arrow
¢fig . 84 .
., To install the cove r, s lide it upwa rd onto the re-
tainers a nd let it lock into p lace .
., Turn the knob to a vertical pos it ion .
Removing and installing the cover behind
the rear bench seat
., To remove the cover, pull it in th e d irection of
the arrow
¢fig. 85 .
., Re lease it upward .
., To install the cover, insert the left and right
sides of the cover into the mounts on the side
trim panel.
., Slide the cover forward unt il it locks into place . ..,
77
Page 80 of 409

Seats and storage
_&. WARNING
-The luggage c ompartment cover is not a
surface for storin9 objects. Objects placed
on the cover could endanger all vehicle oc
cupants during sudden braking maneuvers
or in a crash.
- To reduce the risk of accidents, the luggage
compartment cover should never be unse
cured under any circumstances.
Increasing the size of the vehicle interior
Applies to : vehicles with folding backrests
The rear seat backrests can be folded forward ei
ther separately* or together.
Fig. 86 Backrest : release lever, securing knob and lock*
Fig. 87 Center backrest: fold ing in* the center backrest
Folding the outer* rear backrests forward
and backward
.,. Pull the release lever @¢ fig. 86 in the direc
tion of the arrow and fold the backrest forward .
.,. Fold the backrest back up again until it latches
or the red marking @ is no longer
visible¢ &,.
78
Folding the center rear backrest forward and
backward
Applies to: Sportback
.,. Pull on the upper release lever (D and fold the
backrest
forward @¢ fig. 87.
.,. Fold the backrest backward until it locks into
place .
Applies to : Coupe
When secured, the backrest can be locked© us
ing the mechanical
key¢ page 39. This prevents
access into the luggage compartment from the
vehicle interior. You can only enlarge the luggage
compartment if the backrest is not locked .
_&. WARNING
-The backrest must be securely latched to
ensure the safety belt is protecting the rear
seat positions.
- The backrest must be securely latched so
objects cannot slide forward out of the lug
gage compartment during sudden braking.
(D Note
- If you move the front seat back when the
rear seat backrest is folded forward, you
could damage the head restraints on the
rear seat.
- Move the rear head restraints down before
folding the rear backrests forward
~ page 74. This is especially true if the Rear
Seat Entertainment (RSE)* is installed, be
cause it could be damaged.
- Make sure the outer safety belts are not
pinched or damaged when folding the seat
up.
-