Page 57 of 273

Seats, restraints55IL:suitable for particular ISOFIX restraint systems of the 'specific-vehicle', 'restricted' or 'semi-universal' categories.The ISOFIX restraint system must be approved for the specific vehicle type (refer to the vehicle type list of the child
restraint system)IUF:suitable for ISOFIX forward-facing child restraint systems of universal category approved for use in this weight classX:no ISOFIX child restraint system approved in this weight class1:move seat forwards as far as necessary and adjust seat backrest as far as necessary to a vertical position to ensure
that the belt runs forwards from the upper anchorage point2:move seat upwards as far as necessary and adjust seat backrest as far as necessary to a vertical position to ensure
that the belt is tight on the buckle side3:move the respective front seat ahead of the child restraint system forwards as far as necessary and adjust seat
backrest as far as necessary to a vertical position4:adjust the respective headrest as necessary or remove if required
ISOFIX size class and seat device
A – ISO/F3:forward-facing child restraint system for children of maximum size in the weight class 9 to 18 kgB – ISO/F2:forward-facing child restraint system for smaller children in the weight class 9 to 18 kgB1 – ISO/F2X:forward-facing child restraint system for smaller children in the weight class 9 to 18 kgC – ISO/R3:rear-facing child restraint system for children of maximum size in the weight class up to 18 kgD – ISO/R2:rear-facing child restraint system for smaller children in the weight class up to 18 kgE – ISO/R1:rear-facing child restraint system for young children in the weight class up to 13 kgF – ISO/L1:left lateral facing position child restraint system (carry-cot)G – ISO/L2:right lateral facing position child restraint system (carry-cot)
Permissible options for fitting an i-Size child restraint system with ISOFIX brackets
On front passenger seat
On rear outboard seatsOn rear centre seat
activated airbagdeactivated airbagi-Size child restraint systemsXXXX
Page 58 of 273
56Seats, restraintsX:seating position not suitable for i-Size 'universal' child restraint systems
Page 59 of 273

Storage57StorageStorage compartments................57
Glovebox ................................... 57
Cupholders ................................ 57
Armrest storage .........................58
Centre console storage .............58
Load compartment .......................59
Load compartment cover ...........60
Rear floor storage cover ............60
Lashing eyes ............................. 61
Warning triangle ........................61
First aid kit ................................. 61
Roof rack system .........................62
Roof rack ................................... 62
Loading information .....................62Storage compartments9Warning
Do not store heavy or sharp
objects in the storage
compartments. Otherwise, the
storage compartment lid could
open and vehicle occupants could be injured by objects being thrown
around in the event of hard
braking, a sudden change in
direction or an accident.
Glovebox
To open the glovebox, pull the
handle.
The glovebox should be closed whilst driving.
Cupholders
Cupholders are located in the centre
console.
Page 60 of 273
58Storage
Additional cupholders are located in
the rear armrest. Fold down armrest.
Armrest storage
Storage under the front armrest
Press button to fold up the armrest.
The armrest must be in rearmost
position.
Centre console storage
A storage compartment is located in
the centre console.
Page 61 of 273
Storage59Load compartment
Load compartment extension
The rear seat backrest is divided into
two parts. Both parts can be folded
down.
Remove the load compartment cover
if necessary 3 60.
Press and hold the catch, then push the head restraints down 3 37.
Fold up the rear armrest.
Guide the seat belts of the outer seats
into the belt guides.
Pull the release lever on one or both
outer sides and fold down the
backrests onto the seat cushion.
To fold up, raise the backrests and
guide them into an upright position
until they engage audibly.
Make sure the seat belt is in the belt guide and is not twisted or caught in
the behind of backrests.The backrests are properly engaged
when the red mark near the release
lever is no longer visible.
9 Warning
When folding up, ensure that
backrests are securely locked in
position before driving. Failure to
do so may result in personal injury or damage to the load or vehicle in the event of hard braking or a
collision.
Page 62 of 273
60Storage
The seat belt of the centre seat couldbe blocked when the backrest is
folded up too quickly. To unlock the
retractor, push in the seat belt or pull
it out by approx. 20 mm then release.
Load compartment cover
Do not place any objects on the cover.
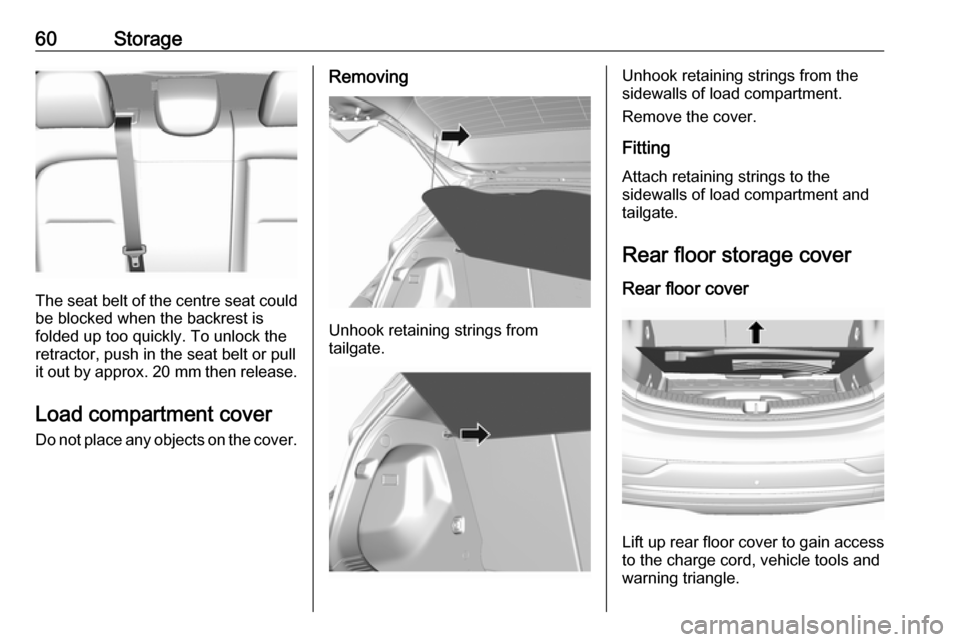
Removing
Unhook retaining strings from
tailgate.
Unhook retaining strings from the
sidewalls of load compartment.
Remove the cover.
Fitting Attach retaining strings to the
sidewalls of load compartment and
tailgate.
Rear floor storage cover Rear floor cover
Lift up rear floor cover to gain access
to the charge cord, vehicle tools and
warning triangle.
Page 63 of 273
Storage61General hint9Warning
For safety reasons, stow all parts
in the load compartment in its
position, always drive with a
closed rear floor cover and, if
possible, with folded up rear
backrests.
Otherwise, vehicle occupants
could be injured by objects being
thrown around in the event of
sharp braking, a sudden change in direction or an accident.
Lashing eyes
The lashing eyes are designed to
secure items against slippage, e.g.
using lashing straps or luggage net.
Warning triangle
Stow the warning triangle in the
vehicle tool box below the rear floor
cover in the load compartment.
First aid kit
Stow the first-aid kit in the load
compartment.
Page 64 of 273

62StorageRoof rack systemRoof rackFor safety reasons and to avoid
damage to the roof, the vehicle
approved roof rack system is
recommended. For further
information contact your workshop.
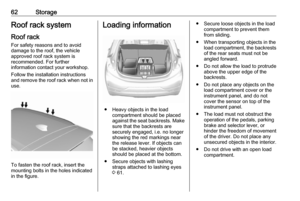
Follow the installation instructions
and remove the roof rack when not in
use.
To fasten the roof rack, insert the
mounting bolts in the holes indicated
in the figure.
Loading information
● Heavy objects in the load compartment should be placed
against the seat backrests. Make
sure that the backrests are
securely engaged, i.e. no longer
showing the red markings near the release lever. If objects can
be stacked, heavier objects
should be placed at the bottom.
● Secure objects with lashing straps attached to lashing eyes3 61.
● Secure loose objects in the load
compartment to prevent themfrom sliding.
● When transporting objects in the load compartment, the backrestsof the rear seats must not be
angled forward.
● Do not allow the load to protrude above the upper edge of the
backrests.
● Do not place any objects on the load compartment cover or theinstrument panel, and do not
cover the sensor on top of the instrument panel.
● The load must not obstruct the operation of the pedals, parking
brake and selector lever, or
hinder the freedom of movement
of the driver. Do not place any
unsecured objects in the interior.
● Do not drive with an open load compartment.