Page 217 of 273

Vehicle care215High voltage battery cooling
system9 Danger
The high voltage battery coolant
may only be serviced by a
qualified technician.
Improper handling could cause serious injuries or death.
The high voltage battery coolantreservoir is located on the front side
of the engine compartment.
Check to see if coolant is visible in the high voltage battery coolant reservoir.
If coolant is visible but the coolant
level is below the cold fill line, there
could be a leak within the cooling
system.
If the coolant level is too low, seek the assistance of a workshop.
Power electronics and charger
modules cooling system9 Danger
The power electronics and
charger modules coolant may only be serviced by a qualified
technician.
Improper handling could cause serious injuries or death.
The power electronics and charger
modules are cooled using the same coolant loop.
The power electronics and charger
modules coolant reservoir is located
on the front side of the engine
compartment.
Check to see if coolant is visible in the
power electronics and charger
modules coolant reservoir. If coolant
is visible but the coolant level is below the cold fill line, there could be a leak
in the cooling system.
If the coolant level is too low, seek the assistance of a workshop.
Page 218 of 273

216Vehicle careWasher fluid
Fill with clean water mixed with a
suitable quantity of approved
windscreen washer fluid which
contains antifreeze.
When adding windscreen washer
fluid to the vehicle, be sure to read the
manufacturer's instructions before
use.
Caution
Only washer fluid with a sufficient
antifreeze concentration provides
protection at low temperatures or
a sudden drop in temperature.
● When using concentrated washer fluid, follow the
manufacturer's instructions for
adding water.
● Do not mix water with ready-to- use washer fluid. Water can
cause the solution to freeze and
damage the washer fluid tank
and other parts of the washer
system.
● Fill the washer fluid tank only three quarters full when it is verycold. This allows for fluid
expansion if freezing occurs,
which could damage the tank if it
is completely full.
● Do not use engine coolant (antifreeze) in the windscreen
washer. It can damage the
windscreen washer system and
paint.
Washer fluid 3 248.
Brakes In the event of minimum thickness ofthe brake lining, a squealing noise
sounds during braking.Continued driving is possible but
have the brake lining replaced as
soon as possible.
Once new brake linings are installed,
do not brake unnecessarily hard for
the first few journeys.
Brake fluid9 Warning
Brake fluid is poisonous and
corrosive. Avoid contact with eyes,
skin, fabrics and painted surfaces.
Page 219 of 273

Vehicle care217When the vehicle has not been
running for at least 1 minute, the
maximum fluid level is at the top of the
reservoir body. When the vehicle is
running, the brake fluid level must be
between the MIN and MAX marks.
If the brake fluid level is below MIN
seek the assistance of a workshop.
After work is done on the brake
hydraulic system, make sure the fluid level is in the proper operating rangebetween the MIN and MAX marks
when the vehicle is running. Only use
high-performance brake fluid
approved for the vehicle. Consult a
workshop.
Brake fluid 3 248.
Vehicle battery9 Danger
Only a trained service technician
with the proper knowledge and
tools may inspect, test or replace
the high voltage battery.
Seek the assistance of a
workshop if the high voltage
battery needs service.
This vehicle has a high voltage
battery and a 12 V vehicle battery.
If the vehicle is involved in a crash, the
sensing system may shut down the
high voltage system. If this occurs,
the high voltage battery will be
disconnected and the vehicle will not
start.
A service message will be displayed
in the Driver Information Centre.
Before the vehicle can be operated
again, it must be serviced at a
workshop.
Airbag system 3 45.
A vehicle cover, which can reduce
sun loading on the vehicle and
improve high voltage battery life, is
available from your Opel Ampera-e
Service Partner.
The Opel Ampera-e authorised
repairer has information on how to recycle the high voltage battery.
Keep the vehicle plugged in, even
when fully charged, to keep the high
voltage battery temperature ready for
the next drive. This is important when
outside temperatures are extremely
hot or cold.
Refer to the replacement number
shown on the original 12 V vehicle
battery label if a new 12 V vehicle
battery is required. The vehicle has
an Absorbed Glass Mat (AGM) 12 V
vehicle battery.
Installation of a standard 12 V vehicle battery will result in reduced 12 V
vehicle battery life. When using a 12 V battery charger on the AGM12 V vehicle battery, note that somechargers have an AGM battery
setting on the charger. If available,
use the AGM setting on the charger
to limit charge voltage to 14.8 V.
Follow the charger manufacturer's
instructions.
Page 220 of 273

218Vehicle careBatteries do not belong in household
waste. They must be disposed of at
an appropriate recycling collection
point.
There are connecting points for jump
starting in the engine compartment.
Jump starting 3 240.
Remove the 12 V vehicle battery
black negative (−) cable from the
12 V vehicle battery to prevent the
12 V vehicle battery from running
down, or use a battery trickle charger.
Ensure the vehicle is switched off
before connecting or disconnecting
the 12 V vehicle battery.
Vehicle storage 3 211.
Battery discharge protection 3 105.Warning label
Meaning of symbols:
● No sparks, naked flames or smoking.
● Always shield eyes. Explosive gases can cause blindness or
injury.
● Keep the 12 V vehicle battery out
of reach of children.
● The 12 V vehicle battery contains
sulphuric acid which could cause
blindness or serious burn
injuries.
● See the Owner's Manual for further information.
● Explosive gas may be present in the vicinity of the 12 V vehicle
battery.
Post-crash label
The post-crash label is located in the
door frame 3 152.
Page 221 of 273
Vehicle care219Wiper blade replacement
Windscreen 1. Lift the wiper arm.
2. Press button to disengage the wiper blade and remove.
3. Lower wiper arm carefully.
Rear window
1. Pull the cover on the right until it disengages.
2. Slide the cover leftwards to unhook it from the blade
assembly.
3. Remove the cover.
4. Lift the wiper arm.
5. Push the release lever (2) to disengage the hook and pull the
blade assembly (3) out of the
wiper arm (1).
6. Push the new blade assembly securely on the wiper arm until the
release lever clicks into place.
7. After wiper blade replacement, ensure that the cover hook slides
into the slot in the blade assembly.
8. Snap the cover down to secure.
Headlight aiming Headlight aim has been preset andshould need no further adjustment.
When driving in countries where the
traffic drives on the opposite side of the road, it is not necessary to adjust
the low beam.
Page 222 of 273

220Vehicle careIf the vehicle is damaged in a crash,
the headlight aim may be affected. If
adjustment to the low beam is
necessary, seek the assistance of a
workshop.Bulb replacement
Switch off the vehicle and the relevant
light.
Only hold a new bulb at the base. Do not touch the bulb glass with bare
hands.
Use only the same bulb type for
replacement.
Replace headlight bulbs from within
the engine compartment.
Bulb check
After a bulb replacement, switch on
the vehicle, operate and check the
lights.
Halogen bulbs9 Warning
Halogen bulbs have pressurised
gas inside and can burst if you
drop or scratch the bulb. You or others could be injured. Be sure to read and follow the instructions onthe bulb package.
Xenon headlights9 Danger
Xenon headlights work under
extremely high electrical voltage.
Do not touch. Have bulbs replaced by a workshop.
Bulbs for front turn lights and
corner lighting can be changed.
Sidelight / Daytime running lights are
designed as Light Emitting Diodes
(LEDs) and cannot be replaced.
Front turn lights Each turn light is accessible from
behind via the respective wheel
house:
Page 223 of 273

Vehicle care221
1.Tilt the wheel and remove screws
on the outside of the wheel house.
Use the screwdriver provided with the vehicle tools.
2. Detach the respective wheel house panel partially.
3. Rotate the bulb holder anticlockwise to disengage and
pull it out.
4. Pull the old bulb straight out of the
holder and replace it with a new
one.
5. Insert the lamp holder back into the turn light housing and rotate it
clockwise.
6. Reinstall the wheel house panel with screws.
Tail lights Tail light assembly in the rear
bumper
The tail light assembly is located in
the rear bumper. The bulbs are
accessible from the underside of the
vehicle.
● (1) Rear fog light (driver side) / reversing light (passenger side)
● (2) Turn light
● (3) Tail / brake light 1. Turn the bulb holder anticlockwise
and remove it from the reflector.
2. Pull the bulb out of the bulb holder.
3. Replace bulb.
4. Insert the bulb holder into the reflector and rotate clockwise.
In case of failure, have LEDs replaced by a workshop.
Tail light assembly in the tailgate The lights of the tail light assembly in
the tailgate are LEDs and have to be
replaced by a workshop.
Side turn lights Have bulbs replaced by a workshop.
Page 224 of 273
222Vehicle careNumber plate light
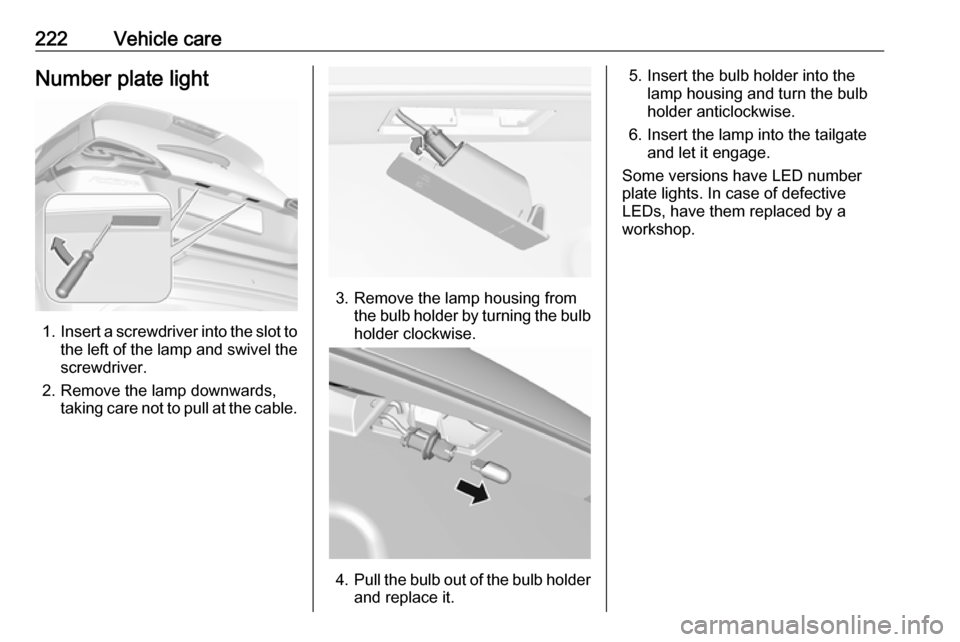
1.Insert a screwdriver into the slot to
the left of the lamp and swivel the screwdriver.
2. Remove the lamp downwards, taking care not to pull at the cable.
3. Remove the lamp housing fromthe bulb holder by turning the bulbholder clockwise.
4. Pull the bulb out of the bulb holder
and replace it.
5. Insert the bulb holder into the lamp housing and turn the bulb
holder anticlockwise.
6. Insert the lamp into the tailgate and let it engage.
Some versions have LED number
plate lights. In case of defective
LEDs, have them replaced by a
workshop.