Page 164 of 784

164
PRIUS PRIME_OM_OM47A88U_(U)
2-2. Charging
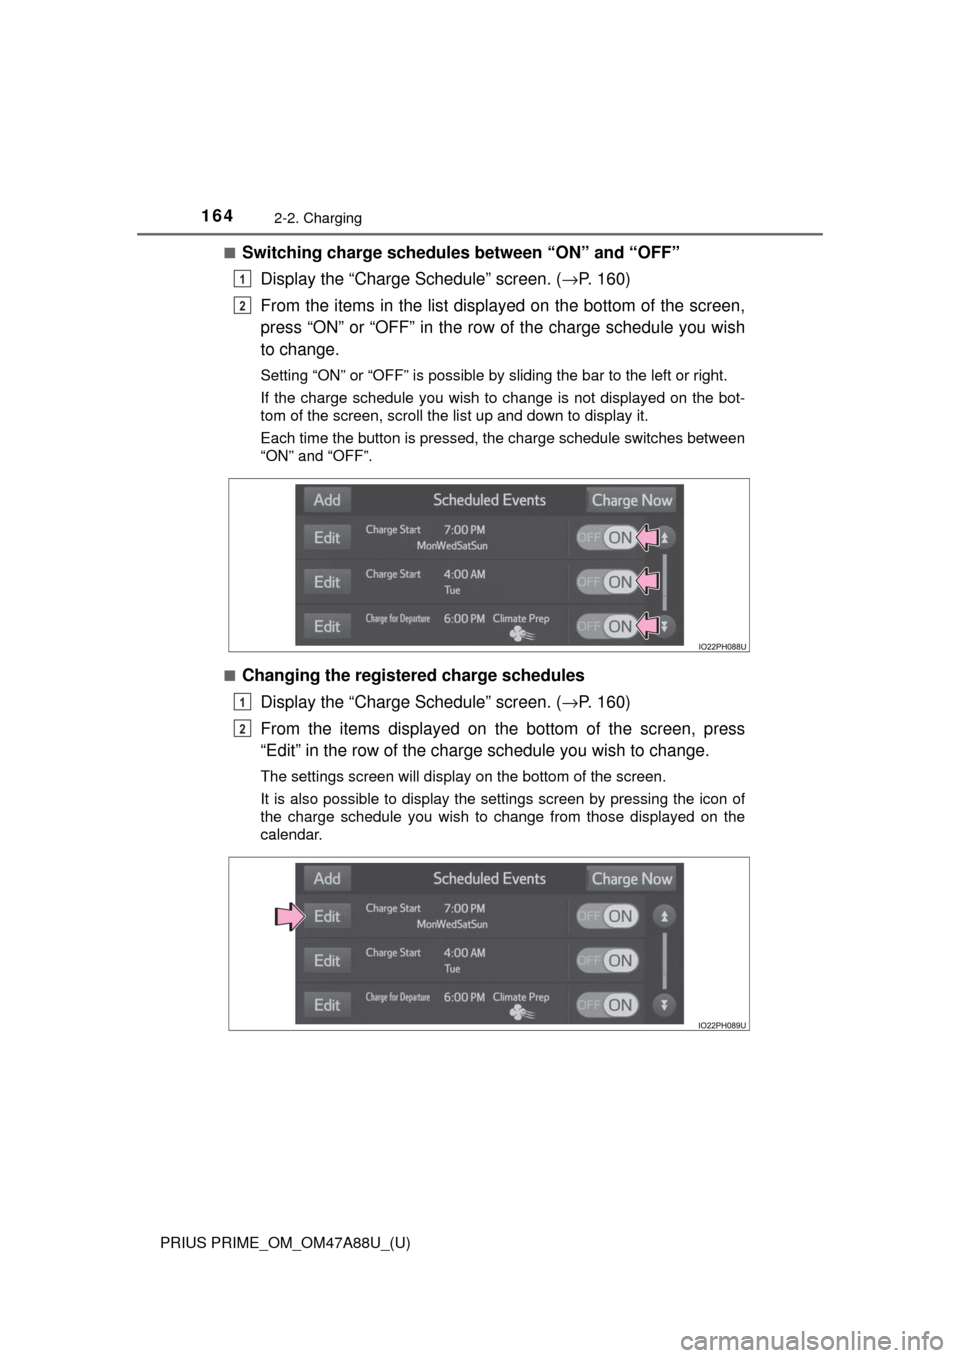
■Switching charge schedules between “ON” and “OFF”Display the “Charge Schedule” screen. ( →P. 160)
From the items in the list displayed on the bottom of the screen,
press “ON” or “OFF” in the row of the charge schedule you wish
to change.
Setting “ON” or “OFF” is possible by sliding the bar to the left or right.
If the charge schedule you wish to change is not displayed on the bot-
tom of the screen, scroll the list up and down to display it.
Each time the button is pressed, the charge schedule switches between
“ON” and “OFF”.
■
Changing the registered charge schedules Display the “Charge Schedule” screen. ( →P. 160)
From the items displayed on the bottom of the screen, press
“Edit” in the row of the charge schedule you wish to change.
The settings screen will display on the bottom of the screen.
It is also possible to display the settings screen by pressing the icon of
the charge schedule you wish to change from those displayed on the
calendar.
1
2
1
2
Page 165 of 784
PRIUS PRIME_OM_OM47A88U_(U)
1652-2. Charging
2
Plug-in hybrid system
●Changing registered items:
Change the desired settings as described in step to step of
the “Registering the charge schedule” procedure. ( →P. 162)
When a setting is changed, its icon on the calendar also changes.
● Deleting registered items:
Press “Delete”.
A deletion confirmation message will display.
Press “Yes” to delete the selected charge schedule.
To cancel deletion, press “No”.
When a charge schedule is deleted, its icon is also deleted from the cal-
endar.
■
Turning “Charge Now” on
The “Charge Now” setting can be changed by performing one of the
two following procedures.
Operations on “Charge Schedule” screen
Display the “Charge Schedule” screen. ( →P. 160)
Press “Charge Now”.
Each time the button is pressed, “Charge Now” switches between on
and off and the indicator on the button turns on and off.
37
1
2
Page 166 of 784
166
PRIUS PRIME_OM_OM47A88U_(U)
2-2. Charging
Operation on ending screen
Turn the power switch off.
The ending screen is displayed on the 11.6-inch display.
While the ending screen is
displayed, press “Charge
Now”.
Each time the button is pressed,
“Charge Now” switches between
on and off and the indicator on
the button turns on and off.
After setting operations are complete, charging starts immediately
when the charging cable is connected. (→P. 136)
1
2
Page 167 of 784

PRIUS PRIME_OM_OM47A88U_(U)
1672-2. Charging
2
Plug-in hybrid system
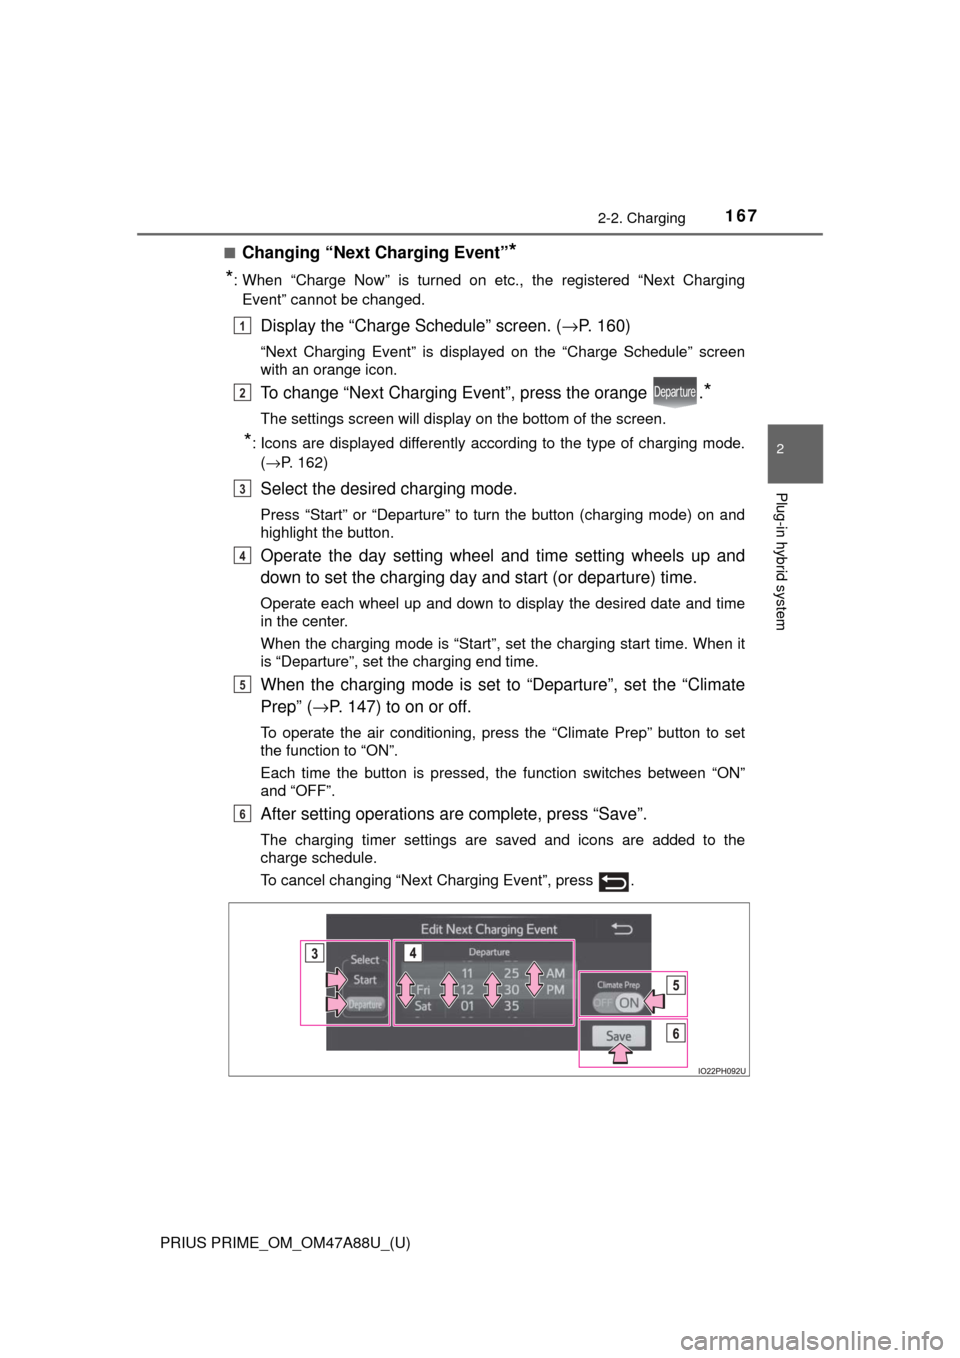
■Changing “Next Charging Event”*
*
: When “Charge Now” is turned on etc., the registered “Next Charging Event” cannot be changed.
Display the “Charge Schedule” screen. ( →P. 160)
“Next Charging Event” is displayed on the “Charge Schedule” screen
with an orange icon.
To change “Next Charging Event”, press the orange .*
The settings screen will display on the bottom of the screen.
*: Icons are displayed differently according to the type of charging mode.
(→P. 162)
Select the desired charging mode.
Press “Start” or “Departure” to turn the button (charging mode) on and
highlight the button.
Operate the day setting wheel and time setting wheels up and
down to set the charging day and start (or departure) time.
Operate each wheel up and down to display the desired date and time
in the center.
When the charging mode is “Start”, set the charging start time. When it
is “Departure”, set the charging end time.
When the charging mode is set to “Departure”, set the “Climate
Prep” (→ P. 147) to on or off.
To operate the air conditioning, press the “Climate Prep” button to set
the function to “ON”.
Each time the button is pressed, the function switches between “ON”
and “OFF”.
After setting operations are complete, press “Save”.
The charging timer settings are saved and icons are added to the
charge schedule.
To cancel changing “Next Charging Event”, press .
1
2
3
4
5
6
Page 168 of 784

168
PRIUS PRIME_OM_OM47A88U_(U)
2-2. Charging
■Setting the charge schedule
The charge schedule cannot be set while driving.
■ When charging timer setting operations are canceled
When the vehicle is in the following conditions, charging timer setting opera-
tions are canceled.
●The power switch is turned off before the settings are confirmed
● The vehicle starts off
● When the display which priority is higher than that of the timer charging set-
ting
■ “Next Charging Event”
After charging completes, the “Next Charging Event” displayed on the display
will not change until the charging cable is removed, even after charging is
performed according to the “Next Charging Event” schedule.
■ To return to original setting after changing “Next Charging Event” set-
ting
Turning the setting of “Charge Now” on and then off can return the setting of
“Next Charging Event” to its original setting.
■ When “Next Charging Event” is changed while charging
● When the charging mode is “Departure”, the current charging is interrupted
or continued depending on the remaining time until the charging is com-
pleted.
● When the charging mode is “Start”, the current charging is interrupted, the
next charging will start at the set time.
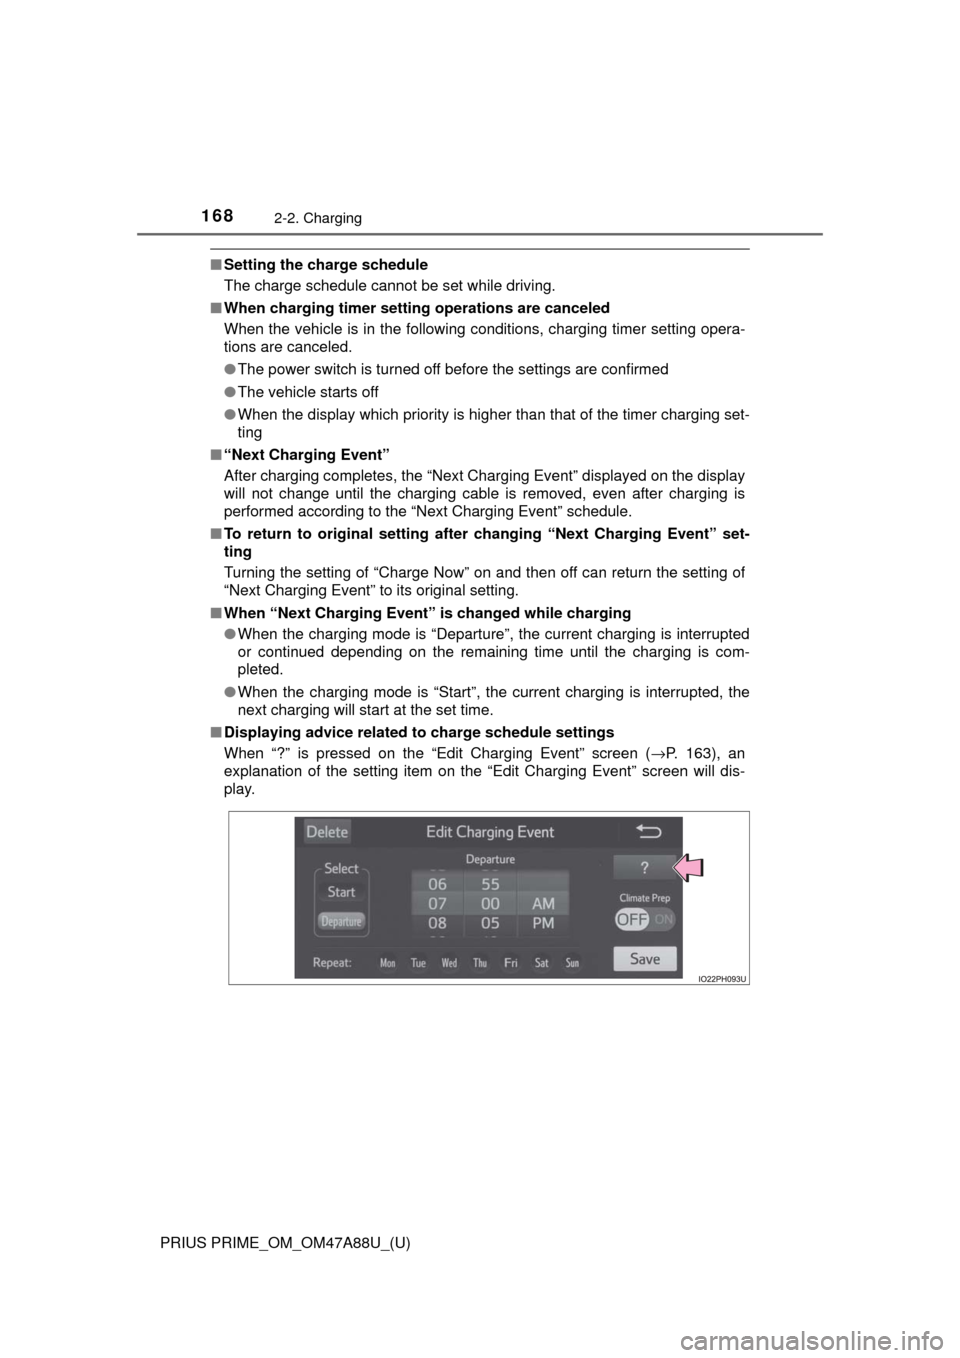
■ Displaying advice related to charge schedule settings
When “?” is pressed on the “Edit Charging Event” screen ( →P. 163), an
explanation of the setting item on the “Edit Charging Event” screen will dis-
play.
Page 169 of 784
PRIUS PRIME_OM_OM47A88U_(U)
1692-2. Charging
2
Plug-in hybrid system
■When the power switch is turned off
The next charge schedule (“Next
Charging Event”) can be checked on the
ending screen
* that is displayed when the
power switch is turned off.
*: The ending screen may not be dis-
played during charging.
WARNING
■ Cautions performing the setting operation
As the hybrid system needs to be operating during setting up the display,
ensure that the vehicle is parked in a place with adequate ventilation. In a
closed area such as a garage, exhaust gases including harmful carbon
monoxide (CO) may collect and enter the vehicle. This may lead to death or
a serious health hazard.
NOTICE
■While performing the setting operation
To prevent 12-volt battery discharge, ensure that the hybrid system is oper-
ating while setting up the display features.
Page 170 of 784

170
PRIUS PRIME_OM_OM47A88U_(U)
2-2. Charging
When normal charging cannot be carried
out
Refer to the following table and carry out the appropriate correction
procedure.
When charging does not start, even though the normal proce-
dure is followed, check each of the following items.
If a message is shown on the multi- information display, also refer to
P. 175.
When normal charging cannot be carried out
Likely causeCorrection procedure
The power source indicator on the CCID (Charging Circuit Interrupting
Device) does not illuminate, even though the plug is connected to an
external power source.
Plug is not properly connected to
outletCheck that the plug is properly con-
nected to the outlet.
Power is outAfter power is restored, carry out the
charging procedure again.
Building breaker is tripped and
power is cut off
Check that the breaker is connected
and if there is no malfunction, check
if the vehicle can be charged
through another outlet.
If charging is possible, the first outlet
may have a malfunction. Contact the
building or facility manager, or an
electrician.
Short circuit between CCID
(Charging Circuit Interrupting
Device) and plugImmediately stop charging and con-
tact your Toyota dealer.
Page 171 of 784

PRIUS PRIME_OM_OM47A88U_(U)
1712-2. Charging
2
Plug-in hybrid system
*: Refer to P. 106 for details regarding charging indicator illumination andflashing.
The error warning indicator on the CCID (Charging Circuit Interrupting
Device) flashes.
Electrical leakage detection function
or self- diagnostic function operates
and power is cut off
When the voltage is insufficient, the
error warning indicator may flash
when there is noise interference.
Perform a reset and connect to a
proper power source. ( →P. 110)
If charging does not start, immedi-
ately stop charging and contact your
Toyota dealer.
Charging indicator does not illuminate, even though charging connector
is connected.
The plug is not properly connected
to the outletCheck whether the plug is properly
connected to the outlet.
Charging connector is not securely
connected to charging inlet
Check the connection status of the
charging connector.
If the charging indicator does not
illuminate, even though the charging
connector is securely connected,
there may be a malfunction in the
system. Immediately stop charging
and contact your Toyota dealer.
Hybrid battery (traction battery) is
already fully chargedWhen the hybrid battery (traction
battery) is fully charged, charging is
not performed.
The charging equipment does not
operatePlease contact the facility manager
when there is a problem with
charging equipment.
Charging indicator flashes and charging cannot be carried out.
When charging indicator slowly
flashes
*:
Charge schedule is registered
When you wish to charge according
to the timer, wait until the set time.
To immediately start charging, set
“Charge Now” to “On”.
( → P. 156, 165)
When charging indicator rapidly
flashes
*:
Malfunction occurred in an external
power source or the vehicle
Start the hybrid system and follow
the instructions displayed by the
message on the multi-information
display. ( →P. 175)
Likely causeCorrection procedure