Page 169 of 336

5-42
OTHER CONTROLS AND EQUIPMENT
74LH0-74E
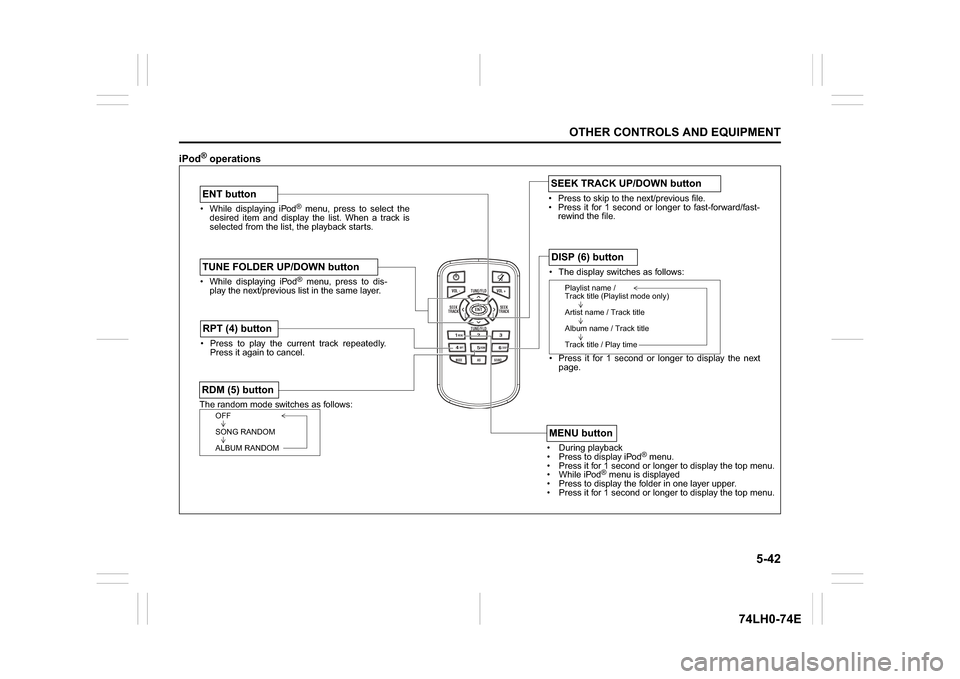
iPod
® operations
/TUNE
VOL -VOL + FLD/TUNE
MODE
AS
SOUND
1
5
4
FLDENT
SEEK
TRACK
SEEK
TRACK
RPT RDM
6
MENU
3 2DISP
While displaying iPod
® menu, press to select the
desired item and display the list. When a track is
selected from the list, the playback starts.
ENT buttonThe random mode switches as follows:RDM (5) button
OFF
SONG RANDOM
ALBUM RANDOM
Press to play the current track repeatedly.
Press it again to cancel.RPT (4) button
The display switches as follows:
Press it for 1 second or longer to display the next
page.DISP (6) button
Playlist name /
Track title (Playlist mode only)
Artist name / Track title
Album name / Track title
Track title / Play time
During playback
Pres
s to display iPod
® menu.
Press it for 1 second or longer to display the top menu.
While iPod
® menu is displayed
Press to displa
y the folder in one layer upper.
Press it for 1 second or longer to display the top menu.
MENU button
While displaying iPod
® menu, press to dis-
play the next/previous list in the same layer.
TUNE FOLDER UP/DOWN button
Press to skip to the next/previous file.
Press it for 1 second or longer to fast-forward/fast-
rewind the file.SEEK TRACK UP/DOWN button
Page 170 of 336

5-43OTHER CONTROLS AND EQUIPMENT
74LH0-74E
TroubleshootingWhen encountered a problem, check and follow the instructions as described below.
If the described suggestions do not solve the problem, it is recommended to take the unit to your authorized MARUTI SUZUKI dealer.
Problem
Possible cause
Possible solution
Common
Unable to operate The security function is on.When “SECURITY” is displayed, enter
the ID.
When “HELP” is displayed, contact your
authorized MARUTI SUZUKI dealer.
Unable to turn on the power (no sound).
(No sound is produced)Fuse is blown.Contact your authorized MARUTI
SUZUKI dealer.
Radio
Much noiseIt may not be exactly tuned in to the sta-
tion.Tune it in exactly to the station.
Unable to receive by auto tuningThere may be no station emitting signals
powerful enough.Pick up a station by manual tuning.
CD
Sound skips or noise producedThe disc is dirty. Wipe the disc with a soft cloth.
The disc has a major scratch or is
warped.Replace the disc with the one with no
scratch and also not warped.
Page 171 of 336

5-44
OTHER CONTROLS AND EQUIPMENT
74LH0-74E
MP3/WMA/AAC
No playbackThe disc contains unsupported formatted
data.Check the file format.
Sound skips or noise producedSound skipping may occur when playing
VBR (Variable Bit Rate) files.It is not recommended to play VBR files.
USB
Playback does not start when the USB
device is connected.There is no supported format file to play
on this unit.Check the file format.
The current consumption of the USB
device exceeds 1.0 A.Use an USB device with a current con-
sumption lower than 1.0 A.®Pairing failedThe distance between this unit and the
®
ready device is too far, or a metallic
object may be located between the
®
ready device and this unit.Change the location of the
® ready
device.
The
® function of the
® ready device is
off.Refer to the manual of the
® ready
device. (Some devices have the power
saving function that automatically acti-
vates after a certain time.)
Unable to receive a call.Your current location may be out of ser-
vice area.Drive your vehicle to the service area of
the phone.
The voice quality of hands-free is low
(Distortion, noise etc.).Another wireless device may be located
near the unit.Switch off the wireless device or keep it
away from the unit.
Problem
Possible cause
Possible solution
Page 172 of 336
5-45OTHER CONTROLS AND EQUIPMENT
74LH0-74E
Error Display Messages
Display
Possible cause
Possible solution
CD
ERROR 1The disc cannot be read.Insert the disc with its label side up.
Check the disc if it is not warped or is free of flaws.
When ERROR 1 does not disappear even when a normal
disc is inserted, contact your dealer.
ERROR 3The player developed an error of an
unidentified cause.When the CD is in the unit, press the CD eject button to
remove the disc.
When the disc cannot be ejected, contact your dealer.
USB/iPod
®ERROR 1The USB device is disconnected. Check the connection of the USB device.
ERROR 2Impossible to communicate correctly with
the USB device.Unplug the USB device and plug it again.
Check the USB device.
ERROR 3Inoperable due to an unidentified cause.Unplug the USB device and plug it again.
When ERROR 3 does not disappear, contact your dealer.
ERROR 4The current consumption of the USB
device exceeds 1.0 A.Check the USB device.
Page 173 of 336
5-46
OTHER CONTROLS AND EQUIPMENT
74LH0-74E
®
ERROR 1The player developed an error of an
unidentified cause.Disconnect the
® ready device and connect it again.
When ERROR 1 does not disappear, contact your dealer.
FailedFailed to establish pairing Try to establish the pairing again.
Memory FullReached the limit for the number of con-
nected device informationDelete information of unnecessary devices and try to
establish the pairing again.
Not Avail.Inoperable during driving Operate the system after pulling over your vehicle.
Not LinkedPhone is disconnected Try to establish the pairing again.
Display
Possible cause
Possible solution
Page 174 of 336

5-47OTHER CONTROLS AND EQUIPMENT
74LH0-74E
Fuel Filler CapSwift
68LM522
Dzire
74LHT0511
The fuel filler cap is located on the left rear
side of the vehicle. The fuel filler door can
be unlocked by pulling up the opener lever
located on the outboard side of the driver’s
seat and locked by simply closing the door.
57l51093
To remove the fuel filler cap:
1) Open the fuel filler door.
2) Remove the cap by turning it counter
clockwise.
68MLT0503
NOTE:
The cap holder (1) holds the fuel filler cap
(2) by hooking the groove (3) when refuel-
ing.
To reinstall the fuel filler cap:
1) Turn the cap clockwise until you hear
several clicks.
2) Close the fuel filler door.
EXAMPLEEXAMPLE
CAUTION
Remove the fuel filler cap slowly. The
fuel may be under pressure and may
spray out, causing injury.EXAMPLEEXAMPLE
OpenClose
WA R N I N G
Fuel is extremely flammable. Do not
smoke when refueling, and make
sure there are no open flames or
sparks in the area.
WA R N I N G
If you need to replace the fuel cap, use
a genuine MARUTI SUZUKI cap. Use of
an improper cap can result in a mal-
function of the fuel system or emission
control system. It may also result in
fuel leakage in the event of an accident.
(1)
(2)(3)(1)
(1)
EXAMPLE
Page 175 of 336

5-48
OTHER CONTROLS AND EQUIPMENT
74LH0-74E
Engine Bonnet
63J063
To open the engine hood:
1) Pull the hood release handle located on
the outboard side of the driver’s side of
the instrument panel. This will disen-
gage the engine hood lock halfway.
74LHT0514
2) Push the under-hood release lever up
with your finger, as shown in the illustra-tion. While pushing the lever, lift up the
engine hood.
63J065
3) Continue to lift up the hood until it is
high enough to support with the prop
rod.
To close the engine hood:
1) Lift the hood up slightly and remove the
prop rod from the hole. Put the prop rod
back to the holding clip.
2) Lower the hood to about 20 cm above
the hood latch, then let it drop down.
Make sure the hood is securely latched
after closing.
Sun Visor
79J161
The sun visors can be pulled down to block
glare coming through the windshield, or
they can be unhooked and turned to the
side to block glare coming through the side
window.
Card holder (if equipped)
74LHT0516
(1) Card holder
You can put a card in the card holder (1) on
the back of the sun visor.
EXAMPLE
EXAMPLE
WA R N I N G
Make sure the hood is fully closed
and latched before driving. If it is not,
it can fly up unexpectedly during
driving, obstructing your view and
resulting in an accident.
NOTICE
When unhooking and hooking a sun
visor, be sure to handle it by the hard
plastic parts or the sun visor can be
damaged.EXAMPLE
(1)
Page 176 of 336

5-49OTHER CONTROLS AND EQUIPMENT
74LH0-74E
Vanity mirror (if equipped)
74LHT0532
(2) Vanity mirror
Interior Light Front Overhead Light
(if equipped)
64J104
Push the switch to turn on the light and
push it again to turn off the light.Center Overhead Light (if equipped)
64J104
These light switch has three positions
which function as described below:
ON (1)
The light comes on and stays on regard-
less of whether the door is open or closed.
DOOR (2)
The light comes on when the door is
opened. After closing all doors, the light
will remain on for about 15 seconds and
then fade out. If you insert the key into theignition switch during this time, the light will
start to fade out immediately. After remov-
ing the key from the ignition switch, the
light will turn on for about 15 seconds and
then fade out.
OFF (3)
The light remains off even when the door is
opened.
68LM529
NOTE:
The number of doors involved in the light-
ing operation of the interior light depends
on the vehicle specification. If there is a
switch (rubber projection) at the door
opening as shown, the door is involved in
the lighting operation. The tailgate is also
involved in this operation even without the
rubber projection.
NOTICE
When you park your vehicle outdoors
in direct sunlight or in hot weather,
do not leave plastic cards in the
holder. The heat may distort them.
WA R N I N G
Do not use the mirror while driving
your vehicle or could lose control
of the vehicle.
When using the vanity mirror, do
not move too close to a front air
bag location or lean against it. If
the front air bag is accidentally
inflated, it could hit you hard.
(2)
EXAMPLE
EXAMPLE
(1)(2)(3)
EXAMPLE