2017 SUBARU FORESTER change time
[x] Cancel search: change timePage 437 of 634

Starting and operating/Power steering
&SI-DRIVE switches
SI-DRIVE switches
To select the Intelligent (I) mode, perform
either of the following procedures.
. Press the “S/I”switch when the Sport
(S) mode is selected
. Press the “S#/I”switch when the Sport
Sharp (S#) mode is selected
To select the Sport (S) mode, press the “S/
I ” switch when any mode other than Sport
(S) mode is selected.
To select the Sport Sharp (S#) mode,
press the “S#/I”switch when any mode
other than Sport Sharp (S#) mode is
selected.
NOTE
. While the engine is cool, you cannot
change to Sport Sharp (S#) mode.
. The next time you turn on the
engine, after you turned off the engine
in the Sport (S) mode or Sport Sharp
(S#) mode, the SI-DRIVE mode changes
to the Intelligent (I) mode.
. While the engine is running, if the
CHECK ENGINE warning light/malfunc-
tion indicator light illuminates, the SI-
DRIVE mode changes to the Sport (S)
mode. In this case, it is not possible to
change to another mode.
. If there is a possibility that the
engine could overheat because of a
temperature increase of the engine
coolant, it is not possible to change to
the Sport Sharp (S#) mode. While the
vehicle is in the Sport Sharp (S#) mode,
it changes to the Sport (S) mode when
the engine coolant temperature in-
creases.
. If any of the SI-DRIVE indicators
blink, the SI-DRIVE system may be
malfunctioning. Contact your SUBARU
dealer.Power steering
Power steering warning light (type A)
Power steering warning light (type B)
The vehicle is equipped with an electric
power steering system. When the ignition
7-34
Page 447 of 634

Starting and operating/X–mode
X-mode indicator light (type A)
X-mode indicator light (type B)
To activate:
Press the X-mode switch. While the X-
mode is activated, the X-mode indicator light illuminates.
To deactivate:
Press the X-mode switch again. The X-
mode indicator light will turn off when the
X-mode is deactivated.
NOTE
.
Even if you try to activate the X-
mode by pressing the X-mode switch
when the vehicle speed is 12 mph (20
km/h) or more, the X-mode will not be
activated. At this time, a buzzer will
sound twice.
. If the vehicle speed reaches 25 mph
(40 km/h) or more while the X-mode is
activated, a buzzer will sound once and
the X-mode will be deactivated.
NOTE
For models with SI-DRIVE:
. The SI-DRIVE mode will change to
the Intelligent (I) mode when the X-
mode is deactivated.
. The SI-DRIVE mode cannot be chan-
ged while the X-mode is activated. At
this time, a buzzer will sound twice.
. While the engine is running, if any of
the following conditions is met, the X-
mode will be deactivated. In this case, it
is not possible to activate the X-mode.
Also, for models with SI-DRIVE, the mode will change to the Sport (S) mode
and it will not be possible to change to
the other modes.
–The CHECK ENGINE warning
light/malfunction indicator light illu-
minates.
– The AT OIL TEMP warning light
flashes.
– The ABS warning light illumi-
nates.
– The Vehicle Dynamics Control
warning light illuminates.
. If there is a possibility that the
engine could overheat because of a
temperature increase of the engine
coolant, it is not possible to change to
the X-mode. While the vehicle is in the
X-mode, it changes to the Sport (S)
mode when the engine coolant tem-
perature increases.
. It is not possible to activate the X-
mode when the engine is not running,
because the hill descent control func-
tion is not activated.
& Hill descent control function
The hill descent control function will be in
standby mode when the X-mode is acti-
vated and the vehicle speed is less than
approximately 12 mph (20 km/h).
The function will operate when the vehicle
7-44
Page 457 of 634
Starting and operating/Cruise control
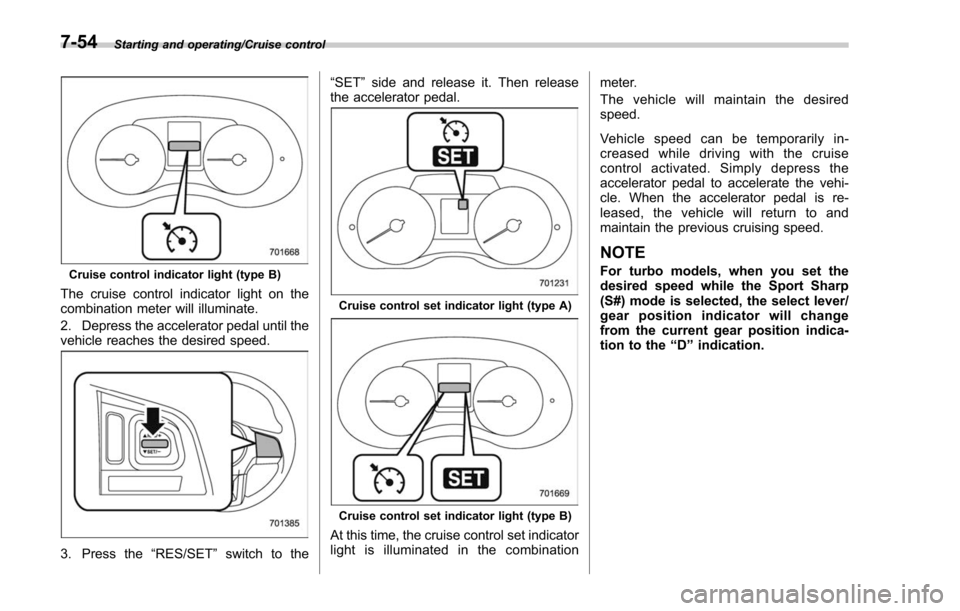
Cruise control indicator light (type B)
The cruise control indicator light on the
combination meter will illuminate.
2. Depress the accelerator pedal until the
vehicle reaches the desired speed.
3. Press the“RES/SET”switch to the “SET
”side and release it. Then release
the accelerator pedal.
Cruise control set indicator light (type A)
Cruise control set indicator light (type B)
At this time, the cruise control set indicator
light is illuminated in the combination meter.
The vehicle will maintain the desired
speed.
Vehicle speed can be temporarily in-
creased while driving with the cruise
control activated. Simp
ly depress the
accelerator pedal to accelerate the vehi-
cle. When the accelerator pedal is re-
leased, the vehicle will return to and
maintain the previous cruising speed.
NOTE
For turbo models, when you set the
desired speed while the Sport Sharp
(S#) mode is selected, the select lever/
gear position indicator will change
from the current gear position indica-
tion to the “D”indication.
7-54
Page 458 of 634
&To temporarily cancel the
cruise control
The cruise control can be temporarily
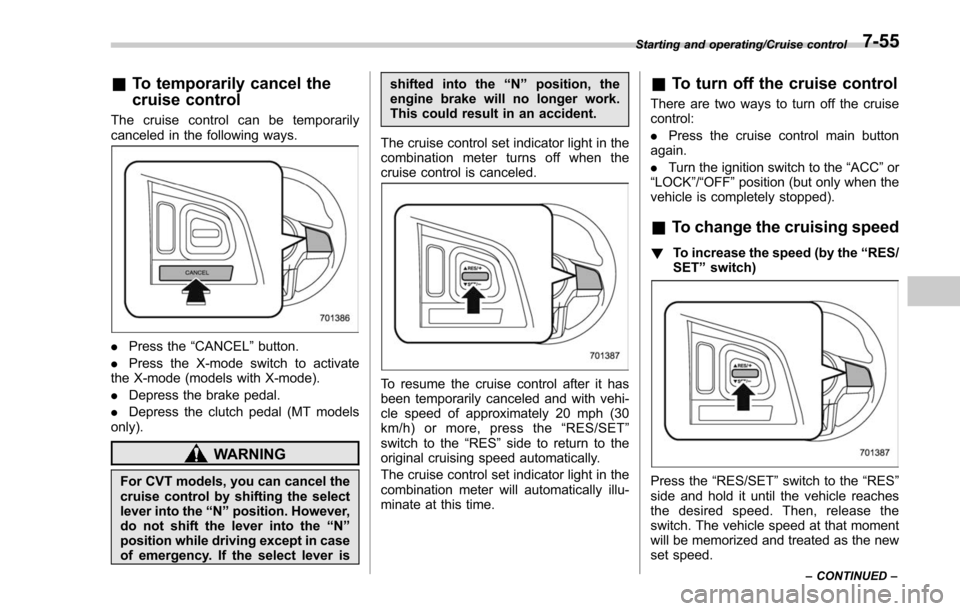
canceled in the following ways.
. Press the “CANCEL”button.
. Press the X-mode switch to activate
the X-mode (models with X-mode).
. Depress the brake pedal.
. Depress the clutch pedal (MT models
only).
WARNING
For CVT models, you can cancel the
cruise control by shifting the select
lever into the “N ” position. However,
do not shift the lever into the “N ”
position while driving except in case
of emergency. If the select lever is shifted into the
“N ” position, the
engine brake will no longer work.
This could result in an accident.
The cruise control set indicator light in the
combination meter turns off when the
cruise control is canceled.
To resume the cruise control after it has
been temporarily canceled and with vehi-
cle speed of approximately 20 mph (30
km/h) or more, press the “RES/SET ”
switch to the “RES ”side to return to the
original cruising speed automatically.
The cruise control set indicator light in the
combination meter will automatically illu-
minate at this time.
& To turn off the cruise control
There are two ways to turn off the cruise
control:
. Press the cruise control main button
again.
. Turn the ignition switch to the “ACC”or
“ LOCK ”/“OFF ”position (but only when the
vehicle is completely stopped).
& To change the cruising speed
! To increase the speed (by the “RES/
SET ”switch)
Press the “RES/SET ”switch to the “RES”
side and hold it until the vehicle reaches
the desired speed. Then, release the
switch. The vehicle speed at that moment
will be memorized and treated as the new
set speed.
Starting and operating/Cruise control
–CONTINUED –7-55
Page 459 of 634
Starting and operating/Cruise control
U.S.-spec. models
When the difference between the actual
vehicle speed and the set speed is small,
the set speed can be increased 1 mph
(1.6 km/h) each time by pressing the
“RES/SET ”switch to the “RES ”side
quickly.
Except U.S.-spec. models
When the difference between the actual
vehicle speed and the set speed is small,
the set speed can be increased 1 km/h
each time by pressing the “RES/SET”
switch to the “RES”side quickly. !
To increase the speed (by accel-
erator pedal)
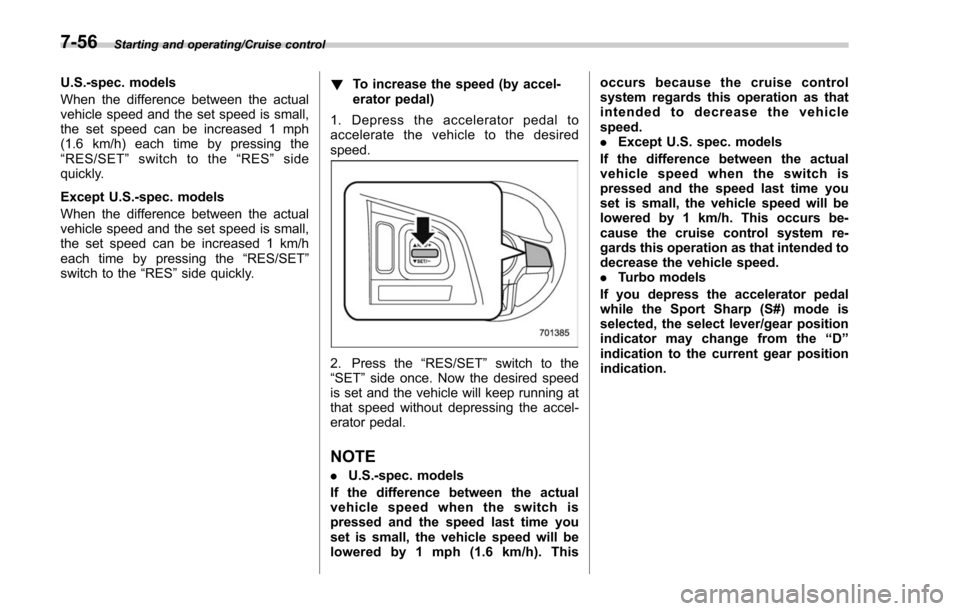
1. Depress the accelerator pedal to
accelerate the vehicle to the desired
speed.
2. Press the “RES/SET”switch to the
“SET ”side once. Now the desired speed
is set and the vehicle will keep running at
that speed without depressing the accel-
erator pedal.
NOTE
. U.S.-spec. models
If the difference between the actual
vehicle speed when the switch is
pressed and the speed last time you
set is small, the vehicle speed will be
lowered by 1 mph (1.6 km/h). This occurs because the cruise control
system regards this operation as that
intended to decrease the vehicle
speed.
.
Except U.S. spec. models
If the difference between the actual
vehicle speed when the switch is
pressed and the speed last time you
set is small, the vehicle speed will be
lowered by 1 km/h. This occurs be-
cause the cruise control system re-
gards this operation as that intended to
decrease the vehicle speed.
. Turbo models
If you depress the accelerator pedal
while the Sport Sharp (S#) mode is
selected, the select lever/gear position
indicator may change from the “D ”
indication to the current gear position
indication.
7-56
Page 468 of 634

vehicle
–When using a chassis dynam-
ometer or free roller device, etc.
– When running the engine and
makingthewheelsrotatewhile
lifting up the vehicle
. If the ignition switch is turned to the
“ LOCK ”/“ OFF ”position, the last known
status of the system is maintained. For
example, if the ignition switch is turned
to the “LOCK ”/“ OFF ”position with the
BSD/RCTA deactivated, the BSD/RCTA
will remain deactivated the next time
the ignition switch is turned to the
“ ON ”position.
. If the vehicle battery is disconnected
due to situations such as battery
terminal or fuse replacement, after the
battery is reconnected, the BSD/RCTA
will be activated.
& Certification for the BSD/
RCTA
. U.S.-spec. models
FCC ID: OAYSRR2A
CAUTION
FCC WARNING
Changes or modifications not ex-
pressly approved by the party re- sponsible for compliance could void
the user
’s authority to operate the
equipment.
This device complies with part 15 of the
FCC Rules. Operation is subject to the
following two conditions: (1) This device
may not cause harmful interference, and
(2) this device must accept any interfer-
ence received, including interference that
may cause undesired operation.
. Canada-spec. models
This device complies with Industry
Canada licence-exempt RSS standard
(s). Operation is subject to the following
two conditions: (1) this device may not
cause interference, and (2) this device
must accept any interference, including
interference that may cause undesired
operation of the device.
Le présent appareil est conforme aux
CNR d ’Industrie Canada applicables aux
appareils radio exempts de licence. L ’ex-
ploitation est autorisée aux deux condi-
tions suivantes: (1) l ’appareil ne doit pas
produire de brouillage, et (2) l ’utilisateur
de l ’appareil doit accepter tout brouillage
radioélectrique subi, même si le brouillage
est susceptible d ’en compromettre le
fonctionnement.
& Handling of radar sensors
Radar sensors
The radar sensors, one on each side of
the vehicle, are mounted inside the rear
bumper.
Starting and operating/BSD/RCTA
–CONTINUED –7-65
Page 475 of 634
Starting and operating/Reverse Automatic Braking System
4) After the vehicle has been stopped by
the system:
Make sure to depress the brake pedal
after the vehicle has been stopped by
automatic braking. Until the brake pedal is
depressed, a message will be displayed
on the multi function display and the
continuous beep will remain sounding.
After the brake pedal is depressed, the
Reverse Automatic Braking system OFF
indicator will illuminate and the system will
temporarily stop operating. The Reverse
Automatic Braking system OFF indicator
will turn off when the select lever is shifted
to a position other than the“R”position.
The system will operate again the next
time the select lever is shifted to “R”
position.
NOTE
Automatic braking by the system will
be released 2 seconds after the vehicle
has been stopped. Before the auto-
matic brake is released, a warning
sound (3 short beeps followed by a
long beep) will activate to alert the
driver.
& Canceling the Reverse Auto-
matic Braking system opera-
tion
The Reverse Automatic Braking system
can be temporarily cancelled by any of the
following operations.
. While automatic braking is in operation,
the brake pedal is depressed
. While automatic braking is in operation,
the accelerator pedal is depressed
. When automatic deceleration is in
activation, the accelerator pedal is de-
pressed hard
. The select lever is shifted to a position
other than the “R”position
NOTE
The system will be cancelled if the
object is no longer detected.
& Reverse Automatic Braking
system ON/OFF setting
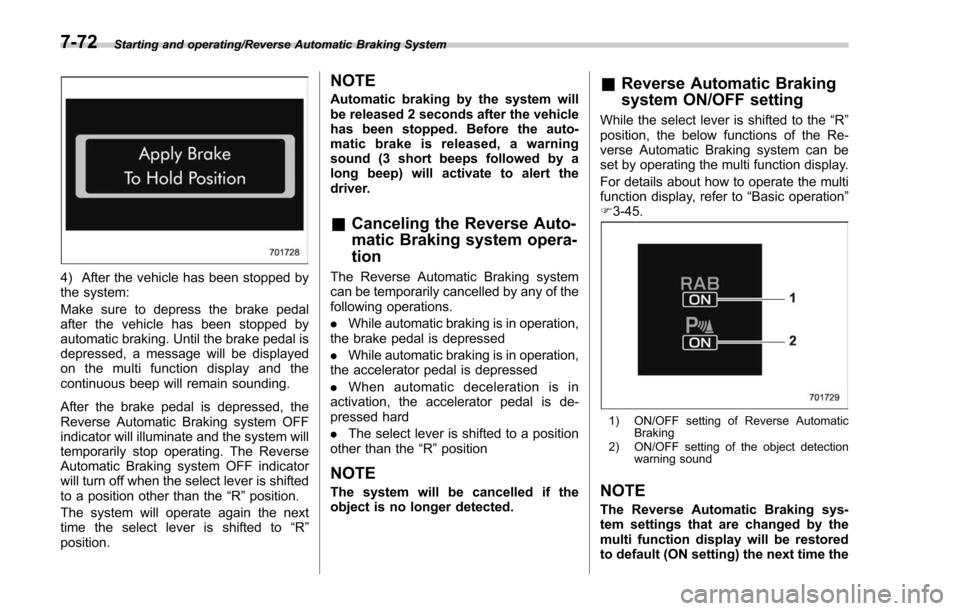
While the select lever is shifted to the “R”
position, the below functions of the Re-
verse Automatic Braking system can be
set by operating the multi function display.
For details about how to operate the multi
function display, refer to “Basic operation ”
F 3-45.
1) ON/OFF setting of Reverse Automatic
Braking
2) ON/OFF setting of the object detection warning sound
NOTE
The Reverse Automatic Braking sys-
tem settings that are changed by the
multi function display will be restored
to default (ON setting) the next time the
7-72
Page 497 of 634
Driving tips/Trailer towing
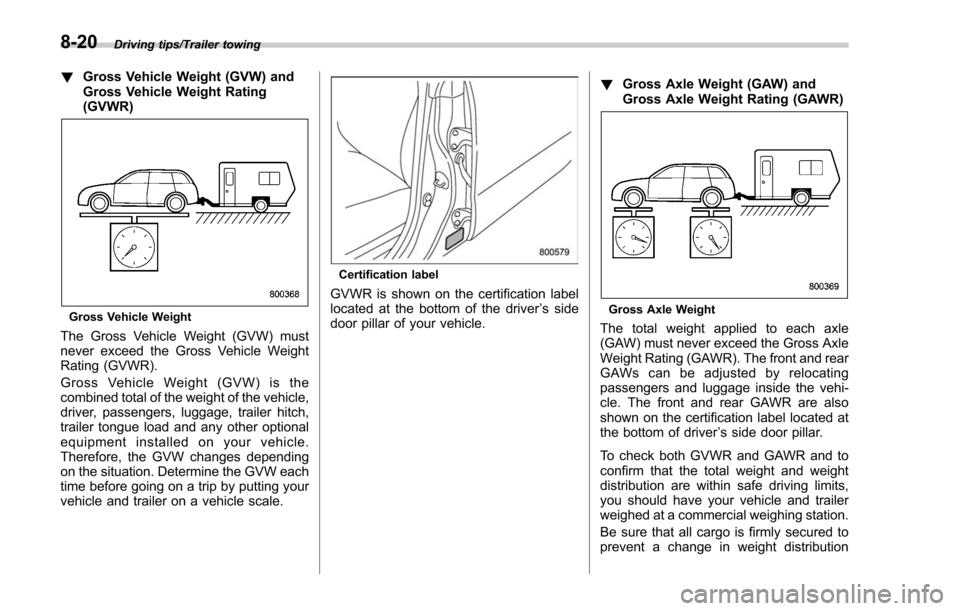
!Gross Vehicle Weight (GVW) and
Gross Vehicle Weight Rating
(GVWR)
Gross Vehicle Weight
The Gross Vehicle Weight (GVW) must
never exceed the Gross Vehicle Weight
Rating (GVWR).
Gross Vehicle Weight (GVW) is the
combined total of the weight of the vehicle,
driver, passengers, luggage, trailer hitch,
trailer tongue load and any other optional
equipment installed on your vehicle.
Therefore, the GVW changes depending
on the situation. Determine the GVW each
time before going on a trip by putting your
vehicle and trailer on a vehicle scale.
Certification label
GVWR is shown on the certification label
located at the bottom of the driver ’s side
door pillar of your vehicle. !
Gross Axle Weight (GAW) and
Gross Axle Weight Rating (GAWR)Gross Axle Weight
The total weight applied to each axle
(GAW) must never exceed the Gross Axle
Weight Rating (GAWR). The front and rear
GAWs can be adjusted by relocating
passengers and luggage inside the vehi-
cle. The front and rear GAWR are also
shown on the certification label located at
the bottom of driver ’s side door pillar.
To check both GVWR and GAWR and to
confirm that the total weight and weight
distribution are within safe driving limits,
you should have your vehicle and trailer
weighed at a commercial weighing station.
Be sure that all cargo is firmly secured to
prevent a change in weight distribution
8-20