2017 SUBARU FORESTER tire type
[x] Cancel search: tire typePage 12 of 634

When possible, you should share the
driving with others.
&Modification of your vehicle
CAUTION
Your vehicle should not be modified
other than with genuine SUBARU
parts and accessories. Other types
of modifications could affect its
performance, safety or durability,
and may even violate governmental
regulations. In addition, damage or
performance problems resulting
from modification may not be cov-
ered under warranties.
&Car phone/cell phone and
driving
CAUTION
Do not use a car phone/cell phone
while driving; it may distract your
attention from driving and can lead
to an accident. If you use a car
phone/cell phone, pull off the road
and park in a safe place before
using your phone. In some States/
Provinces, only hands-free phones may legally be used while driving.
&
Driving vehicles equipped
with navigation system
WARNING
Do not allow the monitor to distract
your attention from driving. Also, do
not operate the controls of the
navigation system while driving.
The loss of attention to driving
could lead to an accident. If you
wish to operate the controls of the
navigation system, first take the
vehicle off the road and stop it in a
safe location.
&Driving with pets
Unrestrained pets can interfere with your
driving and distract your attention from
driving. In a collision or sudden stop,
unrestrained pets or cages can be thrown
around inside the vehicle and hurt you or
your passengers. Besides, the pets can
be hurt under these situations. It is also for
their own safety that pets should be
properly restrained in your vehicle. Re-
strain a pet with a special traveling
harness which can be secured to the rear seat with a seatbelt or use a pet carrier
which can be secured to the rear seat by
routing a seatbelt through the carrier
’s
handle. Never restrain pets or pet carriers
in the front passenger ’s seat. For further
information, consult your veterinarian,
local animal protection society or pet
shop.
& Tire pressures
Check and, if necessary, adjust the
pressure of each tire (including the spare)
at least once a month and before any long
journey.
Check the tire pressure when the tires are
cold. Use a pressure gauge to adjust the
tire pressures to the values shown on the
tire placard. For detailed information, refer
to“Tires and wheels” F11-23.
WARNING
Driving at high speeds with exces-
sively low tire pressures can cause
the tires to deform severely and to
rapidly become hot. A sharp in-
crease in temperature could cause
tread separation, and destruction of
the tires. The resulting loss of
vehicle control could lead to an
accident.
–CONTINUED –
7
Page 47 of 634

Seat, seatbelt and SRS airbags/Seatbelts
reclined seatback. Refer to“Car-
go area cover ”F 6-14.
Pull the strap and adjust the seatback to
the desired position.
Then release the strap and make sure the
seatback is securely locked into place.
Seatbelts
& Seatbelt safety tips
WARNING
. All persons in the vehicle should
fasten their seatbelts BEFORE
the vehicle starts to move. Other-
wise, the possibility of serious
injury becomes greater in the
event of a sudden stop or acci-
dent.
. All belts should fit snugly in order
to provide full restraint. Loose
fitting belts are not as effective in
preventing or reducing injury.
. Each seatbelt is designed to
support only one person. Never
use a single belt for two or more
persons –even children. Other-
wise, in an accident, serious
injury or death could result.
. Replace all seatbelt assemblies
including retractors and attach-
ing hardware worn by occupants
of a vehicle that has been in a
serious accident. The entire as-
sembly should be replaced even
if damage is not obvious.
. Place children in the rear seat properly restrained at all times.
The SRS airbag deploys with
considerable speed and force
and can injure or even kill chil-
dren, especially if they are not
restrained or improperly re-
strained. Because children are
lighter and weaker than adults,
their risk of being injured from
deployment is greater. For that
reason, we strongly recommend
that ALL children (including
those in child seats and those
that have outgrown child re-
straint devices) sit in the REAR
seat properly restrained at all
times in a child restraint device
or in a seatbelt, whichever is
appropriate for the child
’s height
and weight.
Secure ALL types of child re-
straint devices (including for-
ward facing child seats) in the
REAR seats at all times.
NEVER INSTALL A FORWARD
OR REARWARD FACING CHILD
SEAT IN THE FRONT SEAT.
DOING SO RISKS SERIOUS IN-
JURY OR DEATH TO THE CHILD
BY PLACING THE CHILD ’S HEAD
TOO CLOSE TO THE SRS AIR-
BAG.
1-16
Page 96 of 634

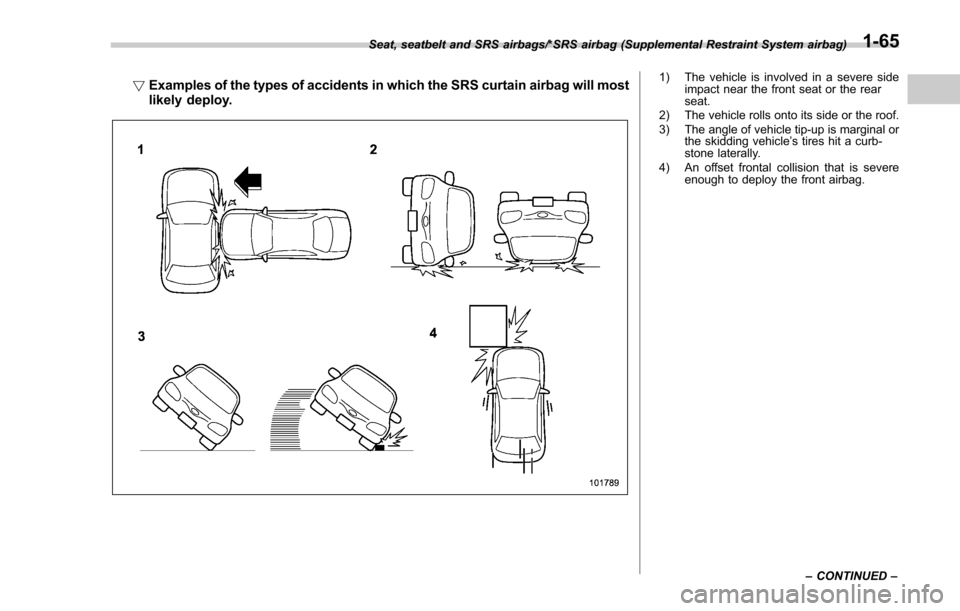
!Examples of the types of accidents in which the SRS curtain airbag will most
likely deploy.1) The vehicle is involved in a severe side
impact near the front seat or the rear
seat.
2) The vehicle rolls onto its side or the roof.
3) The angle of vehicle tip-up is marginal or the skidding vehicle ’s tires hit a curb-
stone laterally.
4) An offset frontal collision that is severe enough to deploy the front airbag.
Seat, seatbelt and SRS airbags/*SRS airbag (Supplemental Restraint System airbag)
–CONTINUED –
1-65
Page 164 of 634

Warning and indicator lights
Several of the warning and indicator lights
illuminate when the ignition switch is
initially turned to the“ON”position. This
permits checking the operation of the
bulbs.
Apply the parking brake and turn the
ignition switch to the “ON”position. For
the system check, several of the following
lights illuminate and then turn off after
several seconds or after the engine has
started.
: Seatbelt warning light (The seatbelt warning light turns off
only when the driver fastens the
seatbelt.)
: Front passenger ’s seatbelt warning
light
(The seatbelt warning light turns off
only when the front seat passenger
fastens the seatbelt.)
: SRS airbag system warning light
ON /
: Front passenger ’s frontal airbag
ON indicator light
/: Front passenger ’s frontal airbag
OFF indicator light
: CHECK ENGINE warning light/Mal- function indicator light
: Coolant temperature low indicator light/Coolant temperature high warn-
ing light
: Charge warning light
: Oil pressure warning light
: Engine low oil level warning light*
: Windshield washer fluid warning light*
: AT OIL TEMP warning light(CVT models)
: Low tire pressure warning light(U.S.-spec. models)
/: ABS warning light
/: Brake system warning light
: Low fuel warning light
: Hill start assist warning light/Hill startassist OFF indicator light
: Door open warning light
: AWD warning light (CVT models)
: Power steering warning light
: Vehicle Dynamics Control warning light/Vehicle Dynamics Control opera-
tion indicator light
: Vehicle Dynamics Control OFF indica-tor light
: Cruise control indicator light(if equipped)
: Cruise control set indicator light(if equipped)
: Headlight indicator light (if equipped)
: Automatic headlight beam leveler warning light (if equipped)
: Steering Responsive Headlight warn-ing light/Steering Responsive Head-
light OFF indicator light (if equipped)*
: High beam assist indicator light (if equipped)
: Access key warning light
(if equipped)
: X-mode indicator light (if equipped)
: Hill descent control indicator light (if equipped)*
*: Applies to models with type A combina- tion meter.
If any lights fail to illuminate, it indicates a
burned-out bulb or a malfunction of the
corresponding system.
Consult your authorized SUBARU dealer
for repair.
Instruments and controls/Warning and indicator lights
–CONTINUED –3-13
Page 198 of 634

Type A combination meter
1) Engine oil: Checks the interval of engineoil replacement.
2) Oil filter: Checks the interval of oil filter replacement.
3) Tires: Checks the interval of tire rotation.
4) Inspection and maintenance: Checks the interval of inspection and maintenance.Type B combination meter
1) Windshield washer fluid: Checks thelevel of windshield washer fluid.
2) Brake fluid: Checks the level of brake fluid.
3) Engine oil: Checks the interval of engine oil replacement.
4) Oil filter: Checks the interval of oil filter replacement.
5) Tires: Checks the interval of tire rotation.
6) Inspection and maintenance: Checks the interval of inspection and maintenance.
When the checks are performed, the color
of the icon corresponding to the checked
item will turn green.
If there is no warning message, the self-
check will complete without notification.
Example of notification
If there is a warning message or a
maintenance notification, the color of the
icon corresponding to the item will turn
yellow and the warning message or the
maintenance notification will be displayed.
Take the appropriate actions based on the
messages indicated.
NOTE
.The self-check screen can be set to
on or off. For details, refer to “On/Off
setting ”F 3-77.
. After performing the maintenance,
change the setting of the correspond-
ing maintenance item. For details, refer
to “Maintenance settings ”F 3-76.
. The maintenance notification screen
will be displayed under either of the
Instruments and controls/Multi function display
–CONTINUED –3-47
Page 205 of 634

Instruments and controls/Multi function display
ItemDetails
Average vehicle speed (Average
vehicle speed for the entire driving
time from when the trip meter was
reset)
Lifetime fuel consumption
Engine oil temperature
Accelerator opening ratio
Boost pressure (turbo models
only)
Journey time (the time that has
elapsed since the ignition switch
was turned to the“ON ”position)
Journey distance (the distance
that has been driven since the
ignition switch was turned to the
“ON ”position)
Average fuel consumption for the
entire driving distance from when
the ignition switch was turned to
the “ON ”position
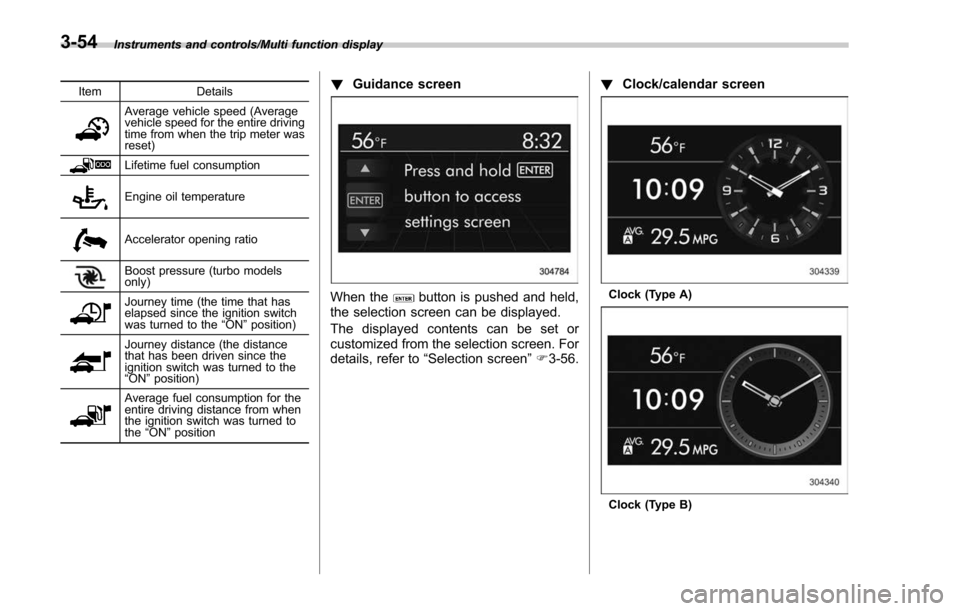
! Guidance screen
When thebutton is pushed and held,
the selection screen can be displayed.
The displayed contents can be set or
customized from the selection screen. For
details, refer to “Selection screen” F3-56. !
Clock/calendar screenClock (Type A)
Clock (Type B)
3-54
Page 423 of 634

Starting and operating/Remote engine start system (dealer option)
&Remote transmitter program
(models without “keyless ac-
cess with push-button start
system ”)
New transmitters can be programmed to
the remote engine start system in the
event that a transmitter is lost, stolen,
damaged or additional transmitters are
desired (the system will accept up to eight
transmitters). New remote engine start
transmitters can be programmed accord-
ing to the following procedure.
1. Open the driver ’s door (the driver ’s
door must remain opened throughout the
entire process).
2. Depress and hold the brake pedal.
3. Turn the ignition switch to “ON”then
“LOCK” , back to “ON”then “LOCK ”, back
to “ON ”then “LOCK”, then back to “ON”
again and leave the ignition “ON”through-
out the programming process.
4. The system will flash the side marker
lights, tail lights and parking lights and
honk the horn three times, indicating that
the system has entered the transmitter
learn mode.
5. Press and release the “
”button on
the transmitter that you want to program.
6. The system will flash the side marker
lights, tail lights and parking lights and honk the horn one time, indicating that the
system has learned the transmitter. Upon
successful programming, the remote start
confirmation transmitter button will flash
one time.
7. Repeat step 5 for any additional
transmitters (the system will accept up to
eight transmitters).
8. The system will exit the transmitter
learn mode if the key is turned to the
“LOCK”
position, the door is closed or
after 2 minutes.
& System maintenance
NOTE
For models without “keyless access
with push-button start system ”:
In the event that the vehicle ’s battery is
replaced, discharged or disconnected,
it will be necessary to start the vehicle
a minimum of one time using the key
prior to activating the remote engine
start system. This is required to allow
the vehicle electronic systems to re-
synchronize. !
Changing the battery
CAUTION
.Do not let dust, oil or water get on
or in the remote engine start
transmitter when replacing the
battery.
. Be careful not to damage the
printed circuit board in the re-
mote engine start transmitter
when replacing the battery.
. Be careful not to allow children to
touch the battery and any re-
moved parts; children could
swallow them.
. There is a danger of explosion if
an incorrect replacement battery
is used. Replace only with the
same or equivalent type of bat-
tery.
. Batteries should not be exposed
to excessive heat such as sun-
shine, fire or the like.
For models with “keyless access with
push-button start system ”:
Perform the procedure described in “Re-
placing battery of access key ”F 11-45.
7-20
Page 442 of 634

2. Apply the parking brake.
3. Check the brake fluid level. For details
about checking the brake fluid level, refer
to“Checking the fluid level ”F 11-18.
. If the brake fluid level is not below the
“MIN ”mark, the EBD system may be
malfunctioning. Drive carefully to the
nearest SUBARU dealer and have the
system inspected.
. If the brake fluid level is below the
“ MIN ”mark, DO NOT drive the vehicle.
Instead, have the vehicle towed to the
nearest SUBARU dealer for repair.
WARNING
. Driving with the brake system
warning light illuminated is dan-
gerous. This indicates your brake
system may not be working
properly. If the light remains
illuminated, have the brakes in-
spected by a SUBARU dealer
immediately.
. If at all in doubt about whether
the brakes are operating prop-
erly, do not drive the vehicle.
Have your vehicle towed to the
nearest SUBARU dealer for re-
pair.
Vehicle Dynamics Control
system
WARNING
Always use the utmost care in
driving –overconfidence because
you are driving a vehicle with the
Vehicle Dynamics Control system
could easily lead to a serious acci-
dent.
CAUTION
. Even if your vehicle is equipped
with Vehicle Dynamics Control
system, winter tires should be
used when driving on snow-cov-
ered or icy roads; in addition,
vehicle speed should be reduced
considerably. Simply having a
Vehicle Dynamics Control sys-
tem does not guarantee that the
vehicle will be able to avoid
accidents in any situation.
. Activation of the Vehicle Dy-
namics Control system is an
indication that the road being
travelled on has a slippery sur-
face; since having Vehicle Dy- namics Control is no guarantee
that full vehicle control will be
maintained at all times and under
all conditions, its activation
should be seen as a sign that
the speed of the vehicle should
be reduced considerably.
. Whenever suspension compo-
nents, steering components, or
an axle are removed from a
vehicle, have an inspection of
that system performed by an
authorized SUBARU dealer.
. The following precautions should
be observed in order to ensure
that the Vehicle Dynamics Con-
trol system is operating properly:
– All four wheels should be
fitted with tires of the same
size, type, and brand. Further-
more, the amount of wear
should be the same for all
four tires.
– Keep the tire pressure at the
proper level as shown on the
vehicle placard attached to
the driver ’s side door pillar.
– Use only the specified tem-
porary spare tire to replace a
flat tire. With a temporary
spare tire, the effectiveness
Starting and operating/Vehicle Dynamics Control system
–CONTINUED –7-39