2017 SUBARU FORESTER audio pre set
[x] Cancel search: audio pre setPage 289 of 634
Audio/Antenna
Antenna
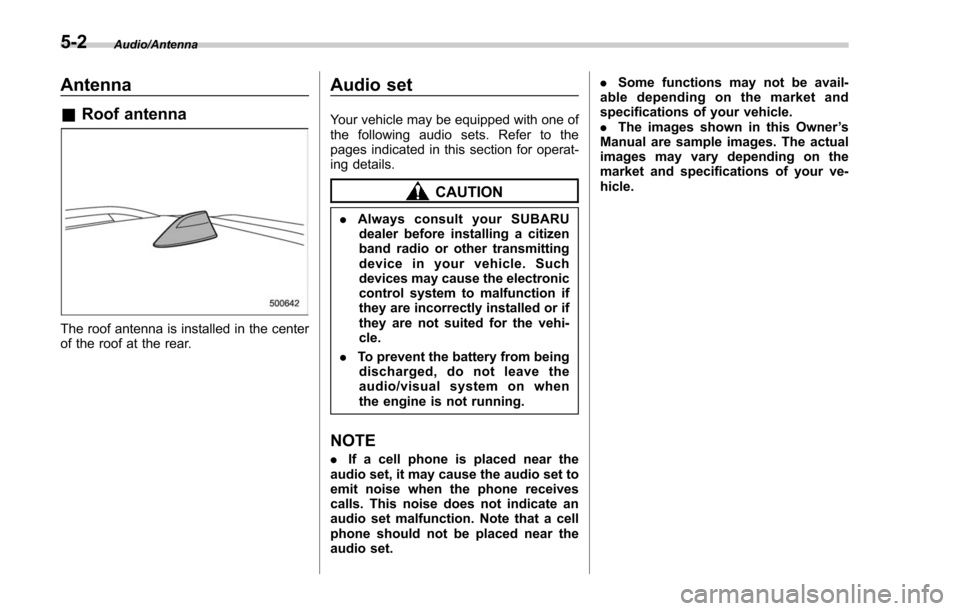
&Roof antenna
The roof antenna is installed in the center
of the roof at the rear.
Audio set
Your vehicle may be equipped with one of
the following audio sets. Refer to the
pages indicated in this section for operat-
ing details.
CAUTION
. Always consult your SUBARU
dealer before installing a citizen
band radio or other transmitting
device in your vehicle. Such
devices may cause the electronic
control system to malfunction if
they are incorrectly installed or if
they are not suited for the vehi-
cle.
. To prevent the battery from being
discharged, do not leave the
audio/visual system on when
the engine is not running.
NOTE
. If a cell phone is placed near the
audio set, it may cause the audio set to
emit noise when the phone receives
calls. This noise does not indicate an
audio set malfunction. Note that a cell
phone should not be placed near the
audio set. .
Some functions may not be avail-
able depending on the market and
specifications of your vehicle.
. The images shown in this Owner ’s
Manual are sample images. The actual
images may vary depending on the
market and specifications of your ve-
hicle.
5-2
Page 297 of 634
Audio/Audio set
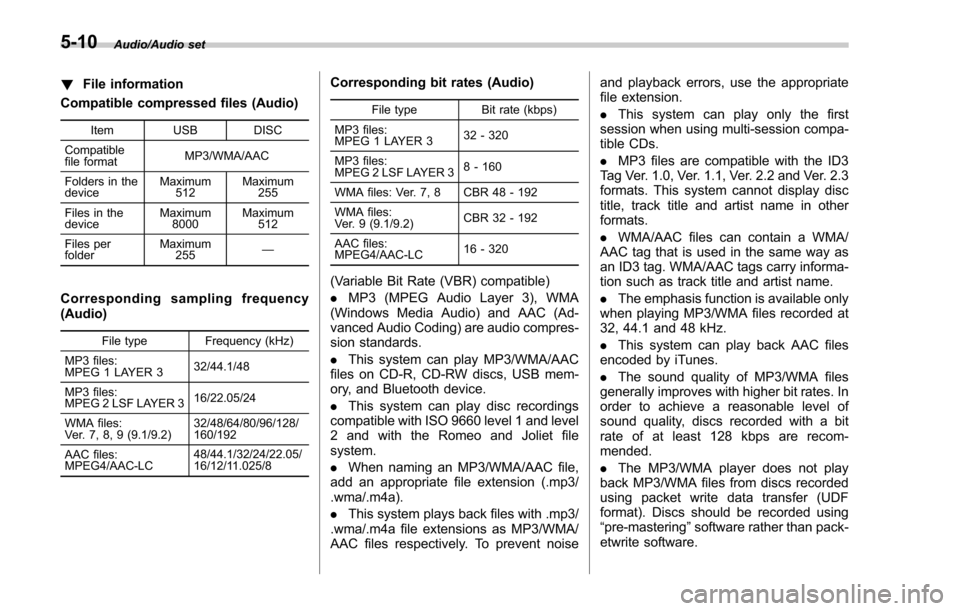
!File information
Compatible compressed files (Audio)
Item USB DISC
Compatible
file format MP3/WMA/AAC
Folders in the
device Maximum
512 Maximum
255
Files in the
device Maximum
8000 Maximum
512
Files per
folder Maximum
255 —
Corresponding sampling frequency
(Audio)
File type Frequency (kHz)
MP3 files:
MPEG 1 LAYER 3 32/44.1/48
MP3 files:
MPEG 2 LSF LAYER 3 16/22.05/24
WMA files:
Ver. 7, 8, 9 (9.1/9.2) 32/48/64/80/96/128/
160/192
AAC files:
MPEG4/AAC-LC 48/44.1/32/24/22.05/
16/12/11.025/8
Corresponding bit rates (Audio)
File type
Bit rate (kbps)
MP3 files:
MPEG 1 LAYER 3 32 - 320
MP3 files:
MPEG 2 LSF LAYER 3 8 - 160
WMA files: Ver. 7, 8 CBR 48 - 192
WMA files:
Ver. 9 (9.1/9.2) CBR 32 - 192
AAC files:
MPEG4/AAC-LC 16 - 320
(Variable Bit Rate (VBR) compatible)
.
MP3 (MPEG Audio Layer 3), WMA
(Windows Media Audio) and AAC (Ad-
vanced Audio Coding) are audio compres-
sion standards.
. This system can play MP3/WMA/AAC
files on CD-R, CD-RW discs, USB mem-
ory, and Bluetooth device.
. This system can play disc recordings
compatible with ISO 9660 level 1 and level
2 and with the Romeo and Joliet file
system.
. When naming an MP3/WMA/AAC file,
add an appropriate file extension (.mp3/
.wma/.m4a).
. This system plays back files with .mp3/
.wma/.m4a file extensions as MP3/WMA/
AAC files respectively. To prevent noise and playback errors, use the appropriate
file extension.
.
This system can play only the first
session when using multi-session compa-
tible CDs.
. MP3 files are compatible with the ID3
Tag Ver. 1.0, Ver. 1.1, Ver. 2.2 and Ver. 2.3
formats. This system cannot display disc
title, track title and artist name in other
formats.
. WMA/AAC files can contain a WMA/
AAC tag that is used in the same way as
an ID3 tag. WMA/AAC tags carry informa-
tion such as track title and artist name.
. The emphasis function is available only
when playing MP3/WMA files recorded at
32, 44.1 and 48 kHz.
. This system can play back AAC files
encoded by iTunes.
. The sound quality of MP3/WMA files
generally improves with higher bit rates. In
order to achieve a reasonable level of
sound quality, discs recorded with a bit
rate of at least 128 kbps are recom-
mended.
. The MP3/WMA player does not play
back MP3/WMA files from discs recorded
using packet write data transfer (UDF
format). Discs should be recorded using
“pre-mastering ”software rather than pack-
etwrite software.
5-10
Page 299 of 634

Audio/Audio set
.Level 2: The file name can have up to
31 characters (including the separation
mark “.” and file extension). Each folder
must contain fewer than 8 hierarchies.
!MP3
. MP3 is an audio compression standard
determined by a working group (MPEG) of
the ISO (International Standard Organiza-
tion). MP3 compresses audio data to
about 1/10 the size of that on conventional
discs.
!WMA
. WMA (Windows Media Audio) is an
audio compression format developed by
Microsoft
®. It compresses files into a size
smaller than that of MP3 files. The
decoding formats for WMA files are Ver.
7, 8 and 9.
. This product is protected by certain
intellectual property rights of Microsoft
Corporation and third parties. Use or
distribution of such technology outside of
this product is prohibited without a license
from Microsoft or an authorized Microsoft
subsidiary and third parties. !
AAC
. AAC is short for Advanced Audio
Coding and refers to an audio compres-
sion technology standard used with
MPEG2 and MPEG4.
5-12
Page 300 of 634
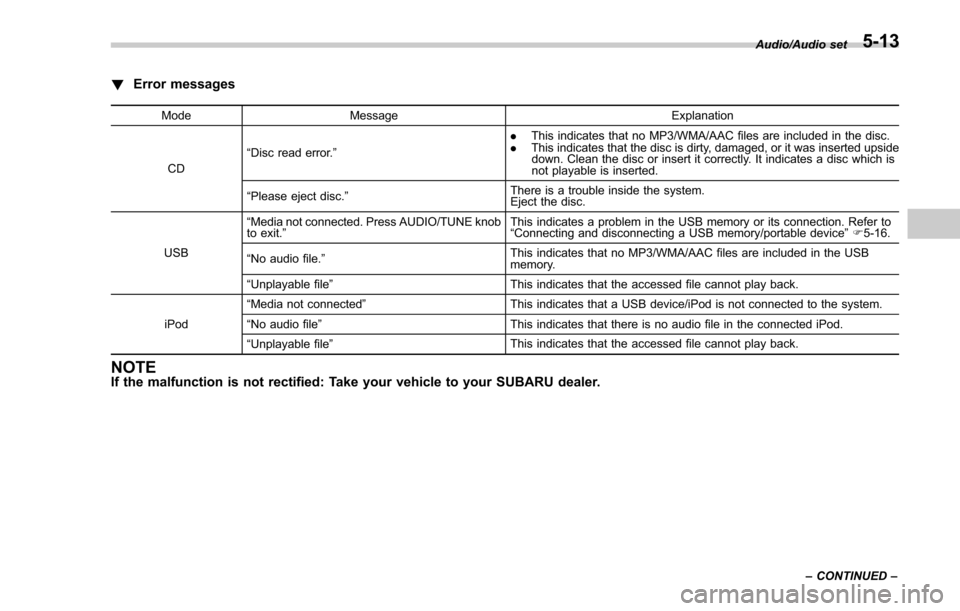
!Error messages
Mode Message Explanation
CD “
Disc read error.” .
This indicates that no MP3/WMA/AAC files are included in the disc.
. This indicates that the disc is dirty, damaged, or it was inserted upside
down. Clean the disc or insert it correctly. It indicates a disc which is
not playable is inserted.
“ Please eject disc. ” There is a trouble inside the system.
Eject the disc.
USB “
Media not connected. Press AUDIO/TUNE knob
to exit. ” This indicates a problem in the USB memory or its connection. Refer to
“
Connecting and disconnecting a USB memory/portable device ”F 5-16.
“ No audio file. ” This indicates that no MP3/WMA/AAC files are included in the USB
memory.
“ Unplayable file ” This indicates that the accessed file cannot play back.
iPod “
Media not connected ” This indicates that a USB device/iPod is not connected to the system.
“ No audio file ” This indicates that there is no audio file in the connected iPod.
“ Unplayable file ” This indicates that the accessed file cannot play back.
NOTEIf the malfunction is not rectified: Take your vehicle to your SUBARU dealer.
Audio/Audio set
–CONTINUED –5-13
Page 301 of 634
Audio/Audio set
&Basic information before use
WARNING
When the vehicle is stopped with the
engine running, always apply the
parking brake for safety. Failure to
do so may result in loss of control of
your vehicle and cause an accident
or serious injury.
CAUTION
. To prevent damaging the screen,
touch the screen keys with your
finger lightly.
. Wipe off fingerprints using a
glass cleaning cloth. Do not use
chemical cleaners to clean the
screen, as they may damage the
touch screen. !
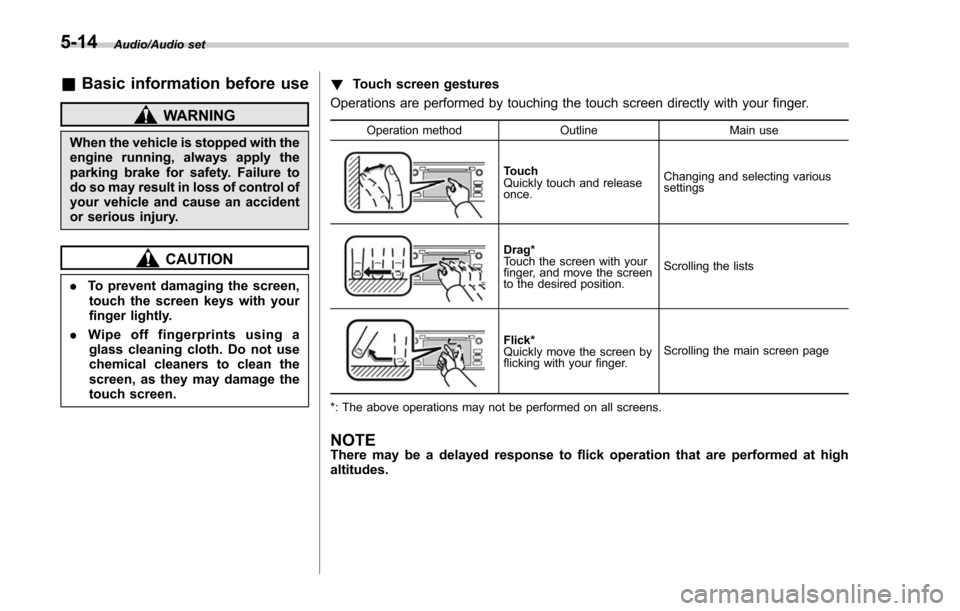
Touch screen gestures
Operations are performed by touching the touch screen directly with your finger.
Operation method OutlineMain use
Touch
Quickly touch and release
once.Changing and selecting various
settings
Drag*
Touch the screen with your
finger, and move the screen
to the desired position.
Scrolling the lists
Flick*
Quickly move the screen by
flicking with your finger.
Scrolling the main screen page
*: The above operations may not be performed on all screens.
NOTEThere may be a delayed response to flick operation that are performed at high
altitudes.
5-14
Page 302 of 634
!Touch screen operation
This system is operated mainly by the
keys on the screen.
When a screen key is touched, a beep
sounds. You can set the beep sound.
Refer to “Unit settings” F5-18.
NOTE
. If the system does not respond to
touching a screen key, move your
finger away from the screen and touch
it again.
. Grayed-out screen keys cannot be
operated.
. The displayed image may become
darker and moving images may be
slightly distorted when the screen is
cold.
. In extremely cold conditions, the
screen may not be displayed correctly.
Also, the screen keys may be less
responsive than usual when pressed.
. When you look at the screen
through polarized material such as
polarized sunglasses, the screen may
be dark and difficult to see. If so, look at
the screen from different angles, adjust
the screen settings or take off your
sunglasses. Refer to “Unit settings ”
F 5-18. !
Entering letters and numbers/list
screen operation
! Entering letters and numbers
When entering the Bluetooth device name
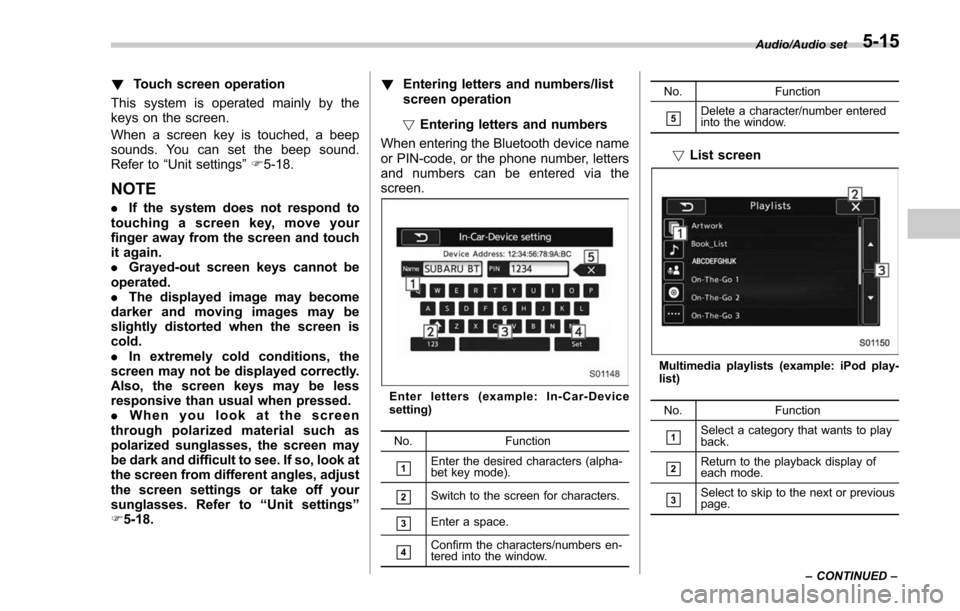
or PIN-code, or the phone number, letters
and numbers can be entered via the
screen.
Enter letters (example: In-Car-Device
setting)
No. Function
&1Enter the desired characters (alpha-
bet key mode).
&2Switch to the screen for characters.
&3Enter a space.
&4Confirm the characters/numbers en-
tered into the window. No. Function
&5Delete a character/number entered
into the window.
!
List screen
Multimedia playlists (example: iPod play-
list)
No. Function
&1Select a category that wants to play
back.
&2Return to the playback display of
each mode.
&3Select to skip to the next or previous
page. Audio/Audio set
–CONTINUED –
5-15
Page 304 of 634
only the first two connected devices
will be recognized.
&Basic operation
This section describes some of the basic
features of the audio/visual system. Some
information may not pertain to your sys-
tem.
Your audio/visual system works when the
ignition switch is turned to the “ACC”or
“ON ”position.
CAUTION
To prevent the battery from being
discharged, do not leave the audio/
visual system on longer than neces-
sary when the engine is not running.
NOTE
Some functions can also be operated
by using the voice command system.
For details, refer to “Voice command
system ”F 5-80. !
Turning the system on and off
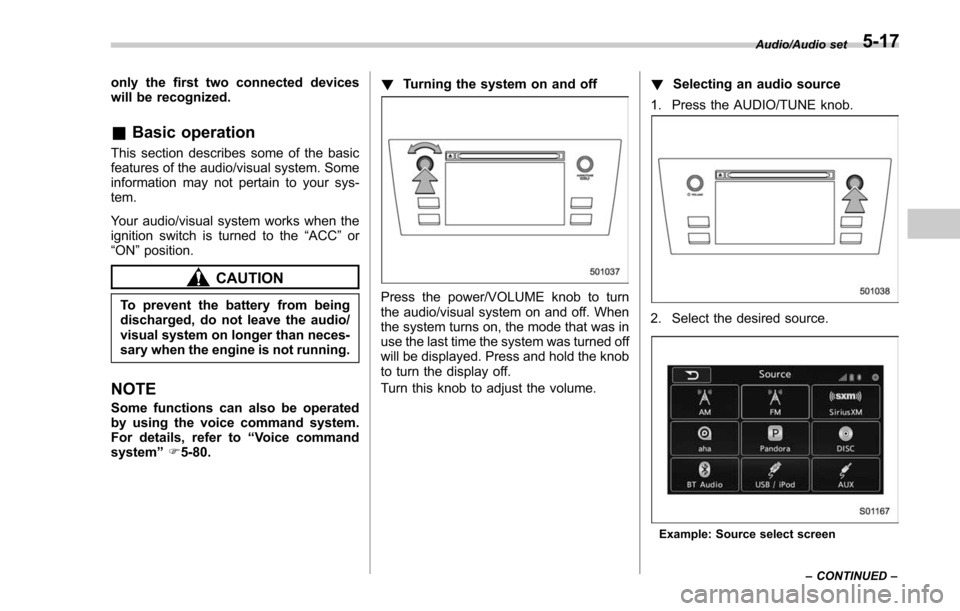
Press the power/VOLUME knob to turn
the audio/visual system on and off. When
the system turns on, the mode that was in
use the last time the system was turned off
will be displayed. Press and hold the knob
to turn the display off.
Turn this knob to adjust the volume. !
Selecting an audio source
1. Press the AUDIO/TUNE knob.
2. Select the desired source.
Example: Source select screen Audio/Audio set
–CONTINUED –
5-17
Page 305 of 634
Audio/Audio set
NOTE
.If the audio control screen appears,
select the “Source ”key on the audio
screen or press the AUDIO/TUNE knob
again.
. When you push the AUDIO/TUNE
knob while any screen other than the
audio control screen is displayed, the
display will return to the audio control
screen.
. When the AUDIO/TUNE knob is
pushed and held, the graphic equalizer
screen will be displayed. Refer to
““Graphic Equalizer ””F5-22.
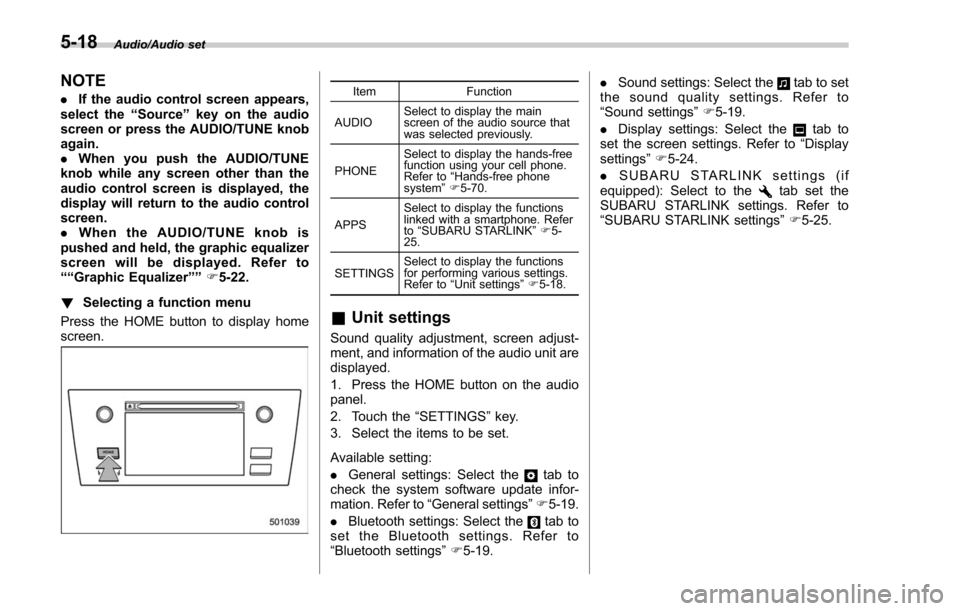
! Selecting a function menu
Press the HOME button to display home
screen.Item Function
AUDIO Select to display the main
screen of the audio source that
was selected previously.
PHONE Select to display the hands-free
function using your cell phone.
Refer to
“Hands-free phone
system ”F 5-70.
APPS Select to display the functions
linked with a smartphone. Refer
to
“SUBARU STARLINK ”F 5-
25.
SETTINGS Select to display the functions
for performing various settings.
Refer to
“Unit settings ”F 5-18.
& Unit settings
Sound quality adjustment, screen adjust-
ment, and information of the audio unit are
displayed.
1. Press the HOME button on the audio
panel.
2. Touch the “SETTINGS”key.
3. Select the items to be set.
Available setting:
. General settings: Select the
tab to
check the system software update infor-
mation. Refer to “General settings” F5-19.
. Bluetooth settings: Select the
tab to
set the Bluetooth settings. Refer to
“Bluetooth settings” F5-19. .
Sound settings: Select the
tab to set
the sound quality settings. Refer to
“Sound settings” F5-19.
. Display settings: Select the
tab to
set the screen settings. Refer to “Display
settings ”F 5-24.
. SUBARU STARLINK settings (if
equipped): Select to the
tab set the
SUBARU STARLINK settings. Refer to
“ SUBARU STARLINK settings” F5-25.
5-18