Page 207 of 634
Instruments and controls/Multi function display
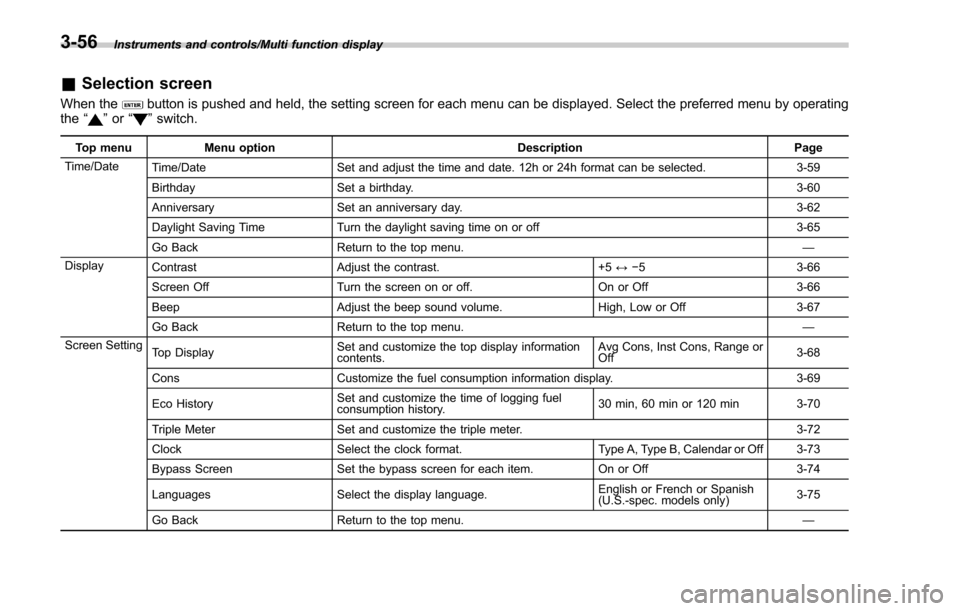
&Selection screen
When thebutton is pushed and held, the setting screen for each menu can be displayed. Select the preferred menu by operating
the “”or “”switch.
Top menu Menu option DescriptionPage
Time/Date Time/Date Set and adjust the time and date. 12h or 24h format can be selected. 3-59
Birthday Set a birthday. 3-60
Anniversary Set an anniversary day. 3-62
Daylight Saving Time Turn the daylight saving time on or off 3-65
Go Back Return to the top menu. —
Display Contrast Adjust the contrast. +5↔−53 -6 6
Screen Off Turn the screen on or off. On or Off3-66
Beep Adjust the beep sound volume. High, Low or Off3-67
Go Back Return to the top menu. —
Screen Setting Top Display Set and customize the top display information
contents. Avg Cons, Inst Cons, Range or
Off
3-68
Cons Customize the fuel consumption information display. 3-69
Eco History Set and customize the time of logging fuel
consumption history. 30 min, 60 min or 120 min 3-70
Triple Meter Set and customize the triple meter. 3-72
Clock Select the clock format. Type A, Type B, Calendar or Off 3-73
Bypass Screen Set the bypass screen for each item. On or Off3-74
Languages Select the display language. English or French or Spanish
(U.S.-spec. models only)
3-75
Go Back Return to the top menu. —
3-56
Page 208 of 634
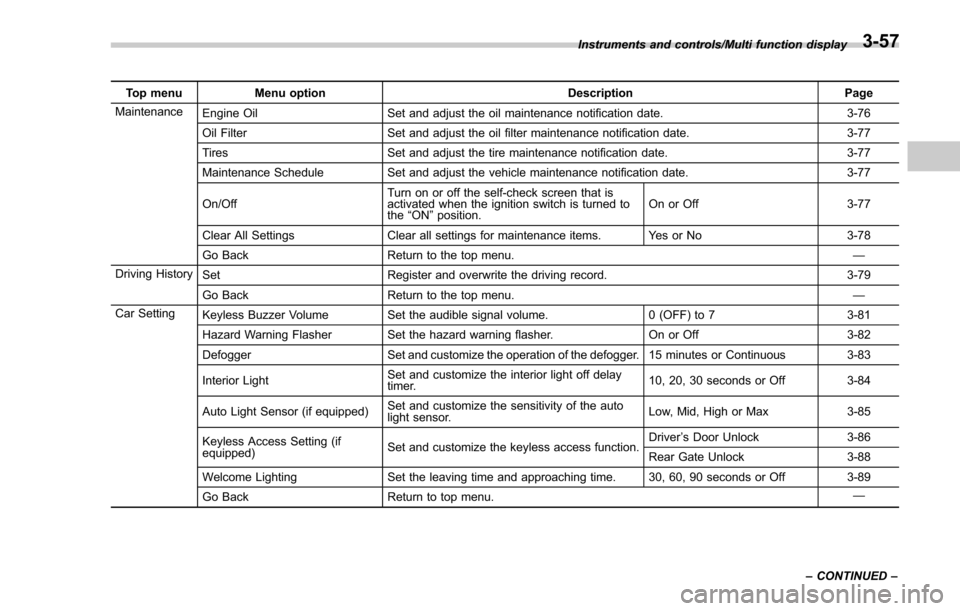
Top menuMenu option DescriptionPage
Maintenance Engine Oil Set and adjust the oil maintenance notification date. 3-76
Oil Filter Set and adjust the oil filter maintenance notification date. 3-77
Tires Set and adjust the tire maintenance notification date. 3-77
Maintenance Schedule Set and adjust the vehicle maintenance notification date. 3-77
On/Off Turn on or off the self-check screen that is
activated when the ignition switch is turned to
the
“ON ”position. On or Off
3-77
Clear All Settings Clear all settings for maintenance items. Yes or No 3-78
Go Back Return to the top menu. —
Driving History Set Register and overwrite the driving record. 3-79
Go Back Return to the top menu. —
Car Setting Keyless Buzzer Volume Set the audible signal volume. 0 (OFF) to 73-81
Hazard Warning Flasher Set the hazard warning flasher. On or Off3-82
Defogger Set and customize the operation of the defogger. 15 minutes or Continuous 3-83
Interior Light Set and customize the interior light off delay
timer. 10, 20, 30 seconds or Off
3-84
Auto Light Sensor (if equipped) Set and customize the sensitivity of the auto
light sensor. Low, Mid, High or Max
3-85
Keyless Access Setting (if
equipped) Set and customize the keyless access function. Driver
’s Door Unlock 3-86
Rear Gate Unlock 3-88
Welcome Lighting Set the leaving time and approaching time. 30, 60, 90 seconds or Off 3-89
Go Back Return to top menu. —
Instruments and controls/Multi function display
–CONTINUED –
3-57
Page 209 of 634
Instruments and controls/Multi function display
Top menuMenu option DescriptionPage
Initialize Reset to Defaults Reset all settings to the default settings. Yes or No 3-90
Lifetime Fuel Consumption Reset Clear logged lifetime fuel consumption data. Yes or No 3-91
Go Back Return to the top menu. —
Go Back —Return to the top menu. —
3-58
Page 219 of 634
Instruments and controls/Multi function display
4. Select an item by operating the“”or
“” switch. Then push thebutton.
5. Select “Set ”by operating the “”
switch, and confirm the setting by pushing
the
button.
6. The system will notify you that the
setting is complete.
& Screen settings
The items in screen settings can be set.
To change the items, operate the “”or
“” switch, and then push thebutton.
! Preparation for screen settings
1. Turn the ignition switch to the “ON”
position.
2. Push and hold the
button to show
the selection screen.
3. After the selection screen is displayed,
operate the “”or “”switch to show the
“ Screen Setting ”item. Then, push the
button.
! Top display setting
1. Perform the preparation steps accord-
ing to “Preparation for screen settings”
F 3-68.
3-68
Page 220 of 634
2. Operate the“”or “”switch to
select the “Top Display ”item. Then push
the
button.
3. Push thebutton once more.
4. Select an item by operating the “”or
“” switch. Then push thebutton.
5. Select “Set ”by operating the “”
switch, and confirm the setting by pushing
the
button.
6. The system will notify you that the
setting is complete.
! Fuel consumption screen setting
1. Perform the preparation steps accord-
ing to “Preparation for screen settings”
F 3-68.
Instruments and controls/Multi function display
–CONTINUED –3-69
Page 259 of 634
Instruments and controls/Mirrors
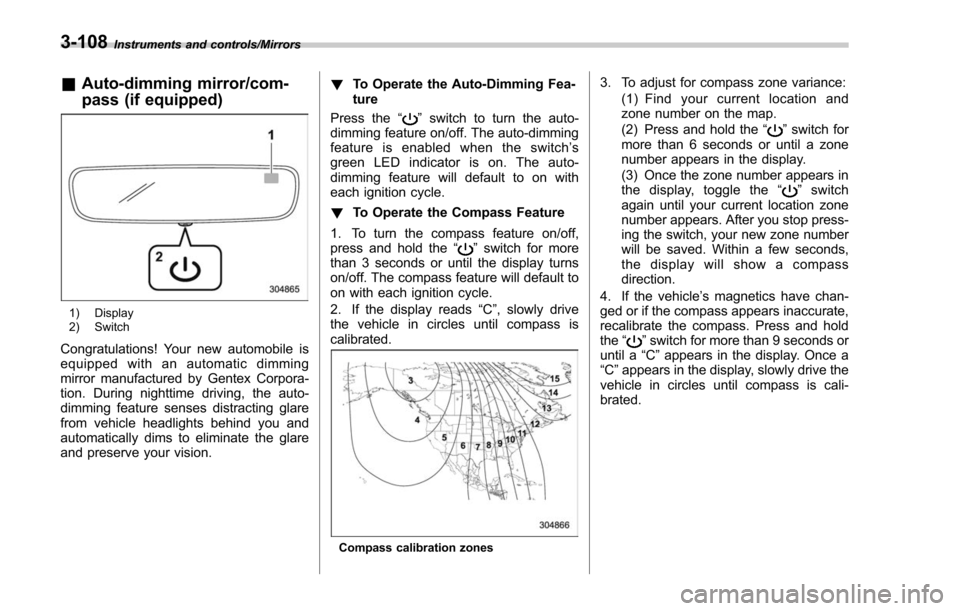
&Auto-dimming mirror/com-
pass (if equipped)
1) Display
2) Switch
Congratulations! Your new automobile is
equipped with an automatic dimming
mirror manufactured by Gentex Corpora-
tion. During nighttime driving, the auto-
dimming feature senses distracting glare
from vehicle headlights behind you and
automatically dims to eliminate the glare
and preserve your vision. !
To Operate the Auto-Dimming Fea-
ture
Press the “
”switch to turn the auto-
dimming feature on/off. The auto-dimming
feature is enabled when the switch’ s
green LED indicator is on. The auto-
dimming feature will default to on with
each ignition cycle.
! To Operate the Compass Feature
1. To turn the compass feature on/off,
press and hold the “
”switch for more
than 3 seconds or until the display turns
on/off. The compass feature will default to
on with each ignition cycle.
2. If the display reads “C”, slowly drive
the vehicle in circles until compass is
calibrated.
Compass calibration zones
3. To adjust for compass zone variance:
(1) Find your current location and
zone number on the map.
(2) Press and hold the “
”switch for
more than 6 seconds or until a zone
number appears in the display.
(3) Once the zone number appears in
thedisplay,togglethe “
”switch
again until your current location zone
number appears. After you stop press-
ing the switch, your new zone number
will be saved. Within a few seconds,
the display will show a compass
direction.
4. If the vehicle’ s magnetics have chan-
ged or if the compass appears inaccurate,
recalibrate the compass. Press and hold
the “
”switch for more than 9 seconds or
until a “C”appears in the display. Once a
“C ”appears in the display, slowly drive the
vehicle in circles until compass is cali-
brated.
3-108
Page 260 of 634
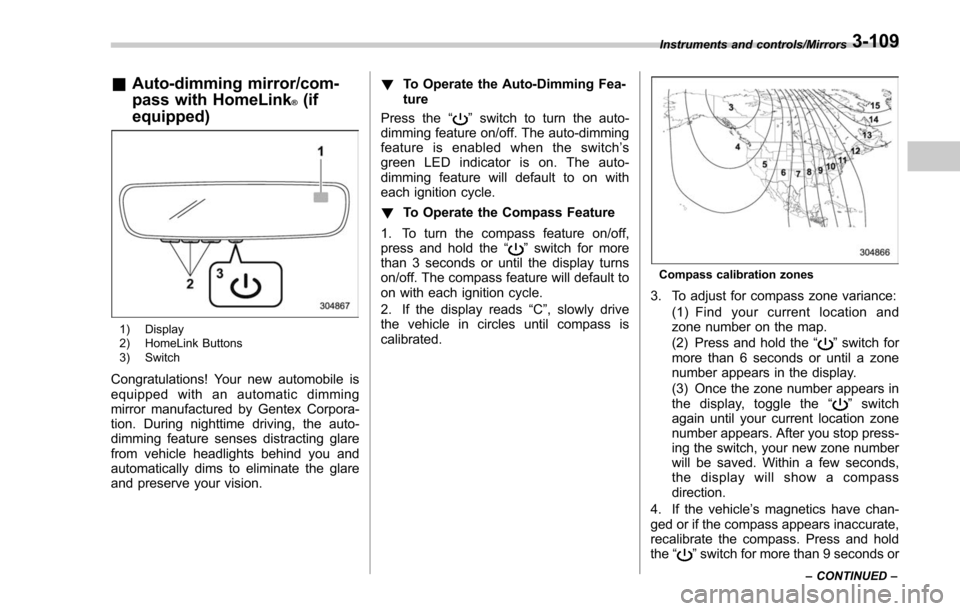
&Auto-dimming mirror/com-
pass with HomeLink
®(if
equipped)
1) Display
2) HomeLink Buttons
3) Switch
Congratulations! Your new automobile is
equipped with an automatic dimming
mirror manufactured by Gentex Corpora-
tion. During nighttime driving, the auto-
dimming feature senses distracting glare
from vehicle headlights behind you and
automatically dims to eliminate the glare
and preserve your vision. !
To Operate the Auto-Dimming Fea-
ture
Press the “
”switch to turn the auto-
dimming feature on/off. The auto-dimming
feature is enabled when the switch’ s
green LED indicator is on. The auto-
dimming feature will default to on with
each ignition cycle.
! To Operate the Compass Feature
1. To turn the compass feature on/off,
press and hold the “
”switch for more
than 3 seconds or until the display turns
on/off. The compass feature will default to
on with each ignition cycle.
2. If the display reads “C”, slowly drive
the vehicle in circles until compass is
calibrated.
Compass calibration zones
3. To adjust for compass zone variance:
(1) Find your current location and
zone number on the map.
(2) Press and hold the “
”switch for
more than 6 seconds or until a zone
number appears in the display.
(3) Once the zone number appears in
thedisplay,togglethe “
”switch
again until your current location zone
number appears. After you stop press-
ing the switch, your new zone number
will be saved. Within a few seconds,
the display will show a compass
direction.
4. If the vehicle’ s magnetics have chan-
ged or if the compass appears inaccurate,
recalibrate the compass. Press and hold
the “
”switch for more than 9 seconds or
Instruments and controls/Mirrors
–CONTINUED –3-109
Page 261 of 634
Instruments and controls/Mirrors
until a“C”appears in the display. Once a
“C ”appears in the display, slowly drive the
vehicle in circles until compass is cali-
brated.
! HomeLink
®Wireless Control Sys-
tem
The HomeLink
®Wireless Control System
provides a convenient way to replace up
to three hand-held radio-frequency re-
motes used to activate devices such as
gate operators, garage door openers,
entry door locks, security systems, even
home lighting. The below steps are
generic programming instructions; for
Genie and Sommer garage door openers
please go directly to the HomeLink web-
site. Additional information and program-
ming videos can be found at
www.HomeLink.com and
www.youtube.com/HomeLinkGentex.
CAUTION
. Before programming HomeLink
to a garage door opener or gate
operator, make sure that people
and objects are out of the way of
the device to prevent potential
harm or damage.
. When programming a garage
door opener, it is advised to park outside of the garage.
. Do not use HomeLink with any
garage door opener that lacks
safety stop and reverse features
as required by U.S. federal safety
standards (this includes any gar-
age door opener model manufac-
tured before April 1, 1982). A
garage door that cannot detect
an object signaling the door to
stop and reverse does not meet
current U.S. federal safety stan-
dards.
. It is also recommended that a
new battery be placed in the
hand-held remote (garage door
opener remote) of the device for
quicker and more accurate train-
ing.
. Some vehicles may require the
ignition switch to be turned to the
“ON ”or “ACC ”position for pro-
gramming and/or operation of
HomeLink.
. Keep the hand-held remote (gar-
age door opener remote) of the
device you are programming for
use in other vehicles as well as
for future HomeLink program-
ming. It is also suggested that
upon the sale of the vehicle, the programmed HomeLink buttons
be erased for security purposes.
Refer to
“Erasing HomeLink But-
tons ”F 3-113.
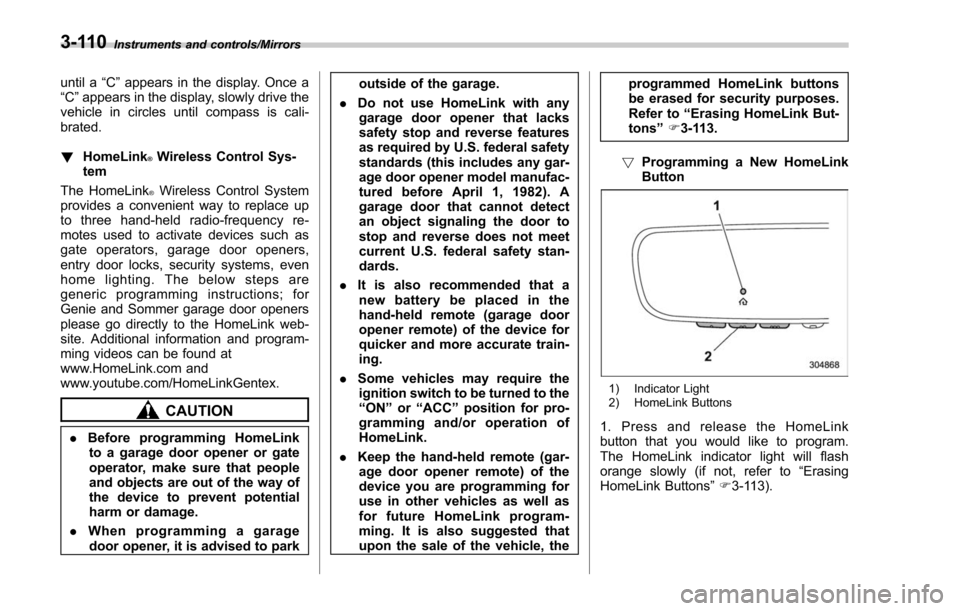
! Programming a New HomeLink
Button
1) Indicator Light
2) HomeLink Buttons
1. Press and release the HomeLink
button that you would like to program.
The HomeLink indicator light will flash
orange slowly (if not, refer to “Erasing
HomeLink Buttons ”F 3-113).
3-110