2017 SUBARU FORESTER Top display
[x] Cancel search: Top displayPage 128 of 634

Alarm system
The alarm system helps to protect your
vehicle and valuables from theft. The horn
sounds and the hazard warning flashers
flash if someone attempts to break into
your vehicle.
For models with“keyless access with
push-button start system ”:
The system can be armed and disarmed
with the keyless access function or access
key.
The system will not be activated when the
push-button ignition switch is in the “ACC ”
or “ON ”position.
For models without “keyless access
with push-button start system ”:
The system can be armed and disarmed
with the remote transmitter.
The system will not be activated when the
key is inserted into the ignition switch.
Your vehicle’ s alarm system has been set
for activation at the time of shipment from
the factory. You can set the system for
deactivation yourself or have it done by
your SUBARU dealer.
& System operation
The alarm system will sound the following
alarms when triggered.
. The vehicle ’s horn will sound for 30
seconds.
. The hazard warning flashers will flash
for 30 seconds.
If any of the doors or the rear gate remains
open after the 30-second period, the horn
will continue to sound for a maximum of 3
minutes. If the door or the rear gate is
closed while the horn is sounding, the
horn will stop sounding with a delay of up
to 30 seconds.
The alarm is triggered by:
. Opening any of the doors or the rear
gate
. Physical impact to the vehicle, such as
forced entry (only models with shock
sensors (dealer option))
NOTE
The alarm system can be set to trigger
the illumination of the following interior
lights.
. Map lights (illuminate only when the
door interlock switch is in the “DOOR ”
position)
. Dome light (illuminates only when
the dome light switch is in the “DOOR ”position)
.
Cargo area light (illuminates only
when the cargo area light switch is in
the “ON ”position)
The notifications regarding the map
lights, dome light and cargo area light
are deactivated as the factory setting. A
SUBARU dealer can activate the sys-
tem. Contact your SUBARU dealer for
details.
& Activating and deactivating
the alarm system
To change the setting of your vehicle’ s
alarm system for activation or deactiva-
tion, do the following.
1. Disarm the alarm system. Refer to
“Disarming the system ”F 2-29.
2. Sit in the driver ’s seat and shut all
doors and the rear gate.
3. Turn the ignition switch to the “ON”
position.
4. Hold down the REAR (UNLOCK) side
of the driver ’s power door locking switch,
open the driver ’s door within the following
1 second, and wait 10 seconds without
releasing the switch. The setting will then
be changed as follows.
If the system was previously activated:
The odometer/trip meter screen displays
Keys and doors/Alarm system
–CONTINUED –2-25
Page 129 of 634

Keys and doors/Alarm system
“AL oF ”and the horn sounds twice,
indicating that the system is now deacti-
vated.
If the system was previously deacti-
vated:
The odometer/trip meter screen displays
“ AL on ”and the horn sounds once,
indicating that the system is now acti-
vated.
NOTE
You may have the above setting
change done by your SUBARU dealer.
& If you have accidentally trig-
gered the alarm system
! To stop the alarm
Perform any of the following operations.
. Press any button on the access key/
remote transmitter.
. Turn the ignition switch to the “ON ”
position (models without “keyless access
with push-button start system ”).
. Turn the push-button ignition to the
“ ACC ”position (models with “keyless
access with push-button start system ”).
NOTE
Only registered keys will stop the
alarm. If the immobilizer transponder
is not registered, the alarm will not stop.
&
Arming the system
NOTE
. The system can be armed even if the
engine hood, the windows and/or
moonroof are open. Always make sure
that they are fully closed before arming
the system.
. When arming the system, if any of
the doors (including the rear gate) is
not fully closed, an electronic chirp
sounds five times, and the hazard
warning flashers flash five times to
alert you that the doors (including the
rear gate) are not properly closed.
When you close the door, the doors
will automatically lock and the system
will automatically arm in 30 seconds.
. The 30-second standby time can be
eliminated if you prefer. Have it per-
formed by your SUBARU dealer.
. The system is in the standby mode
for a 30-second period before arming
the system. The security indicator light
will flash at short intervals during this
period.
. If any of the following actions is
done during the standby period, the
system will not switch to the surveil-
lance state. –
Doors (including the rear gate)
are unlocked using the access key/
remote transmitter.
– Doors (including the rear gate)
are unlocked using the keyless
access function (models with “key-
less access with push-button start
system ”).
– Any door (including the rear
gate) is opened.
– The ignition switch is turned to
the “ON ”position (models without
“ keyless access with push-button
start system ”).
– Push-button ignition switch is
turned to the “ACC ”position (mod-
els with “keyless access with push-
button start system ”).
! To arm the system using the access
key/remote transmitter
1. Close all windows and the moonroof (if
equipped).
2. Remove the key from the ignition
switch (models without “keyless access
with push-button start system ”)/turn the
push-button ignition switch to the “OFF”
position (models with “keyless access with
push-button start system ”).
3. Open the doors and get out of the
vehicle.
4. Make sure that the engine hood is
2-26
Page 190 of 634

The clock can be set to 12-hour or 24-hour
clock displays. Perform the following
procedure to switch the display format.
1. Place the ignition switch in the
“LOCK”/“OFF”position.
2. Press and hold the “−”button that is
located near the clock display for approxi-
mately 5 seconds. The clock display will
then start to flash.
3. While the clock display is flashing,
press and hold the “+”button for approxi-
mately 2 seconds. The clock format will
then change.
4. The clock display will continue to flash
for approximately 3 seconds to inform you
that the clock display has been changed.
If you want to change the clock display
again, press and hold the “+”button for
approximately 2 seconds while the clock
display is flashing.Multi information display
(models with type B combi-
nation meter)
WARNING
Always pay adequate attention to
safe driving when operating the
multi information display while the
vehicle is in motion. When operation
of the multi information display
interferes with your ability to con-
centrate on driving, stop the vehicle
before performing operations on the
screen. Also, do not concentrate on
the display while driving. Doing so
may cause you to look away from
the road and could result in an
accident.
Various information will be shown on the
multi information display. Also, a warning
message will appear on the display if a
malfunction, etc. is detected. In addition,
several settings for the displayed content
can be performed.
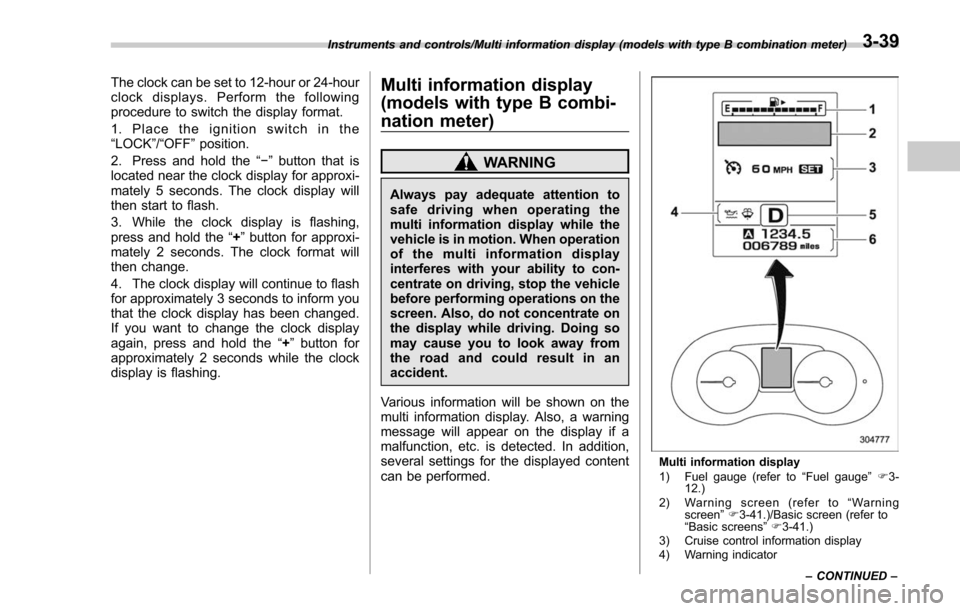
Multi information display
1) Fuel gauge (refer to “Fuel gauge ”F 3-
12.)
2) Warning screen (refer to “Warning
screen ”F 3-41.)/Basic screen (refer to
“ Basic screens ”F 3-41.)
3) Cruise control information display
4) Warning indicator
Instruments and controls/Multi information display (models with type B combination meter)
–CONTINUED –
3-39
Page 193 of 634

Instruments and controls/Multi information display (models with type B combination meter)
Menu screen entering screen:
While this screen is selected, pull the“/
SET ”switch to enter the menu screen.
& Menu screens
Pull the “/SET”switch to enter the menu
screens when all of the following condi-
tions are satisfied.
. The vehicle has been completely
stopped.
. The select lever is in the “P”position.
. The menu screen entering screen is
selected.
. The “
”information reminder is off. The menu list is as follows.
First menu
Second menu
Screen Settings Welcome Good-bye Screen
Gauge Initial Movement
Languages
Go Back
EyeSight (models with EyeSight system) Warning Volume
Lead Vehicle Acquisition Sound
Lead Vehicle Moving Monitor Function
Go Back
BSD/RCTA (if equipped) Warning Volume
RAB (if equipped) Warning Volume
Sonar Audible Alarm
Default Settings ―
3-42
Page 195 of 634

Instruments and controls/Multi function display
!Default Settings
Select “Ye s ”to use the menu screen to
restore customized settings to the factory
default settings. Select “No”to return to
the previous screen without restoring the
factory default settings.Multi function display (if
equipped)
NOTE
. If your vehicle is equipped with an
information display (monochrome), re-
fer to “Information display (Mexico-
spec. models) ”F 3-34.
. Illustrations show the display for
U.S.-spec. models as an example. For
models other than U.S.-spec. models,
elements in the illustrations (such as
the display indication and measure-
ment unit) may be different than the
ones for U.S.-spec. models.
. When the vehicle is in motion,
certain functions and selections may
not be available.
WARNING
Always pay adequate attention to
safe driving when operating the
multi function display while the
vehicle is in motion. When operation
of the multi function display is
disturbing your awareness and abil-
ity to concentrate on driving, stop
the vehicle in a safe place before
performing operations on the
screen. Also, do not concentrate
on the display while driving. Doing so may cause you to look away from
the road and could result in an
accident.
The multi function display has the follow-
ing functions.
Description Page
Displays useful messages,
such as warning information,
etc. 3-48
Displays basic screens (e.g.
fuel consumption screen, etc.) 3-48
Sets and adjusts maintenance
notification 3-76
Registers driving history 3-79
Sets and customizes car op-
eration 3-80
Reverse Automatic Braking
system display (if equipped) 7-66
Also, the multi function display can also be
used to set and initialize the multi function
display itself.
3-44
Page 196 of 634

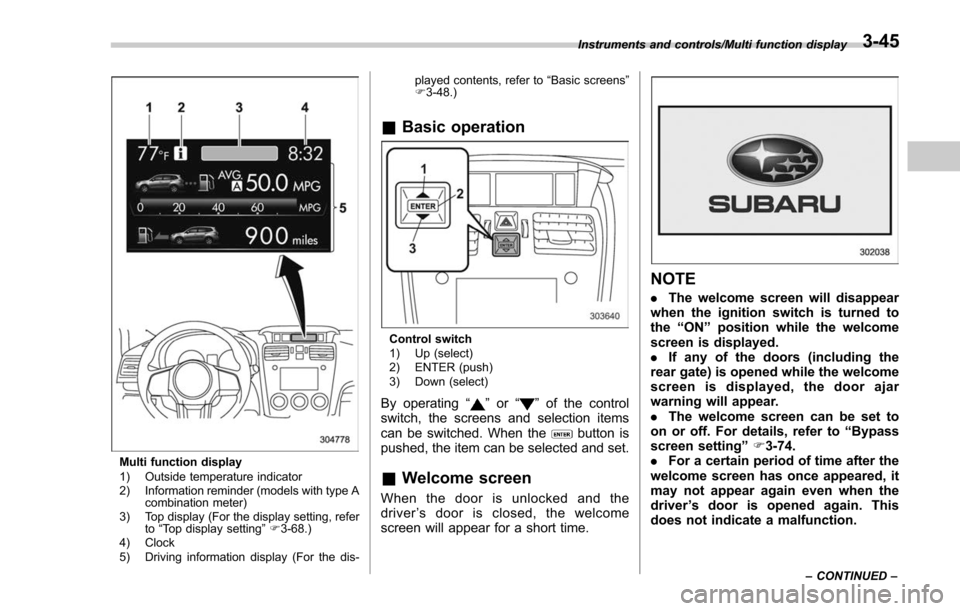
Multi function display
1) Outside temperature indicator
2) Information reminder (models with type Acombination meter)
3) Top display (For the display setting, refer to“Top display setting ”F 3-68.)
4) Clock
5) Driving information display (For the dis- played contents, refer to
“Basic screens ”
F 3-48.)
& Basic operation
Control switch
1) Up (select)
2) ENTER (push)
3) Down (select)
By operating “”or “”of the control
switch, the screens and selection items
can be switched. When the
button is
pushed, the item can be selected and set.
& Welcome screen
When the door is unlocked and the
driver ’s door is closed, the welcome
screen will appear for a short time.
NOTE
. The welcome screen will disappear
when the ignition switch is turned to
the “ON ”position while the welcome
screen is displayed.
. If any of the doors (including the
rear gate) is opened while the welcome
screen is displayed, the door ajar
warning will appear.
. The welcome screen can be set to
on or off. For details, refer to “Bypass
screen setting ”F 3-74.
. For a certain period of time after the
welcome screen has once appeared, it
may not appear again even when the
driver ’s door is opened again. This
does not indicate a malfunction.
Instruments and controls/Multi function display
–CONTINUED –3-45
Page 200 of 634

!Information bar
1) Information bar
2) Outside temperature indicator
3) Information reminder (models with type A
combination meter)
4) Top display
5) Clock
While the ignition switch is in the “ACC ”or
“ON ”position, the outside temperature
indicator, clock, etc. will be shown on the
information bar.
!Outside temperature indicator
This displays the outside temperature
between −408 F( −408 C) and 122 8F
(50 8C).
Icy road surface warning screen
When the outside temperature becomes
37 8F(3 8C) or less, the icy road surface
warning screen interrupts to inform the
driver that the road surface may be frozen.
NOTE
. The outside temperature indicator
shows the temperature around the
sensor. Therefore, the temperature in-
dication may differ from the actual
outside air temperature.
. The icy road surface warning screen
should be treated only as a guide. Be
sure to check the condition of the road
surface before driving.
. Once the icy road surface warning
screen is displayed, it will not be
displayed again unless the ignition switch is turned to the
“ACC ”or “ON ”
position after it has been turned to
“ LOCK ”/“ OFF ”position.
! Information reminder
The screen returns to the original screen
several seconds after the interruption
screen has been displayed. If the inter-
ruption screen can be displayed once
more even after the original screen has
appeared, an information reminder should
be displayed. For details about the inter-
ruption screen, refer to “Interruption
screen” F3-48.
! Top display
One of the following items can be dis-
played on the top display.
. Average fuel consumption correspond-
ing to the driving distance of each trip
meter
. Current fuel consumption (This may
not be displayed when driving at a low
speed.)
. Driving range on remaining fuel
For details about the setting of the top
display, refer to “Top display setting ”F 3-
68.
Instruments and controls/Multi function display
–CONTINUED –3-49
Page 202 of 634

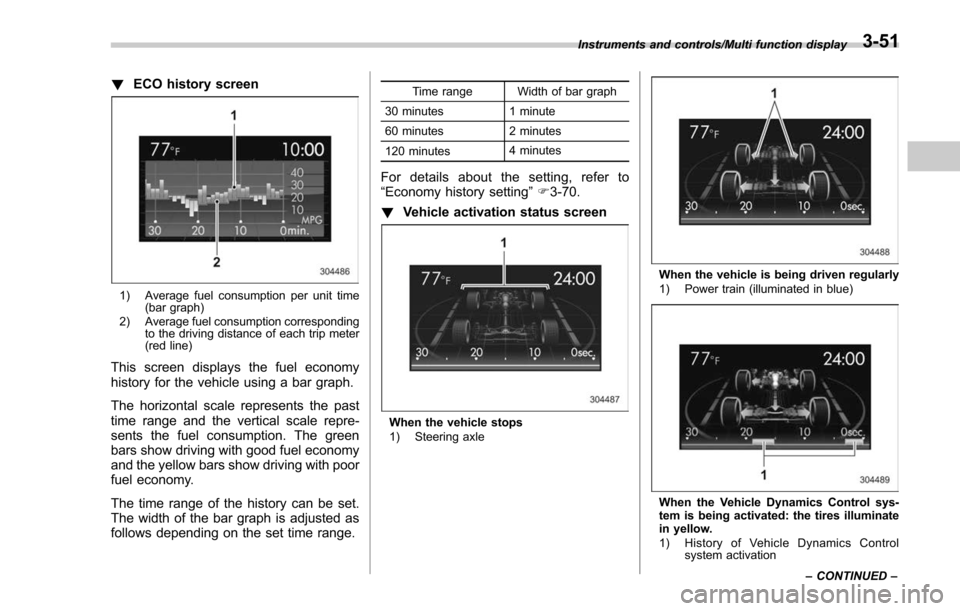
!ECO history screen
1) Average fuel consumption per unit time
(bar graph)
2) Average fuel consumption corresponding to the driving distance of each trip meter
(red line)
This screen displays the fuel economy
history for the vehicle using a bar graph.
The horizontal scale represents the past
time range and the vertical scale repre-
sents the fuel consumption. The green
bars show driving with good fuel economy
and the yellow bars show driving with poor
fuel economy.
The time range of the history can be set.
The width of the bar graph is adjusted as
follows depending on the set time range.
Time range Width of bar graph
30 minutes 1 minute
60 minutes 2 minutes
120 minutes 4 minutes
For details about the setting, refer to
“Economy history setting
”F 3-70.
! Vehicle activation status screen
When the vehicle stops
1) Steering axle
When the vehicle is being driven regularly
1) Power train (illuminated in blue)
When the Vehicle Dynamics Control sys-
tem is being activated: the tires illuminate
in yellow.
1) History of Vehicle Dynamics Control
system activation
Instruments and controls/Multi function display
–CONTINUED –
3-51