2017 SUBARU FORESTER Top display
[x] Cancel search: Top displayPage 369 of 634

Audio/Voice command system
&Voice command system op-
eration
1. Press the talk switch on the steering
wheel.
After the voice command top screen has
been displayed, speech guidance will
commence.
NOTE
When the voice command mode is
audio mode, voice guidance for the
voice command system can be skipped
by pressing the talk switch on the
steering wheel.
2. Say the command.
Example (Say “PHONE ”)
NOTE
. Commands related with each func-
tion are displayed on the screen of the
each function tab. Some commonly
used commands are displayed on the
screen of the main tab. Even if any tab
is selected, all commands can be
operated.
. Saying
“Help ”prompts guidance to
offer examples of commands and op-
eration methods.
. To cancel voice recognition, select
“ 6 ”, or press and hold the talk switch
on the steering wheel.
. If the system does not respond or
the confirmation screen does not dis-
appear, press the talk switch on the steering wheel and try again.
.
The notations used in the com-
mands are as follows.
–< >: Numbers, titles or names to
be spoken
! Voice command example: Call
name
1. Press the talk switch on the steering
wheel.
2. Say
“ Call
. A confirmation screen will be dis-
played showing the recognition re-
sults. If multiple matching items are
found, a selection screen will be
displayed. Say
“
the number.
NOTE
. In the same manner as it is dis-
played on the screen, “Call
“Call a contact ”say the name of a contact. For exam-
ple:“Call a contact ”,“John Smith ”or“Call a contact ”,“Mary Davis ”.Short or abbreviated names in the
contacts list may not be recognized.
Change names in the contacts list to
full names.
. Sometimes a voice recognition re-
sult confirmation screen will be dis-
played. After confirming the result, say
5-82
Page 370 of 634

“Ye s ”or“No”.
. When the system recognizes multi-
ple names from the contacts list, a
name candidate list will be displayed
on the screen. If the desired name is
not displayed on the top of the screen,
say or select the number of the name
from the candidate list (number 1,
number 2, etc.) to select a name from
the candidate list.
. When a contact has multiple phone
numbers registered in the contacts list,
a candidate list will be displayed. If the
desired phone number is not displayed
on the top of the screen, say or select
the number of the desired phone
number from the candidate list (num-
ber 1, number 2, etc.) to select a phone
number from the candidate list.
! Voice command example: Dial
number
1. Press the talk switch on the steering
wheel.
2. Say
“ Dial number ”.
3. Say
“ Dial
For example, if the phone number is
2345678:
Say
“ two three four five six seven
eight”
Do not say“ twenty three forty five sixty
seven eight ”
4. Say“Dial ”or press the off hook switch
on the steering wheel.
NOTE
. When the system recognizes multi-
ple phone numbers, a phone number
candidate list will be displayed on the
screen. Pressing the off hook switch on
the steering wheel makes a call to the
top entry on the list. If the desired
phone number is not displayed on the
top of the screen, say the number of
the desired phone number from the
candidate list to select a phone number
from the candidate list.
. Calling to the following phone num-
bers
–3 digit numbers (911, 411, 611)
– 7 digit numbers (Local phone
numbers)
– 10 digit numbers (Area code +
Local phone number)
– 11 digit phone numbers (1 + Area
code + Local phone number)
. As the system cannot recognize
additional numbers, say the complete
number without stopping. !
Casual speech recognization
Due to natural language speech recogni-
tion technology, this system enables re-
cognition of a command when spoken
naturally. However, the system cannot
recognize every variation of each com-
mand. In some situations, it is possible to
omit the command for the procedure and
directly state the desired operation. Not all
voice commands are displayed in the
function menu.
NOTE
If the command cannot be recognized
completely, the command input screen
will be displayed. (Search results will
be shown based on the part of the
command that was recognized.)
! Expression examples for each
function
Command Expression examples
“ Dial
Phone
Audio/Voice command system
–CONTINUED –5-83
Page 371 of 634

Audio/Voice command system
&Command list
Recognizable voice commands and their
actions are shown below.
NOTE
. Some voice commands may not be
available depending on the market,
vehicle specifications or the device
connection status.
. Frequently used commands are
listed in the following tables.
. For devices that are not installed in
the vehicle, the related commands will
not be displayed on the screen. Also,
according to conditions, other com-
mands may not be displayed on the
screen.
. The functions available may vary
according to the system installed.
. Voice recognition language can be
changed. Refer to “Unit settings ”F 5-
18.
. The notations used in the com-
mands are as follows.
–<
>: Numbers, titles or
names to be spoken
– (
): There is no need to
speak the command, the voice
command system will recognize
the content. !
Basic command
Voice command Function
Back Go back one hierar-
chy or cancel the
voice recognition
(voice command top
screen)
Help Ask for help with the
current task
Cancel, Close Cancel the current
task
Ye s
No
Display OFF Turns the display off
Audio ON Turns the audio sys-
tem on
Audio OFF Turns the audio sys-
tem off
STARLINK Switch to APPS mode
!
Commands for changing the audio
mode
Voice command Function
Change to AM Switch to AM mode
Change to AM1 Switch to AM mode
band 1
Change to AM2 Switch to AM mode
band 2
Change to FM Switch to FM mode
Change to FM1 Switch to FM mode
band 1
Change to FM2 Switch to FM mode
band 2
Change to FM3 Switch to FM mode
band 3
Change to SiriusXM Switch to XM mode
Change to BT Audio Switch to Bluetooth
Audio mode
Change to CD Switch to CD mode
Change to USB Switch to USB mode
Change to iPod Switch to iPod mode
Change to aha Switch to aha radio
mode
Change to Pandora Switch to Pandora
mode
Change to AUX Switch to AUX mode
5-84
Page 372 of 634

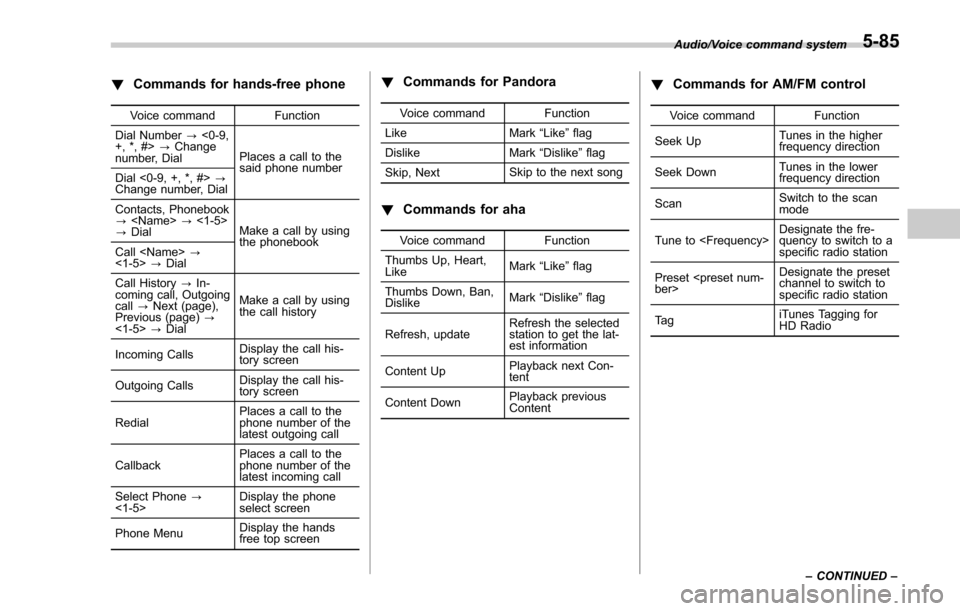
!Commands for hands-free phone
Voice command Function
Dial Number ?<0-9,
+, *, #> ?Change
number, Dial Places a call to the
said phone number
Dial <0-9, +, *, #> ?
Change number, Dial
Contacts, Phonebook
?
? Dial Make a call by using
the phonebook
Call
<1-5> ?Dial
Call History ?In-
coming call, Outgoing
call ?Next (page),
Previous (page) ?
<1-5> ?Dial Make a call by using
the call history
Incoming Calls Display the call his-
tory screen
Outgoing Calls Display the call his-
tory screen
Redial Places a call to the
phone number of the
latest outgoing call
Callback Places a call to the
phone number of the
latest incoming call
Select Phone ?
<1-5> Display the phone
select screen
Phone Menu Display the hands
free top screen
!
Commands for Pandora
Voice command Function
Like Mark “Like ”flag
Dislike Mark“Dislike ”flag
Skip, Next Skip to the next song
!
Commands for aha
Voice command Function
Thumbs Up, Heart,
Like Mark
“Like ”flag
Thumbs Down, Ban,
Dislike Mark
“Dislike ”flag
Refresh, update Refresh the selected
station to get the lat-
est information
Content Up Playback next Con-
tent
Content Down Playback previous
Content
!
Commands for AM/FM control
Voice command Function
Seek Up Tunes in the higher
frequency direction
Seek Down Tunes in the lower
frequency direction
Scan Switch to the scan
mode
Tune to
quency to switch to a
specific radio station
Preset
channel to switch to
specific radio station
Ta g iTunes Tagging for
HD Radio
Audio/Voice command system
–CONTINUED –
5-85
Page 398 of 634

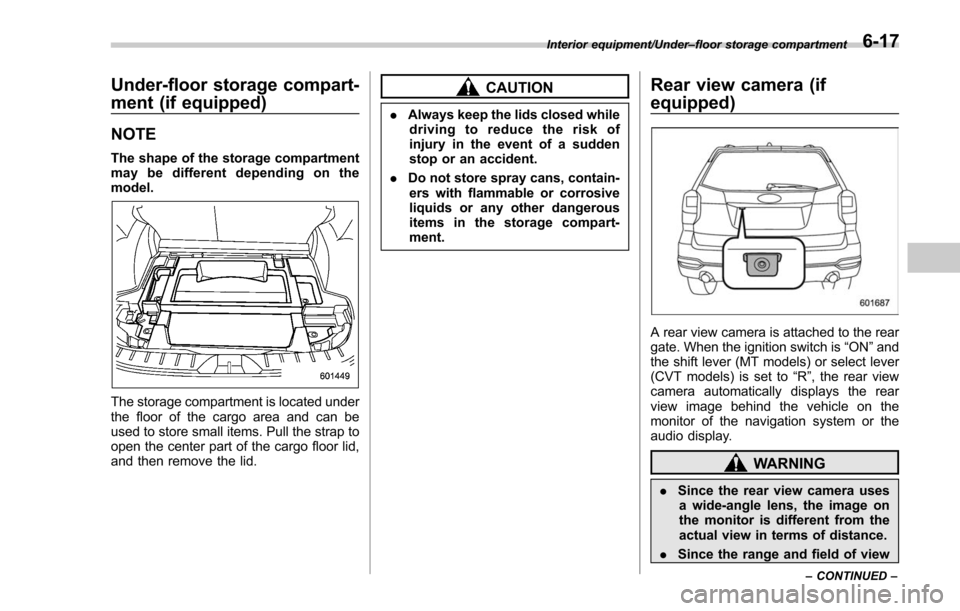
Under-floor storage compart-
ment (if equipped)
NOTE
The shape of the storage compartment
may be different depending on the
model.
The storage compartment is located under
the floor of the cargo area and can be
used to store small items. Pull the strap to
open the center part of the cargo floor lid,
and then remove the lid.
CAUTION
.Always keep the lids closed while
driving to reduce the risk of
injury in the event of a sudden
stop or an accident.
. Do not store spray cans, contain-
ers with flammable or corrosive
liquids or any other dangerous
items in the storage compart-
ment.
Rear view camera (if
equipped)
A rear view camera is attached to the rear
gate. When the ignition switch is “ON”and
the shift lever (MT models) or select lever
(CVT models) is set to “R”, the rear view
camera automatically displays the rear
view image behind the vehicle on the
monitor of the navigation system or the
audio display.
WARNING
. Since the rear view camera uses
a wide-angle lens, the image on
the monitor is different from the
actual view in terms of distance.
. Since the range and field of view
Interior equipment/Under –floor storage compartment
–CONTINUED –6-17
Page 399 of 634

Interior equipment/Rear view camera
of the image on the monitor is
limited, you should always check
the rear view and the surround-
ing area with your eyes and
mirrors, and move backward at
a slow speed. Moving backward
only by checking the rear view
image from the camera could
cause an accident.
. Do not disassemble or modify the
camera, switch or wiring. If
smoke comes out or you smell
a strange odor, stop using the
rear view camera immediately.
Contact your SUBARU dealer
for an inspection. Continued use
may result in accident, fire or
electric shock.
CAUTION
. If your vehicle is washed with a
high-pressure washer, do not
allow water to contact the camera
directly. Entry of water into the
camera lens may result in con-
densation, malfunction, fire or
electric shock.
. Since the camera is a precision
device, do not subject it to strong
impacts. Otherwise, malfunction, fire or electric shock may occur.
. If mud or snow sticks to or is
frozen on the camera, you must
be very careful when removing it.
Otherwise, damage to the camera
may cause a fire or electric
shock. Pour water or lukewarm
water over the camera to remove
mud and ice, and wipe it with a
soft, dry cloth.
. Do not put a flame close to the
camera or wiring. Otherwise, da-
mage or fire may occur.
. When replacing the fuse, be sure
to use a fuse with the specified
rating. Use of a fuse with a
different rating may result in a
malfunction.
. If the rear view camera is used for
a long time while the engine is
not operated, the battery may
become completely discharged.
NOTE
. Do not wipe the camera with alcohol,
benzine or paint thinner. Otherwise,
discoloration may occur. To remove
contamination, wipe the camera with a
cloth moistened with a diluted neutral
detergent and then wipe it with a soft, dry cloth.
.
When waxing the vehicle, be careful
not to apply the wax to the camera. If it
comes in contact with the camera,
moisten a clean cloth with a diluted
neutral detergent to remove the wax.
. The camera lens has a hard coating
to help prevent scratches. However,
when washing the vehicle or cleaning
the camera lens, be careful not to
scratch the camera lens. Do not use a
washing brush directly on the camera
lens. The image quality of the rear view
camera may deteriorate.
. Strong light shined on the camera
lens may develop vertical lines around
the light source. This is not a malfunc-
tion.
. Under fluorescent light, the display
may flicker. However, this is not a
malfunction.
. The image of the rear view camera
may be slightly different from the
actual color of the objects.& How to use the rear view
camera
When the shift lever/select lever is set to
“R”, the rear view camera automatically
displays the rear view image from the
vehicle. When the lever is set to other
positions, the image before setting to “R”
6-18
Page 475 of 634

Starting and operating/Reverse Automatic Braking System
4) After the vehicle has been stopped by
the system:
Make sure to depress the brake pedal
after the vehicle has been stopped by
automatic braking. Until the brake pedal is
depressed, a message will be displayed
on the multi function display and the
continuous beep will remain sounding.
After the brake pedal is depressed, the
Reverse Automatic Braking system OFF
indicator will illuminate and the system will
temporarily stop operating. The Reverse
Automatic Braking system OFF indicator
will turn off when the select lever is shifted
to a position other than the“R”position.
The system will operate again the next
time the select lever is shifted to “R”
position.
NOTE
Automatic braking by the system will
be released 2 seconds after the vehicle
has been stopped. Before the auto-
matic brake is released, a warning
sound (3 short beeps followed by a
long beep) will activate to alert the
driver.
& Canceling the Reverse Auto-
matic Braking system opera-
tion
The Reverse Automatic Braking system
can be temporarily cancelled by any of the
following operations.
. While automatic braking is in operation,
the brake pedal is depressed
. While automatic braking is in operation,
the accelerator pedal is depressed
. When automatic deceleration is in
activation, the accelerator pedal is de-
pressed hard
. The select lever is shifted to a position
other than the “R”position
NOTE
The system will be cancelled if the
object is no longer detected.
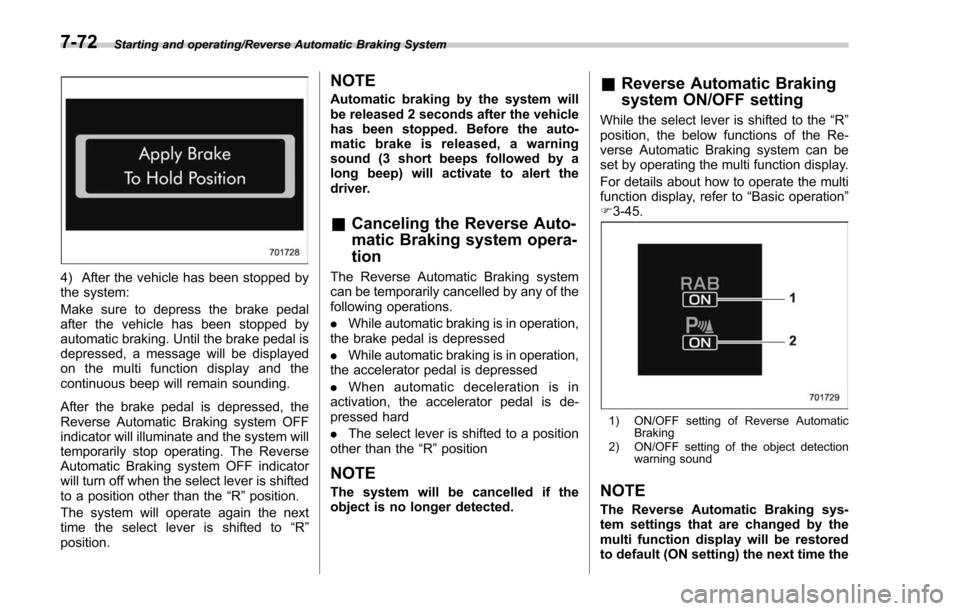
& Reverse Automatic Braking
system ON/OFF setting
While the select lever is shifted to the “R”
position, the below functions of the Re-
verse Automatic Braking system can be
set by operating the multi function display.
For details about how to operate the multi
function display, refer to “Basic operation ”
F 3-45.
1) ON/OFF setting of Reverse Automatic
Braking
2) ON/OFF setting of the object detection warning sound
NOTE
The Reverse Automatic Braking sys-
tem settings that are changed by the
multi function display will be restored
to default (ON setting) the next time the
7-72
Page 505 of 634

In case of emergency/If you park your vehicle in case of an emergency
If you park your vehicle in
case of an emergency
1) Models with multi function display
2) Models without multi function display
The hazard warning flasher should beused in day or night to warn other drivers
when you have to park your vehicle under
emergency conditions.
Avoid stopping on the road. It is best to
safely pull off the road if a problem occurs.
The hazard warning flasher can be acti-
vated regardless of the ignition switch
position.
Turn on the hazard warning by pushing
the hazard warning flasher switch. Turn it
off by pushing the switch again.
NOTE
When the hazard warning flasher is on,
the turn signals do not work.
Temporary spare tire
WARNING
.
Never tow a trailer when the
temporary spare tire is used.
The temporary spare tire is not
designed to sustain the towing
load. Use of the temporary spare
tire when towing can result in
failure of the spare tire and/or
less stability of the vehicle and
may lead to an accident.
. When a spare tire is mounted or a
wheel rim is replaced without the
original pressure sensor/trans-
mitter being transferred, the low
tire pressure warning light will
illuminate steadily after blinking
for approximately one minute.
This indicates the tire pressure
monitoring system (TPMS) is un-
able to monitor all four road
wheels. Contact your SUBARU
dealer as soon as possible for
tire and sensor replacement and/
or system resetting.
9-2