2017 SUBARU FORESTER instrument panel
[x] Cancel search: instrument panelPage 6 of 634

Warranties
&Warranties for U.S.A.
All SUBARU vehicles distributed by
Subaru of America, Inc. and sold at retail
by an authorized SUBARU dealer in the
United States come with the following
warranties:
. SUBARU Limited Warranty
. Emission Control Systems Warranty
. Emissions Performance Warranty
All warranty information, including details
of coverage and exclusions, is in the
“ Warranty and Maintenance Booklet ”.
Read these warranties carefully.
& Warranties for Canada
All SUBARU vehicles distributed by
Subaru Canada, Inc. and sold at retail by
an authorized SUBARU dealer in Canada
come with the following warranties:
. SUBARU Limited Warranty
. Anti-Corrosion Warranty
. Emission Control Warranty
All warranty information, including details
of coverage and exclusions, is in the
“ Warranty and Service Booklet ”. Read
these warranties carefully.
& Warranties except for U.S.A.
and Canada
All warranty information, including details
of coverage and exclusions, is in the
“Warranty and Maintenance Booklet ”.
Read these warranties carefully.
How to use this Owner ’s
Manual
& Using your Owner ’s Manual
Before you operate your vehicle, carefully
read this manual. To protect yourself and
extend the service life of your vehicle,
follow the instructions in this manual.
Failure to observe these instructions may
result in serious injury and damage to your
vehicle.
This manual is composed of fourteen
chapters. Each chapter begins with a brief
table of contents, so you can usually tell at
a glance if that chapter contains the
information you want.
Chapter 1: Seat, seatbelt and SRS
airbags
This chapter informs you how to use the
seat and seatbelt and contains precau-
tions for the SRS airbags.
Chapter 2: Keys and doors
This chapter informs you how to operate
the keys, locks and windows.
Chapter 3: Instruments and controls
This chapter informs you about the opera-
tion of instrument panel indicators and
how to use the instruments and other
switches.
– CONTINUED –
1
Page 21 of 634

&Instrument panel1) Outside mirror switch (page 3-115)
2) Seat position memory switch (page 1-5)
3) Steering Responsive Headlight OFF
switch (models with Steering Respon-
sive Headlight) (page 3-99)/Steering re-
sponsive fog light off switch (if equipped)
(page 3-103)
4) Illumination brightness control (page 3-101)
5) BSD/RCTA OFF switch (page 7-58)
6) Vehicle Dynamics Control OFF switch (models without power rear gate)
(page 7-41)/Memory switch (models with
power rear gate) (page 2-42)
7) Combination meter (page 3-9)
8) Information display (page 3-34)/Multi function display (page 3-44)
9) Hazard warning flasher switch (models with multi function display) (page 3-8)
10) Hazard warning flasher switch (models without multi function display) (page 3-8)
11) Multi function display control switch (page 3-44)
12) Audio (page 5-1)
13) Climate control (page 4-1)
14) Power rear gate switch (page 2-39)
15) Fuse box (page 11-37)
16) Hood lock release (page 11-7)
17) Vehicle Dynamics Control OFF switch (models with power rear gate)
(page 7-41)
16
Page 60 of 634

der the center of the instrument
panel
If you need service or repair in those
areas or near the front seatbelt
retractors, have the work performed
by your authorized SUBARU dealer.
NOTE
If the front or side part of the vehicle is
damaged in an accident to the extent
that the seatbelt pretensioner does not
operate, contact your SUBARU dealer
as soon as possible.
& Precautions against vehicle
modification
Always consult your SUBARU dealer if
you want to install any accessory parts to
your vehicle.
CAUTION
Do not perform any of the following
modifications. Such modifications
can interfere with proper operation
of the seatbelt pretensioners.
. Attachment of any equipment
(bush bar, winches, snow plow,
skid plate, etc.) other than genu-
ine SUBARU accessory parts to the front end.
. Modification of the suspension
system or front end structure.
. Installation of a tire of different
size and construction from the
tires specified on the vehicle
placard attached to the driver ’s
door pillar or specified for indivi-
dual vehicle models in this Own-
er ’s Manual.
Child restraint systems
Infants and small children should always
be placed in an infant or child restraint
system in the rear seat while riding in the
vehicle. You should use an infant or child
restraint system that meets Federal Motor
Vehicle Safety Standards or Canada
Motor Vehicle Safety Standards, is com-
patible with your vehicle and is appro-
priate for the child ’s age and size. All child
restraint systems are designed to be
secured in vehicle seats by lap belts or
the lap belt portion of a lap/shoulder belt
(except those described in “Installation of
child restraint systems by use of lower and
tether anchorages (LATCH) ”F 1-37).
Children could be endangered in an
accident if their child restraints are not
Seat, seatbelt and SRS airbags/Child restraint systems
–CONTINUED –1-29
Page 75 of 634

Seat, seatbelt and SRS airbags/*SRS airbag (Supplemental Restraint System airbag)
near the SRS airbag cover or
between you and the SRS airbag.
If the SRS airbag deploys, these
objects could interfere with its
proper operation and could be
propelled inside the vehicle,
causing injury.
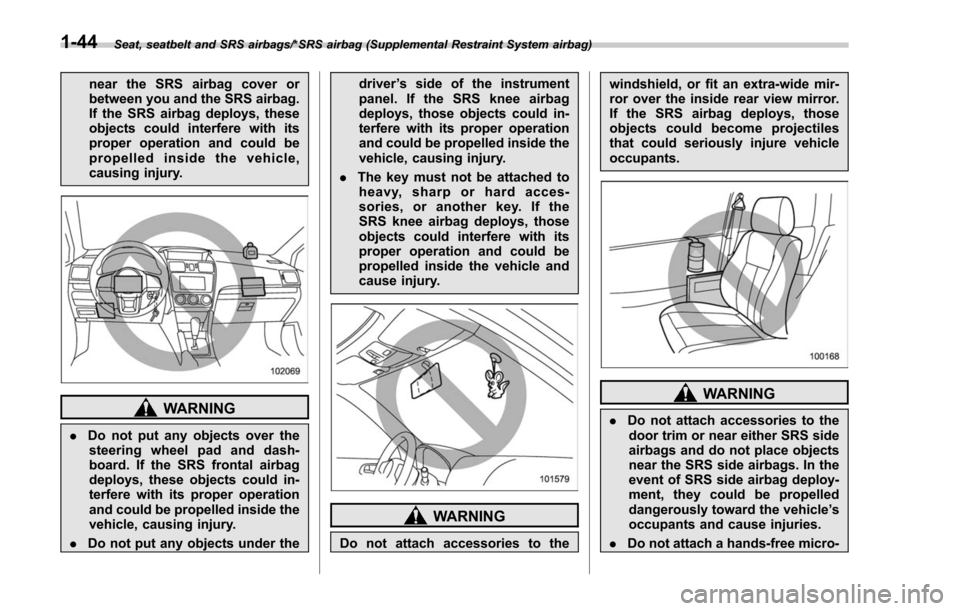
WARNING
.Do not put any objects over the
steering wheel pad and dash-
board. If the SRS frontal airbag
deploys, these objects could in-
terfere with its proper operation
and could be propelled inside the
vehicle, causing injury.
. Do not put any objects under the driver
’s side of the instrument
panel. If the SRS knee airbag
deploys, those objects could in-
terfere with its proper operation
and could be propelled inside the
vehicle, causing injury.
. The key must not be attached to
heavy, sharp or hard acces-
sories, or another key. If the
SRS knee airbag deploys, those
objects could interfere with its
proper operation and could be
propelled inside the vehicle and
cause injury.
WARNING
Do not attach accessories to the windshield, or fit an extra-wide mir-
ror over the inside rear view mirror.
If the SRS airbag deploys, those
objects could become projectiles
that could seriously injure vehicle
occupants.
WARNING
.
Do not attach accessories to the
door trim or near either SRS side
airbags and do not place objects
near the SRS side airbags. In the
event of SRS side airbag deploy-
ment, they could be propelled
dangerously toward the vehicle ’s
occupants and cause injuries.
. Do not attach a hands-free micro-
1-44
Page 86 of 634

are placed on the seat.!If the passenger ’s frontal airbag
OFF indicator illuminates and
the ON indicator turns off even
when the front passenger ’s seat
is occupied by an adult
This can be caused by the adult incor-
rectly sitting in the front passenger ’s seat.
1. Turn the ignition switch to the “LOCK”/
“OFF ”position.
2. Ask the front passenger to set the
seatback to the upright position, sit up
straight in the center of the seat cushion,
correctly fasten the seatbelt, position his/
her legs out forward, and adjust the seat to
the rearmost position.
3. Turn the ignition switch to the “ON”
position.
If the OFF indicator remains illuminated
while the ON indicator remains off, take
the following actions.
1. Turn the ignition switch to the “LOCK”/
“OFF ”position.
2. Make sure that the front passenger
does not use a blanket, seat cushion, seat
cover, seat heater or massager, etc.
3. If wearing excessive layers of clothing,
the front passenger should remove any
unnecessary items before sitting in the
front passenger ’s seat, or should sit in a rear seat.
4. Turn the ignition switch to the
“ON”
position and wait 6 seconds to allow the
system to complete self-checking. Follow-
ing the system check, both indicators turn
off for 2 seconds. Now, the ON indicator
should illuminate while the OFF indicator
remains off.
If the OFF indicator still remains illumi-
nated while the ON indicator remains off,
ask the occupant to move to the rear seat
and immediately contact your SUBARU
dealer for an inspection.
! How to contact the vehicle manu-
facturer concerning modifications
for persons with disabilities that
may affect the advanced airbag
system
Changing or moving any parts of the front
seats, rear seat, seatbelts, front bumper,
front side frame, radiator panel, instrument
panel, combination meter, steering wheel,
steering column, tire, suspension or floor
panel can affect the operation of the
SUBARU advanced airbag system. If
you have any questions, you may contact
the following SUBARU distributors.
Subaru of America, Inc.
Customer Dealer Services Department
P.O. Box 6000
Cherry Hill, NJ 08034-6000
1-800-SUBARU3 (1-800-782-2783)
Subaru Hawaii
2850 Pukoloa Street, Suite 202,
Honolulu, HI 96819-4467
808-839-2273
Shen
’s Corporation dba Prestige Automo-
bile
491, East Marine Corps Drive, Route 1
Dededo, Guam 96921-6225
671-633-2698
Trebol Motors
P.O. Box 11204, San Juan, Puerto Rico
00910
787-793-2828
Seat, seatbelt and SRS airbags/*SRS airbag (Supplemental Restraint System airbag)
–CONTINUED –1-55
Page 93 of 634

Seat, seatbelt and SRS airbags/*SRS airbag (Supplemental Restraint System airbag)
between the occupant and the side
window and supplements the seatbelt by
reducing the impact on the occupant’s
head.
In a rollover, SRS curtain airbags on both
sides of the vehicle deploy between the
occupant and the side window and sup-
plement the seatbelt by reducing the
impact to the occupant ’s head.
In an offset frontal collision, SRS side
airbags and SRS curtain airbags on both
sides of the vehicle deploy between the
occupant and the side window and sup-
plement the seatbelt by reducing the
impact to the occupant ’s head and chest.
! Operation
The SRS side airbag and SRS curtain
airbag can function only when the ignition switch is in the
“ON”position.
The driver ’s and front passenger ’s SRS
side airbags and SRS curtain airbags
deploy independently of each other since
each has its own impact sensor.
An impact sensor, which senses impact
force, is located in each of the following
locations.
. In the left and right front doors
. In the left and right center pillars
. In the left and right rear wheel houses
. Under the rear center seat
. On both the right and left sides at the
front of the vehicle (front sub sensors)
Rollover sensor and frontal impact sensor
are located inside the airbag control
module which is located under the center
of the instrument panel.
If the impact sensor that is located under
the rear center seat and one of the center
pillar impact sensors or front door impact
sensors both sense an impact force above
a predetermined level in a side collision,
the control module causes both the SRS
side airbag and curtain airbag on the
impacted side to inflate regardless of
whether the rear wheel house impact
sensor on the same side senses an
impact. If the impact sensor that is located under
the rear center seat and one of the rear
wheel house impact sensors together
sense an impact force above a predeter-
mined level in a side collision, the control
module causes only the SRS curtain
airbag on the impacted side to inflate.
Even if a frontal collision occurs, both right
and left SRS side airbags and SRS curtain
airbags will deploy when the front sensor
and the control unit determine that the
impact results from an offset frontal colli-
sion.
The SRS side airbags and SRS curtain
airbags are designed to deploy when the
driver
’s SRS frontal airbag deploys or the
driver ’s and passenger ’s SRS frontal air-
bags deploy in a frontal collision, and also
when the system determines that the
collision is an offset frontal collision. The
SRS side airbags and SRS curtain air-
bags are basically designed not to deploy
in a frontal collision when the SRS frontal
airbags do not deploy or the system
determines that the collision is other than
an offset frontal collision.
If the rollover sensor detects rollover of the
vehicle, the control module inflates the
SRS curtain airbags on both sides. At this
time, the driver ’s and front passenger ’s
seatbelt pretensioners also operate at the
1-62
Page 114 of 634

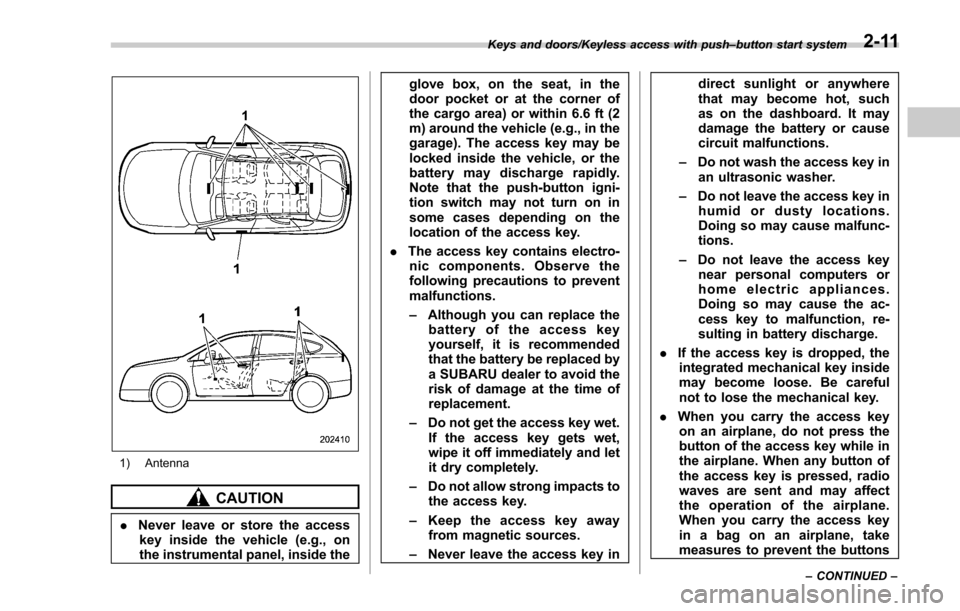
1) Antenna
CAUTION
.Never leave or store the access
key inside the vehicle (e.g., on
the instrumental panel, inside the glove box, on the seat, in the
door pocket or at the corner of
the cargo area) or within 6.6 ft (2
m) around the vehicle (e.g., in the
garage). The access key may be
locked inside the vehicle, or the
battery may discharge rapidly.
Note that the push-button igni-
tion switch may not turn on in
some cases depending on the
location of the access key.
. The access key contains electro-
nic components. Observe the
following precautions to prevent
malfunctions.
– Although you can replace the
battery of the access key
yourself, it is recommended
that the battery be replaced by
a SUBARU dealer to avoid the
risk of damage at the time of
replacement.
– Do not get the access key wet.
If the access key gets wet,
wipe it off immediately and let
it dry completely.
– Do not allow strong impacts to
the access key.
– Keep the access key away
from magnetic sources.
– Never leave the access key in direct sunlight or anywhere
that may become hot, such
as on the dashboard. It may
damage the battery or cause
circuit malfunctions.
– Do not wash the access key in
an ultrasonic washer.
– Do not leave the access key in
humid or dusty locations.
Doing so may cause malfunc-
tions.
– Do not leave the access key
near personal computers or
home electric appliances.
Doing so may cause the ac-
cess key to malfunction, re-
sulting in battery discharge.
. If the access key is dropped, the
integrated mechanical key inside
may become loose. Be careful
not to lose the mechanical key.
. When you carry the access key
on an airplane, do not press the
button of the access key while in
the airplane. When any button of
the access key is pressed, radio
waves are sent and may affect
the operation of the airplane.
When you carry the access key
in a bag on an airplane, take
measures to prevent the buttons
Keys and doors/Keyless access with push –button start system
–CONTINUED –2-11
Page 143 of 634

Keys and doors/Rear gate
The power rear gate operates only when
all of the following conditions are satisfied.
.The vehicle is stopped completely.
. The outside temperature is within a
range from −22 8F to 1588 F (from−30 8Cto
70 8C).
. The ignition switch is in the “LOCK”/
“OFF ”or “ACC ”position. Or, the ignition
switch is in the “ON”position and the
parking brake is applied (MT models)/the
select lever is in the “P”position (CVT
models).
NOTE
. If the button is pressed repeatedly
while the power rear gate is operating,
the system may ignore the button
operation in order to avoid being
damaged. Do not press the button
unnecessarily.
. It is not possible to stop the rear
gate temporarily while opening be-
tween the completely closed position
and approximately 12 in (30 cm) open.
If you press one of the power rear gate
buttons briefly during this range, the
rear gate will be closed.
. If the vehicle starts to move while
the power rear gate is operating, the
system sounds a buzzer and closes the
rear gate automatically. At this time, if
the system detects jamming, it will deactivate the power rear gate and the
rear gate will not be closed. If this
occurs, close the rear gate via regular
procedures.
.
If you try to open the rear gate using
the power rear gate function immedi-
ately after closing the rear gate using
the power rear gate function, an elec-
tronic chirp will sound and the rear
gate will not open. Wait for a while
before trying to open the rear gate via
the power rear gate function. If you
wish to open it right away, it can be
opened manually. !
Operation by the button on the
instrument panelPower rear gate button
To open the rear gate:
Press and hold the power rear gate button
when the rear gate is closed. Then an
electronic chirp will sound twice and the
hazard warning flashers will flash twice.
The rear gate will open automatically.
To stop the rear gate midway:
Briefly press the power rear gate button
while the rear gate is being opened. Then
the hazard warning flashers will flash
twice. If the button is pressed again, the
rear gate will close. If the button is briefly
pressed while the gate is closed, the rear
gate can be opened. However, the rear
gate cannot be stopped again while it is
2-40