2017 SUBARU FORESTER oil change
[x] Cancel search: oil changePage 55 of 634
Seat, seatbelt and SRS airbags/Seatbelts
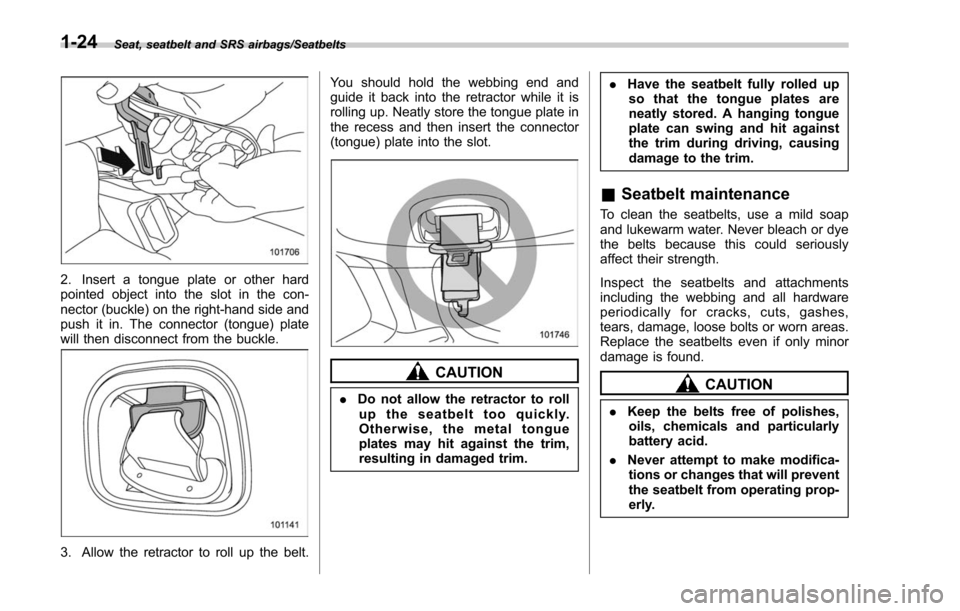
2. Insert a tongue plate or other hard
pointed object into the slot in the con-
nector (buckle) on the right-hand side and
push it in. The connector (tongue) plate
will then disconnect from the buckle.
3. Allow the retractor to roll up the belt.You should hold the webbing end and
guide it back into the retractor while it is
rolling up. Neatly store the tongue plate in
the recess and then insert the connector
(tongue) plate into the slot.
CAUTION
.
Do not allow the retractor to roll
up the seatbelt too quickly.
Otherwise, the metal tongue
plates may hit against the trim,
resulting in damaged trim. .
Have the seatbelt fully rolled up
so that the tongue plates are
neatly stored. A hanging tongue
plate can swing and hit against
the trim during driving, causing
damage to the trim.
& Seatbelt maintenance
To clean the seatbelts, use a mild soap
and lukewarm water. Never bleach or dye
the belts because this could seriously
affect their strength.
Inspect the seatbelts and attachments
including the webbing and all hardware
periodically for cracks, cuts, gashes,
tears, damage, loose bolts or worn areas.
Replace the seatbelts even if only minor
damage is found.
CAUTION
. Keep the belts free of polishes,
oils, chemicals and particularly
battery acid.
. Never attempt to make modifica-
tions or changes that will prevent
the seatbelt from operating prop-
erly.
1-24
Page 198 of 634

Type A combination meter
1) Engine oil: Checks the interval of engineoil replacement.
2) Oil filter: Checks the interval of oil filter replacement.
3) Tires: Checks the interval of tire rotation.
4) Inspection and maintenance: Checks the interval of inspection and maintenance.Type B combination meter
1) Windshield washer fluid: Checks thelevel of windshield washer fluid.
2) Brake fluid: Checks the level of brake fluid.
3) Engine oil: Checks the interval of engine oil replacement.
4) Oil filter: Checks the interval of oil filter replacement.
5) Tires: Checks the interval of tire rotation.
6) Inspection and maintenance: Checks the interval of inspection and maintenance.
When the checks are performed, the color
of the icon corresponding to the checked
item will turn green.
If there is no warning message, the self-
check will complete without notification.
Example of notification
If there is a warning message or a
maintenance notification, the color of the
icon corresponding to the item will turn
yellow and the warning message or the
maintenance notification will be displayed.
Take the appropriate actions based on the
messages indicated.
NOTE
.The self-check screen can be set to
on or off. For details, refer to “On/Off
setting ”F 3-77.
. After performing the maintenance,
change the setting of the correspond-
ing maintenance item. For details, refer
to “Maintenance settings ”F 3-76.
. The maintenance notification screen
will be displayed under either of the
Instruments and controls/Multi function display
–CONTINUED –3-47
Page 227 of 634
Instruments and controls/Multi function display
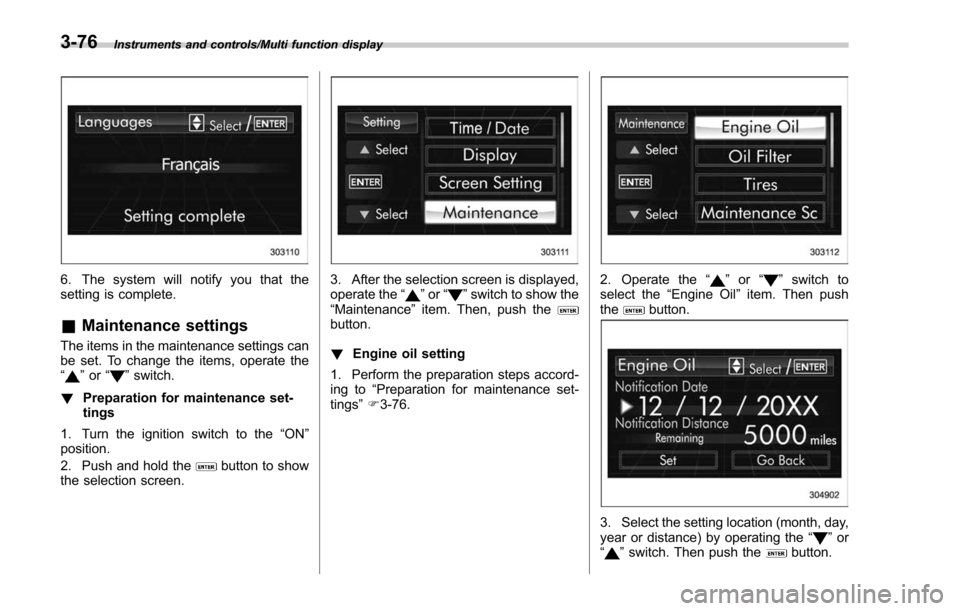
6. The system will notify you that the
setting is complete.
&Maintenance settings
The items in the maintenance settings can
be set. To change the items, operate the
“
”or “”switch.
! Preparation for maintenance set-
tings
1. Turn the ignition switch to the “ON”
position.
2. Push and hold the
button to show
the selection screen.
3. After the selection screen is displayed,
operate the “”or “”switch to show the
“Maintenance ”item. Then, push the
button.
! Engine oil setting
1. Perform the preparation steps accord-
ing to “Preparation for maintenance set-
tings ”F 3-76.
2. Operate the “”or “”switch to
select the “Engine Oil ”item. Then push
the
button.
3. Select the setting location (month, day,
year or distance) by operating the “”or
“” switch. Then push thebutton.
3-76
Page 228 of 634
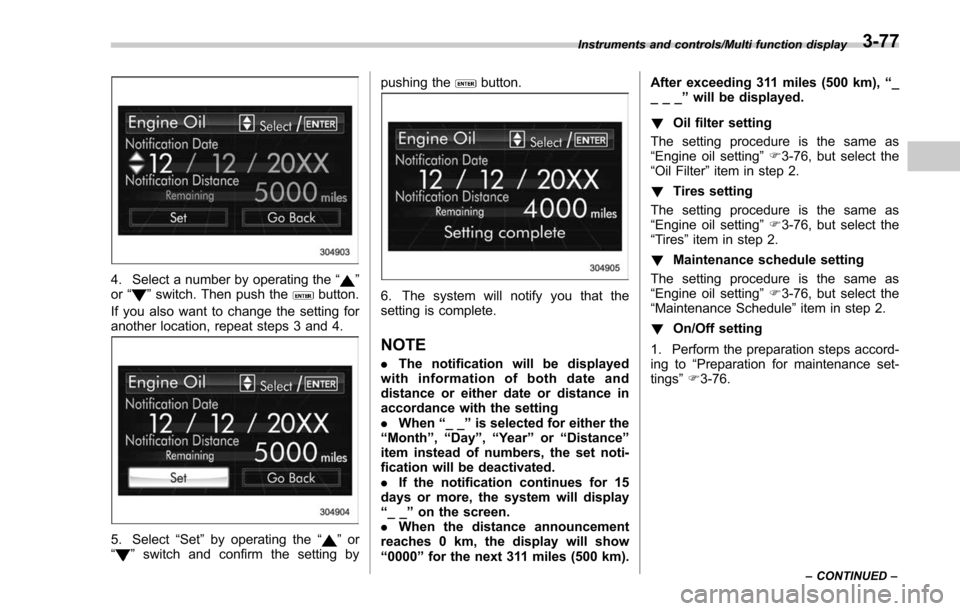
4. Select a number by operating the“”
or “”switch. Then push thebutton.
If you also want to change the setting for
another location, repeat steps 3 and 4.
5. Select “Set”by operating the “”or
“” switch and confirm the setting by pushing the
button.
6. The system will notify you that the
setting is complete.
NOTE
.
The notification will be displayed
with information of both date and
distance or either date or distance in
accordance with the setting
. When “__”is selected for either the
“ Month ”, “Day ”,“Year ”or “Distance”
item instead of numbers, the set noti-
fication will be deactivated.
. If the notification continues for 15
days or more, the system will display
“ __ ”on the screen.
. When the distance announcement
reaches 0 km, the display will show
“ 0000 ”for the next 311 miles (500 km). After exceeding 311 miles (500 km),
“_
___ ”will be displayed.
! Oil filter setting
The setting procedure is the same as
“Engine oil setting ”F 3-76, but select the
“Oil Filter ”item in step 2.
! Tires setting
The setting procedure is the same as
“Engine oil setting ”F 3-76, but select the
“Tires ”item in step 2.
! Maintenance schedule setting
The setting procedure is the same as
“Engine oil setting ”F 3-76, but select the
“Maintenance Schedule ”item in step 2.
! On/Off setting
1. Perform the preparation steps accord-
ing to “Preparation for maintenance set-
tings ”F 3-76.
Instruments and controls/Multi function display
–CONTINUED –3-77
Page 432 of 634
CAUTION
Do not place or hang anything on
the shift paddles. Doing so may
result in accidental gear shifting.
NOTE
Please read the following points care-
fully and bear them in mind when using
the manual mode.
.If you attempt to shift down when
the engine speed is too high, i.e., when
a downshift would push the tachometer
needle beyond the red zone, beeps will
be emitted to warn you that the down-
shift is not possible.
. If you attempt to shift up when the
vehicle speed is too low, the transmis-
sion will not respond.
. You can perform a skip-shift (for
example, from 4th to 2nd) by operating
the shift paddle twice in rapid succes-
sion.
. The transmission automatically se-
lects 1st gear when the vehicle stops
moving.
. If the temperature of the transmis-
sion fluid becomes too high, the “AT
OIL TEMP ”warning light on the combi-
nation meter will illuminate. Immedi-
ately stop the vehicle in a safe location and let the engine idle until the warning
light turns off.
.
For models with SI-DRIVE, by select-
ing Sport Sharp (S#) mode, upshifting
will not occur automatically. According
to the road conditions, shift change
manually so that the tachometer needle
does not enter the red zone. Also, if the
engine revolutions reach the specified
number, the fuel supply will be cut. In
this case, perform shift up operation.
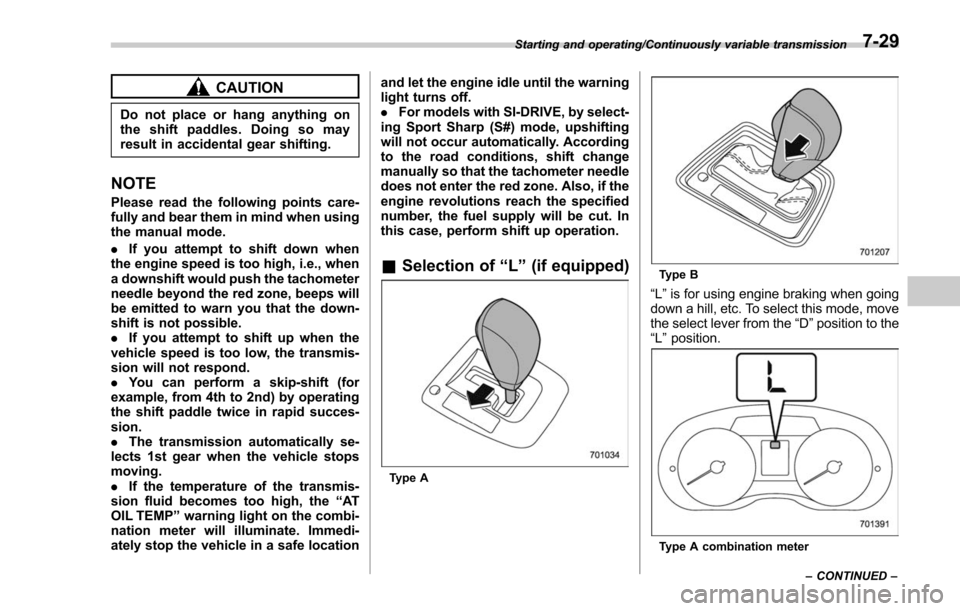
& Selection of “L ” (if equipped)
Type A
Type B
“L ” is for using engine braking when going
down a hill, etc. To select this mode, move
the select lever from the “D”position to the
“L ”position.
Type A combination meter
Starting and operating/Continuously variable transmission
–CONTINUED –
7-29
Page 447 of 634

Starting and operating/X–mode
X-mode indicator light (type A)
X-mode indicator light (type B)
To activate:
Press the X-mode switch. While the X-
mode is activated, the X-mode indicator light illuminates.
To deactivate:
Press the X-mode switch again. The X-
mode indicator light will turn off when the
X-mode is deactivated.
NOTE
.
Even if you try to activate the X-
mode by pressing the X-mode switch
when the vehicle speed is 12 mph (20
km/h) or more, the X-mode will not be
activated. At this time, a buzzer will
sound twice.
. If the vehicle speed reaches 25 mph
(40 km/h) or more while the X-mode is
activated, a buzzer will sound once and
the X-mode will be deactivated.
NOTE
For models with SI-DRIVE:
. The SI-DRIVE mode will change to
the Intelligent (I) mode when the X-
mode is deactivated.
. The SI-DRIVE mode cannot be chan-
ged while the X-mode is activated. At
this time, a buzzer will sound twice.
. While the engine is running, if any of
the following conditions is met, the X-
mode will be deactivated. In this case, it
is not possible to activate the X-mode.
Also, for models with SI-DRIVE, the mode will change to the Sport (S) mode
and it will not be possible to change to
the other modes.
–The CHECK ENGINE warning
light/malfunction indicator light illu-
minates.
– The AT OIL TEMP warning light
flashes.
– The ABS warning light illumi-
nates.
– The Vehicle Dynamics Control
warning light illuminates.
. If there is a possibility that the
engine could overheat because of a
temperature increase of the engine
coolant, it is not possible to change to
the X-mode. While the vehicle is in the
X-mode, it changes to the Sport (S)
mode when the engine coolant tem-
perature increases.
. It is not possible to activate the X-
mode when the engine is not running,
because the hill descent control func-
tion is not activated.
& Hill descent control function
The hill descent control function will be in
standby mode when the X-mode is acti-
vated and the vehicle speed is less than
approximately 12 mph (20 km/h).
The function will operate when the vehicle
7-44
Page 541 of 634
Maintenance and service/Engine oil
Engine oil
CAUTION
.If the level gauge cannot be
pulled out easily, twist the level
gauge right and left, then gently
pull it out. Otherwise, you may be
injured accidentally straining
yourself.
. Use only engine oil with the
recommended grade and vis-
cosity.
. Be careful not to spill engine oil
when adding it. If oil touches the
exhaust pipe, it may cause a bad
smell, smoke, and/or a fire. If
engine oil gets on the exhaust
pipe, be sure to wipe it off.
& Engine oil consumption
Some engine oil will be consumed while
driving. The rate of consumption can be
affected by such factors as transmission
type, driving style, terrain and tempera-
ture. Under the following conditions, oil
consumption can be increased and thus
require refilling between maintenance
intervals:
. When the engine is new and within the break-in period
.
When the engine oil is of lower quality
. When the incorrect oil viscosity is used
. When engine brakin g is employed
(repeatedly)
. When the engine is operated at high
engine speeds (for extended periods of
time)
. When the engine is operated under
heavy loads (for extended periods of time)
. When towing a trailer
. When the engine idles for extended
periods of time
. When the vehicle is operated in stop
and go and/or heavy traffic situations
. When the vehicle is used under severe
thermal conditions
. When the vehicle accelerates and
decelerates frequently
Under these or similar conditions, you
should check your oil at least every 2nd
fuel fill-up and change your engine oil
more frequently. Different drivers in the
same car may experience different results.
If your oil consumption rate is greater than
expected, contact your authorized
SUBARU retailer who may perform a test
under controlled conditions.
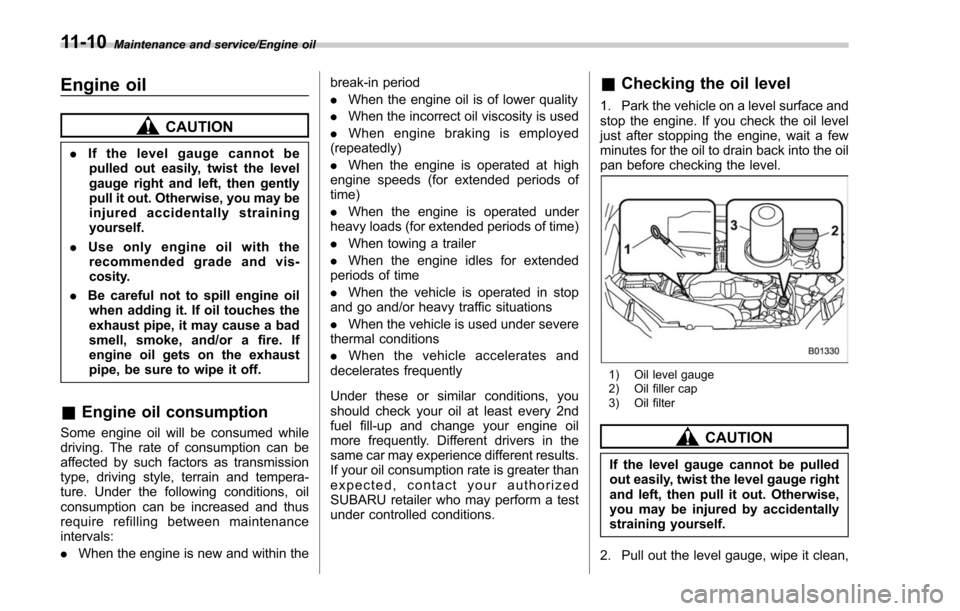
& Checking the oil level
1. Park the vehicle on a level surface and
stop the engine. If you check the oil level
just after stopping the engine, wait a few
minutes for the oil to drain back into the oil
pan before checking the level.
1) Oil level gauge
2) Oil filler cap
3) Oil filter
CAUTION
If the level gauge cannot be pulled
out easily, twist the level gauge right
and left, then pull it out. Otherwise,
you may be injured by accidentally
straining yourself.
2. Pull out the level gauge, wipe it clean,
11-10
Page 542 of 634
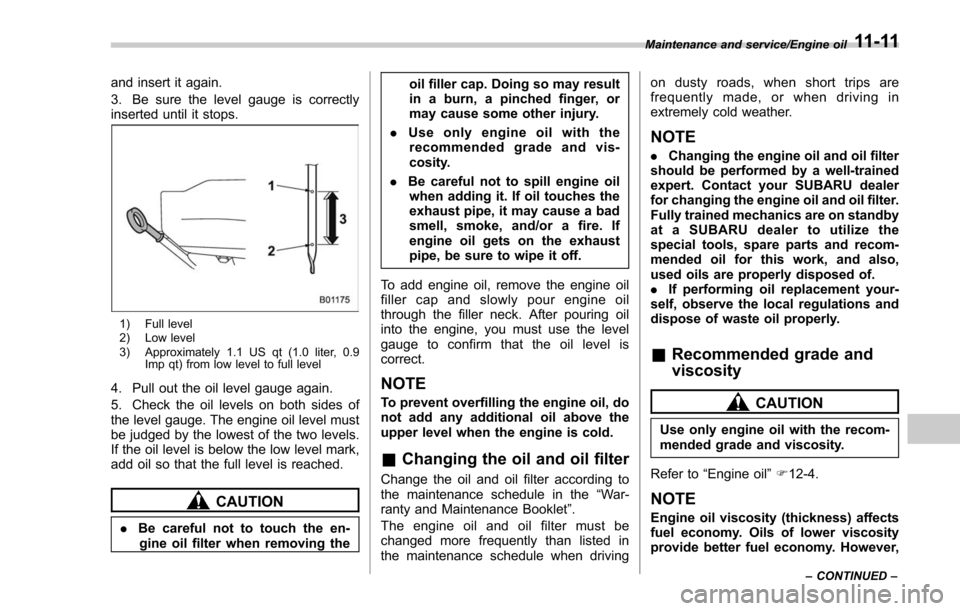
and insert it again.
3. Be sure the level gauge is correctly
inserted until it stops.
1) Full level
2) Low level
3) Approximately 1.1 US qt (1.0 liter, 0.9Imp qt) from low level to full level
4. Pull out the oil level gauge again.
5. Check the oil levels on both sides of
the level gauge. The engine oil level must
be judged by the lowest of the two levels.
If the oil level is below the low level mark,
add oil so that the full level is reached.
CAUTION
.Be careful not to touch the en-
gine oil filter when removing the oil filler cap. Doing so may result
in a burn, a pinched finger, or
may cause some other injury.
. Use only engine oil with the
recommended grade and vis-
cosity.
. Be careful not to spill engine oil
when adding it. If oil touches the
exhaust pipe, it may cause a bad
smell, smoke, and/or a fire. If
engine oil gets on the exhaust
pipe, be sure to wipe it off.
To add engine oil, remove the engine oil
filler cap and slowly pour engine oil
through the filler neck. After pouring oil
into the engine, you must use the level
gauge to confirm that the oil level is
correct.
NOTE
To prevent overfilling the engine oil, do
not add any additional oil above the
upper level when the engine is cold.
& Changing the oil and oil filter
Change the oil and oil filter according to
the maintenance schedule in the “War-
ranty and Maintenance Booklet ”.
The engine oil and oil filter must be
changed more frequently than listed in
the maintenance schedule when driving on dusty roads, when short trips are
frequently made, or when driving in
extremely cold weather.
NOTE
.
Changing the engine oil and oil filter
should be performed by a well-trained
expert. Contact your SUBARU dealer
for changing the engine oil and oil filter.
Fully trained mechanics are on standby
at a SUBARU dealer to utilize the
special tools, spare parts and recom-
mended oil for this work, and also,
used oils are properly disposed of.
. If performing oil replacement your-
self, observe the local regulations and
dispose of waste oil properly.
& Recommended grade and
viscosity
CAUTION
Use only engine oil with the recom-
mended grade and viscosity.
Refer to “Engine oil ”F 12-4.
NOTE
Engine oil viscosity (thickness) affects
fuel economy. Oils of lower viscosity
provide better fuel economy. However,
Maintenance and service/Engine oil
–CONTINUED –11-11