Page 17 of 32

Audio mode
to Bluetooth ®
Audio mode or t o a diff
er ent
audio source. In addition, it is possible to
view or change the track via the Infotainment
system. Note
● Due t o the l
arge number of different Blue-
tooth ®
audio sources in existence, it is not
possible to guarantee that all of the descri-
bed functions may be performed fault-free for
all these sources.
● To manage the media with the Bluetooth ®
connected dev
ice, consult and take into con-
sideration the manufacturer’s electronics in-
struction manual.
● Only use compatible Bluetooth ®
device
s.
You can request information concerning Blue-
tooth ®
products compatible with SEAT serv-
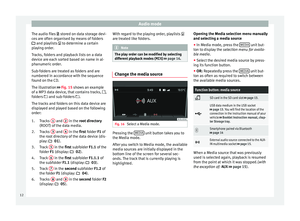
ice or through the Internet. An external audio source connected to
the A
UX
-IN mu
ltimedia socketDepending on the level of vehicle equipment,
ther
e i
s
an AUX-IN multimedia socket on the
radio front ›››
Fig. 1 4 in the stowage com-
p ar
tment
on the front passenger side, in the
centre console, or in the armrest between the
two front seats.
The AUX-IN multimedia socket can only be
used with a 3.5 mm jack plug. An external audio source connected to it can
only be p
layed over the vehicle speakers, but
cannot be controlled via the radio.
The AUX-IN multimedia socket should be acti-
vated in the system setting ››› page 21 in
order for it to appear in the Media selection
menu ››› page 12.
Connecting an external audio source to the
AUX-IN multimedia socket
● Reduce the base volume on the radio.
● Connect the external audio source to the
AUX-IN mu
ltimedia socket.
● Start playback on the external audio
source.
● In M
edia mode, press the MEDIA unit but-
t on t
o di
splay the selection menu for availa-
ble media sources ››› page 12.
● Press the function button .
The outp ut
volume of a connected external
audio source should be adjusted to that of
the other audio sources.
Adjusting the output volume
If you need to increase the output volume for
the external audio source, first lower the
base volume on the radio.
If the sound from the external audio source is
too low, increase the output volume on the
external audio source if possible. If this is not
enough, set the input volume in the system settings to
level 2 or level 3
›››
page 21.
If the sound from the connected external au-
dio source is too loud or distorted, lower the
output volume on the external audio source if
possible. If this is not enough, change the in-
put volume to level 2 or level 1 . Note
● If p l
ayback of the external audio source fin-
ishes or if the connector of the AUX-IN multi-
media socket is unplugged, the radio will re-
main in the AUX menu.
● Interference noise may be heard if the ex-
terna
l audio source is powered from the 12-
volt power socket of the vehicle.
● Please read and observe the manufactur-
er's ins
truction manual for the external audio
source. Track information display
When playing audio files containing addition-
al
tr
ac
k information (ID3 tag with MP3 files)
››› Fig. 17, various types of stored track infor-
mation can be displayed.
15
Page 18 of 32

Audio mode
Changing playback mode Fig. 18
SD card slot. Possible playback
modes. Refer to the information on the playing order
of
fi
l
es and folders ››› page 11.
Selecting play modes ● Press a function button to start the corre-
sponding p
layback mode. The function but-
ton is underlined.
Random play: The tracks play in random
order. Random playback remains active for
the corresponding media source until it is
closed for that source.
Repetition: The tracks from the playback
list are replayed.
● Press the function button again to t
ermi-
nate the current playback mode on the track
being played.
● Press the function button again to r
eplay
only the track being played. After pressing once again the repeat function is deactiva-
ted.
Tel
ephone management
Connection and use Requirements for telephone management:
Your mo
b
ile telephone is connected via Blue-
tooth ®
to the infotainment system.
Connection between the mobile telephone
and the infotainment system ● Please note the information concerning
›› ›
page 14
● Press the PHONE unit button.
● In the Bluetooth ®
menu of
y
our mobile tel-
ephone, search for the name that is shown
on the screen.
● If necessary, please note the instrucctions
concernin
g ›››
page 14
● To complete the pairing of the telephone,
res
pond to the respective references of both
devices.
Changing the volume
Playback of media and telephone calls stem-
ming from the connected mobile telephone is
realised through the vehicle’s speaker. If the voice control in the connected mobile
telephone i
s activated, the voice communica-
tions are also broadcast through the vehi-
cle’s speaker.
The playback volume can be modified with
the volume control .
In addition, the volume of the navigation in-
structions can be regulated in the sound
settings menu.
If the unit volume (display: ), is muted, it
also stops a media source that may be re-
peating in the connected Smartphone. Note
● To m an
age the media and the telephone
with the connected mobile telephone, consult
and take into consideration the manufactur-
er’s electronics instruction manual.
● Only use compatible Bluetooth ®
device
s.
You can request information concerning Blue-
tooth ®
products compatible with SEAT serv-
ice or through the Internet. 16
Page 19 of 32

Audio mode
Telephone functions Fig. 19
Connected telephone. Fig. 20
Dialling the number with the menu
b utt
on. Once the telephone is properly connected,
y
ou c
an m
anage the call functions from mo-
bile telephone paired with the infotainment
system ››› Fig. 19. Dialling numbers:
Pres
s the function button ››› Fig. 19 to
show the dialled number panel ››› Fig. 20.
You can select a number here with the right
rotary knob and confirm by pressing it. If the
number is complete, the call can be initiated
through the handset ››› Fig. 20.
In addition, there are the following possibili-
ties here:
● : dial the emergency call 1)
.
● : it c
onnects you to the SEAT breakdown
ser v
ice 1)
.
● : it t akes to the SEAT information hotline 1)
.
●
: it initiates a call to your inbox. For that,
the fir
st time that you may select it, it shall be
requested that you insert your inbox number.
Directory:
Press the function button ››› Fig. 19 to
show the directory. You shall find all of the
contacts from your mobile telephone in the
directory, that you may select one by one
with the right rotary knob and establish the
communication by pressing it, or for a start
access a list of available numbers. For that,
during the first connection, you must have
confirmed the transfer of the mobile tele-
phone contacts. You shall be able to save a selected contact as a favourite via the star
butt
on.
R
ecord of calls:
Press the function button ››› Fig. 19 to
show the record of calls. All of the calls from
your mobile telephone shall be shown here
once you have confirmed the transfer of the
mobile telephone contacts.
● ALL : shows all of the calls in chronological
order
.
● : show s only the lost calls.
●
: show s only the calls received.
●
: shows only the calls made.
The f
unction button saves an entry as a fa-
vourite.
Inbox:
Press the function button ››› Fig. 19 to
hear the content of the inbox. For that, the
first time that you may select it, it shall be re-
quested that you insert your inbox number.
Emergency call: 1)
Press the function button ››› Fig. 19 to
make an emergency call. 1)
Not in all markets.
17
Page 20 of 32

Audio mode
Favourites Fig. 21
Favourites view. Favourites view.
Pr
e
s
s the function button ››› Fig. 19 to
change the favourites view ››› Fig. 21. Once a
an empty position from the favourites is se-
lected, you shall access the directory, where
you may select a contact as a favourite. The
selection of an occupied position makes it
necessary to dial the corresponding tele-
phone number. Using the telephone Fig. 22
Current phone call. Incoming call:
If
y
ou receive a call, you have three possibili-
ties:
● accepting the call with function button .
● muting the call signal volume with the
function b
utton .
● rejecting the call with the function button
.
The active ca
ll
If you accept the incoming call, you have
these possibilities during the call ››› Fig. 22:
● Press the function button to send out
DTMF
tones (e.g. to control an answering ma-
chine).
● Press the function button to hol
d the con-
versation. ●
Pre s
s the function button to silence the
microphone.
● With ends the c
all.
Settings on the connected telephone Through the
MENU unit button, the telephone
setting s
are accessed: The following setting
possibilities are available:
Hands-free : If there is an active call, you can continue
it on the mobile telephone or retake it on the infotain-
ment system.
Telephone selection : Alternating between the tele-
phones recognized by the infotainment system, or
searching for new devices.
User profile : Selecting settings for the currently
connected telephone:
Managing the favourites (e.g. deletion).
Defining or modifying the inbox numbers.
Modifying the directory order sequence.
Downloading the contacts again.
Activating/deactivating the announcement on the
mobile telephone upon turning off the engine.
Select a call tone (only if the telephone does not
transmit any tone).
Bluetooth ®
: You can choose settings here for the tele-
phone connection. For example, it is possible to delete
known devices. 18
Page 21 of 32

Audio mode
Note
● A devic e c
onnected via Bluetooth ®
, if it
supports this profile, it shall always be used
at the same time for calls and audio via Blue-
tooth ®
.
● To manage the media and the telephone
with the connect
ed mobile telephone, consult
and take into consideration the manufactur-
er’s electronics instruction manual. Drive Mii App*
Intr oduction Fig. 23
Main menu Connection of the applica-
tion. You shall have the following options through
the
Sm
ar
tphone: Navigation via Smartphone with the navi-
gation announc
ements through the ra-
dio.
Display of the ECOTRAINER tutor.
Indication of travel data.
Indication of the revolution counter, etc.
Search in the all of the input fields.
Via the radio, you can also use the telephone
function from your Smartphone connected
with the right setting button. Note
For management of the telephone and multi-
media, and f or n
avigation with the connected
Smartphone, read and take into considera-
tion the manufacturer’s electronics instruc-
tion manual. Connection and use
Requirements: Y
our
Sm
artphone is connec-
ted ›››
page 13 to the radio via USB and in
your Smartphone the SEAT application is in-
stalled to connect Smartphone to the radio 1)
.
Insert the Smartphone into the holder and
turn it on. The mounting and dismantling of 1 2
3
4
5 the unit and the holder is described in the ve-
hic
l
e in
struction manual. ››› Booklet Instruc-
tion manual.
Connection between the Smartphone and ra-
dio
● Press the MENU unit button to start the
m ain menu.
● The sel ect
and activate the Connection
function of the application with the
setting b
utton.
Once the connection is made, you can man-
age the music playback from the radio via the
Smartphone. You can initiate the navigation
in the Smartphone and listen to the naviga-
tion instructions through the vehicle’s audio
system.
Instructions for the navigation
Navigation announcements are heard
through the vehicle speakers. In this respect
take note of the instructions in Changing the
volume ››› page 20
The management is done via the connected
Smartphone ››› page 20. »1)
For further information about the application with
re g
ard to its installation and handling, take note of
the information is included in the vehicle. 19
Page 22 of 32

Audio mode
Changing the volume
M u
ltimedi
a playback, the navigation instruc-
tions and the telephone conversations that
the connected Smartphone transmits are
heard through the vehicle’s speakers.
The playback volume can be modified with
the volume control .
You can also regulate the volume of the navi-
gation announcements in the sound set-
tings menu ››› table on page 21.
When the unit volume is muted (display: ),
it also stops the playback of the multimedia
sources that repeat in the connected Smart-
phone. Note
● If y
ou desire more information concerning
the l installation and handling of the applica-
tion, consult the information provided with
the vehicle.
● To manage the media and telephone and to
navig
ate with the connected Smartphone,
consult and take into consideration the man-
ufacturer’s electronics instruction manual.
● A device connected via Bluetooth ®
, if it
sup
ports this profile, it shall always be used
at the same time for calls and audio via Blue-
tooth ®
and the connection for applications.
● Only use compatible Bluetooth ®
device
s.
You can request information concerning Blue-
tooth ®
products compatible with SEAT serv-
ice or through the Internet. 20
Page 23 of 32

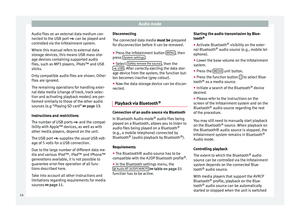
Change settings Displaying settings menus and changing set-
ting
s
● Pr
ess the MENU unit button.
● Select the desired setti")
Settings menu
Settings menu S y
s
tem and functions settings
(SETUP)
Change settings Displaying settings menus and changing set-
ting
s
● Pr
ess the MENU unit button.
● Select the desired setting with the settings
b utt on and c
onfirm by pressing it slightly.
● Select the submenu with the settings but-
ton.
● Choose the de
sired setting with the set-
tings
button.
● Confirm changes by pressing the settings
button s
lightly.
● Press the MENU unit button, function but-
t on t
o c
lose the SETUP menu.
While volume settings are being adjusted,
the currently active audio source is played at
the level of the setting as it changes.
Overview of available settings menus
The selection of possible settings will de-
pend on the country, the unit in question and
the vehicle equipment.
Menu options: submenus with repercussion
Radio settings : Settings are made here that affect
the Radio mode.
Arrow buttons : Regulate the operation of the but-
tons with arrow and to change the station in ra-
dio mode ››› page 6.
Preset list : All available stations on the selected
frequency band can be browsed with the arrow but-
tons.
Station list : All stored stations are browsed
with the arrow buttons.
Traffic Program (TP)
: Traffic stations an-
nouncements ››› page 7
Radio text
: Radio text display
Delete presets : Deleting stored stations.
Delete all: All stored stations will be deleted.
By selecting a special memory only some stations
are deleted. Memories containing a station stand
out visibly, are identified with a frequency and have
a bin symbol at the end of the line.
FM station list a)
:
Alphabetically : In alphabetic order.
Group: Sorted by groups.
FM Advanced settings :
Regional RDS:b)
: It is possible to switch off RDS-
dependent services for travel in areas where there is
no RDS coverage (automatic station tracking, traffic
news TP) ››› page 6.
Menu options: submenus with repercussion
Automatic : Automatic change an RDS regional
programme.
Fixed : Stations that accept RDS are manually se-
lected.
Frequency switching (AF)
: Automatic sta-
tion tracking ››› page 6.
If the function is active, while in motion it always
changes the frequency of the set radio station,
which at that time can be set better. This happens
even if it interrupts a set regional broadcast.
If the function is deactivated, there is no frequen-
cy change. The frequency tuned is active until re-
ception is interrupted.
DAB Advanced settings :
DAB traffic announcements
: If there are
announcements of a traffic radio station available,
they are played directly in the active DAB Radio
mode. The traffic announcements of FM traffic news
stations are ignored. If this feature is deactivated or
if the current DAB set does not offer a TP service,
traffic announcements of an FM traffic radio station
are reproduced directly in the active DAB Radio
mode ››› page 7.
Other DAB alerts
: DAB announcements
(news, sport, weather, warnings, etc.) are played
during the active DAB radio mode.
DAB-DAB station tracking
: Automatic sta-
tion tracking in DAB radio mode. If the current DAB
station is broadcast on another channel due to a
change in location, this channel is switched to auto-
matically (factory setting).
» 21
Page 24 of 32

Settings menuMenu options: submenus with repercussion
DAB-FM Automatic switching
: Switching to
FM frequency band is allowed for automatic station
tracking ››› page 23.
Media settings : You can set the settings here for the
Media mode.
Mix/Repeat including subfolders
: It estab-
lishes that random play and repeat play can include
any existing subfolders. The setting only affects the
playback of MP3/WMA files.
Selecting Bluetooth device : Selection of the
Bluetooth device that has to be used for the playback
or the telephone.
Application connection : The settings of this menu
option are only available when there is a connected de-
vice.
Telephone settings : Settings for the pairing with a
Smartphone compatible with Bluetooth®.
Sound setup :
Volume:
Maximum switch-on volume : Here you can set
the volume needed to turn on the unit. To set it, use
the +
and - buttons or the settings button.
Announcements
: Here you can set the volume of
the notifications from the traffic stations (TP). To set
it, use the +
and - buttons or the settings button.
Speed-dependent control
: The speed-depend-
ent volume regulation automatically increases the
volume as the vehicle speed increases ››› page 23.
Menu options: submenus with repercussion
AUX volume : Adjust the input volume of an exter-
nal audio source (AUX) to the output volume of the
other audio sources.
BT audio : To adjust the input volume of an exter-
nal audio source (Bluetooth®) to the playback vol-
ume of the other audio sources.
Balance - Fader : To adjust the distribution of the
sound.
Treble - Mid - Bass : To adjust the characteristics
of the sound.
System settings :
Screen:
Switch off screen (in 10 seconds)
:
The screen turns off automatically if during the set
time no operation is performed. As soon as one of
the buttons on the unit, function buttons or knobs is
operated, the display becomes active and displays
the last active dialogue.
Brightness : Selecting screen brightness from
Maximum brightness to Maximum darkness .
Show clock in standby mode
: When the
unit is off, the display shows the current time.
Colour : Here you can select marking colours for the
screen.
Language : Here you can set the desired language for
the user interface. Alternatively you can also let it auto-
matically select the language of the instrument cluster.
Bluetooth :
Menu options: submenus with repercussion
Bluetooth
: Press to deactivate Bluetooth ®
. All
of the existing connections shall be disconnected.
Visibility : Activating and deactivating the Blue-
tooth ®
.
Visible : The Bluetooth ®
visibility is deactiva-
ted.
Not visible : Bluetooth®
visibility is deactiva-
ted. The Bluetooth ®
visibility has to be activated
for the external pairing of a Bluetooth ®
device
with the Infotainment system.
Name : To display or change the name of the device.
This name will be displayed to other Bluetooth ®
de-
vices in the Bluetooth settings ®
.
Paired devices : Displays paired devices. Discon-
nection and connection of individual Bluetooth ®
de-
vices and Bluetooth ®
profiles.
Find a device : Search for visible Bluetooth ®
de-
vices within the range of the Infotainment system.
The maximum range is approx. 10 metres.
Bluetooth audio (A2DP/AVRCP)
: This func-
tion must be activated if it has to connect an external
audio source via Bluetooth ®
to the Infotainment sys-
tem. ››› page 14.
Application connection :
Active transfer of data
:
Record:22