Page 1 of 32
YOU&Mii
COLOUR CONNECTION
Owner’s manual
1SL012720CB
Inglés
1SL012720CB (08.16)
Page 2 of 32

SEAT S.A. is permanently concerned about continuous development of its t\
ypes and models. For this reason we ask you to under-
stand, that at any given time, changes regarding shape, equipment and te\
chnique may take place on the car delivered. For this reason
no right at all may derive based on the data, drawings and descriptions \
in this current handbook.
All texts, illustrations and standards in this handbook are based on the\
status of information at the time of printing. Except for error
or omission, the information included in the current handbook is valid a\
s of the date of closing print.
Re-printing, copying or translating, whether total or partial is not all\
owed unless SEAT allows it in written form.
SEAT reserves all rights in accordance with the “Copyright” Act.
All rights on changes are reserved.
❀This paper has been manufactured using bleached non-chlorine cellulose.
© SEAT S.A. - Reprint: 15.08.16
About this manual
This manual contains information, recommen-
dations, advice and warnings related to your
radio system. The other publications in the
vehicle documentation contain further infor -
mation of which you should be aware for your
own safety and for that of your passengers.
Ensure that the onboard documentation is
kept in the vehicle at all times. This is espe -
cially important when lending or selling the
vehicle to another person.
This manual contains a description of the
equipment supplied with the vehicle at the
time of press. Some of the units described
herein will not be available until a later date or
is only available in certain markets. The
illustrations are intended as a general
guide and may vary from the equipment �tted
in your vehicle in some details.
The screen colour and the colour of the infor -
mation displayed on it can vary according to
vehicle model.
Directions and positions of components (e.g.
right, left, front, rear) are always relative to the
direction of travel of the vehicle unless other -
wise stated.
The equipment marked with an aster -
isk* is �tted as standard only in certain
versions, and is only supplied as op -
tional extras for some versions, or are
only offered in certain countries.
® All registered marks are indicated with
®. Although the copyright symbol does
not appear, it is a copyrighted mark.
>> The section is continued on the follow -
ing page.
WARNING
Texts preceded by this symbol contain infor -
mation on safety. They warn you about possi -
ble dangers of accident or injury.
CAUTION
Texts with this symbol draw your attention to
potential sources of damage to your vehicle.
For the sake of the environment
Texts preceded by this symbol contain rele-
vant information concerning environmental
protection.
Note
Texts preceded by this symbol contain additio -
nal information.
Page 3 of 32

Table of Contents
Table of Contents
Ov er
v
iew . . . . . . . . . . . . . . . . . . . . . . . . . . . . . 2
Unit overview . . . . . . . . . . . . . . . . . . . . . . . . . . . 2
Introduction . . . . . . . . . . . . . . . . . . . . . . . . . . 4
General operating information . . . . . . . . . . . . . 4
Audio mode . . . . . . . . . . . . . . . . . . . . . . . . . . . 6
Radio mode . . . . . . . . . . . . . . . . . . . . . . . . . . . . 6
Digital radio mode (DAB, DAB+ and audio
DMB)* . . . . . . . . . . . . . . . . . . . . . . . . . . . . . . . . . 9
Media mode . . . . . . . . . . . . . . . . . . . . . . . . . . . . 11
Telephone management . . . . . . . . . . . . . . . . . . 16
Drive Mii App* . . . . . . . . . . . . . . . . . . . . . . . . . . 19
Settings menu . . . . . . . . . . . . . . . . . . . . . . . . 21
System and functions settings (SETUP) . . . . . . 21
Other information . . . . . . . . . . . . . . . . . . . . . 24
Abbreviations . . . . . . . . . . . . . . . . . . . . . . . . . . . 24
Index . . . . . . . . . . . . . . . . . . . . . . . . . . . . . . . . . 25
1
Page 4 of 32
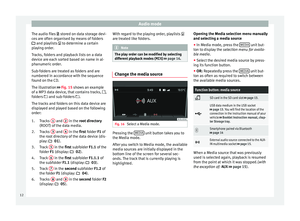
Overview
Overview Unit o
v
erview Fig. 1
Overview of the controls.
1 ››› page 4, ››› page 5
2 ››› page 13
3 ››› page 21 4
››› page 15
5 ››› page 4
6 ››› page 6 7
››› page 11
8 ››› page 4
9 ››› page 16 10
››› page 3
2
Page 5 of 32

Overview
Main menus
● To access the main menu, press the equi-
pment's MENU button
›››
Fig. 1
10 .
● To select a function, rotate the set Button
› ›
›
Fig. 1 5 until observing it and press said
settin g b
utt
on.
Radio
RADIO Main menu
››› page 6
RDS ››› page 6
TP Function ››› page 7
Change frequency band ››› page 8Changing station ››› page 8
Storing stations ››› page 9
Tuning in to stored stations ››› page 9
Digital Radio Mode ››› page 9
Media
Media sources and audio files
››› page 11
Playback order ››› page 11
Selecting a Media source ››› page 12
SD card ››› page 13
USB port ››› page 13Bluetooth ››› page 14
AUX-IN socket ››› page 15
Track information ››› page 15
Changing the playback mode ››› page 16
SoundSound and volume setup
››› table on page 21
TelephoneConnection and operation
››› page 16
Telephone functions ››› page 17
Favourites ››› page 18Using the telephone ››› page 18
Connected telephone settings ››› page 18
Drive Mii App ››› page 19
SetupRadio
››› table on page 21
Media ››› table on page 21
Application connection ››› table on page 21Telephone ››› table on page 21
Sound ››› table on page 21
System ››› table on page 21
Drive Mii App
*Connection and operation ››› page 19 3
Page 6 of 32

Introduction
Introduction Gener a
l
operating information
Safety notes WARNING
Distracting the driver in any way can lead to
an acc ident
and cause injuries. Operating the
radio system while driving can distract you
from the road traffic.
● Always drive responsibly paying careful at-
tention to the tr
affic.
● Select volume settings that allow you to
eas
ily hear signals from outside the vehicle
at all times (e.g. emergency services sirens
and horns).
● Hearing may be impaired if using too high a
volume settin
g, even if only for short periods
of time. WARNING
The volume level may suddenly change when
you sw it
ch audio source or connect a new au-
dio source.
● Reduce the base volume before switching
audio source or c
onnecting a new audio
source. WARNING
Connecting, inserting or removing a data me-
dium whil e driv
ing can distract your attention
from the traffic and cause an accident. WARNING
Connecting leads for external devices may
ob s
truct the driver.
● Arrange the connecting leads so that they
do not ob
struct the driver. WARNING
External devices that may be loose or not
properly sec
ured, could move be thrown
around the passenger compartment during a
sudden driving or braking manoeuvre or an
accident and cause damage or injury.
● Never place or set external devices on the
doors, on top of
or near the area marked with
the word “AIRBAG” of the steering wheel, the
dash board or the backrests, nor between
these areas and the passengers. External de-
vices can cause serious injury in the event of
an accident, especially when the airbags in-
flate. CAUTION
The vehicle loudspeakers may be damaged if
the v o
lume is too high or the sound is distor-
ted. Additional displays
Depending on the vehicle, the factory-set as-
si
s
tance systems are temporarily displayed
on the screen. These displays disappear au-
tomatically when they are no longer required.
All instructions appear only after completely
restarting the radio system. Note
● To oper at
e the equipment just press the
buttons gently.
● Due to country-specific legislation, certain
function
s cannot be selected when the vehi-
cle is travelling above a certain speed.
● Using a mobile telephone in the vehicle
may
cause noise from the vehicle loudspeak-
ers.
● On some vehicles with ParkPilot, the vol-
ume of the audio sourc
e is automatically low-
ered when reverse gear is selected. Rotary/push knobs, unit and function
b
utt
on
s Overview
● Rotary/push knobs.
● Labelled u nit buttons
(h
ar
d keys).
● Function buttons (soft k
eys).
4
Page 7 of 32

Introduction
Rotary/push knobs
L ef
t
rotary knob ››› Fig. 1 1 is used as the
v o
lume c
ontrol or on/off button.
The right-hand rotary/push knob 5 is refer-
r ed t
o a
s the setting knob.
Unit buttons and function buttons
The labelled buttons on the unit are referred
to as “unit buttons” and are pictured as a
button symbol with blue content, e.g. MEDIAunit button
›››
Fig. 1 7 .
Ther e ar
e 6 u
nlabelled unit buttons below the
screen ››› Fig. 1 8 . These unit buttons are re-
f err
ed t
o as “function buttons” as their func-
tions depend on the active function mode.
The function assigned to a function button is
shown on the corresponding button in the
lower section of the display (e.g. ››› Fig. 2).
Switching on and off ●
To manually switch the Infotainment sys-
t em on and off
, briefly
press rotary knob
››› Fig. 1 1 .
When the u nit
i
s switched on the system
starts up. The last audio source used shall be
replayed at the last selected volume setting,
provided this does not exceed the preselec-
ted “switch-on volume” ( Volume›››
pag e 21). D
epending on the unit and country in ques-
tion, the unit i
s switched off when the engine
is turned off or the key is removed. If the unit
comes on again without the ignition being
switched on, it will switch off automatically
after 30 minutes (switch-off delay).
Energy management
If, when the ignition is switched off and the
unit switched on, the battery voltage falls be-
low the minimum onboard power supply volt-
age, an audible warning sounds and LOW
BATTERY appears. You should switch the
unit off.
Anti-theft encryption
Once the anti-theft code has been entered for
the first time, it remains stored in the vehicle
(convenience radio coding). If the anti-theft
code has to be inserted manually, e.g. due to
the unit having been installed in another ve-
hicle, please contact a SEAT dealership.
If only the battery terminals have been dis-
connected, switch the ignition on before turn-
ing the unit on again.
Changing basic volume
FunctionOperation
Increasing the
volume.Turn the volume control ››› Fig. 1 1clockwise.
FunctionOperation
Decreasing
the volume.Turn the volume control anti-clock-
wise. Changes to the basic volume are indicated by
a “bar sho
wn briefly
on the screen”.
It is possible to preset certain volume set-
tings and adjustments ››› page 21.
Muting the unit
● Turn the volume control anti-clock
wise
until it displays .
● OR: briefly press the volume control to
activ
ate or deactivate the volume muting
function.
The Media source currently being played is
stopped while the unit is muted. Note
If the base volume has been considerably in-
cr e
ased to play a certain audio source, lower
the volume again before switching to another
audio source. 5
Page 8 of 32

Audio mode
Audio mode
R a
dio mode
Intr
oduction The radio system is supplied in different ver-
sion
s
depending on the country and model
and the vehicle equipment in which it is in-
stalled. Some units are also equipped with a
DAB radio receiver ››› page 9. The possible
radio system versions appear in the overview
of the controls ›››
page 2. Note
● Be ar in mind th
at being underground, in
tunnels, in areas with tall buildings or moun-
tains can interfere with radio signals.
● Foil or metal-coated stickers attached to
the window
s may affect reception on vehicles
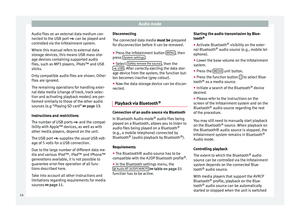
with a window aerial. RADIO main menu
Fig. 2
RADIO main menu: selecting the fre-
quency b and. Fig. 3
RADIO main menu: Station buttons dis-
p l
a
yed. ●
Press the RADIO button in order to start Ra-
dio mode.
Af t
er c
hanging to Radio mode, the available
frequency bands (FM, AM 1)
and DAB 1)
) are in-
itially displayed in the bottom line of the
screen ››› Fig. 2. If the RADIO unit button ispressed again, the functions for the radio re-
c
eiv
er sh
all be shown ››› Fig. 3.
You have the following available options: ● Searching for the next station.
● Turning a stored station back on.
● Switching on the TP function ›››
page 7.
● Store the selected station ›››
page 9.
The station that you are currently listening to
is shown in the middle of the screen. If the
station accepts RDS and the reception is
good, the station name shall be displayed in-
stead of the frequency, e.g. RADIO 21.
RDS and automatic station tracking RDS is a radio data service that allows the
di
s
p
lay of the station name, automatic sta-
tion tracking and the TP function (traffic infor-
mation station ›››
page 7).
With the automatic station tracking the unit
always switches to the frequency that offers
the best reception of the current radio station
as the vehicle travels from one area to the
next. If the reception is poor, the unit may be
muted for a short time as it searches for alter-
native frequencies (AF). 1)
This depends on the country and unit in question.
6


")
