Page 57 of 130

3.3
“Frequencies” mode
This mode allows stations to be
searched for either manually or au-
tomatically by scanning the selected
range of frequencies.
To scan the frequency range, you have
two options:
– manual search: scan through the fre-quencies by successively pressing
the frequency area 4 or by press-
ing 5;
– automatic search: move forwards or backwards to the next station by tap-
ping 6.
4
66
Frequencies Stations Presets
Band
55
“Stations” mode (FM only)
This mode allows you to find a station
by name from an alphabetical list. It
is possible to scan up to 50 available
radio stations.
Flick the list to scroll through all the sta-
tions. The radio station 7 you stopped
on is played. You can also press a radio
station on the list to play.
Band FM
Frequencies Stations Presets
The names of the radio stations that do
not use the RDS system or if the vehicle
is located in a bad radio reception area,
they will not appear on the screen. Only
their frequency is displayed and sorted
at the beginning of the list.
LISTENING TO THE RADIO (2/8)
Frequencies Stations Presets
Band
123
7
FM
Page 58 of 130
.
Press one of the butto")
3.4
“Presets” mode
This mode allows you to recall on
demand those stations which you have
already stored (refer to information on
“Saving a station” in this section).
Press one of the buttons 8 (numbered
1 to 12) to select the radio station you
wish to listen to.
LISTENING TO THE RADIO (3/8)
“Save as preset”
This function stores the station cur-
rently being played. To do this:
– from Frequencies or Stations mode, press 9, then Save as preset and
select a location 8.
Or
– from the “Presets” mode, press and hold one of the buttons 8 until you
hear a beep and a message is dis-
played at the top of the screen.
You can store up to 12 stations per
band.
8
Band
Frequencies
StationsPresets
You can select a saved station using
the steering wheel control.
9
Pop-up menu
9
Depending on the band selected (AM or
FM) and the mode you are in, press 9
to:
– “Change source”;
– “Save as preset”;
– access Settings radio;
– access Sound settings.
“Change source”
This function allows you to change the
audio source (Radio, USB, AUX, etc.).
Frequencies Stations Presets
Band
89
Page 59 of 130

3.5
“Settings”
From this menu, you can activate or de-
activate the following elements:
– “AM";
– “Radio text”;
– “Region”;
– “TA / I-Traffic”;
”AM“
This menu enables you to activate/de-
activate the band AM.
“Radio text”
(Text information)
Some FM radio stations broadcast
text information relating to their pro-
grammes (e.g. song titles).
Note: This information is only available
for certain radio stations.
LISTENING TO THE RADIO (4/8)
“Region”
The frequency of an “FM” radio station
may change depending on the geo-
graphical area.
Activate this function to continue listen-
ing to the same radio station while driv-
ing. The audio system will automatically
track frequency changes without inter-
ruption.
Note: Stations in the same network
sometimes broadcast different pro-
grammes or use different programme
service names.“TA / I-Traffic”
(Traffic information)
When this function is activated, your
audio system makes it possible to auto-
matically receive traffic bulletins when
they are broadcast on certain FM radio
stations (depending on the country).
If the “Region” function is activated,
the “Region” function always has
priority over the “AF" function.
Page 60 of 130

– Stations mode 11;
– Presets mode 12.
“Channels” mode
This mode allows the user to manually
search for station by scanning, press-
ing one of the buttons 14")
3.6
LISTENING TO THE RADIO (5/8)
– Stations mode 11;
– Presets mode 12.
“Channels” mode
This mode allows the user to manually
search for station by scanning, press-
ing one of the buttons 14.
Stations and Presets mode
Please refer to information “Stations”
mode and “Presets” mode above.
Pop-up menu 13Depending on the mode you are in, by
pressing 13 you can:
– access Interactive;
– “Change source” (Radio, USB etc.) ;
– “Save as preset”;
– “Update list”;
– access the “Settings” or “Multimedia Settings” of the DR mode.
“Interactive”
Press 13 then “Interactive” to:
– access EPG;
10
11
12
14
13
Channels Stations Presets
BandDR
« DR »
Choosing a DR station(digital radio)
Digital radio offers a greater choice of
radio stations, better listening quality
and additional information.
There are different modes for choos-
ing a radio station. After choosing
DR, select the mode by pressing one
of the three available tabs:
– Channels mode
10; – access Intellitext;
– access Slideshow;
– access Graphic service.
“EPG”
(EPG)
This menu is used to check DR pro-
gramme schedules.
“Intellitext”
This feature allows access to text
information recorded on some radio
stations. You can scroll through
the text to display new updates on
business, politics, health, weather
and sports.
Note: This information is only avail-
able for certain DR stations.
Page 61 of 130
3.7
“Graphic service”
This menu is used to see the web-
site provided by the current station
when you have a connection.
“Slideshow”
This menu is used to see images
provided by the station in slide-
show.
Storing a station
From “Channels” mode or “Stations”
mode, press 13 then “Save as preset”.
You can also give a long press on one
of the preset buttons until you hear a
beep.
You can store up to 12 stations per
band.
“Update list”
Select this menu to update the list of
radio stations.
LISTENING TO THE RADIO (6/8)
13
Channels Stations Presets
BandDR
You can also access this menu by
pressing
15.
Note: The slideshow 15 is dis-
played when Timeshift function
(direct control) is deactivated.
“Change source”
This function allows you to change the
audio source (Radio, USB, AUX, etc.).
Channels Stations Presets
BandDR
15
Channels Stations Presets
Band
13
Page 62 of 130

“Settings”
From modes Channels, Stations or
Presets, press 13 then Settings to
access the digital radio settings. From
the settings, you can activate or deacti-")
3.8
LISTENING TO THE RADIO (7/8)
“Settings”
From modes Channels, Stations or
Presets, press 13 then Settings to
access the digital radio settings. From
the settings, you can activate or deacti-
vate the following elements:
– “Radio text”;
– “Simulcast/Handover”;
– “Time shift”;
– “TA / I-Traffic”;
– “I-Announcement”.
“Radio text”
(text information)
Some digital radio stations broadcast
text information relating to their pro-
grammes (e.g.: song titles).
Note: This information is only available
for certain radio stations.
“Time shift”
Timeshift
This function enables you to listen to
the radio station using the scroll bar 17.
Press 16 to pause the audio system
and start recording the current station.
Press
to restart playback of the re-
corded station. After playing, you can
move playing by using scroll bar 17.
Note: Press Live or wait for the scroll
bar to reach the end to go back to lis-
tening to the radio station live.
17
“Simulcast/Handover”
When current digital radio station has
poor reception, activate this function so
that your audio system can automati-
cally reconnect to the same station as
your current FM station.
13
Channels Stations Presets
BandDR
16
Channels
Stations Presets
BandDR
Page 63 of 130
3.9
“TA / I-Traffic”
(traffic information)
Depending on the country, your audio
system makes it possible to automati-
cally receive traffic bulletins when they
are broadcast on certain digital radio
stations.
LISTENING TO THE RADIO (8/8)
“I-Announcement”
Press “I-Announcement” then activate
or deactivate below announcements.
For each activated announcement,
your audio system makes it possible to
automatically receive information when
it is broadcast on certain digital radio
stations:
– “Transport news”;
– “Warning”;
– “Information”;
– “Weather”;
– “Event”;
– “Special Event”;
– “Radio Info”;
– “Sport”;
– “Finance”.
Page 64 of 130

From the main folder, you can access:
– the audio files;
– the folders, music, genres, artists, albums and playlists;
– the folders and/or audio files.
Note: Only available s")
3.10
MEDIA (1/2)
From the main folder, you can access:
– the audio files;
– the folders, music, genres, artists, albums and playlists;
– the folders and/or audio files.
Note: Only available sources can be
selected. Unavailable sources won’t be
shown on the screen.
“Player”You can choose between playing all the
tracks or playing a single track.
2
Player Current list
345
1
Navigate toUSB
“Multimedia”
menu
From the main menu, press
“Multimedia”, then “Media”.
“Media”
This menu enables you to listen to
music from an auxiliary source (audio
CD, USB, SD card, etc.).
Select an input source connected to
the system to access the audio files
from the following list:
– “USB-1" (USB port);
– “USB-2" (USB port);
– “SD” (SD card);
– “CD" (audio CD or MP3);
– “AUX-1" (Jack socket);
– “AUX-2" (Jack socket).
Note: the input sources described
above may vary.
Note: depending on the audio source
selected, certain functions cannot be
accessed. When playing a track, you can:
– access the current playback list
1;
– access the next track by pressing 2 or press and hold to fast forward
through the current track.
– pause by pressing 3;
– access the previous track by press- ing 4;
– view the scroll bar 5 and operate it
for certain media.
Note: depending on the input source
connected, the display on the multime-
dia screen will vary.
Navigate to
Player Current list
1
2345
 1
1 2
2 3
3 4
4 5
5 6
6 7
7 8
8 9
9 10
10 11
11 12
12 13
13 14
14 15
15 16
16 17
17 18
18 19
19 20
20 21
21 22
22 23
23 24
24 25
25 26
26 27
27 28
28 29
29 30
30 31
31 32
32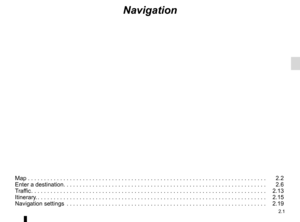 33
33 34
34 35
35 36
36 37
37 38
38 39
39 40
40 41
41 42
42 43
43 44
44 45
45 46
46 47
47 48
48 49
49 50
50 51
51 52
52 53
53 54
54 55
55 56
56 57
57 58
58 59
59 60
60 61
61 62
62 63
63 64
64 65
65 66
66 67
67 68
68 69
69 70
70 71
71 72
72 73
73 74
74 75
75 76
76 77
77 78
78 79
79 80
80 81
81 82
82 83
83 84
84 85
85 86
86 87
87 88
88 89
89 90
90 91
91 92
92 93
93 94
94 95
95 96
96 97
97 98
98 99
99 100
100 101
101 102
102 103
103 104
104 105
105 106
106 107
107 108
108 109
109 110
110 111
111 112
112 113
113 114
114 115
115 116
116 117
117 118
118 119
119 120
120 121
121 122
122 123
123 124
124 125
125 126
126 127
127 128
128 129
129

Depending on the country, your audio
system makes it possible to automati-
cally receive traffic bulletins when they
are broadcast on certain digital r")