Page 65 of 130
3.11
MEDIA (2/2)
Pop-up menu 6
During playback, the pop-up menu 6
enables you to:
– change source;
– activate or deactivate repeat play-
back for the current track;
– activate or deactivate shuffle for all lists;
– access sound ambiance;
– access sound settings.
Player Current list
Navigate to
6
USB
“Navigate to”
Press button Navigate to to access the
playlists by category (Playlist, Artists,
Albums, Podcast, etc.)
Note: The system reads all tracks by
default.
Note: the playlists described above
vary depending on the input source
connected.
Navigate to
Player Current list
6
Page 66 of 130
3.12
– hide/show the status and control bar by pressing the image preview area;
– rotate a photo by pressing 1;
– play a slideshow by pressing 2;
– switch from normal (adjusted) mode to full screen mode by pressing 3.
PHOTO (1/2)
1
2
3
Holiday photos.jpg
“Multimedia”
menu
From the main menu, press
“Multimedia”, “Photo”, then select an
input source connected to the system
from the following list to access the
photos:
– “USB-1" (USB port);
– “USB-2" (USB port);
– “SD" (SD card).
Note: Some formats may not be read-
able by the system.
Note: the input sources described
above may vary.
Photo playback is only possible
when the vehicle is stationary.
“Photo”
Playback
You can choose between reading all
the photos in a slideshow or viewing
a single photo.
When viewing a photo, you can:
– access the previous and next
photo by flicking image view area;
Tulipes_02.jpg
123
Page 67 of 130
3.13
PHOTO (2/2)
“Settings”
From the settings, you can:
– change the display time for each photo in the slideshow;
– active/deactivate animation effect between each photo in the slide-
show.
Once the settings have been made,
press 4 to save your changes and
return to the previous screen.
Note: The slideshow animation effect is
activated by default.Pop-up menu 5
From the photo display screen, press 5
to:
– get detailed information of photos (title, file type, date, path, etc.);
– set the photo as a user profile;
– Accessing settings
5
Holiday photos.jpg
4
Tulipes_02.jpg
54
Photo playback is only possible
when the vehicle is stationary.
Note: For more information on compat-
ible photo formats, please consult an
authorised dealer.
Page 68 of 130
3.14
“Multimedia”
menu
From the main menu, press “Multimedia”
> “Video”, then select an input source
connected to the system from the fol-
lowing list to access the videos:
– “USB-1" (USB port);
– “USB-2" (USB port);
– “SD" (SD card).
Note: Some video formats may not be
readable by the system.
Note: the input sources described
above may vary.
VIDEO (1/2)
– access the next video by pressing 4
or pressing and holding 4 to fast for-
ward the current video;
– view the video in full screen by press- ing 5;
– use the scroll bar 2.
Video playback is only possible
when the vehicle is stationary.
1
324
5
Landscapes
“Video”
Playback
When playing a video, you can:
– access the previous video by
pressing 1. During video playback,
press 1 to restart the video from
the beginning, or press and hold to
rewind;
– pause by pressing 3;
2
34
1
5Brightness Brightness
Page 69 of 130
3.15
Pop-up menu 7
During video playback, press 7 to:
– get detail video information (title, type, date, etc.);
– Accessing settings
Note: For further information about
compatible video formats, please con-
sult an authorised dealer.
VIDEO (2/2)
“Brightness”
During video playback, press
“Brightness” to control brightness. A
control bar will appear for you to per-
form the adjustment. Touch the screen
outside this bar to make it disappear
and return to the video playback.
“Settings”
From the “Settings” menu, you can
choose the type of display: normal (fit)
or full screen. Press 6 to confirm and go
to the previous screen.
Brightness
Brightness
7766
Landscapes
Page 70 of 130
3.16
MULTIMEDIA SETTINGS (1/3)
“Settings”
menu
From the “Multimedia” menu, press
“Settings”, then select the element you
wish to modify:
– “Radio”;
– “Media”;
– “Photo”;
– “Video”;
– “Sound”.
“Radio”
This menu enables you to adjust the
following settings:
– activate/deactivate “AM ” band;
– activate/deactivate “Radio text”;
– activate/deactivate “Region”;
– activate/deactivate “TA/I-Traffic ”;
“Media”
This menu enables you to adjust:
– the main audio volume;
– the sensitivity of the auxiliary socket (Low, Average or High);
– the Bluetooth® audio source.
“Photo”
This menu also enable the following
photo settings to be adjusted:
– change the display time for each photo in the slideshow;
– active/deactivate animation effect between each photo in the slide-
show.
For safety reasons, carry
out these operations when
the vehicle is stationary.
“Video”
This menu enables you to adjust the
type of video display (Fit or Fullscreen
View).
Page 71 of 130

3.17
“Sound”
This menu allows you to configure
the different sound settings.
“Sound ambiance”
This function enables you to select a
musical environment from the follow-
ing presets:
– “Neutral”;
– “Live”;
– “Club”;
– “Lounge”.
Note: You can launch a demonstra-
tion mode that allows you to hear the
sound without Arkamys sound en-
hancement treatment.
“Bass Boost”
This function increases the bass.
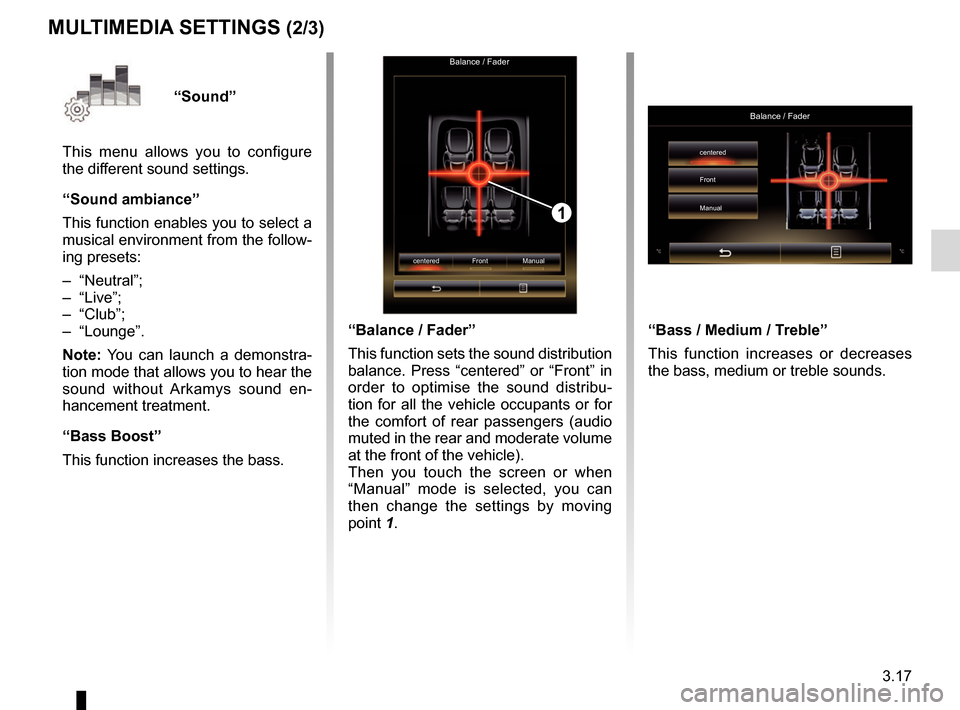
Balance / Fader
centered Front Manual
1
“Balance / Fader”
This function sets the sound distribution
balance. Press “centered” or “Front” in
order to optimise the sound distribu-
tion for all the vehicle occupants or for
the comfort of rear passengers (audio
muted in the rear and moderate volume
at the front of the vehicle).
Then you touch the screen or when
“Manual” mode is selected, you can
then change the settings by moving
point 1.
MULTIMEDIA SETTINGS (2/3)
“Bass / Medium / Treble”
This function increases or decreases
the bass, medium or treble sounds.
Balance / Fader
centered
Front
Manual
Page 72 of 130
3.18
MULTIMEDIA SETTINGS (3/3)
“Volume proportional to speed”
When this function is activated, the
volume of the audio system varies ac-
cording to the vehicle speed.
Press “Volume proportional to speed”
then select “On” or “OFF” to activate or
deactivate this function.
Set the intensity by increasing/decreas-
ing the value using the + and - buttons.
Note: the volume of the audio system
with Bose equipment varies automati-
cally according to the vehicle speed.“Loudness”
You can activate/deactivate bass ampli-
fication by pressing “On” or “OFF”.
“Frequency stabiliser”
This function amplifies low and high
frequencies when the volume is turned
down.
You can activate/deactivate loudness
by selecting “On” or “OFF”.
“Volume stabiliser”
You can activate/deactivate loudness
by selecting “On” or “OFF”.
Note: to reset the default settings for
each function, press the pop-up menu,
then “Reset”.
Sound settings
Bass Boost
Balance / Fader
Bass / Medium / Treble On OFF