Page 49 of 130

2.17
– “Specific road”: to avoid a road on your route. For example, you can
skip a road where you expect heavy
traffic, but the Traffic system has not
warned you about it.
– “Restore original route”: to cancel detours you set previously.
In all cases you are presented with a
map screen, where you can see the
avoided section, the detour and the es-
timated change in length and duration
and the duration in relation to your ini-
tially calculated route.
To confirm your settings, press “Accept”.
ROUTE (3/4)
OverviewShort.
Go
“Avoidances”
To avoid certain sections of the route
in the event of a traffic jam not flagged
up by the system, select “Avoidances”
from the “Itinerary” menu.
You can choose to avoid the follow-
ing elements:
– “Specific sections”: to avoid a cer- tain type of road on the route. For
example, you can skip a section of
motorway or a ferry.
– “Guidance portion”: to indicate a preferred distance over which the
saved route should be avoided.
The screen displays the distance,
the avoided section of the route
and the detour on the map. You
can also see the estimated route
length and duration change com-
pared to the original route on the
top of the screen.
“Overview”
The route overview can be displayed
by pressing “Overview” from the
“Itinerary” menu or after selecting a
destination and calculating the route.
The top area of the screen shows the
total route length and the total time
duration that it takes to get to the des-
tination. You can also see possible
delays caused by traffic events.
Page 50 of 130

“Route”
“Type of route”
This function enables you to change
the current route calculation method
and to recalculate. By selecting a
route type, you also define the default")
2.18
ROUTE (4/4)
“Route”
“Type of route”
This function enables you to change
the current route calculation method
and to recalculate. By selecting a
route type, you also define the default
route calculation method for the fol-
lowing route calculations.
To fund out about the various meth-
ods of calculating a route, please
refer to the section on “Map”.
Overview
Short. Fast;
Go
Pop-up menu
5
Press 5 to access the following func-
tions:
– “Route Alternatives”;
– “Itinerary”;
– “Route”;
– “Simulate route”;
– “Add route to address book”.
For further information, please refer to
the section on “Entering a destination”.
Overview
Go
5
Route preferences
The route preferences are restric-
tions which affect the route calcula-
tion. Please refer to the section on
“Map”.
“Simulate route”
This function enables the route you
will be taking to be simulated up to
destination. Press “Control” to dis-
play the control bar.
The control bar permits the following
functions:
– Fast backward;
– fast forward;
– pause;
– playing speed.
Short.
Economical;
Page 51 of 130

“Settings” menu
From the “Navigation” menu, press
“Settings”, then select the subcategory
you wish to change:
– “Sound and warnings”;
– “Traffic")
2.19
NAVIGATION SETTINGS (1/4)
“Settings” menu
From the “Navigation” menu, press
“Settings”, then select the subcategory
you wish to change:
– “Sound and warnings”;
– “Traffic”;
– “Route”;
– «Map settings»;
– “Visual guidance”.– “Country info”: when you cross
borders, the app can verbally state
information on the country you
have just entered.
– “System messages”: activate this function so that all system mes-
sages are verbally announced.
“Advanced settings”
This menu enables you to choose
how certain verbal instructions (ma-
noeuvres, road and street numbers)
are given:
– either in the language of the coun- try you are in;
– or in the language defined in your profile.
“Vocal information”
This function also enables the quan-
tity and frequency of voice instruc-
tions to be adjusted. Select one of the
following functions:
– “Minimal”;
– “Standard”;
– “Detailed”.
“Sound and warnings”
This menu enables you to set the fol-
lowing sounds:
“Voice”
Activate or deactivate the voice in-
structions.
Note: if this function is disabled, a re-
corded voice will give you the guid-
ance information.
“Speech synthesis settings”
Select this option to optimise the
voice settings. The following settings
are available:
– “Traffic”: activate or deactivate voice announcements for traffic
and road information.
– “Route summary”: as soon as a route has been calculated, the
navigation system can give a brief
verbal summary of the route.
For safety reasons, carry
out these operations when
the vehicle is stationary.
To reset your data and go back
to the default settings, press the
pop-up menu button, then Reset.
Page 52 of 130

“Speed warning”
Maps may contain information about
the speed limits of the road segments.
The navigation system is able to warn
you if you exceed the current limi")
2.20
NAVIGATION SETTINGS (2/4)
“Speed warning”
Maps may contain information about
the speed limits of the road segments.
The navigation system is able to warn
you if you exceed the current limit. This
information may not be available for
your region, or may not be fully correct
for all roads on the map.
The following warning types are avail-
able:
– “Speed limit always visible”: acti-vate this function so that the speed
limit for the section of road taken is
always displayed on the navigation
screen.
– “Speed warning”: the current speed limit is displayed in red and flashes
on the map when you exceed it.
– “Overspeed warning sound”: a beep sounds when you exceed the speed
limit.“Safety warnings”
This function enables you to get a beep
and/or visual warning when you ap-
proach sensitive areas such as near
schools, level crossings, hazardous
areas, etc.
You can programme the navigation
system so that it displays these in-
creased vigilance points on the map,
and so that you can be warned by a
beep when you approach these areas.
For some of these areas, there is a
legal or recommended speed limit. The
beep may differ depending on whether
you are driving under or over the speed
limit.
Choose to be warned when approach-
ing these increased vigilance areas or
only when you are exceeding the speed
limit.
Precautions regarding
navigation
Use of the navigation
system does not in any way
replace the responsibility or vigi-
lance of the driver while driving the
vehicle.
In certain countries it is illegal to ac-
tivate the camera warning option
and this could lead to prosecution.
“Warning sign alerts”
Activate this function to be informed
when approaching specific sections of
road (obstacles, tight corners, cross-
ings, etc.) by road sign displays on
the map screen. For each category
of warning sign, set the warning type
(audio and/or visual) and the distance
from the hazard from which you want to
receive a warning.
Page 53 of 130
2.21
NAVIGATION SETTINGS (3/4)
“Route”
“Route Planning Method”
This function enables the cur-
rent route calculation method to be
changed and to recalculate if neces-
sary. By choosing this type of route,
you also define the default route cal-
culation method for future route cal-
culations.
To fund out about the various meth-
ods of calculating a route, please
refer to the section on “Map”.
Route preferences
The route preferences are restric-
tions which affect the route calcula-
tion. Please refer to the section on
“Map”.“Map Settings”
This function sets the map display,
the map view, etc. Please refer to the
section on “Map”.“Traffic”
This menu enables you to activate or
deactivate traffic information, and to
adjust the settings.
Please refer to the section on “Traffic”.
Note: the availability of the “Traffic”
services may vary.
To reset your data and go back
to the default settings, press the
pop-up menu button, then Reset.
Page 54 of 130

2.22
“Visual guidance”
This menu displays information relating
to your route on the navigation screen.
“Data fields”
The data fields in the corner of the
navigation screen can be custom-
ised. Select this option and choose the
values you want to see. The values
can differ depending on whether you
are following a route or whether you
are travelling without a set destination.
You can choose to display the remain-
ing distance to your destination/next
waypoint, the remaining time until you
reach your destination/next waypoint,
or the estimated arrival time for your
destination/next waypoint. “Signposts”
Whenever relevant information is avail-
able, such as information similar to that
displayed on road signs, it will be dis-
played in the upper section of the map.
You can turn this feature on or off.
“Junction view”
If you are approaching a motorway
junction or a complex crossroads and
the necessary information exists, the
map is replaced with a 3D view of the
junction. You can activate this function
or keep the standard display through-
out your route.
NAVIGATION SETTINGS (4/4)
For safety reasons, carry
out these operations when
the vehicle is stationary.
“Tunnel view”
When entering a tunnel, the surface
roads and buildings can count as a dis-
turbance. This feature shows a generic
image of a tunnel instead of the map.
A top-down overview of the tunnel and
the remaining distance to the tunnel
exit are also displayed.
To reset your data and go back
to the default settings, press the
pop-up menu button, then Reset.
Page 55 of 130
3.1
Multimedia
Listen to the radio . . . . . . . . . . . . . . . . . . . . . . . . . . . . . . . . . . . .\
. . . . . . . . . . . . . . . . . . . . . . . . . . . 3.2
Media . . . . . . . . . . . . . . . . . . . . . . . . . . . . . . . . . . . . \
. . . . . . . . . . . . . . . . . . . . . . . . . . . . . . . . . . . . . 3.10
Photo . . . . . . . . . . . . . . . . . . . . . . . . . . . . . . . . . . . . \
. . . . . . . . . . . . . . . . . . . . . . . . . . . . . . . . . . . . . 3.12
Video . . . . . . . . . . . . . . . . . . . . . . . . . . . . . . . . . . . . \
. . . . . . . . . . . . . . . . . . . . . . . . . . . . . . . . . . . . . 3.14
Multimedia settings . . . . . . . . . . . . . . . . . . . . . . . . . . . . . . . . . . . .\
. . . . . . . . . . . . . . . . . . . . . . . . . . 3.16
Page 56 of 130
3.2
LISTENING TO THE RADIO (1/8)
FrequenciesStations Presets
Band
“Multimedia”
menu
From the main menu, press
“Multimedia”, then “Radio”.
“Radio”
Selecting a band
Select FM, AM or DR by pressing
“Band” on the touchscreen.
It is also possible to choose the band
by using the control under the steer-
ing wheel.
“AM”
Choosing a AM station
There are different modes for choos-
ing a radio station. After choosing
AM, select the required mode by
pressing tabs 1 or 2.
Two search modes are available:
– “Frequencies” mode (tab 1);
– “Presets” mode (tab 2).
“FM”
Choosing a FM station
There are different modes for choos-
ing a radio station. After choosing FM,
select the required mode by pressing
tabs 1, 2 or 3 . Three search modes
are available:
– “Frequencies” mode (tab 1);
– “Stations” mode (tab 2);
– “Presets” mode (tab 3).
Frequencies Presets
Band12132
 1
1 2
2 3
3 4
4 5
5 6
6 7
7 8
8 9
9 10
10 11
11 12
12 13
13 14
14 15
15 16
16 17
17 18
18 19
19 20
20 21
21 22
22 23
23 24
24 25
25 26
26 27
27 28
28 29
29 30
30 31
31 32
32 33
33 34
34 35
35 36
36 37
37 38
38 39
39 40
40 41
41 42
42 43
43 44
44 45
45 46
46 47
47 48
48 49
49 50
50 51
51 52
52 53
53 54
54 55
55 56
56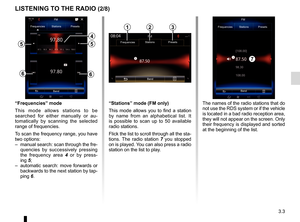 57
57 58
58 59
59 60
60 61
61 62
62 63
63 64
64 65
65 66
66 67
67 68
68 69
69 70
70 71
71 72
72 73
73 74
74 75
75 76
76 77
77 78
78 79
79 80
80 81
81 82
82 83
83 84
84 85
85 86
86 87
87 88
88 89
89 90
90 91
91 92
92 93
93 94
94 95
95 96
96 97
97 98
98 99
99 100
100 101
101 102
102 103
103 104
104 105
105 106
106 107
107 108
108 109
109 110
110 111
111 112
112 113
113 114
114 115
115 116
116 117
117 118
118 119
119 120
120 121
121 122
122 123
123 124
124 125
125 126
126 127
127 128
128 129
129
“Route”
“Route Planning Method”
This function enables the cur-
rent route calculation method to be
changed and to recalculate if neces-
sary. By choosing this t")


FrequenciesStations Presets
Band
“Multimedia”
menu
From the main menu, press
“Multimedia”, then “Radio”.
“Radio”
Selecting a band
Select FM, AM or DR")