2017 PEUGEOT PARTNER TEPEE ELECTRIC ignition
[x] Cancel search: ignitionPage 158 of 252
120
When changing the programmed
reference speed by means of a maintained
press, remain vigilant as the speed can
increase or decrease rapidly.
Do not use the cruise control on slippery
roads or in heavy traffic.
When descending a steep hill, the cruise
control system cannot prevent the vehicle
from exceeding the programmed speed.
The cruise control system cannot in
any circumstances replace the need
to obser ve speed limits or the need for
vigilance on the part of the driver.
It is advisable to leave your feet near the
pedals.
To avoid any jamming under the pedals:
-
e
nsure that the mat is positioned and
secured to the floor correctly,
-
n
ever fit one mat on top of another.
Active City Brake
Active City Brake is a driving assistance
system that aims to avoid a frontal collision
or reduce the speed of an impact if the driver
does not react sufficiently (inadequate brake
application). This system has been designed to
improve driving safety.
The driver must always check the traffic
and assess the distance and relative
speed of other vehicles.
Active City Brake cannot in any
circumstances replace the need for
vigilance on the part of the driver.
Never look at the laser sensor through
an optical instrument (magnifying glass,
microscope, etc.) at a distance of less
than 10
centimetres: risk of eye injury!
Principle
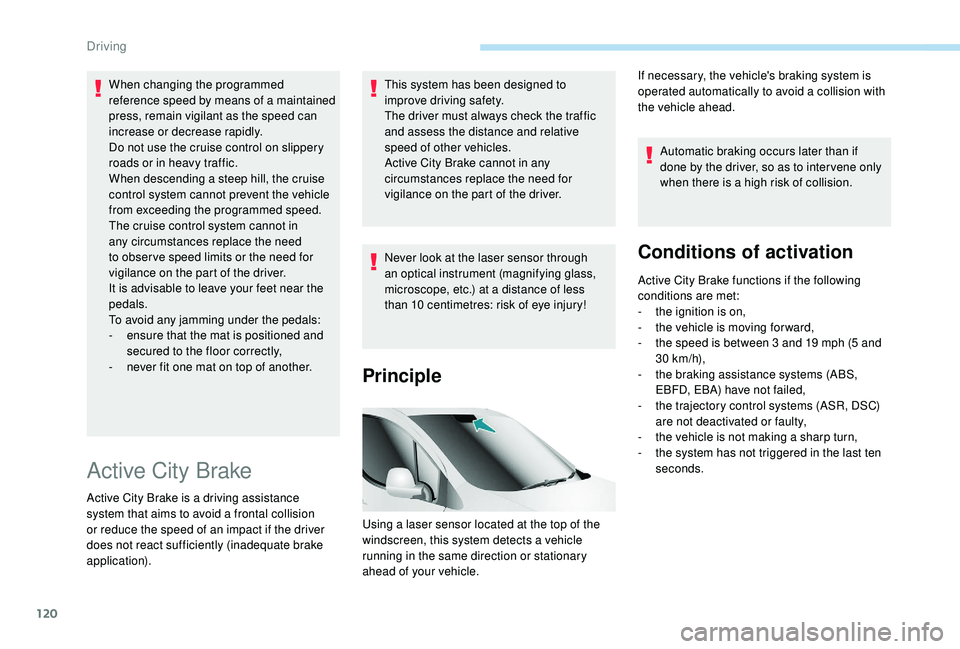
Using a laser sensor located at the top of the
windscreen, this system detects a vehicle
running in the same direction or stationary
ahead of your vehicle.Automatic braking occurs later than if
done by the driver, so as to inter vene only
when there is a high risk of collision.
Conditions of activation
Active City Brake functions if the following
conditions are met:
-
t
he ignition is on,
-
t
he vehicle is moving for ward,
-
t
he speed is between 3 and 19 mph (5 and
30
km/h),
-
t
he braking assistance systems (ABS,
EBFD, EBA) have not failed,
-
t
he trajectory control systems (ASR, DSC)
are not deactivated or faulty,
-
t
he vehicle is not making a sharp turn,
-
t
he system has not triggered in the last ten
seconds.
If necessary, the vehicle's braking system is
operated automatically to avoid a collision with
the vehicle ahead.
Driving
Page 159 of 252
121
Operation
When your vehicle is too close to or
approaches the vehicle ahead too quickly, the
system automatically applies the brakes to
avoid a collision.
You are then warned by the display of a
message.
Your vehicle's brake lamps come on to warn
other road users.The collision can be avoided if the speed
difference between your vehicle and
the one ahead is not more than 9
mph
(15
km/h).
Above this threshold, the system will do
what is possible to avoid or reduce the
accident by lowering the speed of impact.
The automatic braking can bring the vehicle to
a complete stop if the situation requires it.
In this case, the vehicle is held stationary
temporarily (for about 1.5
seconds) to allow
the driver to take back control by pressing the
brake pedal.
Unless the driver presses the clutch
quickly enough during automatic braking,
triggering of the system may cause the
engine to stall. During automatic braking, the driver can
always obtain a higher rate of deceleration
than that controlled by the system, by
pressing firmly on the brake pedal.
After an impact, the system is
automatically put out of ser vice: it no
longer operates.
You must go to a PEUGEOT dealer or a
qualified workshop to have the system
made operational again.
Operating limits
The system only detects vehicles that are
stationary or moving in the same direction as
your vehicle.
It does not detect small vehicles (bicycles,
motorcycles), pedestrians or animals, nor
non-reflective stationary objects.
This system will not trigger or will be interrupted
if the driver:
-
a
ccelerates hard
-
o
r turns the steering wheel sharply
(avoidance manoeuvre). When weather conditions are difficult
(extremely heavy rain, snow, fog, hail,
etc.), braking distances increase, which
may reduce the system’s ability to avoid a
collision.
The driver must therefore remain
particularly cautious.
Never let snow build up on the bonnet
or any object beyond the bonnet or the
front of the roof: this could enter the
field of vision of the sensor and obstruct
detection.Deactivation
The system is deactivated in the vehicle
configuration menu, accessible with the ignition
on.
Its status is stored when the ignition is switched off.
When the system is deactivated, a
message is displayed every time the
ignition is switched on, to warn you.
6
Driving
Page 165 of 252
127
Fuel system cut-off
In the event of a severe collision, a device
automatically cuts off the fuel supply to the
engine.The flashing of this warning lamp is
accompanied by a message on the
screen.
Verify the absence of any odour and fuel leaks
outside the vehicle and restore the supply:
F
s
witch off the ignition (STOP position),
F
r
emove the key from the ignition,
F
r
einsert the key in the ignition,
F
s
witch on the ignition and start.
7
Practical information
Page 168 of 252
130
Removable snow shield
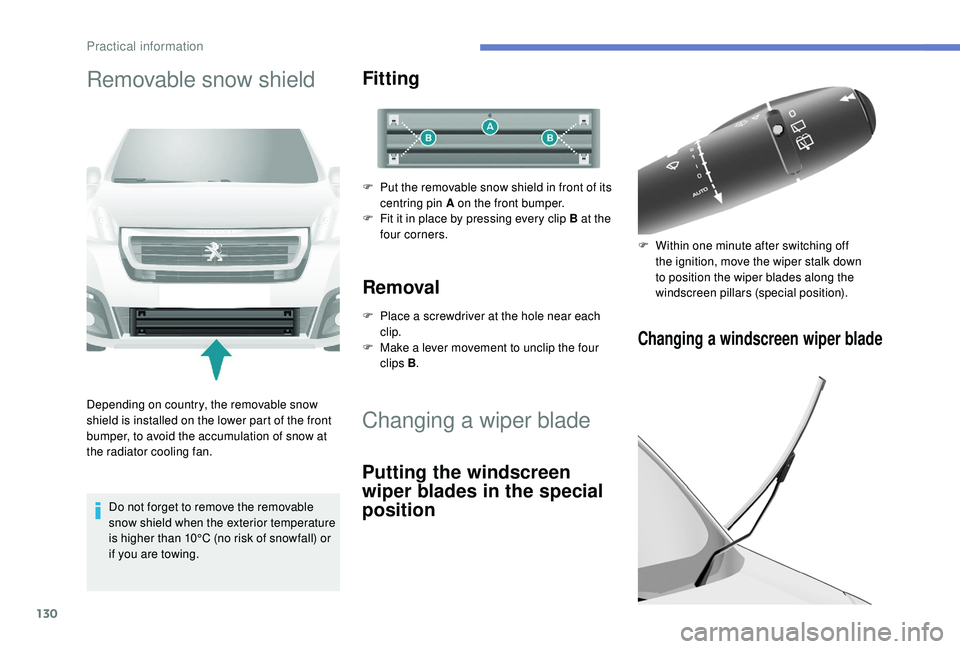
Depending on country, the removable snow
shield is installed on the lower part of the front
bumper, to avoid the accumulation of snow at
the radiator cooling fan.Do not forget to remove the removable
snow shield when the exterior temperature
is higher than 10°C (no risk of snowfall) or
if you are towing.
Fitting
F Put the removable snow shield in front of its centring pin A on the front bumper.
F
F
it it in place by pressing every clip B at the
four corners.
Removal
F Place a screwdriver at the hole near each clip.
F
M
ake a lever movement to unclip the four
clips B .
Changing a wiper blade
Putting the windscreen
wiper blades in the special
position
Changing a windscreen wiper blade
F Within one minute after switching off
the ignition, move the wiper stalk down
to position the wiper blades along the
windscreen pillars (special position).
Practical information
Page 169 of 252

131
To return the wiper blades to their normal
position, switch on the ignition and operate the
wiper stalk again.
Changing the rear wiper blade
F Raise the wiper arm.
F U nclip the wiper blade and remove it.
F
I
nstall the new blade.
F
F
old the arm down.
F
L
ift the arm, then unclip the blade and
remove it.
F
I
nstall the new blade and fold the arm down.Towing device
Load distribution
F D istribute the load in the trailer so that
the heaviest items are as close as
possible to the axle, and the nose weight
approaches the maximum permitted without
exceeding
it.
Air density decreases with altitude, thus
reducing engine performance. The maximum
load which can be towed must be reduced by
10% per 1,000
metres of altitude.
Use towing devices and their original
harnesses approved by PEUGEOT. It
is recommended that the installation be
per formed by a PEUGEOT dealer or a
qualified workshop.
If the towing device is not fitted by
a PEUGEOT dealer, it must still be
fitted in accordance with the vehicle
manufacturer's instructions.
Certain driving assistance or manoeuvring
assistance functions are automatically
deactivated if an approved towbar is used. Obser ve the maximum authorised towable
weight, indicated on your vehicle's
registration certificate, the manufacturer's
label and in the Technical data
section of
this guide.
Complying with the maximum
authorised nose weight (towball)
also includes the use of accessories
(bicycle carriers, tow boxes, etc.).
Obser ve the legislation in force in the
country in which you are driving.
Towbar with a swan neck towball,
lockable and quickly detachable
Presentation
This swan neck towbar, delivered assembled,
can be removed and fitted quickly and easily.
No tools are needed.
7
Practical information
Page 175 of 252
137
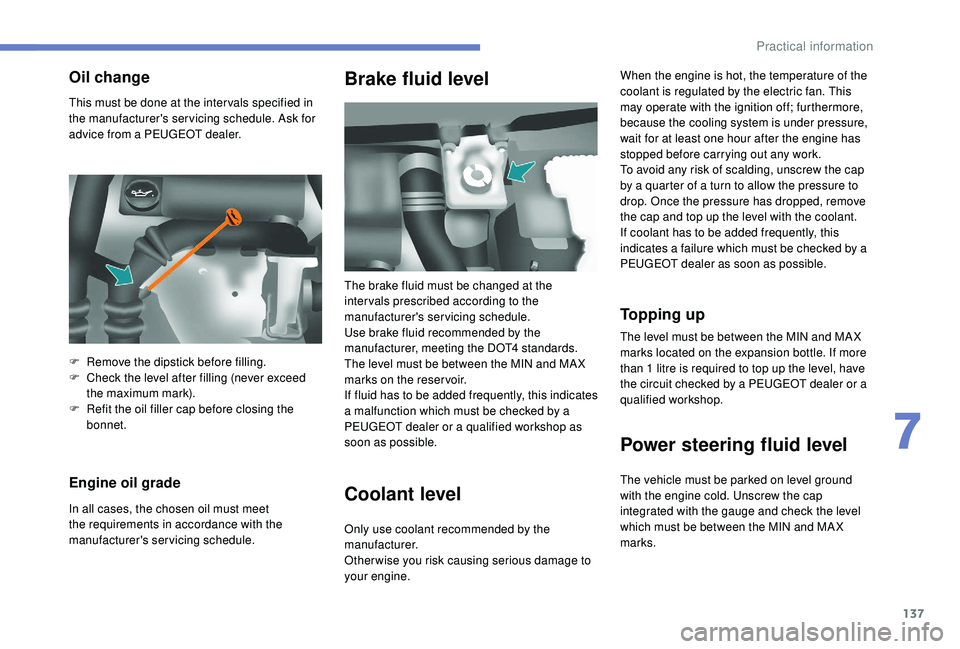
This must be done at the inter vals specified in
the manufacturer's servicing schedule. Ask for
advice from a PEUGEOT dealer.
Engine oil grade
In all cases, the chosen oil must meet
the requirements in accordance with the
manufacturer's servicing schedule.
Brake fluid level
Coolant levelWhen the engine is hot, the temperature of the
coolant is regulated by the electric fan. This
may operate with the ignition off; furthermore,
because the cooling system is under pressure,
wait for at least one hour after the engine has
stopped before carrying out any work.
To avoid any risk of scalding, unscrew the cap
by a quarter of a turn to allow the pressure to
drop. Once the pressure has dropped, remove
the cap and top up the level with the coolant.
If coolant has to be added frequently, this
indicates a failure which must be checked by a
PEUGEOT dealer as soon as possible.
To p p i n g u p
Oil change
The brake fluid must be changed at the
inter vals prescribed according to the
manufacturer's servicing schedule.
Use brake fluid recommended by the
manufacturer, meeting the DOT4 standards.
The level must be between the MIN and MA X
marks on the reservoir.
If fluid has to be added frequently, this indicates
a malfunction which must be checked by a
PEUGEOT dealer or a qualified workshop as
soon as possible.
Only use coolant recommended by the
manufacturer.
Otherwise you risk causing serious damage to
your engine.
F
R
emove the dipstick before filling.
F
C
heck the level after filling (never exceed
the maximum mark).
F
R
efit the oil filler cap before closing the
bonnet. The level must be between the MIN and MA X
marks located on the expansion bottle. If more
than 1
litre is required to top up the level, have
the circuit checked by a PEUGEOT dealer or a
qualified workshop.
Power steering fluid level
The vehicle must be parked on level ground
with the engine cold. Unscrew the cap
integrated with the gauge and check the level
which must be between the MIN and MA X
marks.
7
Practical information
Page 180 of 252
142
Procedure
Before topping up, ensure that the vehicle is
parked on a flat and level sur face.
In wintry conditions, ensure that the
temperature of the vehicle is above -11°C.
Otherwise the AdBlue
® may be frozen and
so cannot be poured into its tank. Park your
vehicle in a warmer area for a few hours to
allow the top-up to be carried out. F
O
btain an AdBlue
® container or bottle. After
first checking the use-by date, read the
instructions on the label carefully before
pouring the contents of the container or
bottle into your vehicle's AdBlue tank.
Or
F
I
nsert the AdBlue
® pump nozzle and refill
the tank until the nozzle stops automatically.
Important:
-
T
o avoid over flowing the AdBlue
® tank,
i
t is recommended:
•
T
o top up between 10 and 13
litres
using AdBlue
® containers or bottles.
Or
•
T
hat you stop after the nozzle’s first
automatic cut-out if you are refilling
at a ser vice station.
-
I
f your vehicle's AdBlue
® tank is
completely empty – which is confirmed
by the alert messages and the
impossibility of starting the engine –
you must add at least 5
litres. Impor tant: when topping up after
a breakdown due to running out
of AdBlue,
you must wait for at least
5 minutes before switching on the
ignition, opening the driver's door,
unlocking the vehicle or inser ting the
key in the switch.
Switch on the ignition, then after a
minimum of 10 seconds, start the engine.
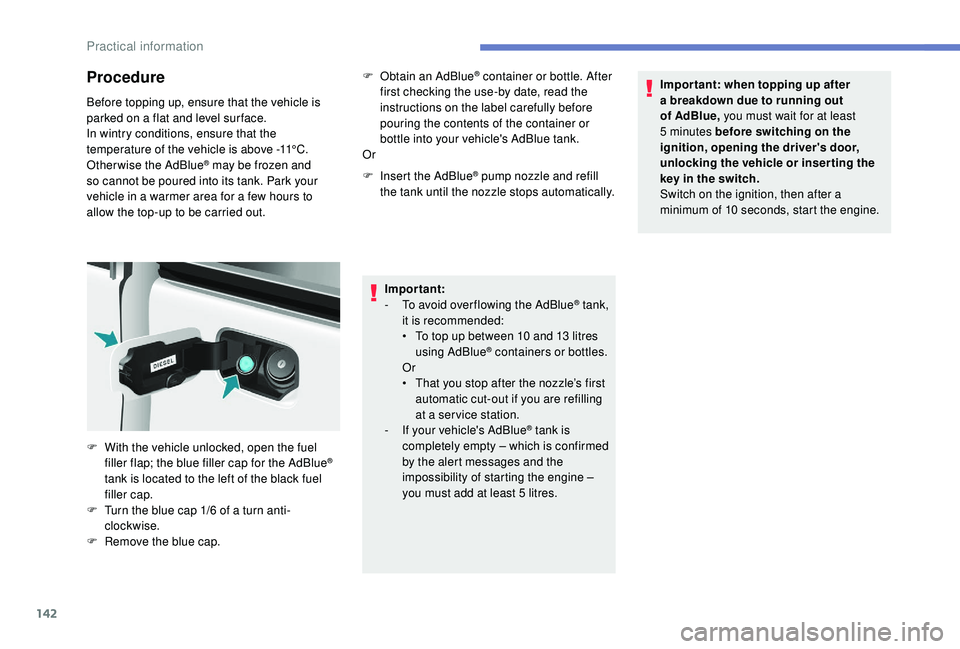
F
W
ith the vehicle unlocked, open the fuel
filler flap; the blue filler cap for the AdBlue
®
tank is located to the left of the black fuel
filler cap.
F
T
urn the blue cap 1/6 of a turn anti-
clockwise.
F
R
emove the blue cap.
Practical information
Page 181 of 252
143
Temporary puncture
repair kit
The kit is located in a storage compartment
under the front seat.
Vehicles supplied with a temporary puncture
repair kit do not have a spare wheel or the
corresponding tools ( jack, wheelbrace, etc.).
The temporary puncture repair kit comprises a
compressor and a bottle of sealant.
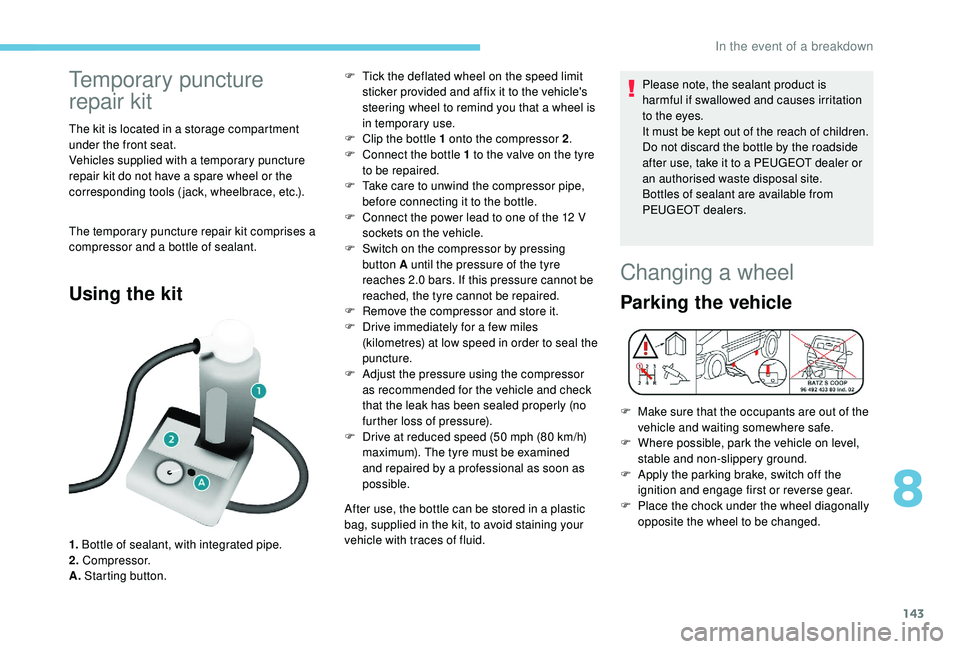
Using the kit
1. Bottle of sealant, with integrated pipe.
2. Compressor.
A. Starting button. F
T
ick the deflated wheel on the speed limit
sticker provided and affix it to the vehicle's
steering wheel to remind you that a wheel is
in temporary use.
F
C
lip the bottle 1 onto the compressor 2
.
F
C
onnect the bottle 1 to the valve on the tyre
to be repaired.
F
T
ake care to unwind the compressor pipe,
before connecting it to the bottle.
F
C
onnect the power lead to one of the 12 V
sockets on the vehicle.
F
S
witch on the compressor by pressing
button A until the pressure of the tyre
reaches 2.0 bars. If this pressure cannot be
reached, the tyre cannot be repaired.
F
R
emove the compressor and store it.
F
D
rive immediately for a few miles
(kilometres) at low speed in order to seal the
puncture.
F
A
djust the pressure using the compressor
as recommended for the vehicle and check
that the leak has been sealed properly (no
further loss of pressure).
F
D
rive at reduced speed (50 mph (80 km/h)
maximum). The tyre must be examined
and repaired by a professional as soon as
possible.
After use, the bottle can be stored in a plastic
bag, supplied in the kit, to avoid staining your
vehicle with traces of fluid. Please note, the sealant product is
harmful if swallowed and causes irritation
to the eyes.
It must be kept out of the reach of children.
Do not discard the bottle by the roadside
after use, take it to a PEUGEOT dealer or
an authorised waste disposal site.
Bottles of sealant are available from
PEUGEOT dealers.
Changing a wheel
Parking the vehicle
F Make sure that the occupants are out of the
vehicle and waiting somewhere safe.
F
W
here possible, park the vehicle on level,
stable and non-slippery ground.
F
A
pply the parking brake, switch off the
ignition and engage first or reverse gear.
F
P
lace the chock under the wheel diagonally
opposite the wheel to be changed.
8
In the event of a breakdown