2017 PEUGEOT PARTNER TEPEE ELECTRIC start stop button
[x] Cancel search: start stop buttonPage 13 of 252
11
Eco-comfort
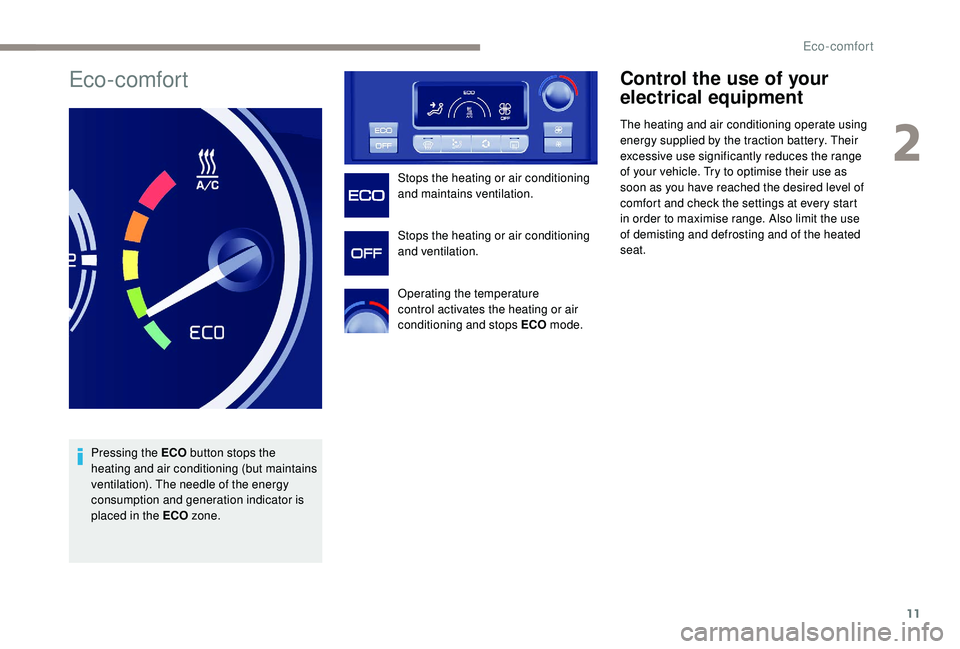
Pressing the ECO button stops the
heating and air conditioning (but maintains
ventilation). The needle of the energy
consumption and generation indicator is
placed in the ECO zone. Stops the heating or air conditioning
and maintains ventilation.
Stops the heating or air conditioning
and ventilation.
Operating the temperature
control activates the heating or air
conditioning and stops ECO mode.
Control the use of your
electrical equipment
The heating and air conditioning operate using
energy supplied by the traction battery. Their
excessive use significantly reduces the range
of your vehicle. Try to optimise their use as
soon as you have reached the desired level of
comfort and check the settings at every start
in order to maximise range. Also limit the use
of demisting and defrosting and of the heated
seat.
2
Eco-comfort
Page 23 of 252
21
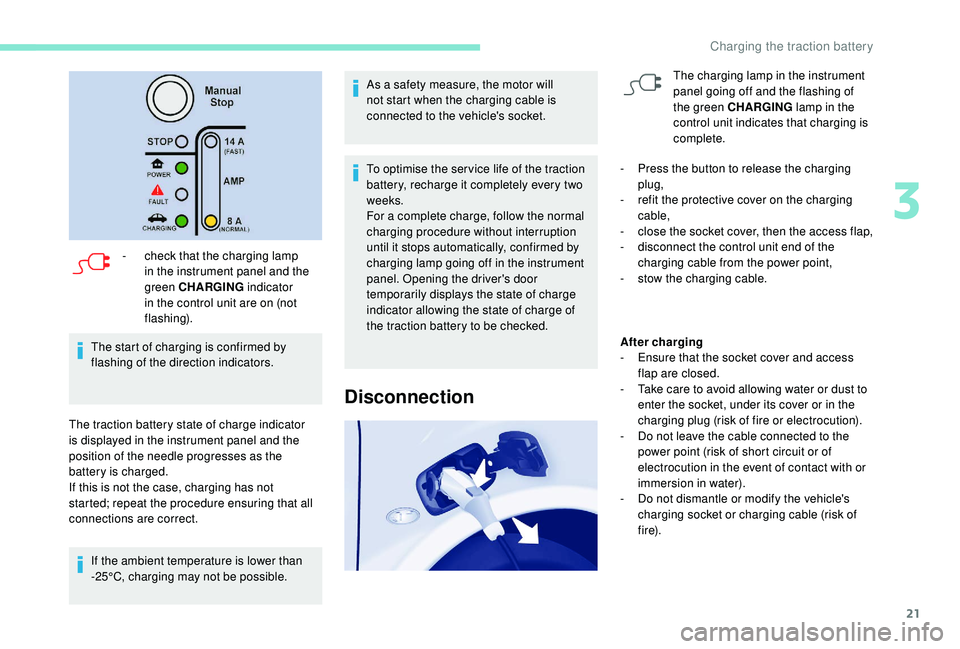
- check that the charging lamp in the instrument panel and the
green CHARGING indicator
in the control unit are on (not
flashing).
The start of charging is confirmed by
flashing of the direction indicators.
The traction battery state of charge indicator
is displayed in the instrument panel and the
position of the needle progresses as the
battery is charged.
If this is not the case, charging has not
started; repeat the procedure ensuring that all
connections are correct. If the ambient temperature is lower than
-25°C, charging may not be possible. As a safety measure, the motor will
not start when the charging cable is
connected to the vehicle's socket.
To optimise the ser vice life of the traction
battery, recharge it completely every two
weeks.
For a complete charge, follow the normal
charging procedure without interruption
until it stops automatically, confirmed by
charging lamp going off in the instrument
panel. Opening the driver's door
temporarily displays the state of charge
indicator allowing the state of charge of
the traction battery to be checked.
Disconnection
The charging lamp in the instrument
panel going off and the flashing of
the green CHARGING
lamp in the
control unit indicates that charging is
complete.
-
P
ress the button to release the charging
plug,
-
r
efit the protective cover on the charging
cable,
-
c
lose the socket cover, then the access flap,
-
d
isconnect the control unit end of the
charging cable from the power point,
-
s
tow the charging cable.
After charging
-
E
nsure that the socket cover and access
flap are closed.
-
T
ake care to avoid allowing water or dust to
enter the socket, under its cover or in the
charging plug (risk of fire or electrocution).
-
D
o not leave the cable connected to the
power point (risk of short circuit or of
electrocution in the event of contact with or
immersion in water).
-
D
o not dismantle or modify the vehicle's
charging socket or charging cable (risk of
f i r e).
3
Charging the traction battery
Page 57 of 252

19
Following this operation, if you wish to
disconnect the battery, lock the vehicle
and wait at least five minutes for the reset
to be taken into account.
Engine oil level indicator
Depending on your vehicle’s engine, when the
ignition is switched on, the engine oil level is
indicated for a few seconds after the ser vice
information.
Oil level correctLow oil level
Oil level gauge fault
The level read will only be correct if the
vehicle is on level ground and the engine
has been stopped for more than thirty
minutes.
For more information on Checking the
levels
and, in particular, the oil level, refer
to the corresponding section.
The flashing of OIL- -
indicates a malfunction
of the engine oil level gauge. Contact a
PEUGEOT dealer or a qualified workshop. The flashing of OIL , together with the Ser vice
warning lamp, accompanied by an audible
signal and a message on the screen, indicates
a low oil level which could damage the engine.
If the low oil level is confirmed by checking with
the dipstick, the level must be topped up.
F
p
ress the trip distance recorder reset button
and keep it pressed,
F
s
witch on the ignition.
The distance recorder display begins a
countdown.
When the display indicates " =0", release the
button; the spanner disappears.
Trip recorder reset button
F With the ignition on, press the button until zeros
appear.
Fuel gauge
The fuel level is tested every time the ignition is
turned to the "on" position.
If the gauge is positioned on:
-
1 : t
he tank is full, about 60 litres.
-
0 : t
he use of the reser ve is started, the
warning lamp lights up permanently. When
the warning lamp comes on, the reser ve is
approximately 8
litres.
1
Instruments
Page 58 of 252

20
For more information on Fuel, refer to the
corresponding section.
Coolant temperature
If the needle is positioned before the red
zone: normal operation.
In arduous conditions of use or hot climatic
conditions, the needle may move close to the
red graduations.
What to do if the needle goes into the red
zone:
F
s
low down the vehicle or let the engine idle. What to do if the warning lamp lights up:
F
s
top immediately, switch off the ignition. The
fan may continue to operate for a certain
time up to approximately ten minutes,
F
w
ait for the engine to cool down in order
to check the coolant level and top it up if
necessary.
Since the cooling system is under pressure,
follow these instructions to avoid any risk of
burns:
F
w
ait at least one hour after the engine stops
to intervene,
F
u
nscrew the cap by 1/4 of a turn to allow the
pressure to drop,
F
w
hen the pressure has dropped, check the
level in the expansion bottle,
F
i
f necessary, remove the cap to top up.
If the needle remains in the red zone, have
it checked by a PEUGEOT dealer or by a
qualified workshop.
For more information on Levels , refer to
the corresponding section.
AdBlue® fluid range
indicators
Alert settings and display
Different levels of alert are triggered according
to the remaining driving range threshold.
You will be informed as each mileage threshold
is reached and the alerts will change from
temporary to permanent.
-
T
he 1
st alert is triggered at a remaining
driving range of 1,500 miles (2,400 km).
-
T
he 2
nd alert is triggered at a remaining
driving range of 375 miles (600 km).
Up to 0
miles, at which point it will be
impossible to restart the engine after a stop.
Driving range
F Press this button to display the information.
With the touch screen: F
s
elect the "Driving assistance"
menu,
F
s
elect "Diagnostic",
F
s
elect CHECK.
Above 3,000
miles (5,000 km), the value is not
defined.
Instruments
Page 63 of 252
25
Key
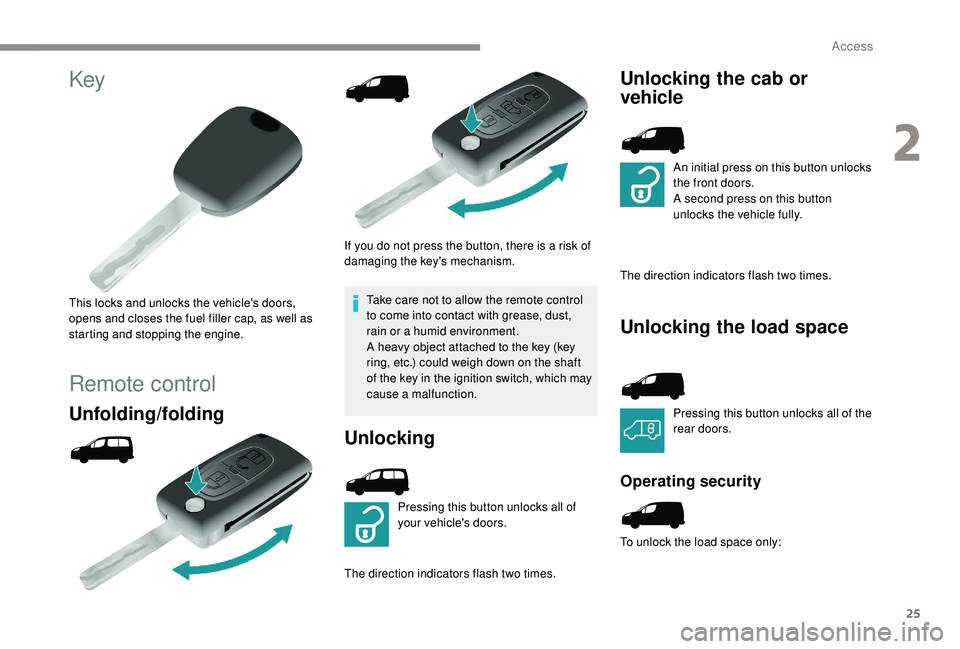
This locks and unlocks the vehicle's doors,
opens and closes the fuel filler cap, as well as
starting and stopping the engine.
Remote control
Unfolding/folding
If you do not press the button, there is a risk of
damaging the key's mechanism.Take care not to allow the remote control
to come into contact with grease, dust,
rain or a humid environment.
A heavy object attached to the key (key
ring, etc.) could weigh down on the shaft
of the key in the ignition switch, which may
cause a malfunction.
Unlocking
Pressing this button unlocks all of
your vehicle's doors.
The direction indicators flash two times.
Unlocking the cab or
vehicle
An initial press on this button unlocks
the front doors.
A second press on this button
unlocks the vehicle fully.
The direction indicators flash two times.
Unlocking the load space
Pressing this button unlocks all of the
rear doors.
Operating security
To unlock the load space only:
2
Access
Page 65 of 252
27
Lost keys, remote control
Go to a PEUGEOT dealer, taking with you the
vehicle's registration certificate, your personal
identification documents and if possible, the
label bearing the key code.
The PEUGEOT dealer will be able to retrieve
the key code and the transponder code
required to order a new key.
F
I
nsert the key into the ignition switch with
the remote control buttons (padlocks) facing
you.
F
S
witch on the ignition.
F
W
ithin ten seconds, press the locking
padlock for at least five seconds.
F
S
witch off the ignition.
F
W
ait at least one minute before using the
remote control.
The remote control is now working again. Anti-theft protection
Do not make any modifications to the
electronic engine immobiliser system; this
could cause malfunctions.
For vehicles with an ignition switch, do not
forget to remove the key and turn the steering
wheel to engage the steering lock.
Remote control
The high frequency remote control is a
sensitive system; do not operate it while it is
in your pocket as there is a possibility that
it may unlock the vehicle, without you being
aware of it.
Do not repeatedly press the buttons of your
remote control out of range and out of sight
of your vehicle. You may stop it from working
and the remote control would have to be
reinitialised.
The remote control does not operate when
the key is in the ignition, even when the
ignition is switched off.
Locking the vehicle
Driving with the doors locked may make
access to the passenger compartment by
the emergency ser vices more difficult in an
emergency.
As a safety precaution (with children on
board), remove the key from the ignition or
take the electronic key when you leave the
vehicle, even for a short time. When purchasing a second-hand vehicle
Have the key codes memorised by a
PEUGEOT dealer, to ensure that the keys in
your possession are the only ones which can
start the vehicle.
2
Access
Page 77 of 252
39
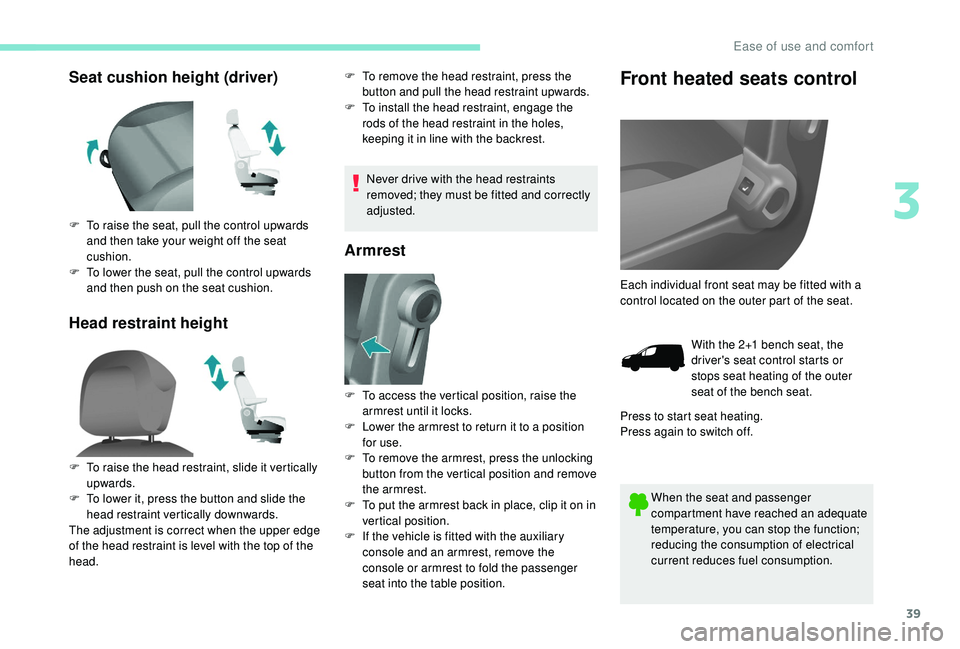
Seat cushion height (driver)
Head restraint heightF To remove the head restraint, press the button and pull the head restraint upwards.
F
T
o install the head restraint, engage the
rods of the head restraint in the holes,
keeping it in line with the backrest.
Never drive with the head restraints
removed; they must be fitted and correctly
adjusted.
Armrest
Front heated seats control
When the seat and passenger
compartment have reached an adequate
temperature, you can stop the function;
reducing the consumption of electrical
current reduces fuel consumption.
F
T
o raise the seat, pull the control upwards
and then take your weight off the seat
cushion.
F
T
o lower the seat, pull the control upwards
and then push on the seat cushion.
F
T
o raise the head restraint, slide it vertically
upwards.
F
T
o lower it, press the button and slide the
head restraint vertically downwards.
The adjustment is correct when the upper edge
of the head restraint is level with the top of the
head. F
T
o access the vertical position, raise the
armrest until it locks.
F
L
ower the armrest to return it to a position
for use.
F
T
o remove the armrest, press the unlocking
button from the vertical position and remove
the armrest.
F
T
o put the armrest back in place, clip it on in
vertical position.
F
I
f the vehicle is fitted with the auxiliary
console and an armrest, remove the
console or armrest to fold the passenger
seat into the table position. Each individual front seat may be fitted with a
control located on the outer part of the seat.
With the 2+1 bench seat, the
driver's seat control starts or
stops seat heating of the outer
seat of the bench seat.
Press to start seat heating.
Press again to switch off.
3
Ease of use and comfort
Page 242 of 252
8
Press this button for more than two
seconds for access to your directory,
then navigate using the thumbwheel.
Or
To dial a number, use your telephone's keypad,
with the vehicle stationary.
Ending a call
During a call, press this button for
more than two seconds.
Confirm with OK to end the call.
The system accesses the telephone's
contacts directory, depending on its
compatibility, and while it is connected by
Bluetooth.
With certain telephones connected by
Bluetooth you can send a contact to the
directory of the audio system.
Contacts imported in this way are saved
in a permanent directory visible to all,
whatever the telephone connected.
The menu for the directory is not
accessible if it is empty.
Frequently asked questions
The following information puts together the answers to the most frequently asked questions
concerning your audio system. QUESTION RESPONSESOLUTION
With the engine off, the audio
system switches off after a few
minutes of use. When the engine is switched
off, the audio system operating
time depends on the state of
charge of the battery.
The switch-off is normal: the
audio system switches to
economy mode and switches
off to prevent discharging the
vehicle's battery.Start the vehicle’s engine to
increase the battery charge.
The message "the audio
system is overheated" appears
on the display. In order to protect the
installation if the surrounding
temperature is too high, the
audio system switches to an
automatic thermal protection
mode leading to a reduction
in volume or the CD play
stopping.Switch the audio system off
for a few minutes to allow the
system to cool.
Peugeot Connect Sound (RD5)