2017 PEUGEOT 5008 steering
[x] Cancel search: steeringPage 191 of 404

189
From neutral N:
F P ress the brake pedal firmly.
F
S
tart the engine.
F
M
aintaining pressure on the brake pedal,
push rear ward to select the automatic
D mode, or for ward, while pressing the
Unlock button to engage reverse R .
Then, from P or N :
F
R
elease the brake pedal.
F
A
ccelerate progressively to automatically
release the electric parking brake.
F
W
ith the parking brake released, the vehicle
then moves off.
In severe wintry conditions (temperature
below -23°C), it is recommended that the
engine be allowed to run for a few minutes
before moving off, to ensure the correct
operation and durability of the engine and
gearbox.Stopping the vehicle
Whatever the state of the gearbox when the
ignition is switched off, P mode is engaged
automatically, with the exception of N , in which
case P mode will be engaged after a delay of
5
seconds (allowing the change to free-wheel).
Check that P mode has been engaged and
that the electric parking brake was applied
automatically; if not, apply it manually.
Operating faults
Malfunction of the gearbox
This is signalled by the illumination
of this warning lamp, accompanied
by the display of a message and an
audible signal, when the ignition is
switched on.
The gearbox switches to back-up mode: drive
mode D is locked in third gear, the steering-
mounted control paddles are inoperative,
Malfunction of the selector
The corresponding indicator lamps
for the selector panel and the
electric parking brake control lever
must be on, as well as the ones in
the instrument panel. mode M is no longer available. You may feel a
pronounced jolt when engaging reverse. This
does not present any risk for the gearbox.
Do not drive faster than 60
mph (100 km/h),
keeping to the speed limit.
Go to a PEUGEOT dealer or a qualified
workshop.
In the event of a minor fault
In the event of a serious fault
Stop as soon as it is safe to do so, away
from the traffic, and call a PEUGEOT
dealer or a qualified workshop.
When the ignition is switched off, the
gearbox goes into P mode automatically. You are alerted by the illumination of
this warning lamp. You are alerted by the warning lamp
lighting up, accompanied by the
display of a message and an audible
signal.
In certain cases, the selector lamps may not
come on, but the state of the gearbox is still
displayed in the instrument panel.
Drive cautiously and go to a PEUGEOT or a
qualified workshop.
6
Driving
Page 193 of 404
191
SPORT
Dynamic pack
This pack influences:
- t he acoustic ambience of the engine,
-
t
he level of power assistance for the
steering,
-
acceleration,
-
h
andling gear transitions with the automatic
gearbox,
-
t
he display on the instrument panel of
information about the dynamic parameters
of the vehicle ("PERSONAL" mode).
Activation / Deactivation
F Press this button; the button indicator lamp lights up to
confirm activation of the
function.
The Dynamic pack is also managed
by the i-Cockpit Amplify function.
For more information on the i-Cockpit Amplify
function, refer to the corresponding section.
If the indicator lamp flashes, activation is
not available (example: if Park Assist is
selected).
If the indicator lamp continues flashing for
a long time, contact a PEUGEOT dealer or
a qualified workshop.
Displays
To show this information on the instrument
panel, select the "PERSONAL" mode and then
the type of information required.This telemetry information (power
output, turbocharger pressure, torque,
longitudinal and lateral acceleration, etc.)
is given as a guide only.
Gear shift indicator
(Depending on engine.)
System which reduces fuel consumption by
recommending the most appropriate gear.
Operation
Depending on the driving situation and your
vehicle's equipment, the system may advise
you to skip one (or more) gear(s). You can
follow this instruction without engaging the
intermediate gears.
Gear shift recommendations are for information
only. In fact, the road layout, the traffic density
and safety remain the deciding factors when
choosing the best gear. The driver therefore
remains responsible for deciding whether or not
to follow the indications issued by the system.
This function cannot be deactivated.
With an automatic gearbox, the system is
only active in manual mode.
The information is displayed in the instrument
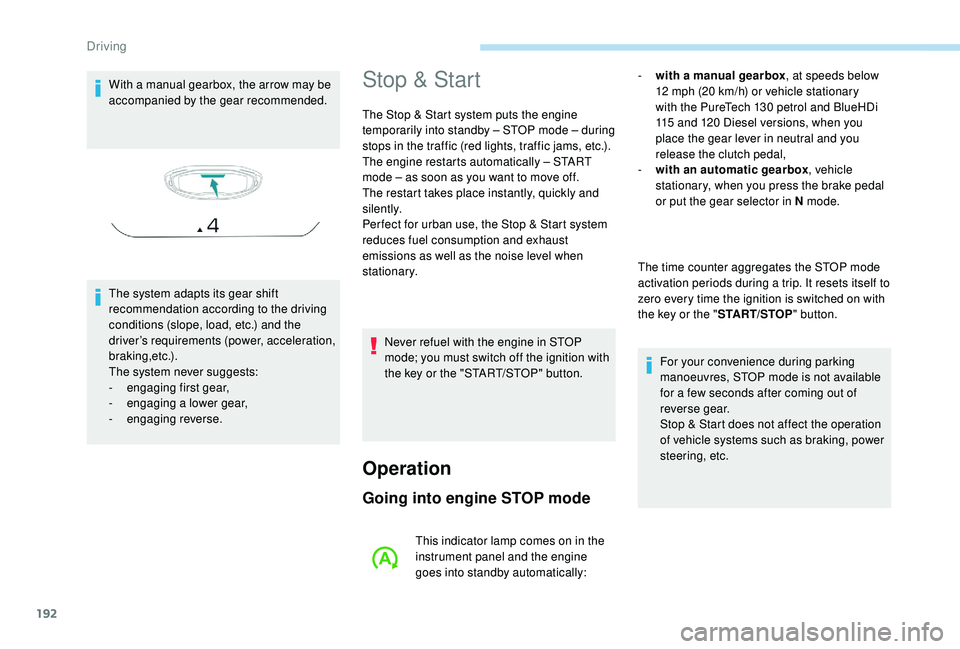
panel in the form of an arrow.
6
Driving
Page 194 of 404
192
With a manual gearbox, the arrow may be
accompanied by the gear recommended.
The system adapts its gear shift
recommendation according to the driving
conditions (slope, load, etc.) and the
driver’s requirements (power, acceleration,
b r a k i n g ,e t c .) .
The system never suggests:
-
e
ngaging first gear,
-
enga
ging a lower gear,
-
enga
ging reverse.Stop & Start
The Stop & Start system puts the engine
temporarily into standby – STOP mode – during
stops in the traffic (red lights, traffic jams, etc.).
The engine restarts automatically – START
mode – as soon as you want to move off.
The restart takes place instantly, quickly and
silently.
Per fect for urban use, the Stop & Start system
reduces fuel consumption and exhaust
emissions as well as the noise level when
stationary.
Operation
Going into engine STOP mode
- with a manual gearbox , at speeds below
12 mph (20 km/h) or vehicle stationary
with the PureTech 130
petrol and BlueHDi
115
and 120 Diesel versions, when you
place the gear lever in neutral and you
release the clutch pedal,
-
w
ith an automatic gearbox , vehicle
stationary, when you press the brake pedal
or put the gear selector in N mode.
The time counter aggregates the STOP mode
activation periods during a trip. It resets itself to
zero every time the ignition is switched on with
the key or the " START/STOP" button.
For your convenience during parking
manoeuvres, STOP mode is not available
for a few seconds after coming out of
reverse gear.
Stop & Start does not affect the operation
of vehicle systems such as braking, power
steering, etc.
Never refuel with the engine in STOP
mode; you must switch off the ignition with
the key or the "START/STOP" button.
This indicator lamp comes on in the
instrument panel and the engine
goes into standby automatically:
Driving
Page 198 of 404
196
Under-inflation alert
This warning is indicated by
continuous illumination of the lamp,
an audible signal and, depending on
the equipment installed, a message
displayed on the screen.
F
R
educe speed immediately, avoid excessive
steering movements and sudden braking.
F
S
top the vehicle as soon as it is safe to do
so.
The loss of pressure detected does not
always cause visible bulging of the tyre.
Do not satisfy yourself with just a visual
check.
F
I
f you have a compressor, such as the one
in the temporary puncture repair kit, check
the pressures of the four tyres when cold.
F
I
f it is not possible to make this check
immediately, drive carefully at reduced
speed.
or
F
I
n case of a puncture, use the temporary
tyre repair kit or the spare wheel (if
equipped). The alert is kept active until the system is
reinitialised.
Reinitialisation
The system must be reinitialised after any
adjustment to the pressures of one or more
tyres, and after changing one or more wheels.
Before reinitialising the system, ensure
that the pressures of the four tyres
are correct for the conditions of use
of the vehicle and conform to the
recommendations on the tyre pressure
label.
The under-inflation alert can only be relied
on if the reinitialisation of the system has
been done with the pressures in the four
tyres correctly adjusted.
The under-inflation detection system
does not give a warning if a pressure is
incorrect at the time of reinitialisation. F
Sel
ect the "
Define the vehicle
parameters " menu.
F Sel ect the "Driving assistance " menu.
F
Sel
ect the "Tyre inflation " menu.
F
Sel
ect the "Reinitialisation " function.
F
Sel
ect "Ye s" to confirm.
Reinitialisation is confirmed by an audible
signal.
Touch screen
F In this menu, select the " Vehicle settings"
tab.
F
I
n the page, select the "
Under-inflation
initialisation " function.
F
Sel
ect "Ye s" to confirm.
The reinitialisation is confirmed by the display
of a message and an audible signal.
Monochrome screen C
Reinitialisation of the function is
done in the " Personalisation-
configuration " menu of the screen.
Reinitialisation of the function is
done in the Vehicle / Driving menu
of the touch screen.
Driving
Page 202 of 404
200
Operating limits
The legislation on speed limits is specific to
each country.
The system does not take account of reduced
speed limits in the following cases:
-
p
oor weather (rain, snow),
-
a
tmospheric pollution,
-
t
railer, caravan,
-
d
riving with a space-saver type spare wheel
or snow chains fitted,
-
p
uncture repair using the temporary repair
kit,
-
y
oung drivers, etc.
The following situations may inter fere with the
operation of the system or prevent it working:
-
p
oor visibility (inadequate street lighting,
falling snow, rain, fog),
-
w
indscreen area located in front of the
camera dirty, misted, frost-covered, snow-
covered, damaged or covered by a sticker,
-
f
ault with the camera,
-
o
bsolete or incorrect mapping,
-
h
idden road signs (other vehicles,
vegetation, snow),
-
s
peed limit signs that do not conform to the
standard, are damaged or distorted.
Memorising the speed
setting
This memorise function is in addition to the
display of Recognition of speed limit signs .
For more information on the Speed
limiter, Cruise control , or Dynamic
cruise control with Stop function , refer
to the corresponding sections.
Steering mounted controls
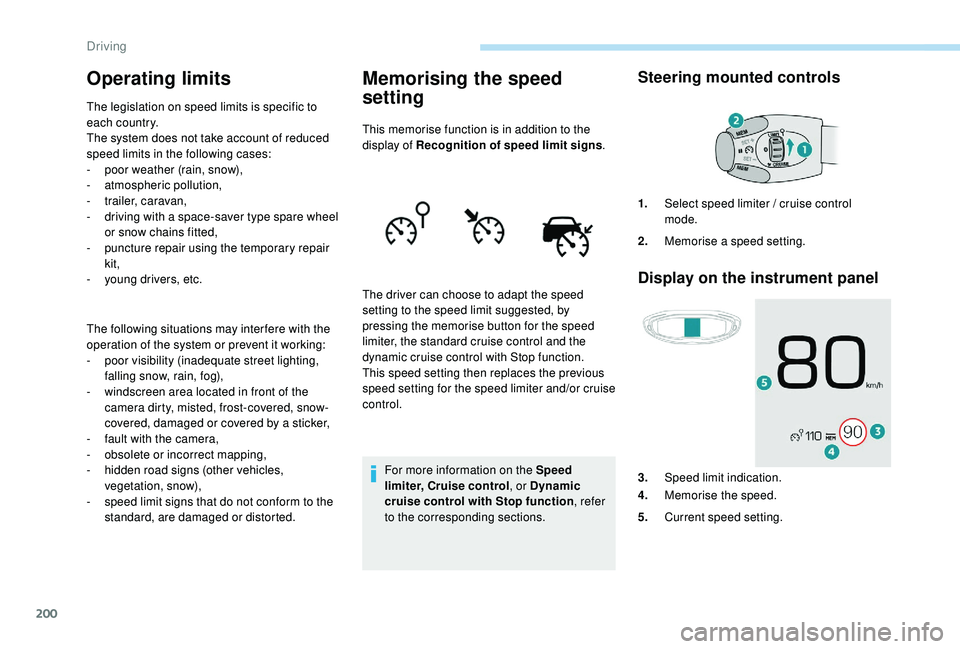
Display on the instrument panel
The driver can choose to adapt the speed
setting to the speed limit suggested, by
pressing the memorise button for the speed
limiter, the standard cruise control and the
dynamic cruise control with Stop function.
This speed setting then replaces the previous
speed setting for the speed limiter and/or cruise
control. 1.
Select speed limiter / cruise control
mode.
2. Memorise a speed setting.
3. Speed limit indication.
4. Memorise the speed.
5. Current speed setting.
Driving
Page 204 of 404
202
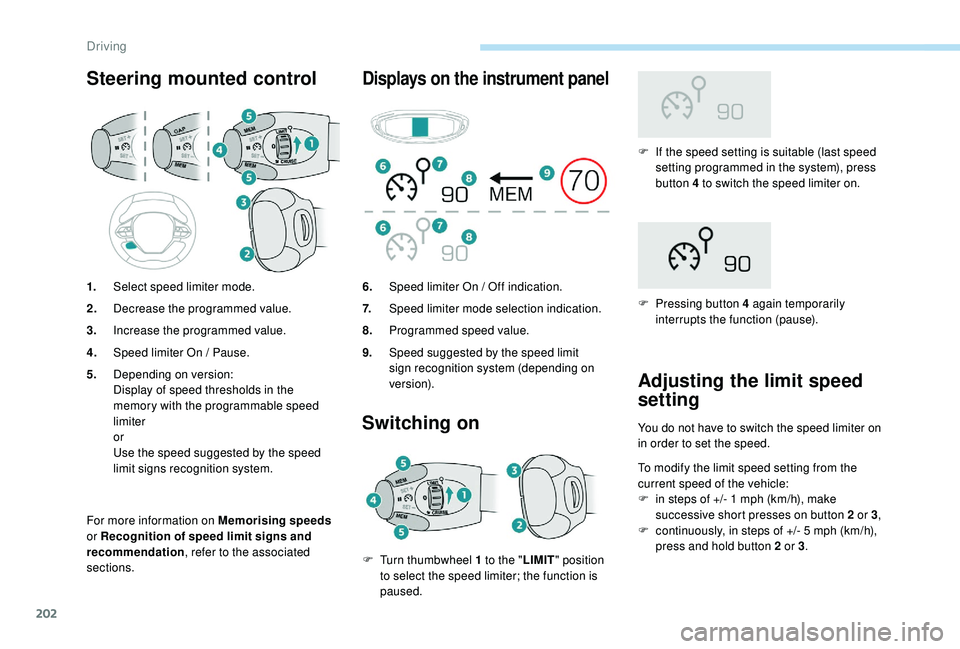
Steering mounted control
For more information on Memorising speeds
or Recognition of speed limit signs and
recommendation, refer to the associated
sections.
Displays on the instrument panel
Switching on
F If the speed setting is suitable (last speed setting programmed in the system), press
button 4
to switch the speed limiter on.
F
P
ressing button 4 again temporarily
interrupts the function (pause).
Adjusting the limit speed
setting
You do not have to switch the speed limiter on
in order to set the speed.
To modify the limit speed setting from the
current speed of the vehicle:
F
i
n steps of +/- 1 mph (km/h), make
successive short presses on button 2
or 3,
F
c
ontinuously, in steps of +/- 5 mph (km/h),
press and hold button 2
or 3.
1.
Select speed limiter mode.
2. Decrease the programmed value.
3. Increase the programmed value.
4. Speed limiter On / Pause.
5. Depending on version:
Display of speed thresholds in the
memory with the programmable speed
limiter
or
Use the speed suggested by the speed
limit signs recognition system. 6.
Speed limiter On / Off indication.
7. Speed limiter mode selection indication.
8. Programmed speed value.
9. Speed suggested by the speed limit
sign recognition system (depending on
ve r s i o n).
F
T
urn thumbwheel 1
to the " LIMIT" position
to select the speed limiter; the function is
paused.
Driving
Page 206 of 404
204
Cruise control
System which automatically
maintains the cruising speed of the
vehicle at a setting programmed by
the driver, without any action on the
accelerator pedal.
The cruise control is switched on manually.
It requires a minimum vehicle speed of 25
mph
(40
km/h).
With a manual gearbox, it requires the
engagement of third gear or higher.
With an automatic gearbox, it requires the
engagement of the selector in mode D or of
second gear or higher in mode M .
Speed regulation remains active after
changing gear on vehicles fitted with a
manual gearbox and Stop & Start. The operation of the cruise control can be
interrupted (pause):
-
b y pressing control 4 or by pressing the
brake pedal,
-
a
utomatically, if operation of the dynamic
stability control system is triggered.
Switching off the ignition cancels any
programmed speed setting.
The cruise control system is a driving aid
that cannot, in any circumstances, replace
the need to obser ve speed limits, nor the
need for vigilance on the part of the driver.
As a safety measure, you are advised to
keep your feet near the pedals at all times.
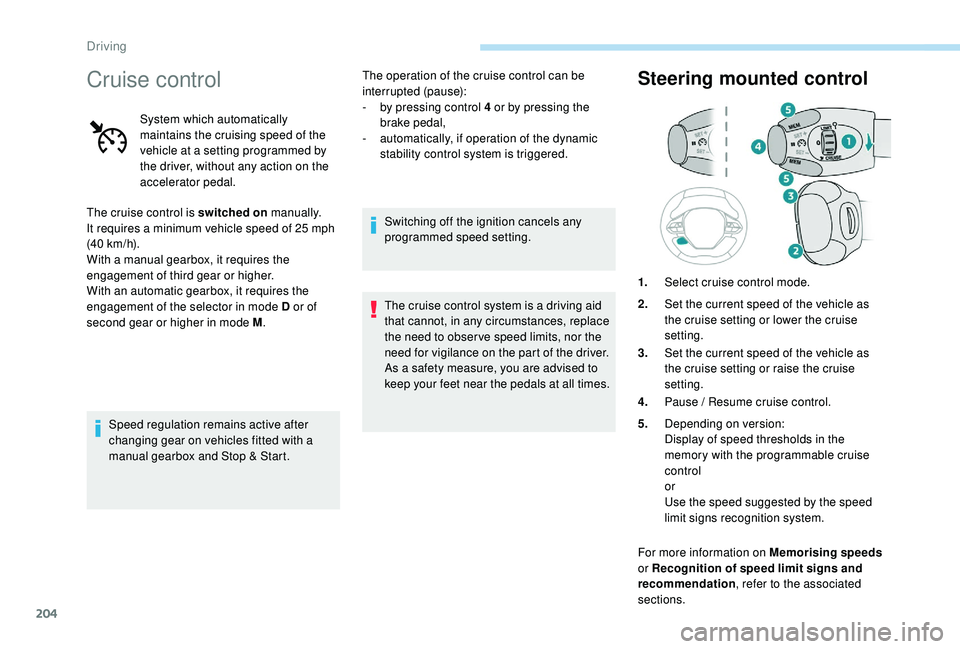
Steering mounted control
1. Select cruise control mode.
2. Set the current speed of the vehicle as
the cruise setting or lower the cruise
setting.
3. Set the current speed of the vehicle as
the cruise setting or raise the cruise
setting.
4. Pause / Resume cruise control.
5. Depending on version:
Display of speed thresholds in the
memory with the programmable cruise
control
or
Use the speed suggested by the speed
limit signs recognition system.
For more information on Memorising speeds
or Recognition of speed limit signs and
recommendation , refer to the associated
sections.
Driving
Page 210 of 404
208
The brake lamps illuminate as soon as
the braking system is activated with
deceleration of the vehicle.
The dynamic cruise control system
is a driving aid that cannot, in any
circumstances, replace the need to obser ve
speed limits and safety distances, nor the
need for vigilance on the part of the driver.
It is recommended that you always keep
your feet close to the pedals.
The driver must be ready to take back
control of their vehicle at any time, using the
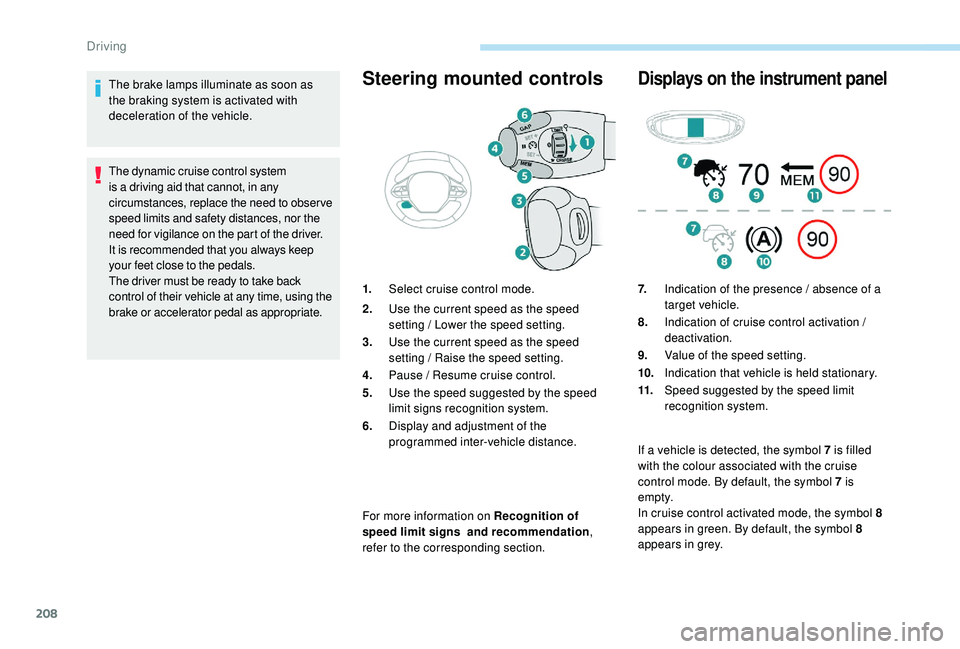
brake or accelerator pedal as appropriate.Steering mounted controls
For more information on Recognition of
speed limit signs and recommendation,
refer to the corresponding section.
Displays on the instrument panel
1. Select cruise control mode.
2. Use the current speed as the speed
setting / Lower the speed setting.
3. Use the current speed as the speed
setting / Raise the speed setting.
4. Pause / Resume cruise control.
5. Use the speed suggested by the speed
limit signs recognition system.
6. Display and adjustment of the
programmed inter-vehicle distance. 7.
Indication of the presence / absence of a
target vehicle.
8. Indication of cruise control activation /
deactivation.
9. Value of the speed setting.
10. Indication that vehicle is held stationary.
11. Speed suggested by the speed limit
recognition system.
If a vehicle is detected, the symbol 7
is filled
with the colour associated with the cruise
control mode. By default, the symbol 7
is
e m pt y.
In cruise control activated mode, the symbol 8
appears in green. By default, the symbol 8
appears in grey.
Driving