2017 PEUGEOT 5008 length
[x] Cancel search: lengthPage 76 of 404
74
Driving position
Adopting a good driving position helps improve
your comfort and protection.
It also optimises interior and exterior visibility
as well as access to controls.
Sitting comfortably
Whether or not your vehicle has certain seat
adjustments described in this section depends
on the trim level and country of sale.
Driver’s side
As a safety precaution, adjust the seats
only when the vehicle is stationary.If your vehicle has electric seats, the
ignition must be on to adjust them.
Passenger’s side
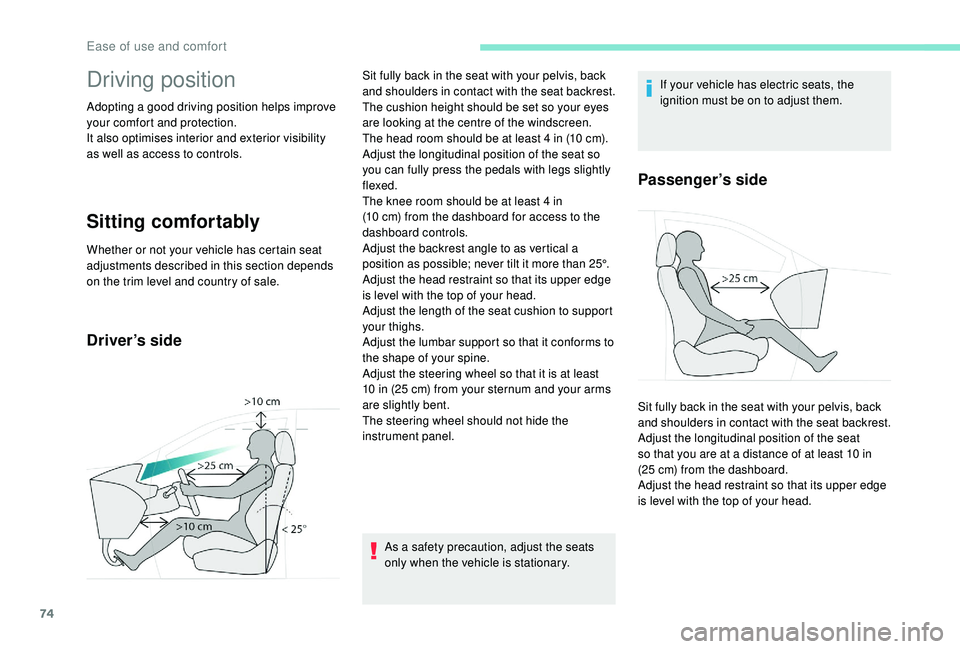
Sit fully back in the seat with your pelvis, back
and shoulders in contact with the seat backrest.
The cushion height should be set so your eyes
are looking at the centre of the windscreen.
The head room should be at least 4
in (10 cm).
Adjust the longitudinal position of the seat so
you can fully press the pedals with legs slightly
flexed.
The knee room should be at least 4
in
(10
cm) from the dashboard for access to the
dashboard controls.
Adjust the backrest angle to as vertical a
position as possible; never tilt it more than 25°.
Adjust the head restraint so that its upper edge
is level with the top of your head.
Adjust the length of the seat cushion to support
your thighs.
Adjust the lumbar support so that it conforms to
the shape of your spine.
Adjust the steering wheel so that it is at least
10
in (25 cm) from your sternum and your arms
are slightly bent.
The steering wheel should not hide the
instrument panel. Sit fully back in the seat with your pelvis, back
and shoulders in contact with the seat backrest.
Adjust the longitudinal position of the seat
so that you are at a distance of at least 10
in
(25
cm) from the dashboard.
Adjust the head restraint so that its upper edge
is level with the top of your head.
Ease of use and comfort
Page 79 of 404
77
"AGR" certified seats
Additional adjustments
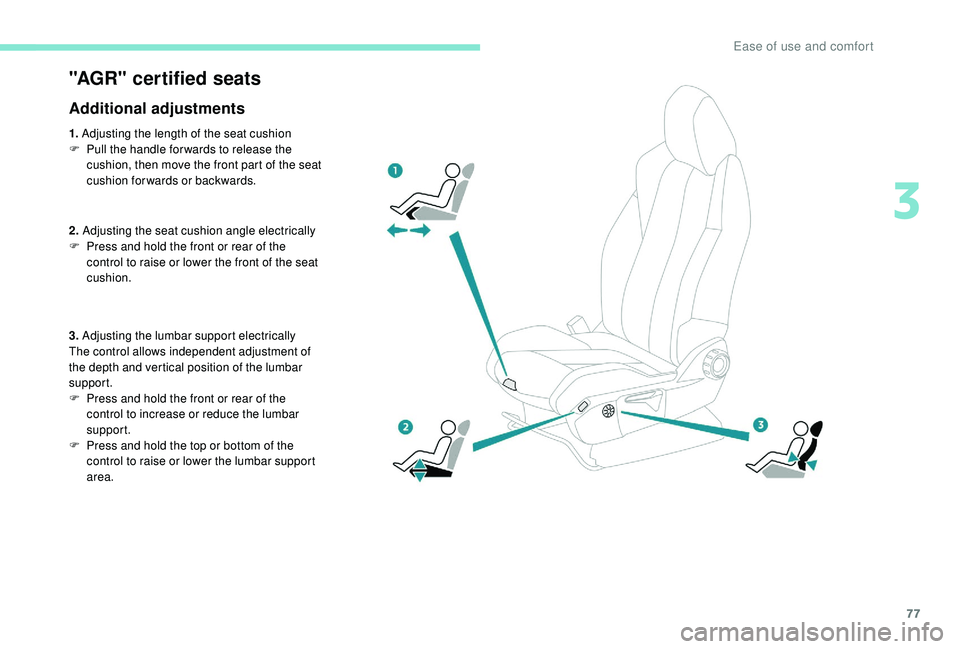
1. Adjusting the length of the seat cushion
F P ull the handle for wards to release the
cushion, then move the front part of the seat
cushion forwards or backwards.
2. Adjusting the seat cushion angle electrically
F
P
ress and hold the front or rear of the
control to raise or lower the front of the seat
cushion.
3. Adjusting the lumbar support electrically
The control allows independent adjustment of
the depth and vertical position of the lumbar
support.
F
P
ress and hold the front or rear of the
control to increase or reduce the lumbar
support.
F
P
ress and hold the top or bottom of the
control to raise or lower the lumbar support
area.
3
Ease of use and comfort
Page 82 of 404
80
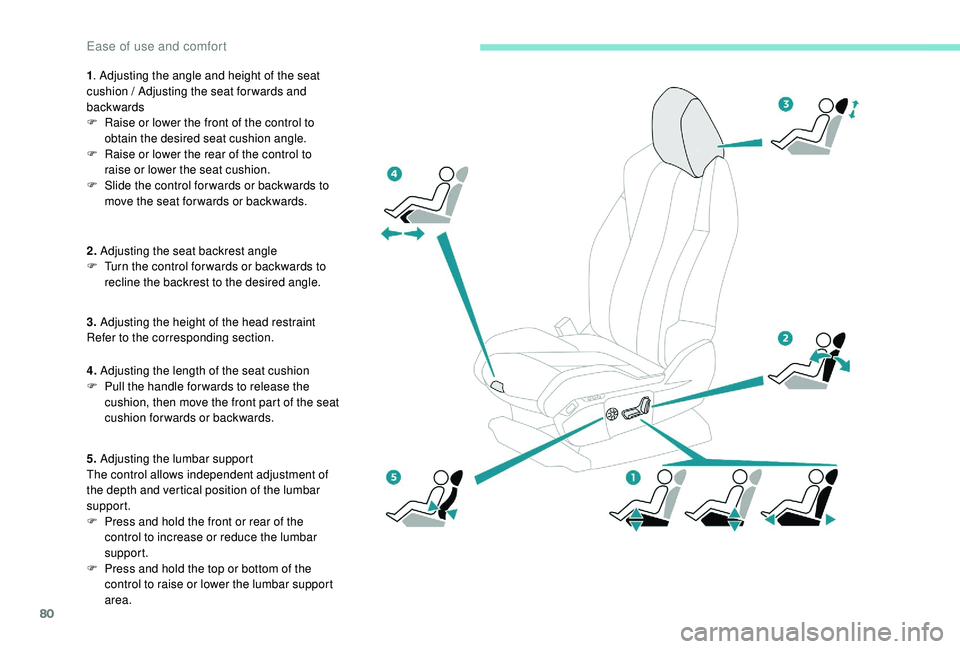
1. Adjusting the angle and height of the seat
cushion / Adjusting the seat forwards and
backwards
F
R
aise or lower the front of the control to
obtain the desired seat cushion angle.
F
R
aise or lower the rear of the control to
raise or lower the seat cushion.
F
S
lide the control for wards or backwards to
move the seat for wards or backwards.
2. Adjusting the seat backrest angle
F
T
urn the control for wards or backwards to
recline the backrest to the desired angle.
3. Adjusting the height of the head restraint
Refer to the corresponding section.
4. Adjusting the length of the seat cushion
F
P
ull the handle for wards to release the
cushion, then move the front part of the seat
cushion forwards or backwards.
5. Adjusting the lumbar support
The control allows independent adjustment of
the depth and vertical position of the lumbar
support.
F
P
ress and hold the front or rear of the
control to increase or reduce the lumbar
support.
F
P
ress and hold the top or bottom of the
control to raise or lower the lumbar support
area.
Ease of use and comfort
Page 137 of 404
135
Rear wiperReverse gear
When reverse gear is engaged, the rear wiper
will come into operation automatically if the
front windscreen wipers are operating.
The system is activated or deactivated via the
vehicle parameters menu in the screen.
This function is activated by default.In the event of snow or hard frost or if
a bicycle carrier is fitted to a towbar,
deactivate the automatic rear wiper via the
vehicle settings menu.
Front screenwash
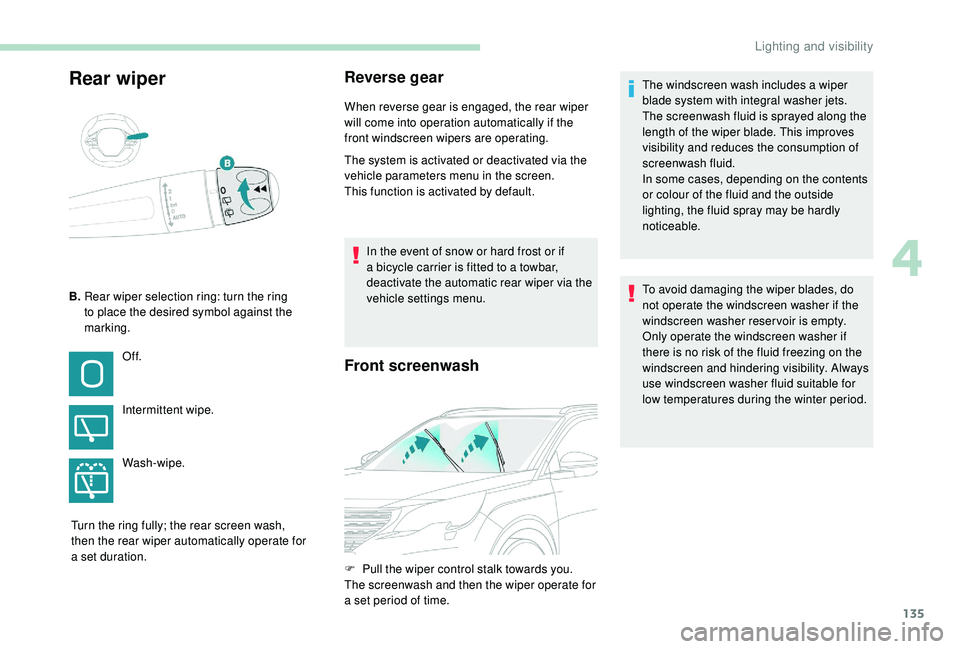
B. Rear wiper selection ring: turn the ring
to place the desired symbol against the
marking.
Of f.
Intermittent wipe.
Wash-wipe.
Turn the ring fully; the rear screen wash,
then the rear wiper automatically operate for
a set duration. To avoid damaging the wiper blades, do
not operate the windscreen washer if the
windscreen washer reservoir is empty.
Only operate the windscreen washer if
there is no risk of the fluid freezing on the
windscreen and hindering visibility. Always
use windscreen washer fluid suitable for
low temperatures during the winter period.
F
P
ull the wiper control stalk towards you.
The screenwash and then the wiper operate for
a set period of time. The windscreen wash includes a wiper
blade system with integral washer jets.
The screenwash fluid is sprayed along the
length of the wiper blade. This improves
visibility and reduces the consumption of
screenwash fluid.
In some cases, depending on the contents
or colour of the fluid and the outside
lighting, the fluid spray may be hardly
noticeable.
4
Lighting and visibility
Page 154 of 404
152
Advice
The driver must ensure that passengers use
the seat belts correctly and that they are all
fastened before setting off.
Wherever you are seated in the vehicle,
always fasten your seat belt, even for short
journeys.
Do not interchange the seat belt buckles as
they will not fulfil their role fully.
The seat belts are fitted with an inertia reel
permitting automatic adjustment of the length
of the strap to your size. The seat belt is
stowed automatically when not in use.
Before and after use, ensure that the seat belt
is reeled in correctly.
The lower part of the strap must be positioned
as low as possible on the pelvis.
The upper part must be positioned in the
hollow of the shoulder.
The inertia reels have an automatic blocking
device at the time of a collision, during
sudden braking or if the vehicle turns over.
You can release the device by pulling the
strap firmly and then releasing it so that it
reels in slightly.In order to be effective, a seat belt must:
-
b e tightened as close to the body as
possible,
-
b
e pulled in front of you with a smooth
movement, checking that it does not twist,
-
b
e used to restrain only one person,
-
n
ot show any signs of cuts or fraying,
-
n
ot be converted or modified to avoid
affecting its performance.
In accordance with current safety regulations,
for all repairs on your vehicle's seat belts, go
to a qualified workshop with the skills and
equipment needed, which a PEUGEOT dealer
is able to provide.
Have your seat belts checked regularly by a
PEUGEOT dealer or a qualified workshop,
particularly if the straps show signs of
damage.
Clean the seat belt straps with soapy water or
a textile cleaning product, sold by PEUGEOT
dealers.
After folding or moving a seat or rear bench
seat, ensure that the seat belt is positioned
and reeled in correctly. Recommendations for children
Use a suitable child seat if the passenger is
less than 12
years old or shorter than one and
a half metres.
Never use the same seat belt to secure more
than one person.
Never allow a child to travel on your lap.
For more information on Child seats , refer to
the corresponding section.
In the event of an impact
Depending on the nature and seriousness
of the impact , the pyrotechnic device may
be deployed before and independently of the
airbags. Deployment of the pretensioners
is accompanied by a slight discharge of
harmless smoke and a noise, due to the
activation of the pyrotechnic cartridge
incorporated in the system.
In all cases, the airbag warning lamp comes
on.
Following an impact, have the seat belts
system checked, and, if necessary, replaced,
by a PEUGEOT dealer or a qualified
workshop.
Safety
Page 197 of 404
195
Operating fault
In the event of a fault with the
system, this warning lamp
flashes for a few moments in the
instrument panel, then remains on,
accompanied by the display of a
message.
Have it checked by a PEUGEOT dealer or a
qualified workshop.
If a fault occurs in STOP mode, the engine may
stall.
All of the instrument panel warning lamps come on.
It is then necessary to switch off the ignition and
start the engine again with the key or the
"START/STOP" button.
The Stop & Start system requires a
12 V battery of specific technology and
specification.
All work on this type of battery must be
carried out only by a PEUGEOT dealer or
a qualified workshop.
For more information on the 12
V batter y,
refer to the corresponding section.
Under-inflation detection
System which automatically checks the
pressures of the tyres while driving.
The system monitors the pressures in the four
tyres, once the vehicle is moving.
It compares the information given by the wheel
speed sensors with reference values, which
must be reinitialised ever y time the tyre
pressures are adjusted or a wheel changed .
The system triggers an alert as soon as it
detects a drop in the inflation pressure of one
or more tyres.
The under-inflation detection system does
not replace the need for vigilance on the
part of the driver.
This system does not avoid the need to
check the tyre pressures (including the
spare wheel) every month as well as
before a long journey.
Driving with under-inflated tyres worsens
road-holding, lengthens braking distances,
causes premature wear of the tyres,
particularly in adverse conditions (heavy
loads, high speeds, long journeys). Driving with under-inflated tyres
increases fuel consumption.
The inflation pressures defined for your
vehicle can be found on the tyre pressure
label.
For more information on the
Identification markings , refer to the
corresponding section.
Checking tyre pressures
This check should be done when the tyres
are "cold" (vehicle stopped for 1
hour or
after a journey of less than 6
miles (10 km)
at moderate speeds).
Other wise, add 0.3
bar to the pressures
shown on the label.
Snow chains
The system does not have to be
reinitialised after fitting or removing snow
chains.
6
Driving