2017 PEUGEOT 5008 open bonnet
[x] Cancel search: open bonnetPage 33 of 404
31
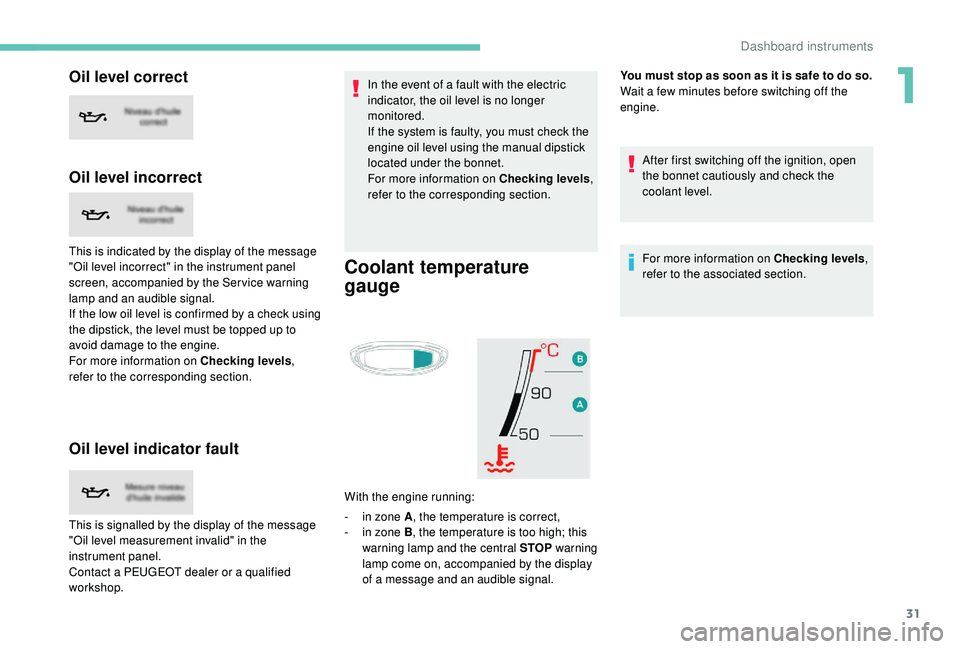
Oil level correct
Oil level incorrect
This is indicated by the display of the message
"Oil level incorrect" in the instrument panel
screen, accompanied by the Ser vice warning
lamp and an audible signal.
If the low oil level is confirmed by a check using
the dipstick, the level must be topped up to
avoid damage to the engine.
For more information on Checking levels,
refer to the corresponding section.
Oil level indicator fault
Coolant temperature
gauge
With the engine running:
-
i
n zone A , the temperature is correct,
-
i
n zone B , the temperature is too high; this
warning lamp and the central STOP warning
lamp come on, accompanied by the display
of a message and an audible signal. You must stop as soon as it is safe to do so.
Wait a few minutes before switching off the
engine.
After first switching off the ignition, open
the bonnet cautiously and check the
coolant level.
For more information on Checking levels ,
refer to the associated section.
This is signalled by the display of the message
"Oil level measurement invalid" in the
instrument panel.
Contact a PEUGEOT dealer or a qualified
workshop. In the event of a fault with the electric
indicator, the oil level is no longer
monitored.
If the system is faulty, you must check the
engine oil level using the manual dipstick
located under the bonnet.
For more information on Checking levels
,
refer to the corresponding section.
1
Dashboard instruments
Page 63 of 404
61
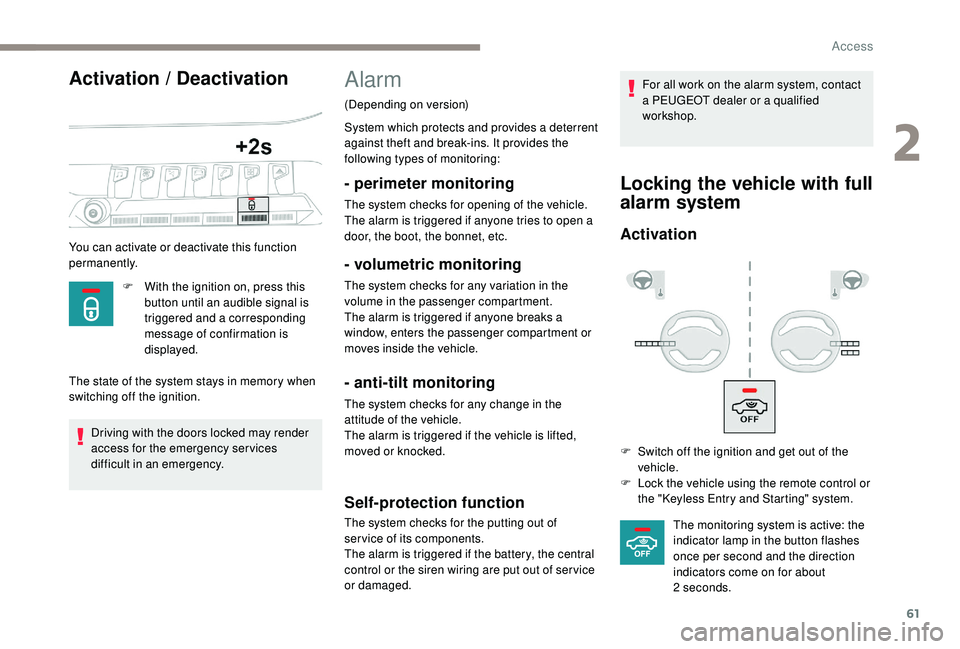
Activation / Deactivation
You can activate or deactivate this function
permanently.F
W
ith the ignition on, press this
button until an audible signal is
triggered and a corresponding
message of confirmation is
displayed.
The state of the system stays in memory when
switching off the ignition.
Driving with the doors locked may render
access for the emergency services
difficult in an emergency.
Alarm
(Depending on version)
System which protects and provides a deterrent
against theft and break-ins. It provides the
following types of monitoring:
- perimeter monitoring
The system checks for opening of the vehicle.
The alarm is triggered if anyone tries to open a
door, the boot, the bonnet, etc.
- volumetric monitoring
The system checks for any variation in the
volume in the passenger compartment.
The alarm is triggered if anyone breaks a
window, enters the passenger compartment or
moves inside the vehicle.
- anti-tilt monitoring
The system checks for any change in the
attitude of the vehicle.
The alarm is triggered if the vehicle is lifted,
moved or knocked.
Self-protection function
The system checks for the putting out of
ser vice of its components.
The alarm is triggered if the battery, the central
control or the siren wiring are put out of ser vice
or damaged. For all work on the alarm system, contact
a PEUGEOT dealer or a qualified
workshop.
Locking the vehicle with full
alarm system
Activation
F Switch off the ignition and get out of the
vehicle.
F
L
ock the vehicle using the remote control or
the "
K
eyless Entry and Starting" system.The monitoring system is active: the
indicator lamp in the button flashes
once per second and the direction
indicators come on for about
2
seconds.
2
Access
Page 64 of 404
62
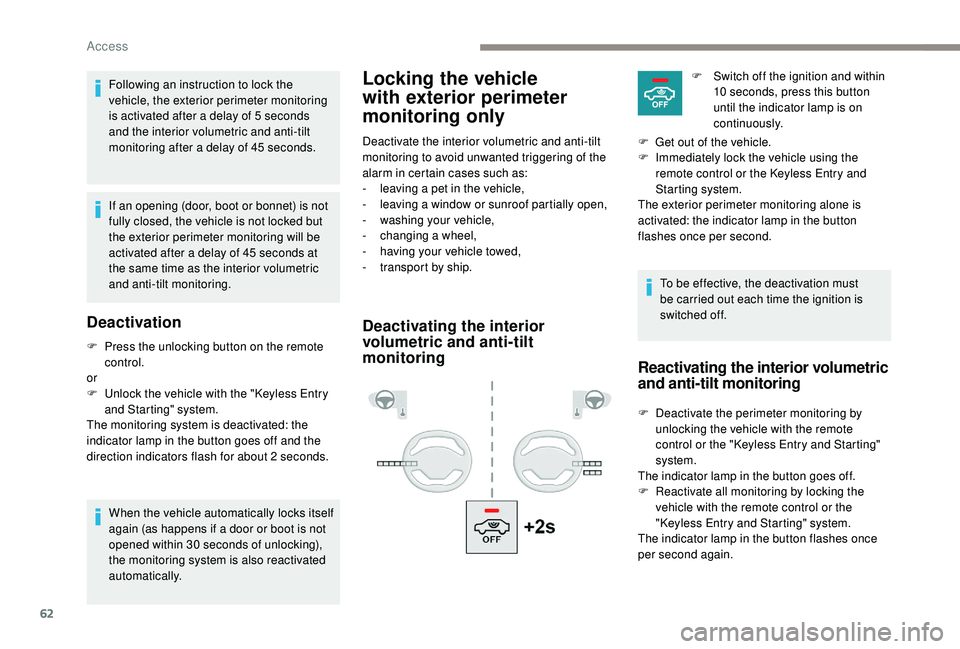
Locking the vehicle
with exterior perimeter
monitoring onlyFollowing an instruction to lock the
vehicle, the exterior perimeter monitoring
is activated after a delay of 5 seconds
and the interior volumetric and anti-tilt
monitoring after a delay of 45
seconds.
If an opening (door, boot or bonnet) is not
fully closed, the vehicle is not locked but
the exterior perimeter monitoring will be
activated after a delay of 45
seconds at
the same time as the interior volumetric
and anti-tilt monitoring.
Deactivation
F Press the unlocking button on the remote control.
or
F
U
nlock the vehicle with the "
K
eyless Entry
and Starting" system.
The monitoring system is deactivated: the
indicator lamp in the button goes off and the
direction indicators flash for about 2
seconds.
When the vehicle automatically locks itself
again (as happens if a door or boot is not
opened within 30
seconds of unlocking),
the monitoring system is also reactivated
automatically. Deactivate the interior volumetric and anti-tilt
monitoring to avoid unwanted triggering of the
alarm in certain cases such as:
-
l
eaving a pet in the vehicle,
-
l
eaving a window or sunroof partially open,
-
w
ashing your vehicle,
-
c
hanging a wheel,
-
h
aving your vehicle towed,
-
t
ransport by ship.
Deactivating the interior
volumetric and anti-tilt
monitoring
To be effective, the deactivation must
be carried out each time the ignition is
switched off.F
S
witch off the ignition and within
10 seconds, press this button
until the indicator lamp is on
continuously.
F
G
et out of the vehicle.
F
I
mmediately lock the vehicle using the
remote control or the
K
eyless Entry and
Starting system.
The exterior perimeter monitoring alone is
activated: the indicator lamp in the button
flashes once per second.
Reactivating the interior volumetric
and anti-tilt monitoring
F Deactivate the perimeter monitoring by unlocking the vehicle with the remote
control or the "
K
eyless Entry and Starting"
system.
The indicator lamp in the button goes off.
F
R
eactivate all monitoring by locking the
vehicle with the remote control or the
"Keyless Entry and Starting" system.
The indicator lamp in the button flashes once
per second again.
Access
Page 196 of 404
194
Deactivation / Reactivation
In certain circumstances, such as the need
to maintain the temperature in the passenger
compartment, it may be useful to deactivate the
Stop & Start system.
The system can be deactivated at any time,
once the ignition is switched on.
If the engine is in STOP mode, it restarts
immediately.
The Stop & Start system is reactivated
automatically every time the ignition is switched
on.
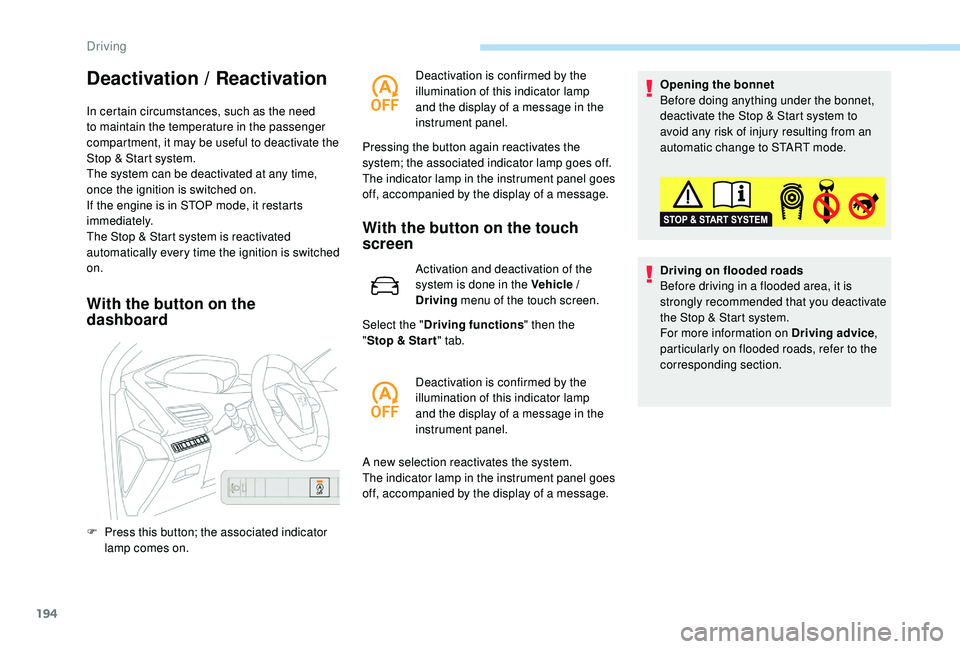
With the button on the
dashboardWith the button on the touch
screen
Activation and deactivation of the
system is done in the Vehicle /
Driving
menu of the touch screen.
Select the " Driving functions " then the
" Stop & Star t " tab.
A new selection reactivates the system.
The indicator lamp in the instrument panel goes
off, accompanied by the display of a message. Opening the bonnet
Before doing anything under the bonnet,
deactivate the Stop & Start system to
avoid any risk of injury resulting from an
automatic change to START mode.
Driving on flooded roads
Before driving in a flooded area, it is
strongly recommended that you deactivate
the Stop & Start system.
For more information on Driving advice
,
particularly on flooded roads, refer to the
corresponding section.
F
P
ress this button; the associated indicator
lamp comes on. Deactivation is confirmed by the
illumination of this indicator lamp
and the display of a message in the
instrument panel.
Pressing the button again reactivates the
system; the associated indicator lamp goes off.
The indicator lamp in the instrument panel goes
off, accompanied by the display of a message.
Deactivation is confirmed by the
illumination of this indicator lamp
and the display of a message in the
instrument panel.
Driving
Page 258 of 404
256
Bonnet
Before doing anything under the bonnet,
deactivate the Stop & Start system to
avoid any risk of injury resulting from an
automatic change to START mode.
The location of the interior bonnet release
lever prevents opening of the bonnet when
the left-hand front door is shut.
When the engine is hot, handle the
exterior safety catch and the stay with
care (risk of burns), using the protected
area.
When the bonnet is open, take care not to
damage the safety catch.
Do not open the bonnet under very windy
conditions.
The cooling fan may star t after
switching off the engine: take care
with articles and clothing that might be
caught by the fan blades.
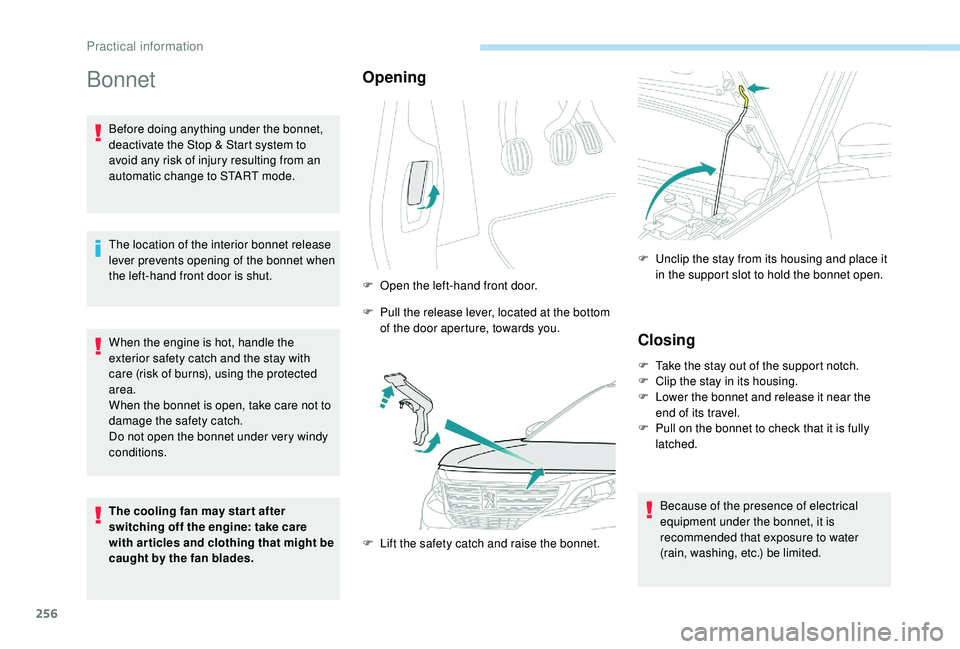
Opening
F Open the left-hand front door.
F
P
ull the release lever, located at the bottom
of the door aperture, towards you.
F
L
ift the safety catch and raise the bonnet. F
U
nclip the stay from its housing and place it
in the support slot to hold the bonnet open.
Closing
F Take the stay out of the support notch.
F C lip the stay in its housing.
F
L
ower the bonnet and release it near the
end of its travel.
F
P
ull on the bonnet to check that it is fully
latched.
Because of the presence of electrical
equipment under the bonnet, it is
recommended that exposure to water
(rain, washing, etc.) be limited.
Practical information
Page 261 of 404
259
Topping up the engine oil level
The location of the oil filler cap is shown in the
corresponding underbonnet layout view.
F
U
nscrew the oil filler cap to access the filler
opening.
F
A
dd oil in small quantities, avoiding any
spills on engine components (risk of fire).
F
W
ait a few minutes before checking the
level again using the dipstick.
F
A
dd more oil if necessary.
F
A
fter checking the level, carefully refit the oil
filler cap and the dipstick in its tube.
After topping up the oil, the check when
switching on the ignition with the oil level
indicator in the instrument panel is not
valid during the 30
minutes after topping
up.
Engine oil change
Refer to the manufacturer's service schedule
for details of the inter val for this operation.
In order to maintain the reliability of the engine
and emissions control system, never use
additives in the engine oil.
Brake fluid level
The fluid level should be close to the
"MA X" mark. If it is not, check the
brake pad wear.
Changing the coolant
Refer to the manufacturer's service schedule
for details of the inter val for this operation.
Fluid specification
This fluid must conform to the manufacturer's
recommendations.
Coolant level
Check the coolant level regularly.
It is normal to top up the fluid
between two services.
The check and top-up must only be done with
the engine cold.
A low coolant level presents a risk of serious
damage to your engine.
The coolant level should be close to the "MA X"
mark but should never exceed it.
If the level is close to or below the "MIN" mark,
it is essential to top up. When the engine is hot, the temperature of the
coolant is regulated by the fan.
In addition, as the cooling system is
pressurised, wait at least one hour after
switching off the engine before carrying out any
work.
To avoid the risk of scalding when you need to
top up in an emergency, place a cloth around
the cap and unscrew the cap by two turns to
allow the pressure to drop.
Once the pressure has dropped, remove the
cap and top up to the required level.
The cooling fan may star t after
switching off the engine: take care
with articles and clothing that might be
caught by the fan blades.Fluid specification
This fluid must conform to the manufacturer's
recommendations.
Screenwash fluid level
Top up to the required level when
necessary.
7
Practical information
Page 281 of 404
279
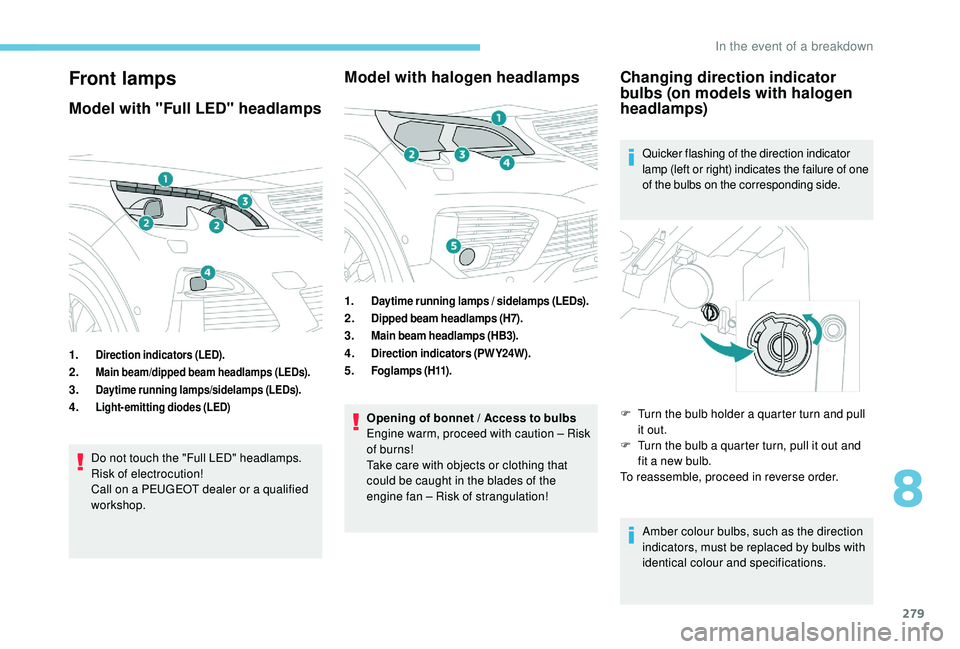
Front lamps
Model with "Full LED" headlamps
1.Direction indicators (LED).
2.Main beam/dipped beam headlamps (LEDs).
3.Daytime running lamps/sidelamps (LEDs).
4.Light-emitting diodes (LED)
Do not touch the "Full LED" headlamps.
Risk of electrocution!
Call on a PEUGEOT dealer or a qualified
workshop.
Model with halogen headlamps
1.Daytime running lamps / sidelamps (LEDs).
2.Dipped beam headlamps (H7).
3.Main beam headlamps (HB3).
4.Direction indicators (PWY24W).
5.Fo g l a m p s ( H11) .
Opening of bonnet / Access to bulbs
Engine warm, proceed with caution – Risk
of burns!
Take care with objects or clothing that
could be caught in the blades of the
engine fan – Risk of strangulation!
Changing direction indicator
bulbs (on models with halogen
headlamps)
Quicker flashing of the direction indicator
lamp (left or right) indicates the failure of one
of the bulbs on the corresponding side.
Amber colour bulbs, such as the direction
indicators, must be replaced by bulbs with
identical colour and specifications.
F
T
urn the bulb holder a quarter turn and pull
it out.
F
T
urn the bulb a quarter turn, pull it out and
fit a new bulb.
To reassemble, proceed in reverse order.
8
In the event of a breakdown
Page 397 of 404
299
Key ...................................................... 49, 56-57
Key, electronic ........................................... 52-55
Keyless Entry and Starting
.........52
, 54-56, 179
Key not recognised
................................ 18
0 -181
Key with remote control
................................17
7
Kit, hands-free
............................... 2
8-29, 15 -16
Kit, puncture repair
............................... 2
67-269
Kit, temporary puncture repair
.......
267-270, 272 Map reading lamps
................................
11
6 -117
Markings, identification
.................................
296
Massage function ...........................................
82
Massage, multi-point
......................................
82
Mat
................................................................
11 6
Memorising a speed
..............................
19
7-198
Menu
...............................................................
13
Menus (audio)
........................................
4-5, 4-6
Messages
........................................................
32
Messages, quick
............................................. 3
2
Mirror, rear view ..............................................
84
Mirrors, door ...............83-84, 104 -105, 227-229
Mirror, vanity
.................................................
111
Misfuel prevention
.........................................
246
Modularity, seats
.............................................
92
Motorised tailgate
..................................... 6
5 - 67
Mountings, Isofix
...........................................
166K
J
LM
Labels, identification ..................................... 296
Lamp, boot .................................................... 123
Lamps, parking
............................................. 127
Lamps, rear
................................................... 281
Lane Departure Warning
System, Active
................................ 17, 222, 229
Lane Departure Warning System (LDWS)
............................. 17, 221-222
LEDs - Light-emitting diodes
................................. 126, 278-279, 281
Level, brake fluid
........................................... 259
Level, Diesel additive
............................260-261
Level, engine coolant
..............................31, 259
Level, engine oil
.............................. 30, 258-259
Levels and checks
..............................
...257-2 6 0
Level, screenwash fluid
................13
5, 259-260
Light-emitting diodes - LEDs
.....................126, 278-279, 281
Lighting
............................................................ 25
Lighting, cornering
........................................ 13 3
Lighting dimmer
.............................................. 35
Lighting, exterior
........................................... 124
Lighting, guide-me home
.................51, 12 9 -13 0
Lighting, interior
...............................
......11 6 -117
Lighting, ambient ..................................... 35, 117
Lighting, welcome
......................................... 13 0
Loading
................................................. 12 2, 255
Load reduction mode
.................................... 252
Locating your vehicle
...................................... 51
Locking
...............................
................50, 54, 56
Locking from the inside
...................................60
Low fuel level
................................................ 24
5
Jack
...............................
.... 268, 273-274, 26, 10
Jump starting
................................................ 286
I
i-Cockpit amplify function ....82, 93, 114 -115 , 191
Ignition ................ ............................. 178 , 18 0, 31
Immobiliser, electronic
............................56, 17 7
Indicator, AdBlue
® range ................................. 32
Indicator, coolant temperature ........................ 31
Indicator, engine oil level
.......................... 30, 34
Indicator lamps, operation
........................ 12
, 14
Indicator lamps, status
.................................... 14
I
ndicators, direction
.............................. 1 2 7, 279
Inflating tyres
................................................ 296
Inflating tyres (using the kit)
.......... 2
69-270, 272
Instrument panel
.............................. 8 -10, 34-37
Intelligent Traction Control
............................ 143
Internet browser
.............................................. 18
I
SOFIX
.......................................................... 167
Isofix mountings
............................................ 166
N
Net ................................................................. 121
Net, high load retaining .................................12 2
Number plate lamps
...................................... 283
O
Oil change ............................................. 25 8-259
Oil consumption .................................... 258-259
Oil, engine
....................................... 13, 258-259
On-board tools
...................................... 267-269
Opening the bonnet
...................................... 256
Opening the boot
...................................... 52, 64
Opening the doors
.................................... 52, 63
Opening the fuel filler flap
.............................245
Opening the windows
..................................... 50
.
Alphabetical index