2017 PEUGEOT 5008 ECU
[x] Cancel search: ECUPage 4 of 404
2
.
.
Head-up digital screen 8
I ndicator and warning lamps 1 2
Indicators
28
Manual test
3
4
Distance recorders
3
5
Lighting dimmer
3
5
Trip computer
3
6
Monochrome screen C
3
8
Touch screen
4
0
Remote control
4
9
K
eyless Entry and Starting
5
2
Back-up procedures
5
7
Anti-intrusion security
6
0
Central locking
6
0
Alarm
61
Doors
63
Boot
64
Hands-free tailgate
6
5
Electric windows
6
9
Panoramic opening sunroof
7
0Driving position
7
4
Front seats
7
6
Steering wheel adjustment
8
3
Mirrors 83
Second row seats
8
5
Third row seats
8
8
Seat modularity
9
2
i- Cockpit Amplify function
9
3
Heating and Ventilation 9 4
Manual air conditioning 9 6
Semi-automatic mono-zone air conditioning
9
7
Automatic dual-zone air conditioning
9
9
Recirculation of interior air
1
03
Front demist – defrost
1
03
Heated windscreen
1
04
Rear screen demist – defrost
1
04
Programmable heating
1
05
Front fittings
1
10
Courtesy lamps
1
16
Interior ambient lighting
1
17
Rear fittings
1
18
Boot fittings
1
20Exterior lighting control stalk
1
24
Direction indicators
1
27
Headlamp adjustment
1
28
Automatic illumination of headlamps
1
28
Automatic headlamp dipping
1
31
Cornering lighting
1
33
Wiper control stalk
1
34
Automatic rain sensitive wipers
1
36
General safety recommendations
1
38
Hazard warning lamps
1
39
H or n
13
9
Emergency or assistance call
1
39
Electronic stability control (ESC)
1
42
Advanced Grip Control
1
45
Hill Assist Descent Control
1
47
Seat belts
1
48
Airbags
1
53
Child seats
1
57
Deactivating the passenger front airbag
1
58
ISOFIX mountings and child seats
1
66
i-Size child seats
1
70
Manual child lock
1
73
Electric child lock
1
74
Over view
Dashboard instruments Ease of use and comfort
Safety
Access Lighting and visibility
Eco-driving
Contents
Page 29 of 404

27
Warning /
indicator lampState
Cause Action / Observations
They light up,
accompanied by the
display of the "Parking
brake fault" message. The parking brake is faulty:
manual and automatic
functions may not be working.
When stationary, to immobilise your vehicle:
F
P
ull and hold the control lever for approximately 7 to 15 seconds, until
the warning lamp comes on in the instrument panel.
If this procedure does not work, you should secure your vehicle as
follows:
F
P
ark on a level sur face.
F
W
ith a manual gearbox, engage a gear.
F
W
ith an automatic gearbox, select mode P, then put the supplied
chocks against one of the wheels.
Call a PEUGEOT dealer or a qualified workshop.
They light up,
accompanied by the
display of the "Parking
brake fault" message. The parking brake is not
operating at maximum
efficiency and cannot secure
the vehicle in every situation. You should secure your vehicle as follows:
F
P
ark on a level sur face.
F
W
ith a manual gearbox, engage a gear.
F
W
ith an automatic gearbox, select mode P, then put the supplied
chocks against one of the wheels.
Call a PEUGEOT dealer or a qualified workshop.
They flash when the
vehicle has been
started. The parking brake has not
been properly released.
As soon as possible, stop the vehicle and try to completely release the
parking brake using the control lever, with your foot on the brake pedal.
If the problem persists, call a PEUGEOT dealer or a qualified workshop.
For more information on the use of the Electric parking brake , refer to the corresponding section.
1
Dashboard instruments
Page 44 of 404
42
Vehicle / Driving menu
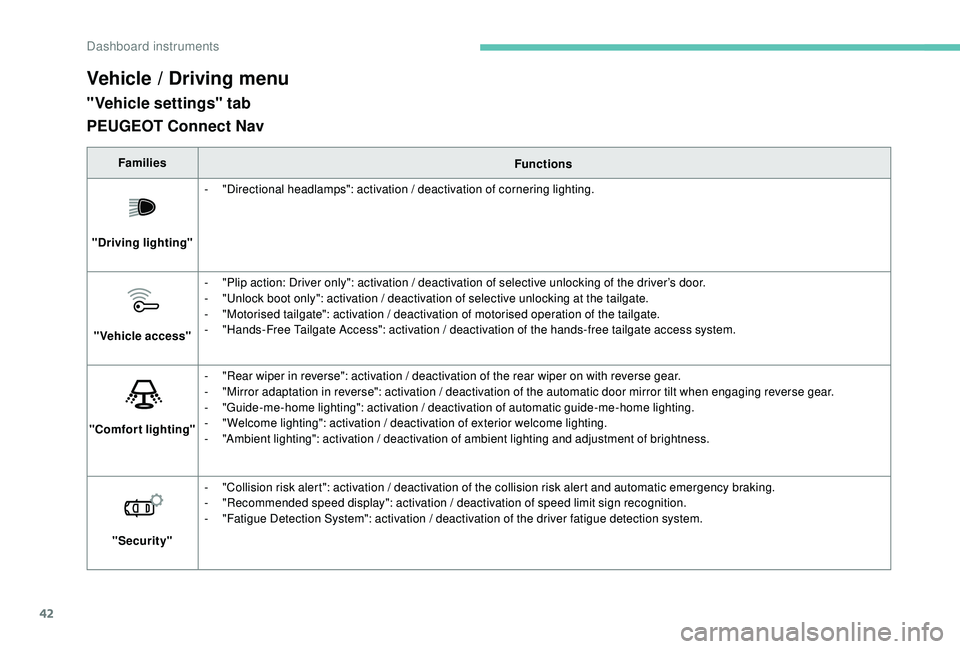
"Vehicle settings" tab
FamiliesFunctions
"Driving lighting" -
"
Directional headlamps": activation / deactivation of cornering lighting.
"Vehicle access" -
"
Plip action: Driver only": activation / deactivation of selective unlocking of the driver’s door.
-
"
Unlock boot only": activation / deactivation of selective unlocking at the tailgate.
-
"
Motorised tailgate": activation / deactivation of motorised operation of the tailgate.
-
"
Hands-Free Tailgate Access": activation / deactivation of the hands-free tailgate access system.
"Comfort lighting" -
"
Rear wiper in reverse": activation / deactivation of the rear wiper on with reverse gear.
-
"
Mirror adaptation in reverse": activation / deactivation of the automatic door mirror tilt when engaging reverse gear.
-
"
Guide-me-home lighting": activation / deactivation of automatic guide-me-home lighting.
-
"
Welcome lighting": activation / deactivation of exterior welcome lighting.
-
"
Ambient lighting": activation / deactivation of ambient lighting and adjustment of brightness.
"Security" -
"
Collision risk alert": activation / deactivation of the collision risk alert and automatic emergency braking.
-
"
Recommended speed display": activation / deactivation of speed limit sign recognition.
-
"
Fatigue Detection System": activation / deactivation of the driver fatigue detection system.
PEUGEOT Connect Nav
Dashboard instruments
Page 45 of 404
43
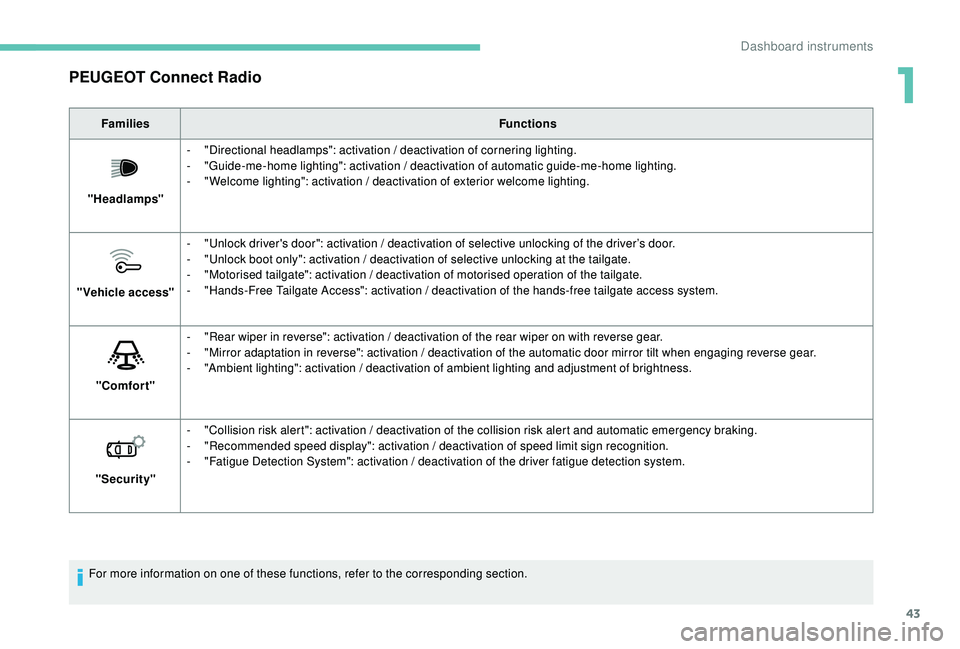
PEUGEOT Connect Radio
FamiliesFunctions
"Headlamps" -
"
Directional headlamps": activation / deactivation of cornering lighting.
-
"
Guide-me-home lighting": activation / deactivation of automatic guide-me-home lighting.
-
"
Welcome lighting": activation / deactivation of exterior welcome lighting.
"Vehicle access" -
"
Unlock driver's door": activation / deactivation of selective unlocking of the driver’s door.
-
"
Unlock boot only": activation / deactivation of selective unlocking at the tailgate.
-
"
Motorised tailgate": activation / deactivation of motorised operation of the tailgate.
-
"
Hands-Free Tailgate Access": activation / deactivation of the hands-free tailgate access system.
"Comfort" -
"
Rear wiper in reverse": activation / deactivation of the rear wiper on with reverse gear.
-
"
Mirror adaptation in reverse": activation / deactivation of the automatic door mirror tilt when engaging reverse gear.
-
"
Ambient lighting": activation / deactivation of ambient lighting and adjustment of brightness.
"Security" -
"
Collision risk alert": activation / deactivation of the collision risk alert and automatic emergency braking.
-
"
Recommended speed display": activation / deactivation of speed limit sign recognition.
-
"
Fatigue Detection System": activation / deactivation of the driver fatigue detection system.
For more information on one of these functions, refer to the corresponding section.
1
Dashboard instruments
Page 62 of 404
60
Anti-intrusion security
Operation
If one of the doors or the boot is open, the
automatic central locking does not take place.This is signalled by the sound of
the locks rebounding, accompanied
by illumination of this symbol in the
instrument panel, an audible signal
and the display of an alert message.
Carrying long or voluminous objects
If you want to drive with the boot open, you
should press the central locking button
to lock the doors. Other wise, every time
the speed of the vehicle exceeds 6
mph
(10
km/h), the locks will rebound and the
alerts mentioned above will appear.
Pressing the central locking button
unlocks the vehicle.
Above 6
mph (10 km/h), this unlocking is
te m p o r a r y.
This system allows automatic simultaneous
locking of the doors and boot as soon as the
speed of the vehicle exceeds 6
mph (10 km/h).
Unlocking
Central locking
This function allows the doors and boot to be
locked or unlocked simultaneously from inside
the vehicle.
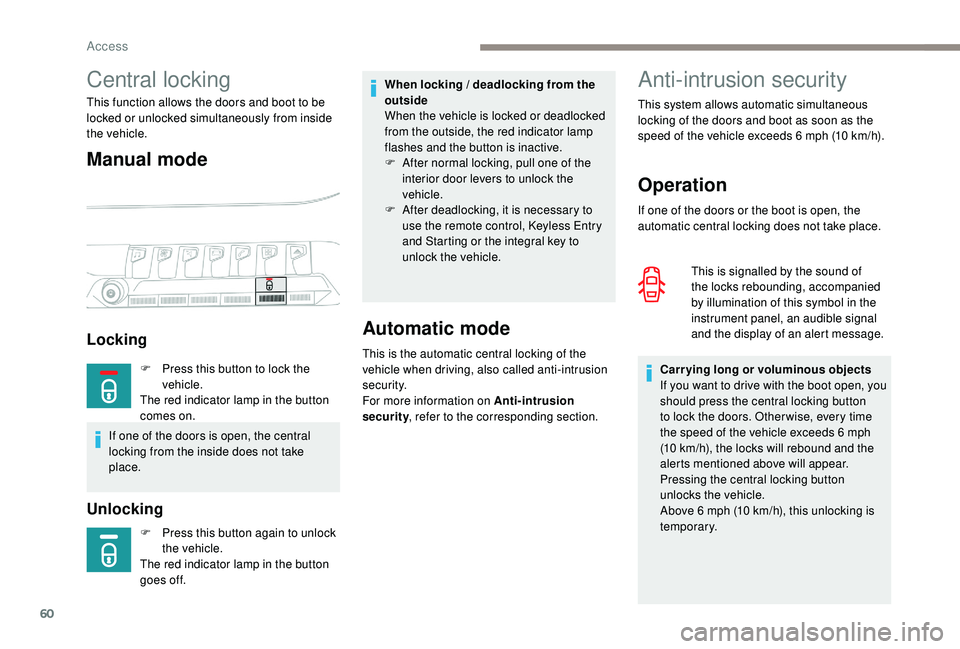
Manual mode
Locking
F Press this button again to unlock
the vehicle.
The red indicator lamp in the button
goes off.
Automatic mode
This is the automatic central locking of the
vehicle when driving, also called anti-intrusion
s e c u r i t y.
For more information on Anti-intrusion
security , refer to the corresponding section.
When locking / deadlocking from the
outside
When the vehicle is locked or deadlocked
from the outside, the red indicator lamp
flashes and the button is inactive.
F
A
fter normal locking, pull one of the
interior door levers to unlock the
vehicle.
F
A
fter deadlocking, it is necessary to
use the remote control,
K
eyless Entry
and Starting or the integral key to
unlock the vehicle.
F
P
ress this button to lock the
vehicle.
The red indicator lamp in the button
comes on.
If one of the doors is open, the central
locking from the inside does not take
place.
Access
Page 80 of 404
78
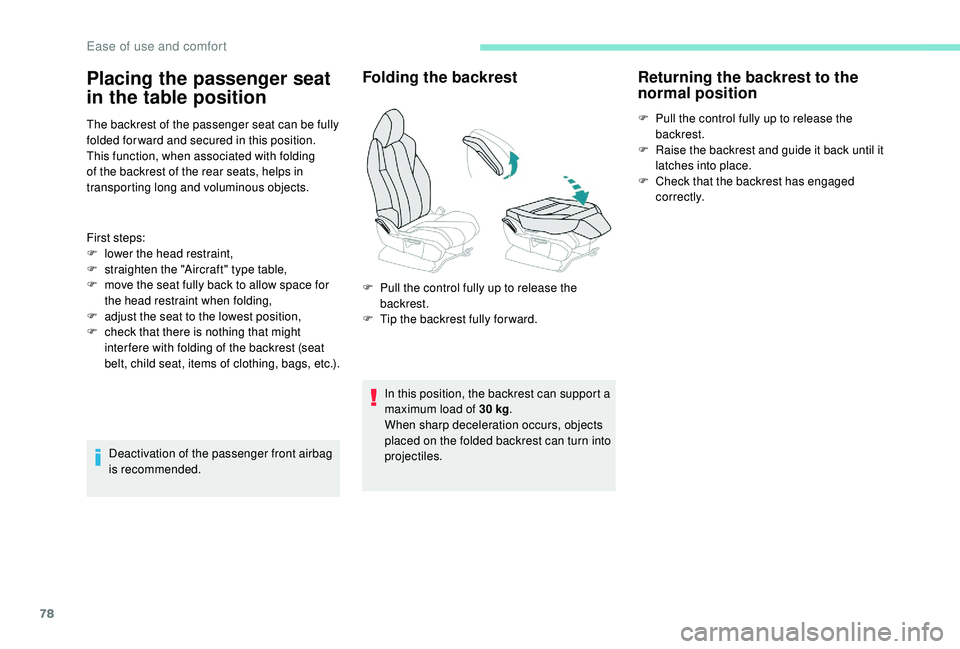
The backrest of the passenger seat can be fully
folded for ward and secured in this position.
This function, when associated with folding
of the backrest of the rear seats, helps in
transporting long and voluminous objects.
First steps:
F
l
ower the head restraint,
F
s
traighten the "Aircraft" type table,
F
m
ove the seat fully back to allow space for
the head restraint when folding,
F
a
djust the seat to the lowest position,
F
c
heck that there is nothing that might
inter fere with folding of the backrest (seat
belt, child seat, items of clothing, bags, etc.).
Deactivation of the passenger front airbag
is recommended.
Folding the backrest
In this position, the backrest can support a
maximum load of 30 kg.
When sharp deceleration occurs, objects
placed on the folded backrest can turn into
projectiles.
Returning the backrest to the
normal position
F Pull the control fully up to release the backrest.
F
R
aise the backrest and guide it back until it
latches into place.
F
C
heck that the backrest has engaged
c o r r e c t l y.
Placing the passenger seat
in the table position
F Pull the control fully up to release the backrest.
F
T
ip the backrest fully for ward.
Ease of use and comfort
Page 81 of 404
79
Front head restraints
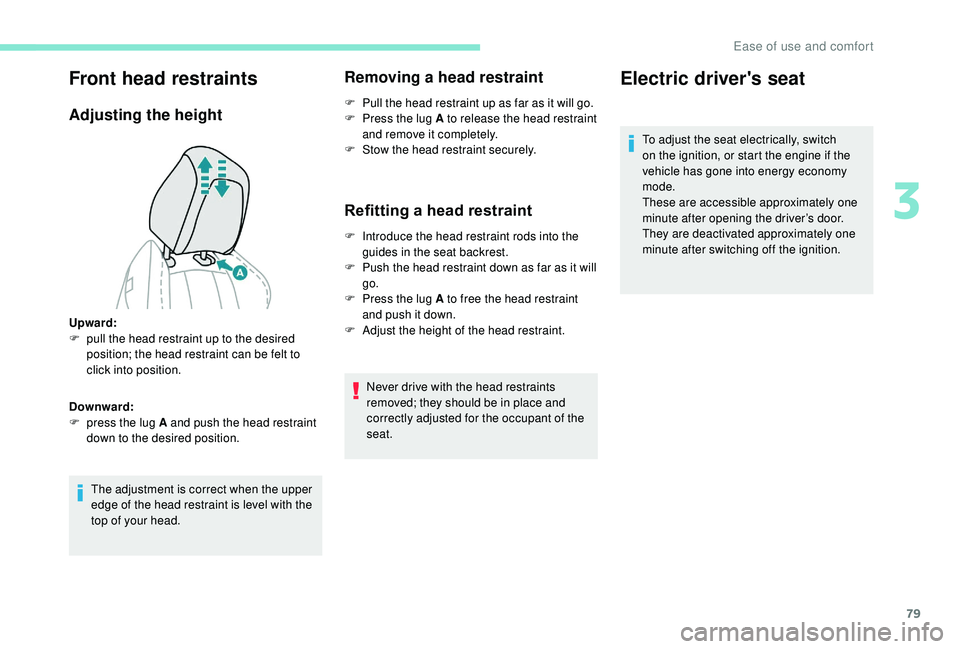
Adjusting the height
The adjustment is correct when the upper
edge of the head restraint is level with the
top of your head.
Removing a head restraint
F Pull the head restraint up as far as it will go.
F P ress the lug A to release the head restraint
and remove it completely.
F
S
tow the head restraint securely.
Refitting a head restraint
F Introduce the head restraint rods into the guides in the seat backrest.
F
P
ush the head restraint down as far as it will
go.
F
P
ress the lug A to free the head restraint
and push it down.
F
A
djust the height of the head restraint.
Never drive with the head restraints
removed; they should be in place and
correctly adjusted for the occupant of the
seat.
Upward:
F
p
ull the head restraint up to the desired
position; the head restraint can be felt to
click into position.
Downward:
F
p
ress the lug A and push the head restraint
down to the desired position.
Electric driver's seat
To adjust the seat electrically, switch
on the ignition, or start the engine if the
vehicle has gone into energy economy
mode.
These are accessible approximately one
minute after opening the driver’s door.
They are deactivated approximately one
minute after switching off the ignition.
3
Ease of use and comfort
Page 118 of 404
116
Removing
To remove the mat on the driver's side:
F m ove the seat as far back as possible,
F
un
clip the fixings,
F
r
emove the mat.
Refitting
To avoid any risk of jamming of the pedals:
- o nly use mats which are suited to the
fixings already present in the vehicle;
these fixings must be used,
-
n
ever place one mat on top of another.
The use of mats not approved by
PEUGEOT may inter fere with access to
the pedals and hinder the operation of the
cruise control / speed limiter.
The mats approved by PEUGEOT have
two fixings located below the seat.
Mats
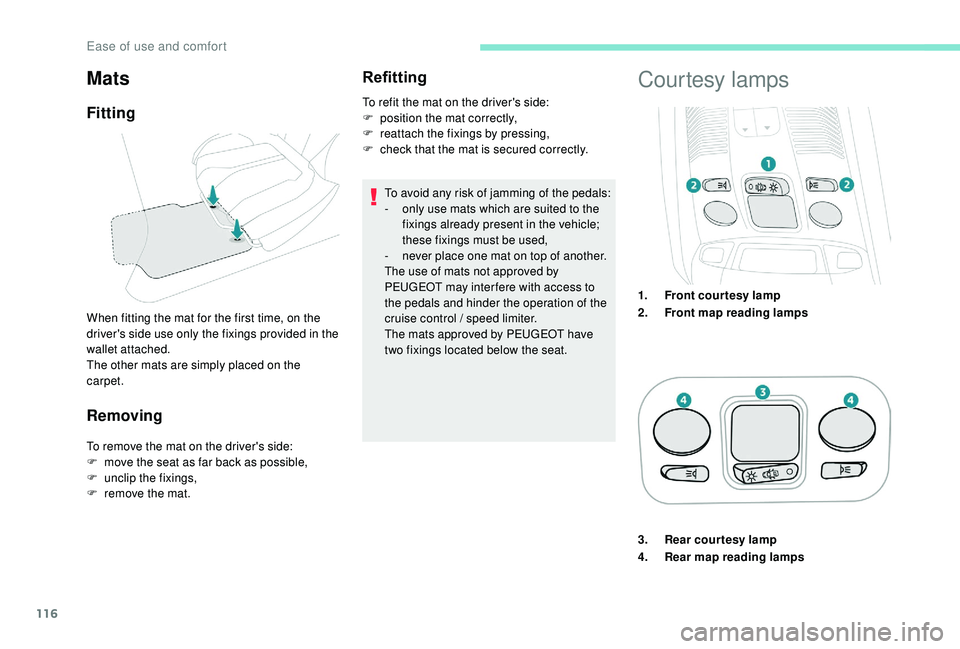
Fitting
When fitting the mat for the first time, on the
driver's side use only the fixings provided in the
wallet attached.
The other mats are simply placed on the
carpet. To refit the mat on the driver's side:
F
p
osition the mat correctly,
F
r
eattach the fixings by pressing,
F
c
heck that the mat is secured correctly.
Courtesy lamps
1.
Front courtesy lamp
2. Front map reading lamps
3. Rear courtesy lamp
4. Rear map reading lamps
Ease of use and comfort