Page 90 of 404

88
Access to third row seatsThird row seats
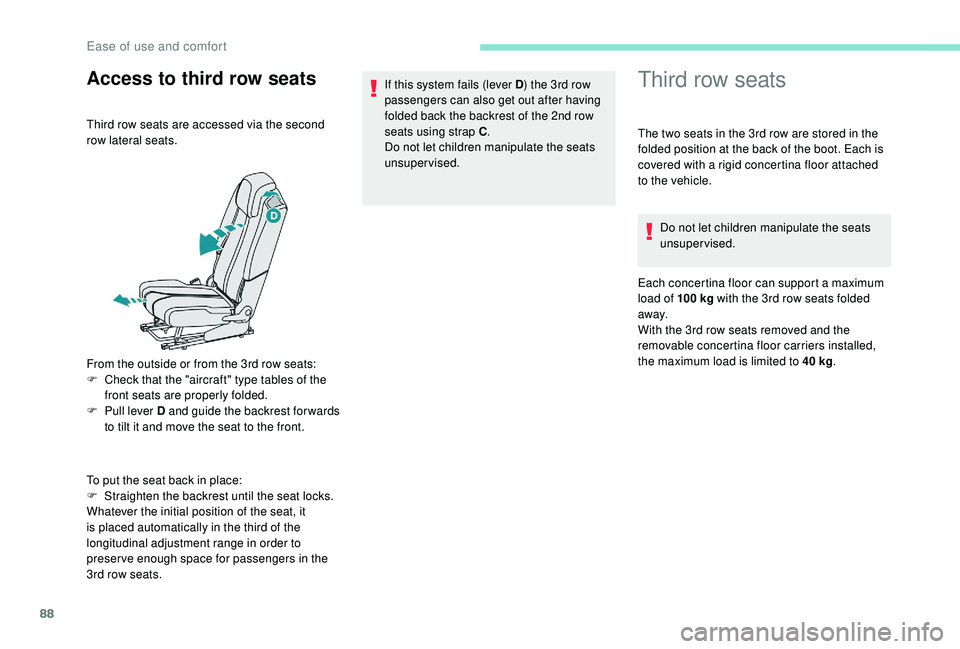
Third row seats are accessed via the second
row lateral seats.
From the outside or from the 3rd row seats:
F
C
heck that the "aircraft" type tables of the
front seats are properly folded.
F
P
ull lever D and guide the backrest for wards
to tilt it and move the seat to the front.
To put the seat back in place:
F
S
traighten the backrest until the seat locks.
Whatever the initial position of the seat, it
is placed automatically in the third of the
longitudinal adjustment range in order to
preserve enough space for passengers in the
3rd row seats. If this system fails (lever D
) the 3rd row
passengers can also get out after having
folded back the backrest of the 2nd row
seats using strap C .
Do not let children manipulate the seats
unsupervised. The two seats in the 3rd row are stored in the
folded position at the back of the boot. Each is
covered with a rigid concertina floor attached
to the vehicle.
Do not let children manipulate the seats
unsupervised.
Each concertina floor can support a maximum
load of 100
kg with the 3rd row seats folded
away.
With the 3rd row seats removed and the
removable concertina floor carriers installed,
the maximum load is limited to 40
kg.
Ease of use and comfort
Page 91 of 404

89
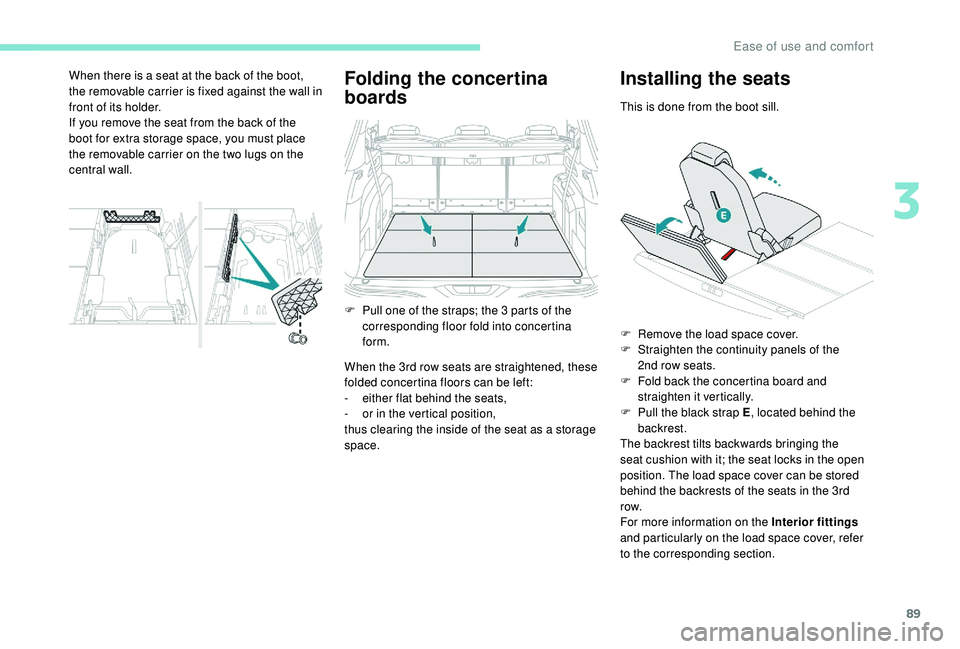
Folding the concertina
boards
When the 3rd row seats are straightened, these
folded concertina floors can be left:
-
ei
ther flat behind the seats,
-
o
r in the vertical position,
thus clearing the inside of the seat as a storage
space.
Installing the seats
This is done from the boot sill.
When there is a seat at the back of the boot,
the removable carrier is fixed against the wall in
front of its holder.
If you remove the seat from the back of the
boot for extra storage space, you must place
the removable carrier on the two lugs on the
central wall.
F
P
ull one of the straps; the 3
parts of the
corresponding floor fold into concertina
form. F
R
emove the load space cover.
F
S
traighten the continuity panels of the
2nd row seats.
F
F
old back the concertina board and
straighten it vertically.
F
P
ull the black strap E , located behind the
backrest.
The backrest tilts backwards bringing the
seat cushion with it; the seat locks in the open
position. The load space cover can be stored
behind the backrests of the seats in the 3rd
row.
For more information on the Interior fittings
and particularly on the load space cover, refer
to the corresponding section.
3
Ease of use and comfort
Page 92 of 404

90
Rear head restraints
The rear head restraints can be removed.
To remove a head restraint:
F
p
ull the head restraint as far up as it will go,
F
p
ress the lug A to release the head restraint
and remove it completely,
F
s
tow the head restraint.
Never drive with passengers seated at
the rear when the head restraints are
removed; they must be in place and in the
high position.
Removal of the seats
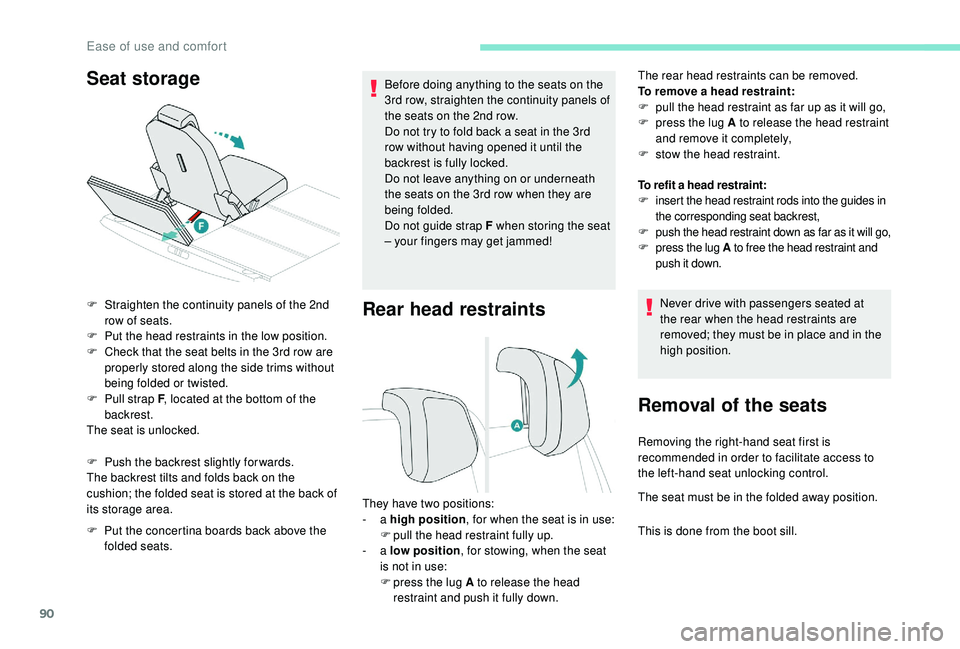
Seat storage
F Straighten the continuity panels of the 2nd
row of seats.
F
P
ut the head restraints in the low position.
F
C
heck that the seat belts in the 3rd row are
properly stored along the side trims without
being folded or twisted.
F
P
ull strap F , located at the bottom of the
backrest.
The seat is unlocked.
F
P
ush the backrest slightly for wards.
The backrest tilts and folds back on the
cushion; the folded seat is stored at the back of
its storage area.
F
P
ut the concertina boards back above the
folded seats. Before doing anything to the seats on the
3rd row, straighten the continuity panels of
the seats on the 2nd row.
Do not try to fold back a seat in the 3rd
row without having opened it until the
backrest is fully locked.
Do not leave anything on or underneath
the seats on the 3rd row when they are
being folded.
Do not guide strap F when storing the seat
– your fingers may get jammed!
They have two positions:
- a high position , for when the seat is in use:
F
p
ull the head restraint fully up.
-
a low position , for stowing, when the seat
is not in use:
F
p
ress the lug A to release the head
restraint and push it fully down. To refit a head restraint:
F
i
nsert the head restraint rods into the guides in
the corresponding seat backrest,
F
p
ush the head restraint down as far as it will go,
F
p
ress the lug A
to free the head restraint and
push it down.
Removing the right-hand seat first is
recommended in order to facilitate access to
the left-hand seat unlocking control.
The seat must be in the folded away position.
This is done from the boot sill.
Ease of use and comfort
Page 93 of 404
91
F Fold back the concertina boards.
F L ift the yellow lever G by pulling the red
strap F , located on the right, to unlock the
seat.
F
G
ripping the seat by the side, by the plastic
covers, lift the rear part of the seat.
F
P
ull the seat away to the rear while keeping
it tilted.
Returning the seats to their original position
This is done from the boot sill.
F
S
et the seat in a tilted position in the front
fixing lugs.
F
L
ower the rear part of the seat until it is
locked.
The yellow lever G folds automatically.
3
Ease of use and comfort
Page 97 of 404

95
Recommendations for ventilation and air
conditioning
In order for these systems to be fully effective,
follow the operation and maintenance
guidelines below:
F
T
o ensure that the air is distributed evenly,
keep the external air intake grilles at the
base of the windscreen, the nozzles, the
vents, the air outlets and the air extractor
in the boot free from obstructions.
F
D
o not cover the sunshine sensor,
located on the dashboard; this is used for
regulation of the automatic air conditioning
system.
F
O
perate the air conditioning system for
at least 5
to 10 minutes once or twice a
month to keep it in per fect working order.
F
E
nsure that the passenger compartment
filter is in good condition and have the
filter elements replaced regularly. We
recommend the use of a combined
passenger compartment filter. Thanks to
its special active additive, it contributes
to the purification of the air breathed by
the occupants and the cleanliness of the
passenger compartment (reduction of
allergic symptoms, bad odours and greasy
deposits). If after an extended stop in sunshine,
the interior temperature is very
high, first ventilate the passenger
compartment for a few moments.
Put the air flow control at a setting high
enough to quickly change the air in the
passenger compartment.
The condensation created by the air
conditioning results in a discharge of
water under the vehicle which is per fectly
normal.
F
T o ensure correct operation of the
air conditioning system, you are also
advised to have it checked regularly
as recommended in the Warranty and
Maintenance Record.
F
I
f the system does not produce cold air,
switch it off and contact a PEUGEOT
dealer or a qualified workshop.
When towing the maximum load on a steep
gradient in high temperatures, switching off
the air conditioning increases the available
engine power and so improves the towing
ability.
Stop & Star t
The heating and air conditioning systems
only work when the engine is running.
To maintain a comfortable temperature
in the passenger compartment, you can
temporarily deactivate the Stop & Start
system.
For more information on Stop & Star t,
refer to the corresponding section.
3
Ease of use and comfort
Page 122 of 404
120
Depending on version, the storage boxes are
fitted in the floor, at the foot of the side seats on
the second row.
On the left side, it may also contain the
temporary puncture repair kit.
To open them, lift the cover by the notch.
Storage boxesBoot fittings
1.Load space cover
2. 12
V accessor y socket (maximum
power: 120
Watts)
3. Boot lamp
4. Luggage retaining strap
5. Storage brackets of the load space
cover 6.
Armrest with cup holder and storage
7. Open storage compartment
8. Concertina floor
9. Stowing rings
Ease of use and comfort
Page 123 of 404

121
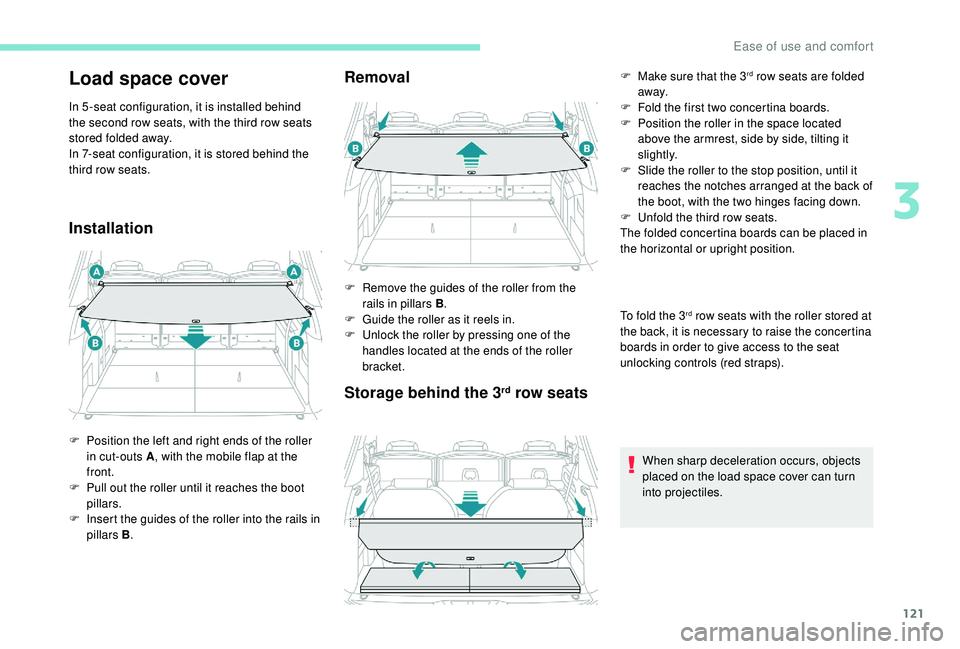
Load space cover
In 5 -seat configuration, it is installed behind
the second row seats, with the third row seats
stored folded away.
In 7-seat configuration, it is stored behind the
third row seats.
InstallationRemoval
F Remove the guides of the roller from the
rails in pillars B .
F
G
uide the roller as it reels in.
F
U
nlock the roller by pressing one of the
handles located at the ends of the roller
bracket.
F
P
osition the left and right ends of the roller
in cut-outs A , with the mobile flap at the
front.
F
P
ull out the roller until it reaches the boot
pillars.
F
I
nsert the guides of the roller into the rails in
pillars B .
Storage behind the 3rd row seats
F Make sure that the 3rd row seats are folded
away.
F
F
old the first two concertina boards.
F
P
osition the roller in the space located
above the armrest, side by side, tilting it
s l i g ht l y.
F
S
lide the roller to the stop position, until it
reaches the notches arranged at the back of
the boot, with the two hinges facing down.
F
U
nfold the third row seats.
The folded concertina boards can be placed in
the horizontal or upright position.
To fold the 3
rd row seats with the roller stored at
the back, it is necessary to raise the concertina
boards in order to give access to the seat
unlocking controls (red straps).
When sharp deceleration occurs, objects
placed on the load space cover can turn
into projectiles.
3
Ease of use and comfort
Page 124 of 404
122
High load retaining net
It offers protection to the occupants when
very sharp braking occurs.
Behind the front seats
Once fitted, the net does not prevent
tipping of the backrests.
Behind the rear seats
This removable net allows the entire loading
volume to be used up to the roof:
-
b
ehind the front seats (1
st row) when the
rear seats are folded down,
-
b
ehind the rear seats (2
nd row) when the
load space cover is removed. F
F
old down the rear seats.
F
I
nsert the ends of the bar, one after the
other, into the fixing points of the roof.
F
A
ttach the net straps to the lower rings,
located on the outer slides of the front
seats.
F
P
ull on the straps to stretch the net. F
R
emove the load space cover.
F
I
nsert the ends of the bar, one after the
other, into the fixing points of the roof.
F
A
ttach the straps of the net to the lower
rings, located on each side trim of the boot.
F
P
ull on the straps to stretch the net.
Ease of use and comfort