Page 25 of 40
 maximum.
To use a power outlet, open the cap")
23
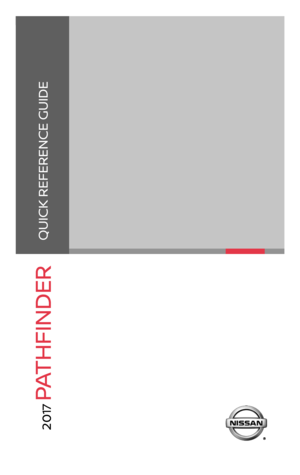
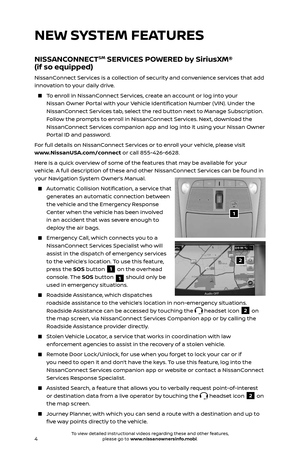
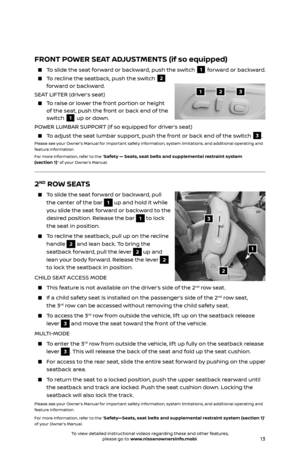
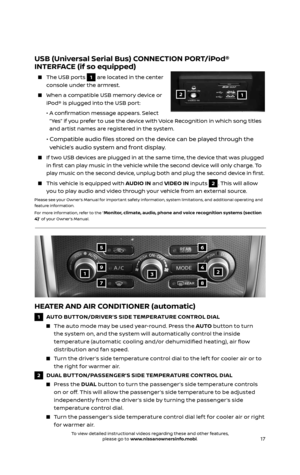
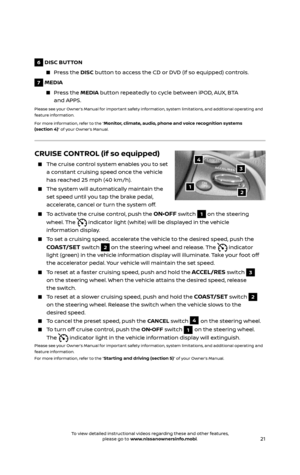
POWER OUTLETS
12V OUTLETS
The power outlets are for powering electrical
accessories such as cellular phones. They are
rated at 12V, 120W (10A) maximum.
To use a power outlet, open the cap.
The power outlets on the instrument panel
1 and inside the center console (if so
equipped)
2 are powered only when the
ignition switch is in the
ACC or ON position.
The power outlet in the cargo area (if so
equipped) 3 is powered all the time.
120V OUTLET (if so equipped)
The 120V outlet 4 is located on the back of
the center console.
To use the outlets for devices that require
120V power, place the ignition switch in the
ON position and push the power inverter
switch
5.
The switch wil l illuminate when enabled.
Please see your Owner’s Manual for important safety
information, system limitations, and additional operating and
feature information.
For more information, refer to the “Instruments and controls
(section 2)” of your Owner’s Manual.
1
2
3
4
5
2485215_17b_Pathfinder_pQRG_111816b.indd 2311/18/16 1:45 PM
To view detailed instructional videos regarding these and other features, please go to www.nissanownersinfo.mobi.To view detailed instructional videos regarding these and other features, please go to www.nissanownersinfo.mobi.
Page 26 of 40
")
24
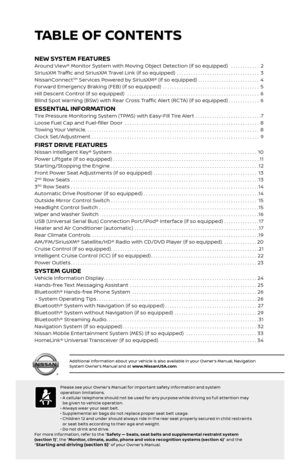
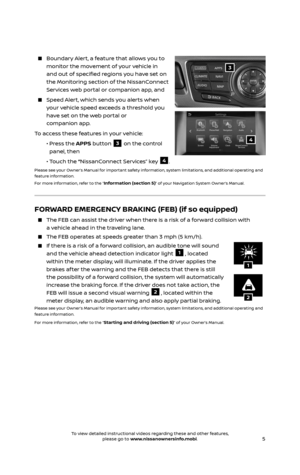
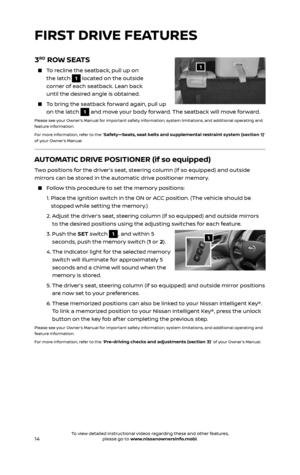
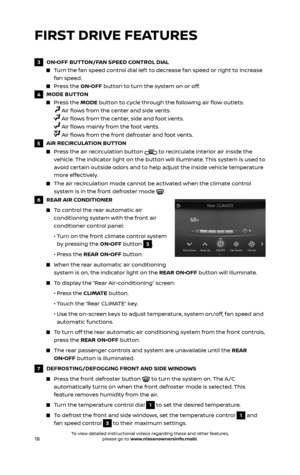
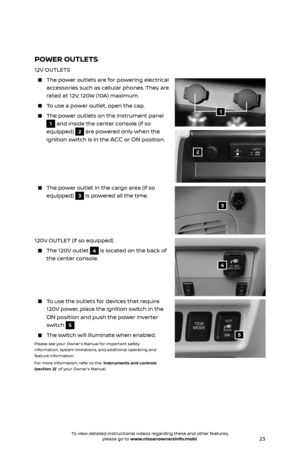
VEHICLE INFORMATION DISPLAY
The vehicle information display 1 displays items such as:
Vehicle settings
Trip computer information
Drive system warnings and settings
(if so equipped)
Cruise control system
Intelligent Key operation information
Indicators and warnings
Tire pressure information
4X4 information (if so equipped)
USING THE VEHICLE INFORMATION DISPLAY
The vehicle information display modes can be changed using the
button 2
and the
ENTER button 3 on the steering wheel.
Press the button 2 on the steering
wheel to enter the vehicle information display
menu items.
Press the button 4 on the steering wheel
to navigate through the items in the vehicle
information display.
Press the ENTER button 3 on the steering
wheel to change or select an item in the
vehicle information display.
Press the button 5 on the steering wheel
to go back to the previous menu.
RESETTING THE TRIP COMPUTER
1. Press the button 2 on the steering wheel
until you reach the trip computer
mode
6.
2. Press the button 2 on the steering wheel again for more than 1.5 seconds
to reset average fuel consumption, average speed, distance to empty and
journey time.
SETTINGS
The setting mode allows you to change the information displayed in the vehicle
information display:
1
2
435
6
Driver assistance
(if so equipped)
Main menu selec tion
Body color
Maintenance
Alarms
Vehicle settings
Language
Unit
Welcome effect
Please see your Owner’s Manual for important safety information, system limitations, and additional operating and
feature information.
For more information, refer to the “Instruments and controls (section 2)” of your Owner’s Manual.
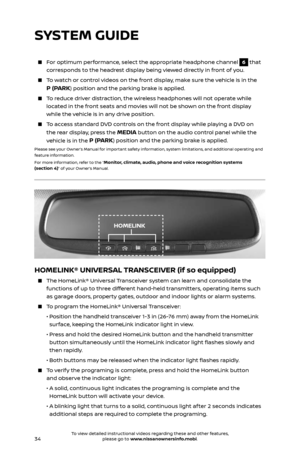
SYSTEM GUIDE
2485215_17b_Pathfinder_pQRG_111816b.indd 2411/18/16 1:45 PM
To view detailed instructional videos regarding these and other features, please go to www.nissanownersinfo.mobi.To view detailed instructional videos regarding these and other features, please go to www.nissanownersinfo.mobi.
Page 27 of 40

25
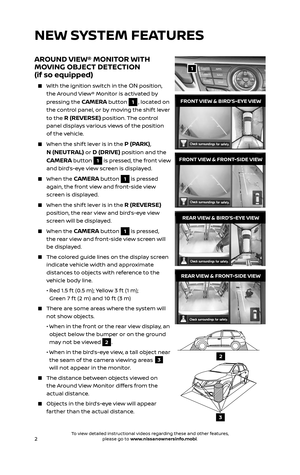
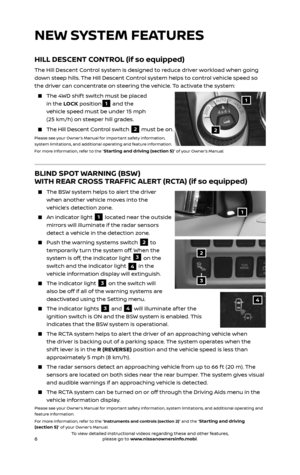
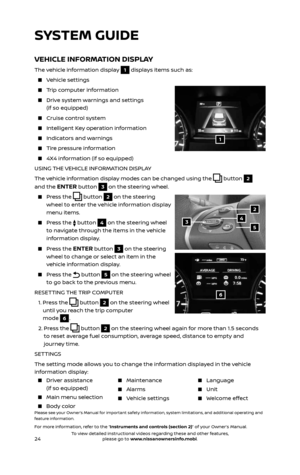
HANDS-FREE TEXT MESSAGING ASSISTANT*
This text messaging feature allows for
sending and receiving text messages through
the vehicle’s interface.
Using predefined or custom messages, send
a text to an entry stored in your Bluetooth®
Hands-free Phone System.
Once enabled, the text message, sender and
delivery time are shown on the control panel
display when the vehicle speed is less than
5 mph (8 km/h).
Text messages have the option of being read aloud.
Once the vehicle is in motion, text messages can only be replied to using the
Voice Recognition button on the steering wheel.
Text messages can be created manually when the vehicle is not in motion.
Custom text messages must be created in advance.
Many cellular phones may require special permission to enable text messaging.
Check the cellular phone’s screen during Bluetooth ®
pairing. For some
cellular phones, you may need to enable “Notifications” in the cellular phone’s
Bluetooth ®
menu for text messages to appear on the touch-screen display.
For more detailed information and instructions, refer to your cellular phone’s
Owner’s Manual.
Text message integration requires that the cellular phone support Message
Access Profile (MAP) for both receiving and sending text messages. Some
cellular phones may not support all text messaging features. Please see
www.NissanUSA.com/bluetooth for compatibility information as well
as your device’s Owner’s Manual.
* Laws in some jurisdictions may restrict the use of “Text-to-Speech”. Some of the applications and features, such as
social networking and texting, may also be restricted. Check local regulations for any requirements before using
these features.
Please see your Owner’s Manual for important safety information, system limitations, and additional operating and
feature information.
For more information, refer to the “
Hands-free phone (section 4)” of your Navigation System
Owner’s Manual.
2485215_17b_Pathfinder_pQRG_111816b.indd 2511/18/16 1:45 PM
To view detailed instructional videos regarding these and other features, please go to www.nissanownersinfo.mobi.To view detailed instructional videos regarding these and other features, please go to www.nissanownersinfo.mobi.
Page 28 of 40

26
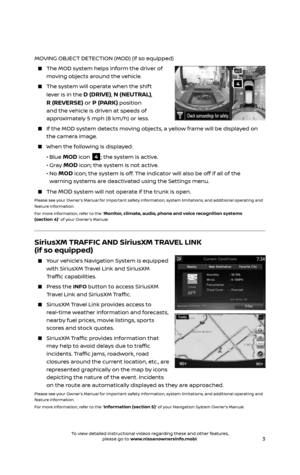
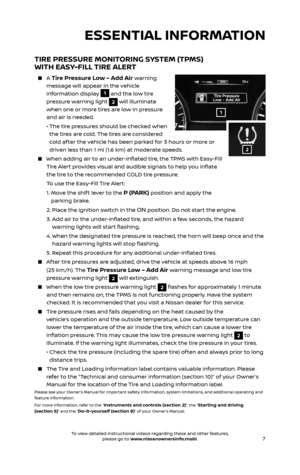
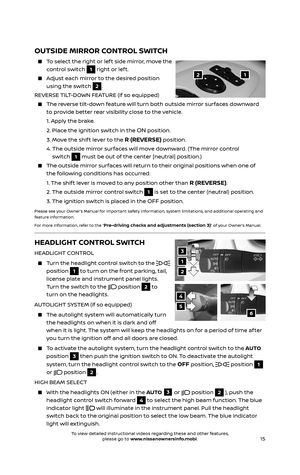
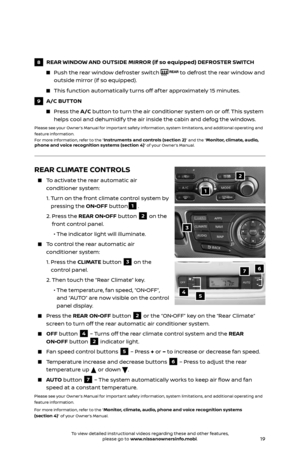
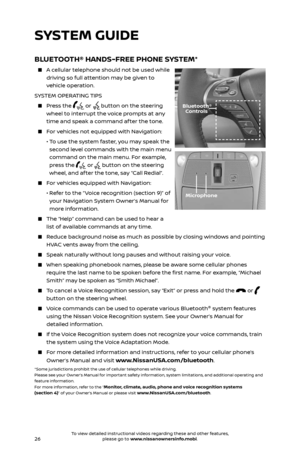
BLUETOOTH® HANDS-FREE PHONE SYSTEM*
A cellular telephone should not be used while
driving so full attention may be given to
vehicle operation.
SYSTEM OPERATING TIPS
Press the or button on the steering
wheel to interrupt the voice prompts at any
time and speak a command af ter the tone.
For vehicles not equipped with Navigation:
• To use the system faster, you may speak the
second level commands with the main menu
command on the main menu. For example,
press the
or button on the steering
wheel, and af ter the tone, say “Call Redial”.
For vehicles equipped with Navigation:
• Refer to the “ Voice recognition (section 9)” of
your Navigation System Owner’s Manual for
more information.
The “Help” c ommand can be used to hear a
list of available commands at any time.
Reduce background noise as much as possible by closing windows and pointing
HVAC vents away from the ceiling.
Speak naturally without long pauses and without raising your voice.
When speaking phonebook names, please be aware some cellular phones
require the last name to be spoken before the first name. For example, “Michael
Smith” may be spoken as “Smith Michael”.
To cancel a Voice Recognition session, say “Exit” or press and hold the or
button on the steering wheel.
Voice commands can be used to operate various Bluetooth®
system features
using the Nissan Voice Recognition system. See your Owner’s Manual for
detailed information.
If the Voice Recognition system does not recognize your voice commands, train
the system using the Voice Adaptation Mode.
For more detailed information and instructions, refer to your cellular phone’s
Owner’s Manual and visit www.NissanUSA.com/bluetooth.
*Some jurisdictions prohibit the use of cellular telephones while driving.
Please see your Owner’s Manual for important safety information, system limitations, and additional operating and
feature information.
For more information, refer to the “
Monitor, climate, audio, phone and voice recognition systems
(section 4)” of your Owner’s Manual or please visit www.NissanUSA.com/bluetooth.
Microphone
Bluetooth® Controls
SYSTEM GUIDE
2485215_17b_Pathfinder_pQRG_111816b.indd 2611/18/16 1:45 PM
To view detailed instructional videos regarding these and other features, please go to www.nissanownersinfo.mobi.To view detailed instructional videos regarding these and other features, please go to www.nissanownersinfo.mobi.
Page 29 of 40

CONNECTING PROCEDURE
The vehicle must be stationary when
connecting the cellular phone.
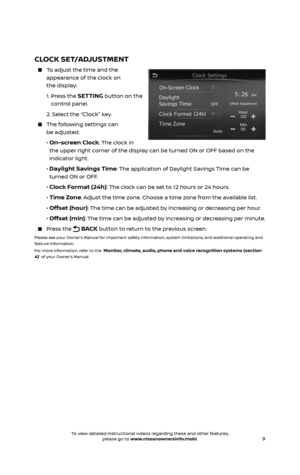
1. Press the SETTING button on the control
pa")
27
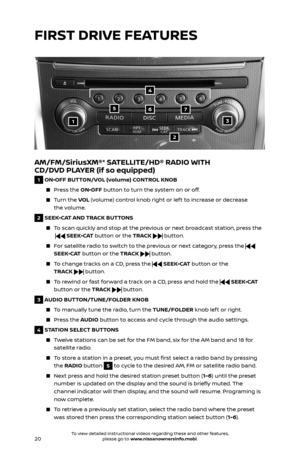
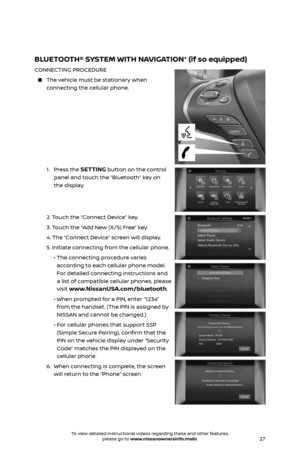
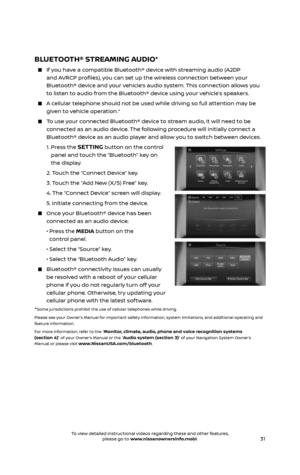
BLUETOOTH® SYSTEM WITH NAVIGATION* (if so equipped)
CONNECTING PROCEDURE
The vehicle must be stationary when
connecting the cellular phone.
1. Press the SETTING button on the control
panel and touch the “Bluetooth” key on
the display.
2. Touch the “Connect Device” key.
3. Touch the “Add New (X/5) Free” key.
4. The “C onnect Device“ screen will display.
5. Initiate connecting from the cellular phone.
• The c onnecting procedure varies
according to each cellular phone model.
For detailed connecting instructions and
a list of compatible cellular phones, please
visit
www.NissanUSA.com/bluetooth.
• When pr ompted for a PIN, enter “1234”
from the handset. (The PIN is assigned by
NISSAN and cannot be changed.)
• For cellular phones that support SSP
(Simple Secure Pairing), confirm that the
PIN on the vehicle display under “Security
Code” matches the PIN displayed on the
cellular phone.
6. When c onnecting is complete, the screen
will return to the “Phone” screen.
2485215_17b_Pathfinder_pQRG_111816b.indd 2711/18/16 1:45 PM
To view detailed instructional videos regarding these and other features, please go to www.nissanownersinfo.mobi.To view detailed instructional videos regarding these and other features, please go to www.nissanownersinfo.mobi.
Page 30 of 40

28
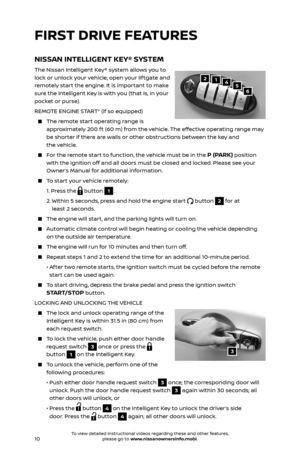
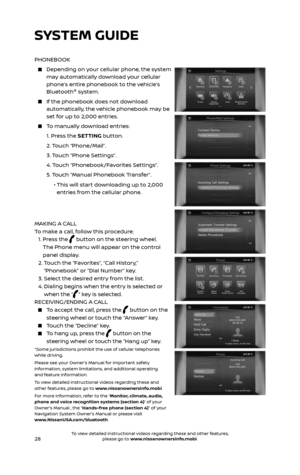
PHONEBOOK
Depending on your cellular phone, the system may automatically download your cellular
phone’s entire phonebook to the vehicle’s
Bluetooth®
system.
If the phonebook does not do wnload automatically, the vehicle phonebook may be
set for up to 2,000 entries.
To manually download entries:
1. Press the SETTING button.
2. Touch “Phone/Mail”.
3. Touch “Phone Settings”.
4. Touch “Phonebook/Favorites Settings”.
5. Touch “Manual Phonebook Transfer”.
• This will start downloading up to 2,000
entries from the cellular phone.
MAKING A CALL
To make a call, follow this procedure:
1. Press the button on the steering wheel.
The Phone menu will appear on the control
panel display.
2. Touch the “Favorites“, “Call History,”
“Phonebook” or “Dial Number” key.
3. Select the desired entry from the list.
4. Dialing begins when the entr y is selected or
when the “” key is selected.
RECEIVING/ENDING A CALL
To accept the call, press the button on the
steering wheel or touch the “Answer” key.
Touch the “Decline” key.
To hang up, press the button on the
steering wheel or touch the “Hang up” key.
*Some jurisdictions prohibit the use of cellular telephones
while driving.
Please see your Owner’s Manual for important safety
information, system limitations, and additional operating
and feature information.
To view detailed instructional videos regarding these and
other features, please go to www.nissanownersinfo.mobi.
For more information, refer to the
“Monitor, climate, audio,
phone and voice recognition systems (section 4)” of your
Owner’s Manual , the “Hands-free phone (section 4)” of your
Navigation System Owner’s Manual or please visit
www.NissanUSA.com/bluetooth.
SYSTEM GUIDE
2485215_17b_Pathfinder_pQRG_111816b.indd 2811/18/16 1:45 PM
To view detailed instructional videos regarding these and other features, please go to www.nissanownersinfo.mobi.To view detailed instructional videos regarding these and other features, please go to www.nissanownersinfo.mobi.
Page 31 of 40

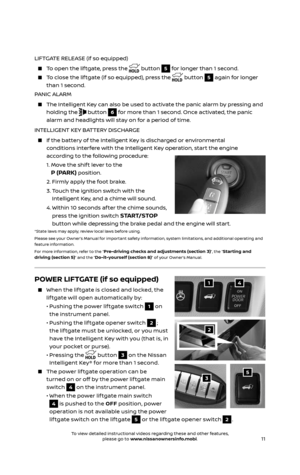
CONNECTING PROCEDURE
The vehicle must be stationary when
connecting the cellular phone.
1. Press the button on the steering
wheel")
29
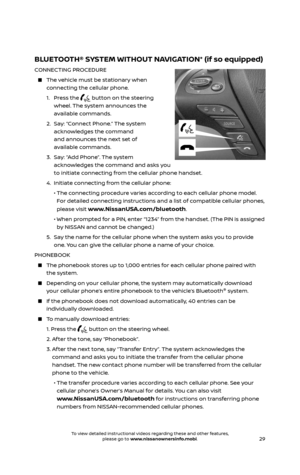
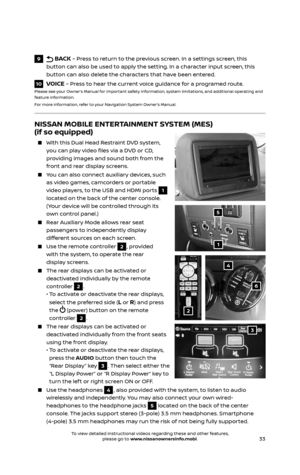
BLUETOOTH® SYSTEM WITHOUT NAVIGATION* (if so equipped)
CONNECTING PROCEDURE
The vehicle must be stationary when
connecting the cellular phone.
1. Press the button on the steering
wheel. The system announces the
available commands.
2. Say: “Connect Phone.” The system
acknowledges the command
and announces the next set of
available commands.
3. Say: “Add Phone”. The system
acknowledges the command and asks you
to initiate connecting from the cellular phone handset.
4. Initiate c onnecting from the cellular phone:
• The connecting procedure varies according to each cellular phone model.
For detailed connecting instructions and a list of compatible cellular phones,
please visit
www.NissanUSA.com/bluetooth.
• When pr ompted for a PIN, enter “1234” from the handset. (The PIN is assigned
by NISSAN and cannot be changed.)
5. Say the name for the cellular phone when the system asks you to provide
one. You can give the cellular phone a name of your choice.
PHONEBOOK
The phonebook stor es up to 1,000 entries for each cellular phone paired with
the system.
Depending on y our cellular phone, the system may automatically download
your cellular phone’s entire phonebook to the vehicle’s Bluetooth ®
system.
If the phonebook does not do wnload automatically, 40 entries can be
individually downloaded.
To manually download entries:
1. Press the button on the steering wheel.
2. Af ter the tone, say “Phonebook”.
3. Af ter the next tone, say “Transfer Entry”. The system acknowledges the
command and asks you to initiate the transfer from the cellular phone
handset. The new contact phone number will be transferred from the cellular
phone to the vehicle.
• The tr ansfer procedure varies according to each cellular phone. See your
cellular phone’s Owner’s Manual for details. You can also visit
www.NissanUSA.com/bluetooth for instructions on transferring phone
numbers from NISSAN-recommended cellular phones.
2485215_17b_Pathfinder_pQRG_111816b.indd 2911/18/16 1:45 PM
To view detailed instructional videos regarding these and other features, please go to www.nissanownersinfo.mobi.To view detailed instructional videos regarding these and other features, please go to www.nissanownersinfo.mobi.
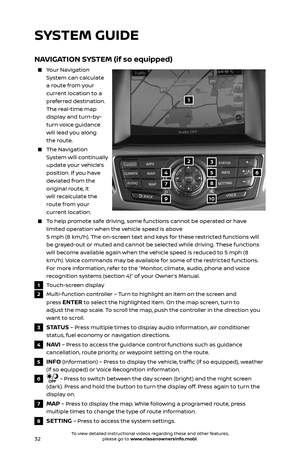
Page 32 of 40

30
4. The system repeats the number and prompts you for the next
command. When you have finished entering numbers or transferring an entry,
choose “Store”.
5. The system confirms the name, location and number.
MAKING A CALL FROM THE PHONEBOOK
In some c ases, names stored in all UPPERCASE letters may not be recognized
by the Voice Recognition system.
1. Press the button on the steering wheel.
2. Af ter waiting for the tone, say “Call.”
3. Af ter the next tone, speak the name of a phonebook entry. For example,
“Michael Smith.”
4. Confirm that the correct name is recognized by saying “Dial” af ter the tone.
MAKING A CALL BY PHONE NUMBER
1. Press the button on the steering wheel. A tone will sound.
2. Say: “Call.” The system acknowledges the command and announces the next
set of available commands.
3. Say: “Phone Number.” The system acknowledges the command and
announces the next set of available commands.
4. Say the number you wish to call starting with the area code in single
digit format.
5. When y ou have finished speaking the phone number, the system repeats it
back and announces the available commands.
6. Say: “Dial.” The system acknowledges the command and makes the call.
RECEIVING/ENDING A CALL
When you receive a cellular phone call, a ring tone sounds through the
audio system.
To accept the call, press the button on the steering wheel.
To reject the call, press the button on the steering wheel.
To hang up the cellular phone at the end of a call or to disconnect during call
placement, press the button on the steering wheel.
*Some jurisdictions prohibit the use of cellular telephones while driving.
Please see your Owner’s Manual for important safety information, system limitations, and additional operating and
feature information.
For more information, refer to the “
Monitor, climate, audio, phone and voice recognition systems
(section 4)” of your Owner’s Manual or the “Audio system (section 3)” of your Navigation System Owner’s
Manual or please visit www.NissanUSA.com/bluetooth.
SYSTEM GUIDE
2485215_17b_Pathfinder_pQRG_111816b.indd 3011/18/16 1:45 PM
To view detailed instructional videos regarding these and other features, please go to www.nissanownersinfo.mobi.To view detailed instructional videos regarding these and other features, please go to www.nissanownersinfo.mobi.