Page 17 of 40

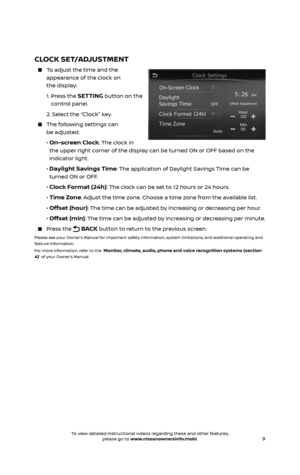
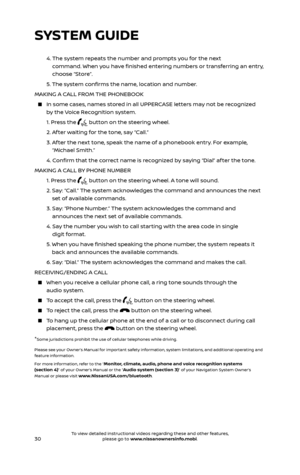
15
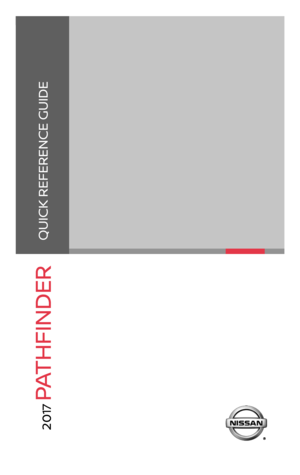
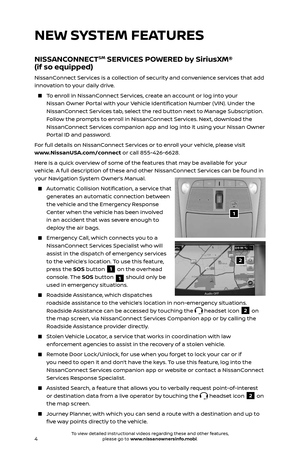
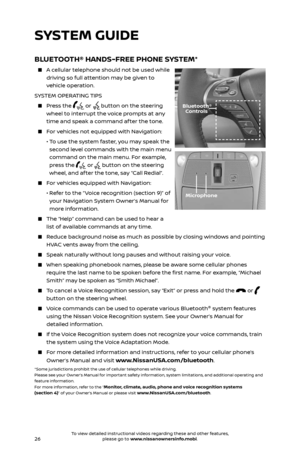
OUTSIDE MIRROR CONTROL SWITCH
To select the right or lef t side mirror, move the
control switch 1 right or lef t.
Adjust each mirror to the desired position
using the switch 2.
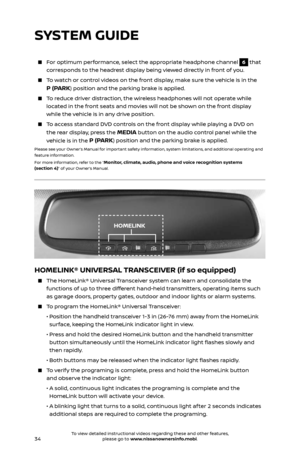
REVERSE TILT-DOWN FEATURE (if so equipped)
The reverse tilt-down feature will turn both outside mirror surfaces downward
to provide better rear visibility close to the vehicle.
1. Apply the brake.
2. Place the ignition switch in the ON position.
3. Move the shif t lever to the R (REVERSE) position.
4. The outside mirr or surfaces will move downward. (The mirror control
switch
1 must be out of the center [neutral] position.)
The outside mirr or surfaces will return to their original positions when one of
the following conditions has occurred:
1. The shift lever is moved to any position other than R (REVERSE).
2. The outside mirr or control switch 1 is set to the center (neutral) position.
3. The ignition switch is plac ed in the OFF position.
Please see your Owner’s Manual for important safety information, system limitations, and additional operating and
feature information.
For more information, refer to the “
Pre-driving checks and adjustments (section 3)” of your Owner’s Manual.
12
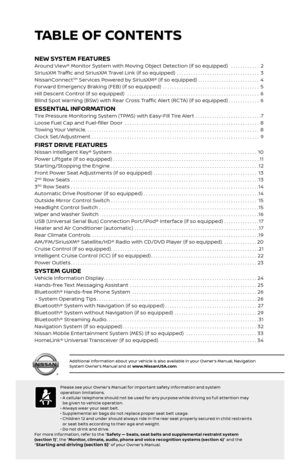
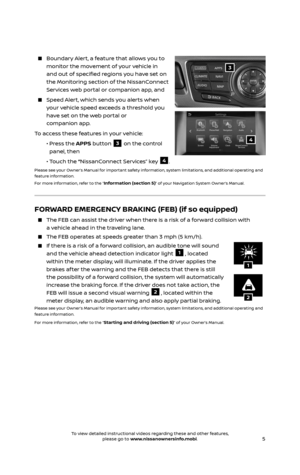
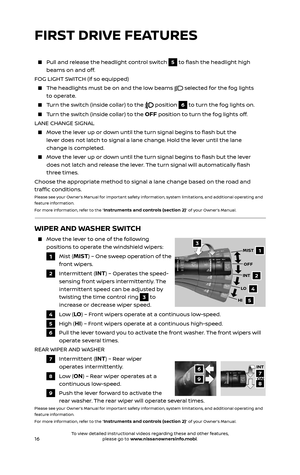
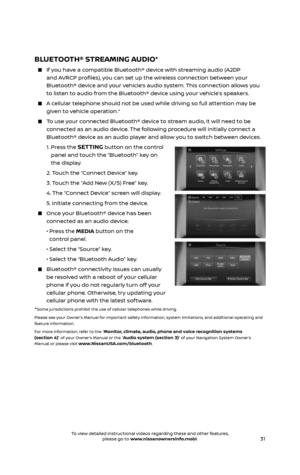
HEADLIGHT CONTROL SWITCH
HEADLIGHT CONTROL
Turn the headlight control switch to the
position 1 to turn on the front parking, tail,
license plate and instrument panel lights.
Turn the switch to the
position 2 to
turn on the headlights.
AUTOLIGHT SYSTEM (if so equipped)
The autolight system wil l automatically turn
the headlights on when it is dark and off
when it is light. The system will keep the headlights on for a period of time af ter
you turn the ignition off and all doors are closed.
To activate the autolight system, turn the headlight control switch to the AUTO
position
3 then push the ignition switch to ON. To deactivate the autolight
system, turn the headlight control switch to the
OFF position, position 1
or
position 2.
HIGH BEAM SELECT
With the he adlights ON (either in the AUTO 3 or position 2 ), push the
headlight control switch forward
4 to select the high beam function. The blue
indicator light
will illuminate in the instrument panel. Pull the headlight
switch back to the original position to select the low beam. The blue indicator
light will extinguish.
3
1
2
4
56
2485215_17b_Pathfinder_pQRG_111816b.indd 1511/18/16 1:45 PM
To view detailed instructional videos regarding these and other features, please go to www.nissanownersinfo.mobi.To view detailed instructional videos regarding these and other features, please go to www.nissanownersinfo.mobi.
Page 18 of 40
 – One sweep operation of the
front wipers.
2 Intermittent")
16
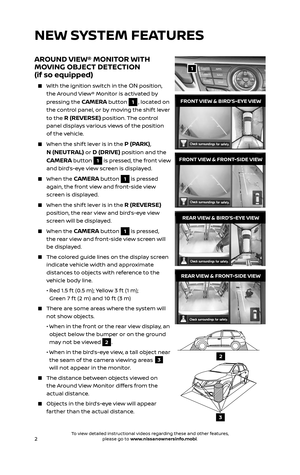
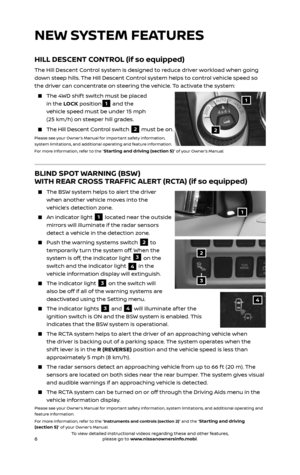
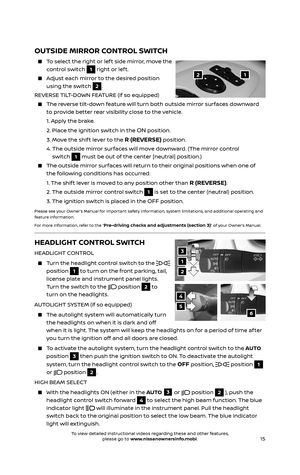
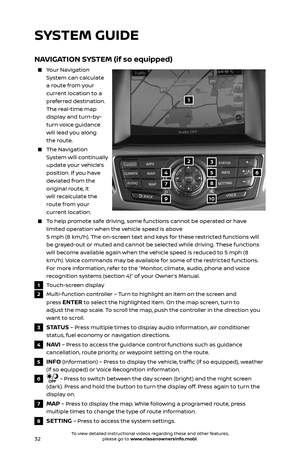
WIPER AND WASHER SWITCH
Move the lever to one of the following
positions to operate the windshield wipers:
1 Mist (MIST) – One sweep operation of the
front wipers.
2 Intermittent (INT) – Operates the speed-
sensing front wipers intermittently. The
intermittent speed can be adjusted by
twisting the time control ring
3 to
increase or decrease wiper speed.
4 Low (LO) – Front wipers operate at a continuous low-speed.
5 High (HI) – Front wipers operate at a continuous high-speed.
6 Pull the lever toward you to activate the front washer. The front wipers will
operate several times.
REAR WIPER AND WASHER
7 Intermittent (INT) – Rear wiper
operates intermittently.
8 Low (ON) – Rear wiper operates at a
continuous low-speed.
9 Push the lev er forward to activate the
rear washer. The rear wiper will operate several times.Please see your Owner’s Manual for important safety information, system limitations, and additional operating and
feature information.
For more information, refer to the “
Instruments and controls (section 2)” of your Owner’s Manual.
1
2
4
5
MIST
OFF
INT
LO
HI3
6
97
8
INT
ON
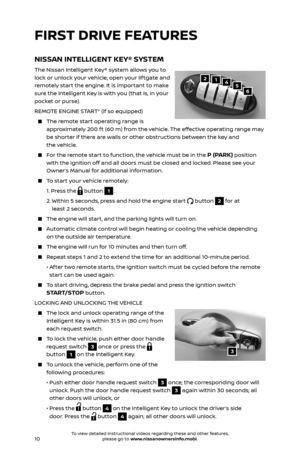
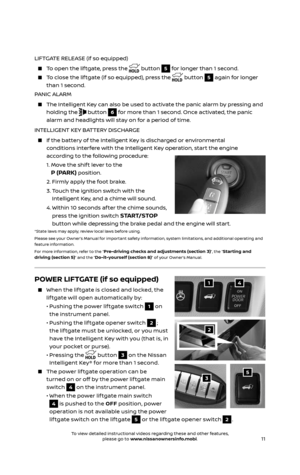
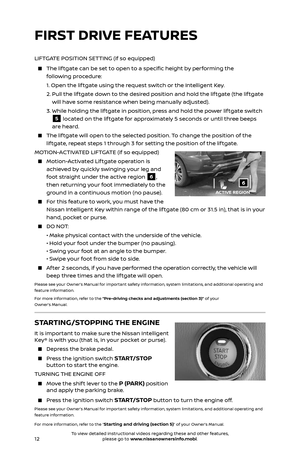
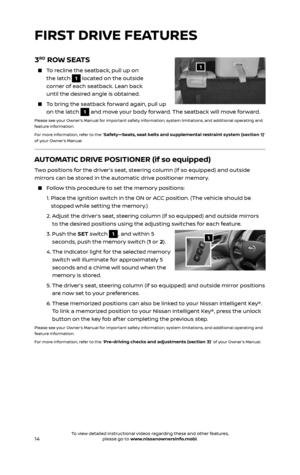
FIRST DRIVE FEATURES
Pull and release the headlight control switch 5 to flash the headlight high
beams on and off.
FOG LIGHT SWITCH (if so equipped)
The headlights must be on and the low beams selected for the fog lights
to operate.
Turn the switch (inside collar) to the position 6 to turn the fog lights on.
Turn the switch (inside collar) to the OFF position to turn the fog lights off.
LANE CHANGE SIGNAL
Move the lever up or down until the turn signal begins to flash but the
lever does not latch to signal a lane change. Hold the lever until the lane
change is completed.
Move the lever up or down until the turn signal begins to flash but the lever
does not latch and release the lever. The turn signal will automatically flash
three times.
Choose the appropriate method to signal a lane change based on the road and
traffic conditions.
Please see your Owner’s Manual for important safety information, system limitations, and additional operating and
feature information.
For more information, refer to the “
Instruments and controls (section 2)” of your Owner’s Manual.
2485215_17b_Pathfinder_pQRG_111816b.indd 1611/18/16 1:45 PM
To view detailed instructional videos regarding these and other features, please go to www.nissanownersinfo.mobi.To view detailed instructional videos regarding these and other features, please go to www.nissanownersinfo.mobi.
Page 19 of 40

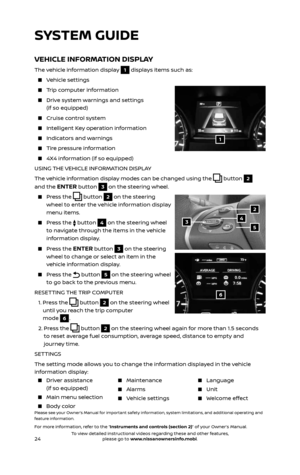
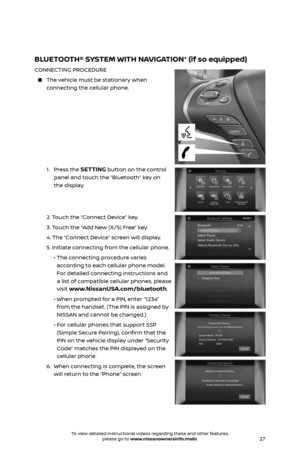
1 AUTO BUTTON/DRIVER’S SIDE TEMPER ATURE CONTROL DIAL
The auto mode may be used year-round. Press the AUTO button to turn
the system")
17
123
5
7
9
6
8
4
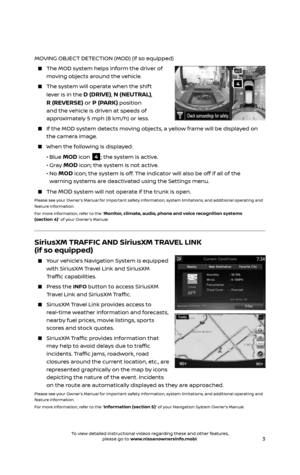
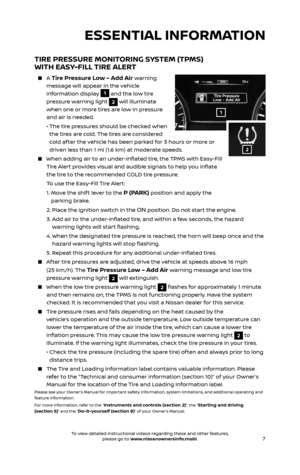
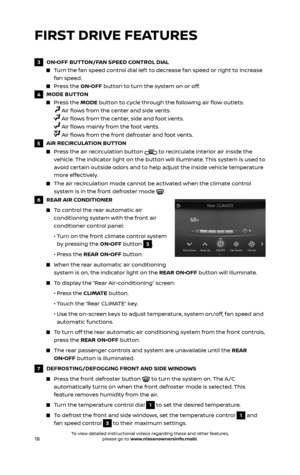
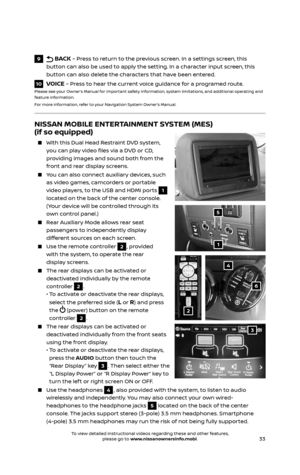
HEATER AND AIR CONDITIONER (automatic)
1 AUTO BUTTON/DRIVER’S SIDE TEMPER ATURE CONTROL DIAL
The auto mode may be used year-round. Press the AUTO button to turn
the system on, and the system will automatically control the inside
temperature (automatic cooling and/or dehumidified heating), air flow
distribution and fan speed.
Turn the driver ’s side temperature control dial to the lef t for cooler air or to
the right for warmer air.
2 DUAL BUTTON/PASSENGER’S SIDE TEMPERATURE CONTROL DIAL
Press the DUAL button to turn the passenger ’s side temperature controls
on or off. This will allow the passenger ’s side temperature to be adjusted
independently from the driver ’s side by turning the passenger ’s side
temperature control dial.
Turn the passenger ’s side temperature control dial lef t for cooler air or right
for warmer air.
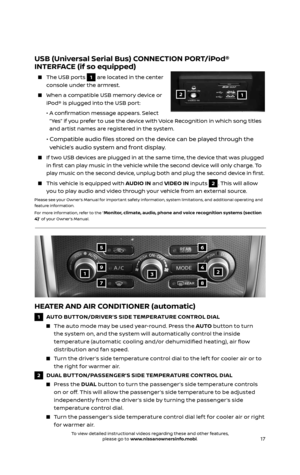
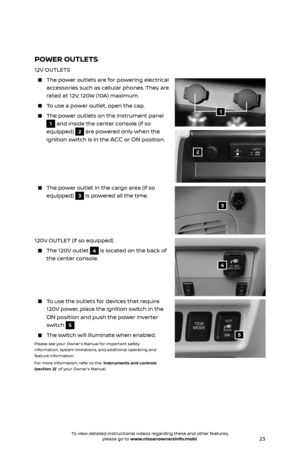
USB (Universal Serial Bus) CONNECTION PORT/iPod®
INTERFACE (if so equipped)
The USB por ts 1 are located in the center
console under the armrest.
When a c ompatible USB memory device or
iPod® is plugged into the USB port:
• A confirmation message appears. Select
“ Yes” if you prefer to use the device with Voice Recognition in which song titles
and artist names are registered in the system.
• Compatible audio files stored on the device can be played through the
vehicle’s audio system and front display.
If two USB devices are plugged in at the same time, the device that was plugged
in first can play music in the vehicle while the second device will only charge. To
play music on the second device, unplug both and plug the second device in first.
This vehicle is equipped with AUDIO IN and VIDEO IN inputs 2. This will allow
you to play audio and video through your vehicle from an external source.
Please see your Owner’s Manual for important safety information, system limitations, and additional operating and
feature information.
For more information, refer to the “
Monitor, climate, audio, phone and voice recognition systems (section
4)” of your Owner’s Manual.
12
2485215_17b_Pathfinder_pQRG_111816b.indd 1711/18/16 1:45 PM
To view detailed instructional videos regarding these and other features, please go to www.nissanownersinfo.mobi.To view detailed instructional videos regarding these and other features, please go to www.nissanownersinfo.mobi.
Page 20 of 40

18
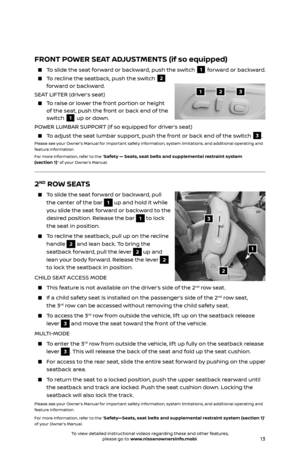
FIRST DRIVE FEATURES
3 ON•OFF BUTTON/FAN SPEED CONTROL DIAL
Turn the fan speed control dial lef t to decrease fan speed or right to increase
fan speed.
Press the ON•OFF button to turn the system on or off.
4 MODE BUTTON
Press the MODE button to cycle through the following air flow outlets:
Air flows from the center and side vents.
Air flows from the center, side and foot vents.
Air flows mainly from the foot vents.
Air flows from the front defroster and foot vents.
5 AIR RECIRCULATION BUTTON
Press the air recirculation button to recirculate interior air inside the
vehicle. The indicator light on the button will illuminate. This system is used to
avoid certain outside odors and to help adjust the inside vehicle temperature
more effectively.
The air recirculation mode cannot be activated when the climate control
system is in the front defroster mode .
6 REAR AIR CONDITIONER
To control the rear automatic air
conditioning system with the front air
conditioner control panel:
• Turn on the front climate control system
by pressing the ON•OFF button 3.
• Pr ess the REAR ON•OFF button.
When the r ear automatic air conditioning
system is on, the indicator light on the REAR ON•OFF button will illuminate.
To display the “Rear Air-conditioning” screen:
• Press the CLIMATE button.
• Touch the “Rear CLIMATE” key.
• Use the on-scr een keys to adjust temperature, system on/off, fan speed and
automatic functions.
To turn off the rear automatic air conditioning system from the front controls,
press the REAR ON•OFF button.
The rear passenger controls and system are unavailable until the REAR
ON•OFF button is illuminated.
7 DEFROSTING/DEFOGGING FRONT AND SIDE WINDOWS
Press the front defroster button to turn the system on. The A/C
automatically turns on when the front defroster mode is selected. This
feature removes humidity from the air.
Turn the temperature control dial 1 to set the desired temperature.
To defrost the front and side windows, set the temperature control 1 and
fan speed control
3 to their maximum settings.
2485215_17b_Pathfinder_pQRG_111816b.indd 1811/18/16 1:45 PM
To view detailed instructional videos regarding these and other features, please go to www.nissanownersinfo.mobi.To view detailed instructional videos regarding these and other features, please go to www.nissanownersinfo.mobi.
Page 21 of 40

19
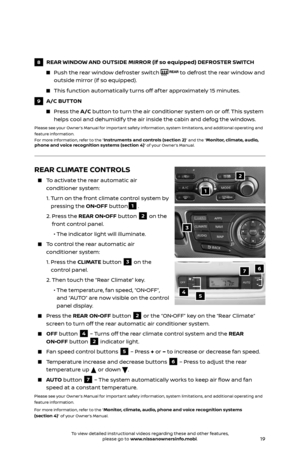
REAR CLIMATE CONTROLS
To activate the rear automatic air
conditioner system:
1. Turn on the front climate control system by
pressing the ON•OFF button1.
2. Press the REAR ON•OFF button 2 on the
front control panel.
• The indicator light will illuminate.
To control the rear automatic air
conditioner system:
1. Press the CLIMATE button 3 on the
control panel.
2. Then touch the “Rear Climate” key.
• The temper ature, fan speed, “ON•OFF”,
and “AUTO” are now visible on the control
panel display.
Press the REAR ON•OFF button 2 or the “ON•OFF” key on the “Rear Climate“
screen to turn off the rear automatic air conditioner system.
OFF button 4 – Turns off the rear climate control system and the REAR
ON•OFF button
2 indicator light.
Fan speed control buttons 5 – Press + or – to increase or decrease fan speed.
Temperature increase and decrease buttons 6 – Press to adjust the rear
temperature up
or down .
AUTO button 7 – The system automatically works to keep air flow and fan
speed at a constant temperature.
Please see your Owner’s Manual for important safety information, system limitations, and additional operating and
feature information.
For more information, refer to the “
Monitor, climate, audio, phone and voice recognition systems
(section 4)” of your Owner’s Manual.
2
4
7
5
6
1
3
8 REAR WINDOW AND OUTSIDE MIRROR (if so equipped) DEFROSTER SWITCH
Push the r ear window defroster switch to defrost the rear window and
outside mirror (if so equipped).
This function automatically turns off af ter approximately 15 minutes.
9 A/C BUTTON
Press the A/C button to turn the air conditioner system on or off. This system
helps cool and dehumidify the air inside the cabin and defog the windows.
Please see your Owner’s Manual for important safety information, system limitations, and additional operating and
feature information.
For more information, refer to the “
Instruments and controls (section 2)” and the “Monitor, climate, audio,
phone and voice recognition systems (section 4)” of your Owner’s Manual.
2485215_17b_Pathfinder_pQRG_111816b.indd 1911/18/16 1:45 PM
To view detailed instructional videos regarding these and other features, please go to www.nissanownersinfo.mobi.To view detailed instructional videos regarding these and other features, please go to www.nissanownersinfo.mobi.
Page 22 of 40

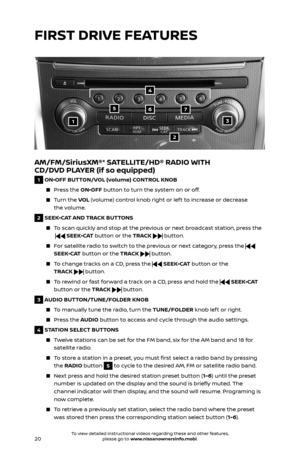
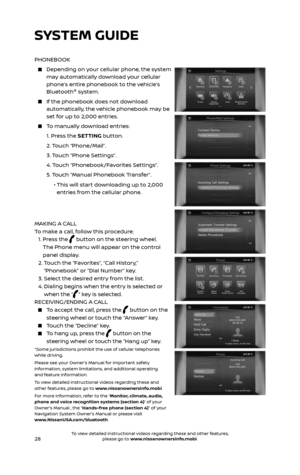
1 ON•OFF BUTTON/VOL (volume) CONTROL KNOB
Press the ON•OFF button to turn the system on or off.
Turn th")
20
AM/FM/SiriusXM®* SATELLITE/HD® RADIO WITH
CD/DVD PLAYER (if so equipped)
1 ON•OFF BUTTON/VOL (volume) CONTROL KNOB
Press the ON•OFF button to turn the system on or off.
Turn the VOL (volume) control knob right or lef t to increase or decrease
the volume.
2 SEEK•CAT AND TRACK BUTTONS
To scan quickly and stop at the previous or next broadcast station, press the
SEEK•CAT button or the TRACK button.
For satellite radio to switch to the previous or next category, press the
SEEK•CAT button or the TRACK
button.
To change tracks on a CD, press the SEEK•CAT button or the
TRACK
button.
To rewind or fast forward a track on a CD, press and hold the SEEK•CAT
button or the TRACK
button.
3 AUDIO BUTTON/TUNE/FOLDER KNOB
To manually tune the radio, turn the TUNE/FOLDER knob lef t or right.
Press the AUDIO button to access and cycle through the audio settings.
4 STATION SELECT BUTTONS
Twelve stations can be set for the FM band, six for the AM band and 18 for
satellite radio.
To store a station in a preset, you must first select a radio band by pressing
the RADIO button 5 to cycle to the desired AM, FM or satellite radio band.
Next press and hold the desired station preset button (1-6) until the preset
number is updated on the display and the sound is briefly muted. The
channel indicator will then display, and the sound will resume. Programing is
now complete.
To retrieve a previously set station, select the radio band where the preset
was stored then press the corresponding station select button ( 1-6).
13
2
567
4
FIRST DRIVE FEATURES
2485215_17b_Pathfinder_pQRG_111816b.indd 2011/18/16 1:45 PM
To view detailed instructional videos regarding these and other features, please go to www.nissanownersinfo.mobi.To view detailed instructional videos regarding these and other features, please go to www.nissanownersinfo.mobi.
Page 23 of 40

The cruise control system enables you to set
a constant cruising speed once the vehicle
has reached 25 mph (40 km/h).
The system wil l automatically mainta")
21
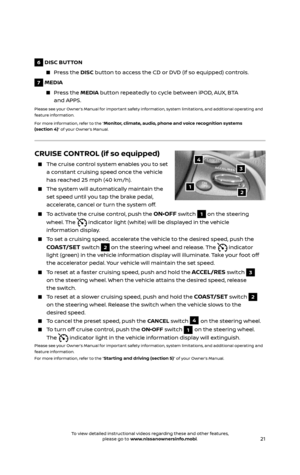
CRUISE CONTROL (if so equipped)
The cruise control system enables you to set
a constant cruising speed once the vehicle
has reached 25 mph (40 km/h).
The system wil l automatically maintain the
set speed until you tap the brake pedal,
accelerate, cancel or turn the system off.
To activate the cruise control, push the ON•OFF switch 1 on the steering
wheel. The
indicator light (white) will be displayed in the vehicle
information display.
To set a cruising speed, accelerate the vehicle to the desired speed, push the
COAST/SET switch 2 on the steering wheel and release. The indicator
light (green) in the vehicle information display will illuminate. Take your foot off
the accelerator pedal. Your vehicle will maintain the set speed.
To reset at a faster cruising speed, push and hold the ACCEL/RES switch 3
on the steering wheel. When the vehicle attains the desired speed, release
the switch.
To reset at a slower cruising speed, push and hold the COAST/SET switch 2
on the steering wheel. Release the switch when the vehicle slows to the
desired speed.
To cancel the preset speed, push the CANCEL switch 4 on the steering wheel.
To turn off cruise control, push the ON•OFF switch 1 on the steering wheel.
The
indicator light in the vehicle information display will extinguish.
Please see your Owner’s Manual for important safety information, system limitations, and additional operating and
feature information.
For more information, refer to the “
Starting and driving (section 5)” of your Owner’s Manual.
12
3
4
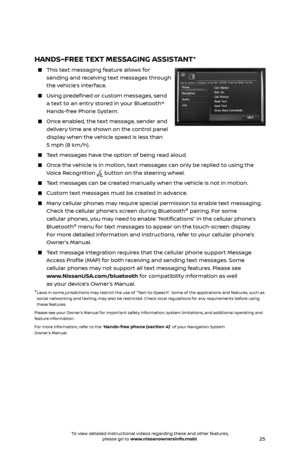
6 DISC BUTTON
Press the DISC button to access the CD or DVD (if so equipped) controls.
7 MEDIA
Press the MEDIA button repeatedly to cycle between iPOD, AUX, BTA
and APPS.
Please see your Owner’s Manual for important safety information, system limitations, and additional operating and
feature information.
For more information, refer to the “
Monitor, climate, audio, phone and voice recognition systems
(section 4)” of your Owner’s Manual.
2485215_17b_Pathfinder_pQRG_111816b.indd 2111/18/16 1:45 PM
To view detailed instructional videos regarding these and other features, please go to www.nissanownersinfo.mobi.To view detailed instructional videos regarding these and other features, please go to www.nissanownersinfo.mobi.
Page 24 of 40
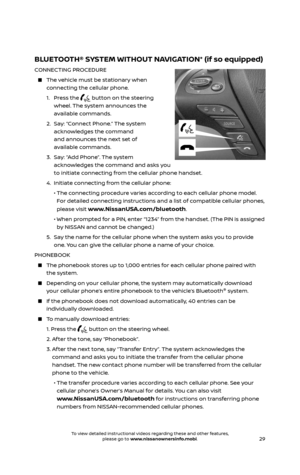
 (if so equipped)
VEHICLE-TO-VEHICLE DISTANCE CONTROL MODE
To set Vehicle-To-Vehicle Distance Control
mode, press the CRUISE ON/OFF
button
1 on the steering")
22
INTELLIGENT CRUISE CONTROL (ICC) (if so equipped)
VEHICLE-TO-VEHICLE DISTANCE CONTROL MODE
To set Vehicle-To-Vehicle Distance Control
mode, press the CRUISE ON/OFF
button
1 on the steering wheel for less
than 1.5 seconds. The
CRUISE indicator
light
2 will illuminate.
Accelerate to the desired speed.
Push down on the COAST/SET switch
3 on the steering wheel and release it.
Intelligent Cruise Control will be set to the desired speed.
Press the distance button 4 on the steering
wheel repeatedly to change the set distance
between long, middle and short.
When a v ehicle is not detected ahead of you in the lane,
the set distance and set vehicle speed indicator lights will
illuminate
5 in set mode.
When a vehicle is detected ahead of you in the lane, the
vehicle ahead detection, set distance and set vehicle speed
indicator lights will illuminate
6 in set mode.
To reset at a faster cruising speed, push and hold the ACCEL/RES switch 7 on
the steering wheel. When the vehicle attains the desired speed, release
the switch.
To reset at a slower cruising speed, push and hold the COAST/SET switch 3 on the steering wheel. Release the switch when the vehicle slows to the
desired speed.
To cancel the preset speed, push the CANCEL switch 8 on the steering wheel
or tap the brake pedal. The set vehicle speed indicator
5 will extinguish.
To turn off Intelligent Cruise Control, press the CRUISE ON/OFF button 1 on the steering wheel. The CRUISE indicator light 2 in the instrument panel
will extinguish.
Please see your Owner’s Manual for important safety information, system limitations, and additional operating and
feature information.
For more information, refer to the
“Starting and driving (section 5)” of your Owner’s Manual.
2
6
1
7
34
5
FIRST DRIVE FEATURES
2485215_17b_Pathfinder_pQRG_111816b.indd 2211/18/16 1:45 PM
To view detailed instructional videos regarding these and other features, please go to www.nissanownersinfo.mobi.To view detailed instructional videos regarding these and other features, please go to www.nissanownersinfo.mobi.