2017 NISSAN ARMADA ECU
[x] Cancel search: ECUPage 174 of 614
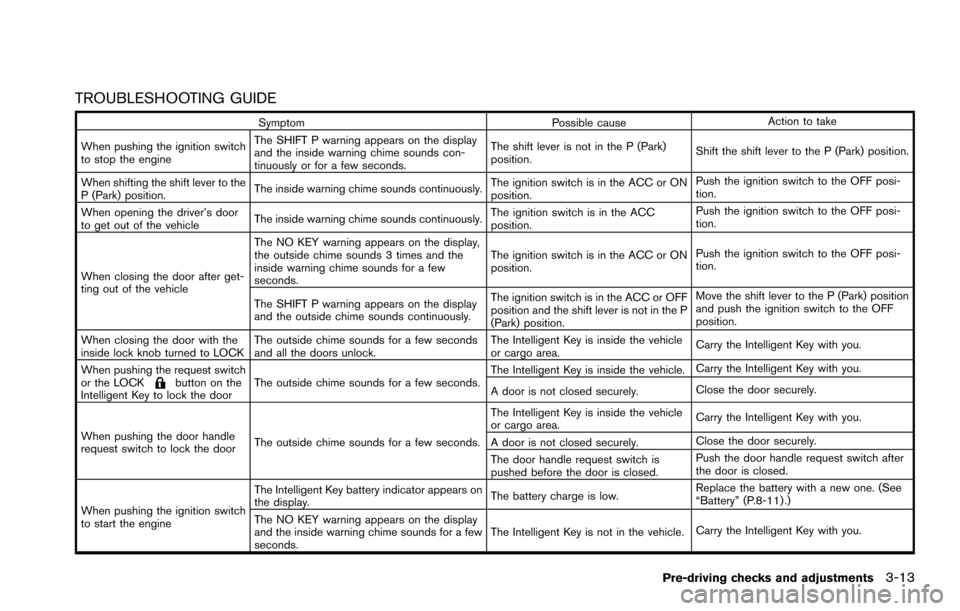
TROUBLESHOOTING GUIDE
SymptomPossible causeAction to take
When pushing the ignition switch
to stop the engine The SHIFT P warning appears on the display
and the inside warning chime sounds con-
tinuously or for a few seconds.
The shift lever is not in the P (Park)
position.
Shift the shift lever to the P (Park) position.
When shifting the shift lever to the
P (Park) position. The inside warning chime sounds continuously.
The ignition switch is in the ACC or ON
position.Push the ignition switch to the OFF posi-
tion.
When opening the driver’s door
to get out of the vehicle The inside warning chime sounds continuously. The ignition switch is in the ACC
position.Push the ignition switch to the OFF posi-
tion.
When closing the door after get-
ting out of the vehicle The NO KEY warning appears on the display,
the outside chime sounds 3 times and the
inside warning chime sounds for a few
seconds.
The ignition switch is in the ACC or ON
position.
Push the ignition switch to the OFF posi-
tion.
The SHIFT P warning appears on the display
and the outside chime sounds continuously. The ignition switch is in the ACC or OFF
position and the shift lever is not in the P
(Park) position.Move the shift lever to the P (Park) position
and push the ignition switch to the OFF
position.
When closing the door with the
inside lock knob turned to LOCK The outside chime sounds for a few seconds
and all the doors unlock. The Intelligent Key is inside the vehicle
or cargo area.
Carry the Intelligent Key with you.
When pushing the request switch
or the LOCK
button on the
Intelligent Key to lock the door The outside chime sounds for a few seconds. The Intelligent Key is inside the vehicle.
Carry the Intelligent Key with you.
A door is not closed securely. Close the door securely.
When pushing the door handle
request switch to lock the door The outside chime sounds for a few seconds. The Intelligent Key is inside the vehicle
or cargo area.
Carry the Intelligent Key with you.
A door is not closed securely. Close the door securely.
The door handle request switch is
pushed before the door is closed. Push the door handle request switch after
the door is closed.
When pushing the ignition switch
to start the engine The Intelligent Key battery indicator appears on
the display.
The battery charge is low.Replace the battery with a new one. (See
“Battery” (P.8-11) .)
The NO KEY warning appears on the display
and the inside warning chime sounds for a few
seconds. The Intelligent Key is not in the vehicle.
Carry the Intelligent Key with you.
Pre-driving checks and adjustments3-13
Page 176 of 614
WARNING
The Intelligent Key transmits radio
waves when the buttons are pushed.
The FAA advises that radio waves may
affect aircraft navigation and commu-
nication systems. Do not operate the
Intelligent Key while on an airplane.
Make sure the buttons are not operated
unintentionally when the unit is stored
for a flight.
It is possible to lock/unlock all doors, fuel-filler
door, activate the panic alarm and open the
windows by pushing the buttons on the Intelli-
gent Key from outside the vehicle.
Before locking the doors, make sure the
Intelligent Key is not left in the vehicle.
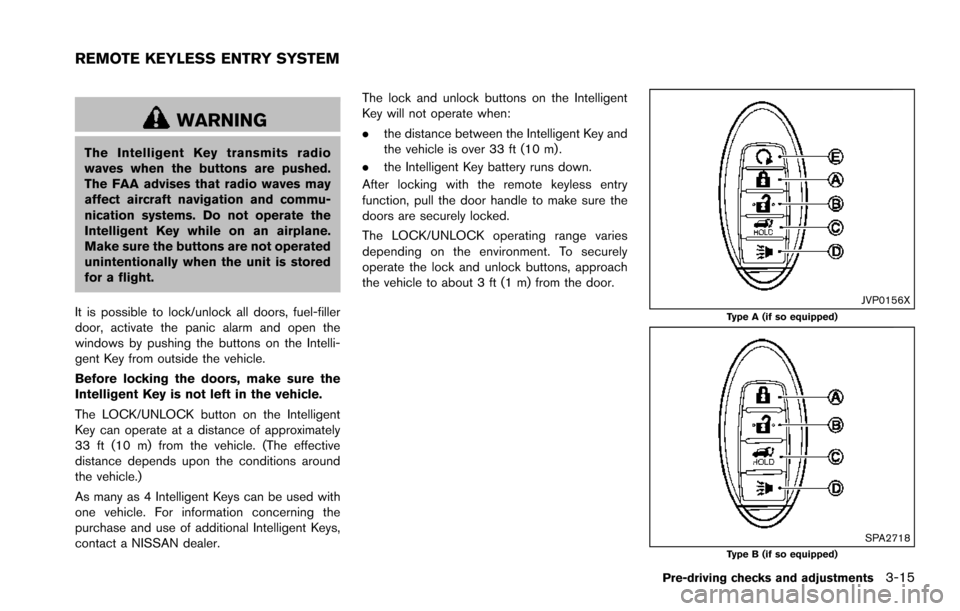
The LOCK/UNLOCK button on the Intelligent
Key can operate at a distance of approximately
33 ft (10 m) from the vehicle. (The effective
distance depends upon the conditions around
the vehicle.)
As many as 4 Intelligent Keys can be used with
one vehicle. For information concerning the
purchase and use of additional Intelligent Keys,
contact a NISSAN dealer. The lock and unlock buttons on the Intelligent
Key will not operate when:
.
the distance between the Intelligent Key and
the vehicle is over 33 ft (10 m) .
. the Intelligent Key battery runs down.
After locking with the remote keyless entry
function, pull the door handle to make sure the
doors are securely locked.
The LOCK/UNLOCK operating range varies
depending on the environment. To securely
operate the lock and unlock buttons, approach
the vehicle to about 3 ft (1 m) from the door.
JVP0156XType A (if so equipped)
SPA2718Type B (if so equipped)
Pre-driving checks and adjustments3-15
REMOTE KEYLESS ENTRY SYSTEM
Page 181 of 614
3-20Pre-driving checks and adjustments
seconds.
The following events will occur when the engine
starts:
. The front parking lights will turn on and
remain on as long as the engine is running.
. The doors will be locked and the air
conditioner system may turn on.
. The engine will continue to run for about 10
minutes. Repeat the steps to extend the time
for an additional 10 minutes. See “Extending
engine run time” (P.3-20) .
Depress and hold the brake pedal, then place
the ignition switch in the ON position before
driving. For further instructions, see “Driving the
vehicle” (P.5-17) .
EXTENDING ENGINE RUN TIME
The remote engine start function can be
extended one time by performing the steps
listed in “Remote starting the engine” (P.3-19) .
Run time will be calculated as follows:
. The first 10 minute run time will start when
the remote engine start function is per-
formed.
. The second 10 minutes will start immedi-
ately when the remote engine start function
is performed. For example, if the engine has
been running for 5 minutes, and 10 minutes
are added, the engine will run for a total of 15 minutes.
. Extending engine run time will count to-
wards the two remote start limit.
A maximum of two remote starts, or a single start
with an extension, are allowed between ignition
cycles.
The ignition switch must be cycled to the ON
position and then back to the OFF position
before the remote engine start procedure can be
used again.
CANCELING A REMOTE START
To cancel a remote start, perform one of the
following:
. Aim the Intelligent Key at the vehicle and
push and hold the remote engine start
button until the front parking lights turn off.
. Turn on the hazard indicator flashers.
. Cycle the ignition switch ON and then OFF.
. The extended engine run time has expired.
. The first 10 minute timer has expired.
. The engine hood has been opened.
. The shift lever is moved out of the P (Park)
position.
. The theft alarm sounds due to illegal entry
into the vehicle.
. The ignition switch is pushed without an
Intelligent Key in the vehicle. .
The ignition switch is pushed with an
Intelligent Key in the vehicle but the brake
pedal is not depressed.
CONDITIONS THE REMOTE ENGINE
START WILL NOT WORK
The remote engine start will not operate if any of
the following conditions are present:
.The ignition switch is placed in the ON
position.
. The hood is not securely closed.
. The hazard indicator flashers are on.
. The engine is still running. The engine must
be completely stopped. Wait at least 6
seconds if the engine goes from running to
off. This is not applicable when extending
engine run time.
. The remote engine start
button is not
pushed and held for at least 2 seconds.
. The remote engine start
button is not
pushed and held within 5 seconds of
pushing the “LOCK”
button.
. The brake pedal is depressed.
. The doors are not closed and locked.
. The liftgate is open.
. The Intelligent Key system warning light
remains on in the vehicle information display.
. An Intelligent Key is left inside the vehicle.
Page 183 of 614
3-22Pre-driving checks and adjustments
WARNING
.Always be sure the liftgate has been
closed securely to prevent it from
opening while driving.
. Do not drive with the liftgate open.
This could allow dangerous exhaust
gases to be drawn into the vehicle.
See “Exhaust gas (carbon monox-
ide)” (P.5-4) .
. Do not leave children unattended
inside the vehicle. They could un-
knowingly activate switches or con-
trols. Unattended children could
become involved in serious acci-
dents.
. Always be sure that hands and feet
are clear of the door frame to avoid
injury while closing the liftgate.
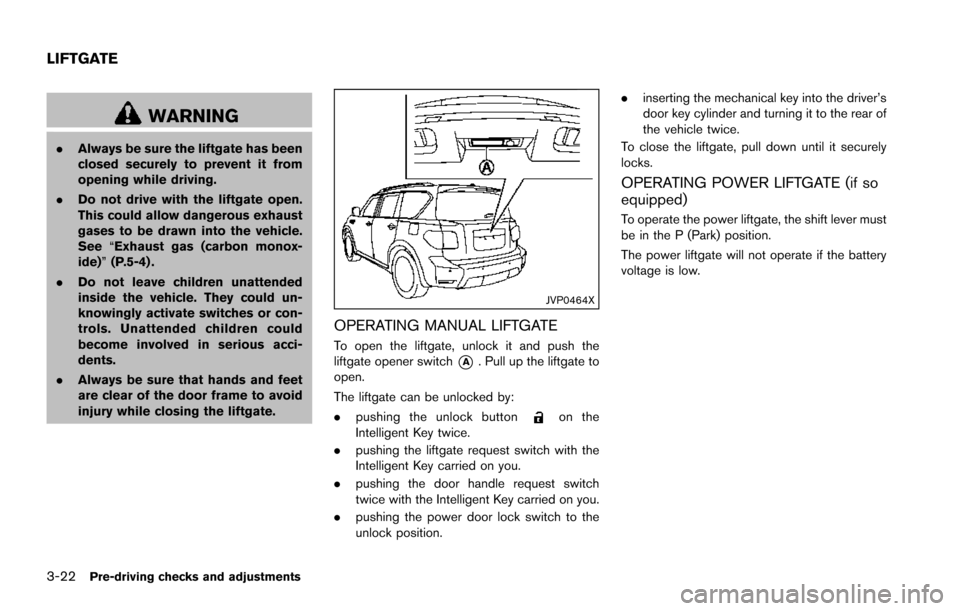
JVP0464X
OPERATING MANUAL LIFTGATE
To open the liftgate, unlock it and push the
liftgate opener switch
*A. Pull up the liftgate to
open.
The liftgate can be unlocked by:
. pushing the unlock button
on the
Intelligent Key twice.
. pushing the liftgate request switch with the
Intelligent Key carried on you.
. pushing the door handle request switch
twice with the Intelligent Key carried on you.
. pushing the power door lock switch to the
unlock position. .
inserting the mechanical key into the driver’s
door key cylinder and turning it to the rear of
the vehicle twice.
To close the liftgate, pull down until it securely
locks.
OPERATING POWER LIFTGATE (if so
equipped)
To operate the power liftgate, the shift lever must
be in the P (Park) position.
The power liftgate will not operate if the battery
voltage is low.
LIFTGATE
Page 188 of 614
.Push the power door lock switch to the
UNLOCK position.
To lock, close the fuel-filler door securely and
lock all doors by operating the door handle
request switch, the LOCK button on the
Intelligent Key, the mechanical key or the power
door lock switch.
FUEL-FILLER CAP
WARNING
. Gasoline is extremely flammable
and highly explosive under certain
conditions. You could be burned or
seriously injured if it is misused or
mishandled. Always stop engine
and do not smoke or allow open
flames or sparks near the vehicle
when refueling.
. Do not attempt to top off the fuel
tank after the fuel pump nozzle
shuts off automatically. Continued
refueling may cause fuel overflow,
resulting in fuel spray and possibly
a fire.
. Use only an original equipment type
fuel-filler cap as a replacement. It
has a built-in safety valve needed
for proper operation of the fuel system and emission control sys-
tem. An incorrect cap can result in a
serious malfunction and possible
injury. It could also cause the mal-
function indicator light to come on.
. Never pour fuel into the throttle
body to attempt to start your vehi-
cle.
. Do not fill a portable fuel container
in the vehicle or trailer. Static elec-
tricity can cause an explosion of
flammable liquid, vapor or gas in
any vehicle or trailer. To reduce the
risk of serious injury or death when
filling portable fuel containers:
— Always place the container on
the ground when filling.
— Do not use electronic devices when filling.
— Keep the pump nozzle in contact with the container while you are
filling it.
— Use only approved portable fuel containers for flammable liquid.
CAUTION
. If fuel is spilled on the vehicle body,
flush it away with water to avoid
paint damage.
. Insert the cap straight into the fuel-
filler tube, then tighten until the
fuel-filler cap clicks. Failure to tight-
en the fuel-filler cap properly may
cause the
malfunction indicator
light (MIL) to illuminate. If the
light illuminates because the fuel-
filler cap is loose or missing, tighten
or install the cap and continue to
drive the vehicle. The
light
should turn off after a few driving
trips. If the
light does not turn
off after a few driving trips, have the
vehicle inspected. It is recom-
mended you visit a NISSAN dealer
for this service.
. The LOOSE FUEL CAP warning will
appear if the fuel-filler cap is not
properly tightened. It may take a few
driving trips for the message to be
displayed. Failure to tighten the
fuel-filler cap properly after the
LOOSE FUEL CAP warning appears
Pre-driving checks and adjustments3-27
Page 236 of 614
.Do not use the Around View�ŠMoni-
tor with the outside mirrors in the
stored position, and make sure that
the liftgate is securely closed when
operating the vehicle using the
Around View
�ŠMonitor.
. The apparent distance between ob-
jects viewed on the Around View
�Š
Monitor differs from the actual dis-
tance.
. The cameras are installed on the
front grille, the outside mirrors and
above the rear license plate. Do not
put anything on the vehicle that
covers the cameras.
. When washing the vehicle with high
pressure water, be sure not to spray
it around the cameras. Otherwise,
water may enter the camera unit
causing water condensation on the
lens, a malfunction, fire or an elec-
tric shock.
. Do not strike the cameras. They are
precision instruments. Doing so
could cause a malfunction or cause
damage resulting in a fire or an
electric shock. The following are operating limitations and do
not represent a system malfunction:
.
The screen displayed on the Around View
�Š
Monitor will automatically return to the
previous screen 3 minutes after the CAM-
ERA button has been pushed while the shift
lever is in a position other than the R
(Reverse) position.
. There may be a delay when switching
between views.
. When the temperature is extremely high or
low, the screen may not display objects
clearly.
. When strong light directly shines on the
camera, objects may not be displayed
clearly.
. The screen may flicker under fluorescent
light.
. The colors of objects on the Around View
�Š
Monitor may differ somewhat from the actual
color of objects.
. Objects on the monitor may not be clear and
the color of the object may differ in a dark
environment.
. There may be differences in sharpness
between each camera view of the bird’s-
eye view. .
If dirt, rain or snow accumulates on the
camera, the Around View
�ŠMonitor may not
display objects clearly. Clean the camera.
. Do not use wax on the camera lens. Wipe off
any wax with a clean cloth that has been
dampened with a diluted mild cleaning
agent, then wipe with a dry cloth.
Monitor, heater, air conditioner, audio, phone and voice recognition systems4-39
Page 296 of 614
2. Replace both batteries with new ones..Recommended battery:Size AA 62 (remote controller)
Size AAA 62 (headphones)
.Be careful not to touch the battery
terminal.
.Make sure that the +and 7ends on the
batteries match the markings inside the
compartment.
3. Close the lid securely.
.If you will not be using the remote controller for long periods of time,
remove the batteries.
.Replacement of the batteries is needed when the remote controller only functions
at extremely close distances to the DVD
Entertainment System or when it does
not function at all.
FCC Notice:
Changes or modifications not expressly
approved by the party responsible for
compliance could void the user’s authority
to operate the equipment. This device
complies with Part 15 of the FCC Rules
and RSS-210 of Industry Canada. Opera-
tion is subject to the following two condi-
tions: (1) This device may not cause
harmful interference, and (2) this device must accept any interference received,
including interference that may cause un-
desired operation of the device.
BEFORE OPERATING DVD ENTER-
TAINMENT SYSTEM
Precautions
Start the engine when using the DVD Entertain-
ment System.
WARNING
The driver must not attempt to operate
the DVD Entertainment System or wear
the headphones while the vehicle is in
motion so that full attention may be
given to vehicle operation.
CAUTION
.
Only operate the DVD Entertain-
ment System while the vehicle en-
gine is running. Operating the DVD
Entertainment System for extended
periods of time with the engine OFF
can discharge the vehicle battery. .
Do not allow the system to get wet.
Excessive moisture such as spilled
liquids may cause the system to
malfunction.
. While playing VIDEO-CD media, this
DVD player does not guarantee
complete functionality of all VI-
DEO-CD formats.
Parental level (parental control)
Video data with the parental control setting can
be played with this system. Please use your own
judgement to set the parental control with the
system.
Disc selection
You can play the following disc formats with the
DVD player:
.DVD-VIDEO
. VIDEO-CD
. DTS-CD
Use DVDs with the region code “ALL” or the
code applicable to your country. (The region
code is displayed as a small symbol printed on
the top of the DVD.) This vehicle-installed DVD
player can only play DVDs with an applicable
region code.
Monitor, heater, air conditioner, audio, phone and voice recognition systems4-99
Page 301 of 614
4-104Monitor, heater, air conditioner, audio, phone and voice recognition systems
SETUP button:
Push the SETUP button to display the rear seat
display settings. (See “Rear display settings”
(P.4-104) .)
BACK button:
Push to go back to the previous screen or
cancel the selection.
Volume:
To adjust the speaker volume push
oron the volume control button.
This button is used to control the volume from
the vehicle speakers. To adjust the volume of the
headphones, use the volume knob that is
attached to the headphones.
Keypad:
: PLAY/PAUSE button
: STOP button
: FORWARD button
: REWIND button
: FORWARD button for commercial skip (forDVD-VIDEO and DVD-VR)
: REWIND button for commercial skip (forDVD-VIDEO and DVD-VR)
Key illumination button:
If the key illumination button is pushed, the
buttons on the remote controller will be lit up.
Rear display settings
Display mode adjustment of the rear seat
displays can be performed while a DVD or
USB movie is being played. Set the rear display
select switch on the remote controller to either L
or R according to the display you want to set,
and then push the SETUP button. It is not
possible to make display mode adjustments to
the left and right displays at the same time.
Aspect:
Select the display size from “FULL”, “NORMAL”,
“CINEMA” or “WIDE”.
Picture Mode:
Select the Picture Mode from “NORMAL”,
“DYNAMIC”, “CINEMA”, “GAME” .
To adjust the display brightness automatically,
select the “Brightness” key and then select from
“DARKER”, “NORMAL” or “BRIGHTER”. When
adjusting manually, select “OFF” and push
ENTER button on the remote controller.
To adjust tint, color or contrast, select a key
using the select button (
or) , push
ENTER on the remote controller.
Push the BACK button on the remote controller
to apply the settings and return to the previous
display.
To return the adjustment levels to the default
value, select “Execute” next to “Initialization” push the select button (
,) on the remote
controller and push the ENTER button. The
“Execute” key is deactivated when the picture
mode settings are already in the default value.
Color System:
To choose the color system, select from
“NTSC”, “PAL”, “PAL-60”, “PAL-M”, “PAL-N” or
“AUTO” .
3D Y/C filter:
Set to ON/OFF push the select button (
or) and push ENTER button on the remote
controller. When turned on, small characters
and an outline of the shapes will be displayed
more clearly than when turned off.
AUX Volume Setting:
This is only active when in the Rear AUX mode.
To set the AUX volume, select from “HIGH”,
“LOW” or “MIDDLE” .