Page 492 of 614
SCE0876
2. Loosen each wheel nut one or two turns byturning counterclockwise with the wheel nut
wrench. Do not remove the wheel nuts
until the tire is off the ground.
NCE130
3. Install the assembled jack rod into the jack
as shown.
4. Carefully raise the vehicle until the clearance between the tire and ground is achieved.
5. To lift the vehicle, securely hold the jack lever and rod with both hands and turn the jack
lever.
NOTE:
Before jacking up the vehicle, make sure
the ignition switch is placed in the OFF
position. If the vehicle is lifted up with the
engine running, the auto-leveling suspen-
sion will become disabled after 120 sec-
onds. To reset the auto-leveling
In case of emergency6-9
Page 493 of 614

6-10In case of emergency
suspension, cycle the ignition switch ON/
OFF one time.
SCE0910
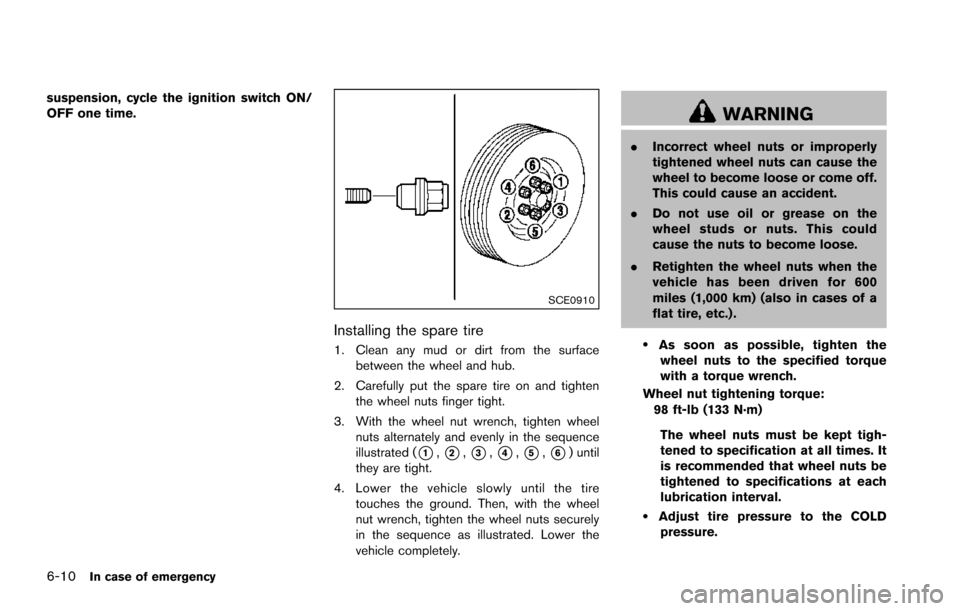
Installing the spare tire
1. Clean any mud or dirt from the surfacebetween the wheel and hub.
2. Carefully put the spare tire on and tighten the wheel nuts finger tight.
3. With the wheel nut wrench, tighten wheel nuts alternately and evenly in the sequence
illustrated (
*1,*2,*3,*4,*5,*6) until
they are tight.
4. Lower the vehicle slowly until the tire touches the ground. Then, with the wheel
nut wrench, tighten the wheel nuts securely
in the sequence as illustrated. Lower the
vehicle completely.
WARNING
.Incorrect wheel nuts or improperly
tightened wheel nuts can cause the
wheel to become loose or come off.
This could cause an accident.
. Do not use oil or grease on the
wheel studs or nuts. This could
cause the nuts to become loose.
. Retighten the wheel nuts when the
vehicle has been driven for 600
miles (1,000 km) (also in cases of a
flat tire, etc.) .
.As soon as possible, tighten the
wheel nuts to the specified torque
with a torque wrench.
Wheel nut tightening torque: 98 ft-lb (133 N·m)
The wheel nuts must be kept tigh-
tened to specification at all times. It
is recommended that wheel nuts be
tightened to specifications at each
lubrication interval.
.Adjust tire pressure to the COLDpressure.
Page 494 of 614
COLD pressure:
After the vehicle has been parked
for three hours or more or driven
less than 1 mile (1.6 km) .
COLD tire pressures are shown on
the Tire and Loading Information
label affixed to the driver side center
pillar.
After adjusting tire pressure to the COLD tire
pressure, the display of the tire pressure
information may show higher pressure than the
COLD tire pressure after the vehicle has been
driven more than 1 mile (1.6 km). This is
because the tire pressurizes as the tire tem-
perature rises. This does not indicate a system
malfunction.
Stowing the damaged tire and tools
1. Securely store the damaged tire, jack and tools in the storage area.
2. Close the cargo floor cover.
3. Replace the cargo floor board.
4. Close the liftgate.
WARNING
Always make sure that the spare tire
and jacking equipment are properly
secured after use. Such items can
become dangerous projectiles in an
accident or sudden stop.
In case of emergency6-11
Page 500 of 614
SCE0925Two-Wheel Drive (2WD) models
TOWING RECOMMENDED BY
NISSAN
Two-Wheel Drive (2WD) models
NISSAN recommends that your vehicle be
towed with the driving (rear) wheels off the
ground or place the vehicle on a flat bed truck as
illustrated.
CAUTION
.Never tow automatic transmission
models with the rear wheels on the
ground or four wheels on the
ground (forward or backward) , as this may cause serious and expen-
sive damage to the transmission. If
it is necessary to tow the vehicle
with the front wheels raised, always
use towing dollies under the rear
wheels.
. When towing rear wheel drive mod-
els with the front wheels on the
ground or on towing dollies: Place
the ignition in the ACC or ON
position, and secure the steering
wheel in a straight-ahead position
with a rope or similar device.
In case of emergency6-17
Page 505 of 614
6-22In case of emergency
ference with other parts.
SCE0961
4. Remove the 4 bolts*2that secure the
4WD shift motor using the wrench
*3that
is equipped in the vehicle.
5. Remove the 4WD shift motor assembly.
CAUTION
Be careful not to allow the assembly to
contact water, dirt or sand.
SCE0962
6. Completely insert the wrench into the internal gear
*Bof the transfer.
7. Fully turn the wrench clockwise
*4as far as
it will go. This shifts the transfer to the 4L
position.
8. Install the 4WD shift motor assembly. Securely tighten the 4 bolts using the
wrench.
CAUTION
.Do not connect the harness con-
nector of the 4WD shift motor after
the above procedure has been per-
Page 513 of 614

7-6Appearance and care
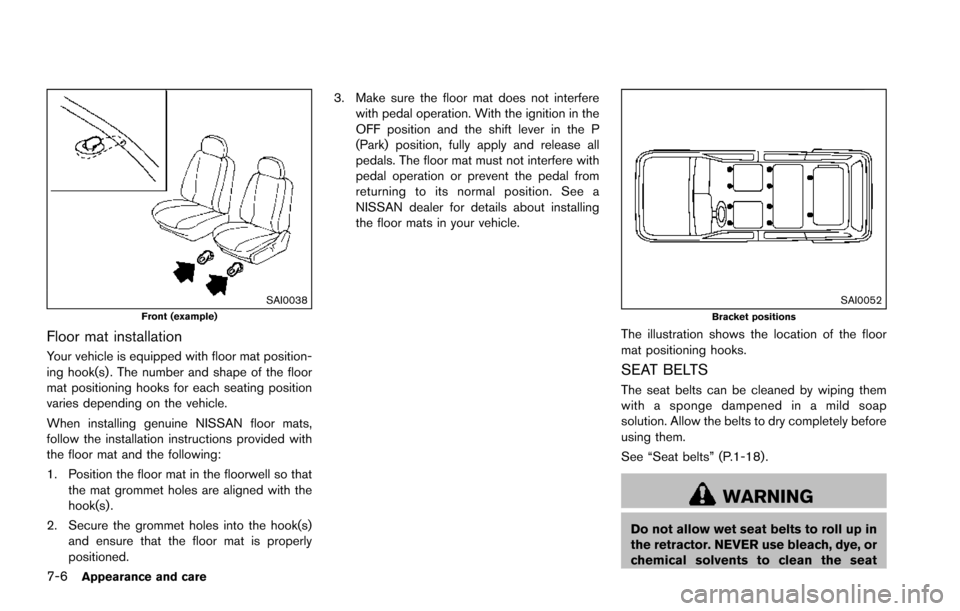
SAI0038Front (example)
Floor mat installation
Your vehicle is equipped with floor mat position-
ing hook(s) . The number and shape of the floor
mat positioning hooks for each seating position
varies depending on the vehicle.
When installing genuine NISSAN floor mats,
follow the installation instructions provided with
the floor mat and the following:
1. Position the floor mat in the floorwell so thatthe mat grommet holes are aligned with the
hook(s) .
2. Secure the grommet holes into the hook(s) and ensure that the floor mat is properly
positioned. 3. Make sure the floor mat does not interfere
with pedal operation. With the ignition in the
OFF position and the shift lever in the P
(Park) position, fully apply and release all
pedals. The floor mat must not interfere with
pedal operation or prevent the pedal from
returning to its normal position. See a
NISSAN dealer for details about installing
the floor mats in your vehicle.
SAI0052Bracket positions
The illustration shows the location of the floor
mat positioning hooks.
SEAT BELTS
The seat belts can be cleaned by wiping them
with a sponge dampened in a mild soap
solution. Allow the belts to dry completely before
using them.
See “Seat belts” (P.1-18).
WARNING
Do not allow wet seat belts to roll up in
the retractor. NEVER use bleach, dye, or
chemical solvents to clean the seat
Page 517 of 614

8-2Do-it-yourself
When performing any inspection or mainte-
nance work on your vehicle, always take care
to prevent serious accidental injury to yourself or
damage to the vehicle. The following are general
precautions which should be closely observed.
WARNING
.Park the vehicle on a level surface,
apply the parking brake securely
and block the wheels to prevent
the vehicle from moving. Move the
shift lever to P (Park) .
. Be sure the ignition switch is in the
OFF or LOCK position when per-
forming any parts replacement or
repairs.
. Never connect or disconnect the
battery or any transistorized com-
ponent while the ignition switch is
in the ON position.
. Never leave the engine or automatic
transmission related component
harnesses disconnected while the
ignition switch is in the ON position.
. If you must work with the engine
running, keep your hands, clothing,
hair and tools away from moving fans, belts and any other moving
parts.
. It is advisable to secure or remove
any loose clothing and remove any
jewelry, such as rings, watches, etc.
before working on your vehicle.
. Always wear eye protection when-
ever you work on your vehicle.
. If you must run the engine in an
enclosed space such as a garage, be
sure there is proper ventilation for
exhaust gases to escape.
. Never get under the vehicle while it
is supported only by a jack. If it is
necessary to work under the vehicle,
support it with safety stands.
. Keep smoking materials, flame and
sparks away from fuel tank and the
battery.
. Your vehicle is equipped with an
automatic engine cooling fan. It may
come on at any time without warn-
ing, even if the ignition key is in the
OFF position and the engine is not
running. To avoid injury, always
disconnect the negative battery
cable before working near the fan. .
Because the fuel lines are under
high pressure even when the engine
is off, it is recommended you visit a
NISSAN dealer for service of the
fuel filter or fuel lines.CAUTION
.Do not work under the hood while
the engine is hot. Turn the engine
off and wait until it cools down.
. Avoid direct contact with used en-
gine oil and coolant. Improperly
disposed engine oil, coolant, and/
or other vehicle fluids can damage
the environment. Always conform to
local regulations for disposal of
vehicle fluid.
This “8. Do-it-yourself” section gives instruc-
tions regarding only those items which are
relatively easy for an owner to perform.
A genuine NISSAN Service Manual is also
available. (See “Owner’s Manual/Service Man-
ual order information” (P.10-33).)
You should be aware that incomplete or
improper servicing may result in operating
MAINTENANCE PRECAUTIONS
Page 520 of 614

JVM0733X
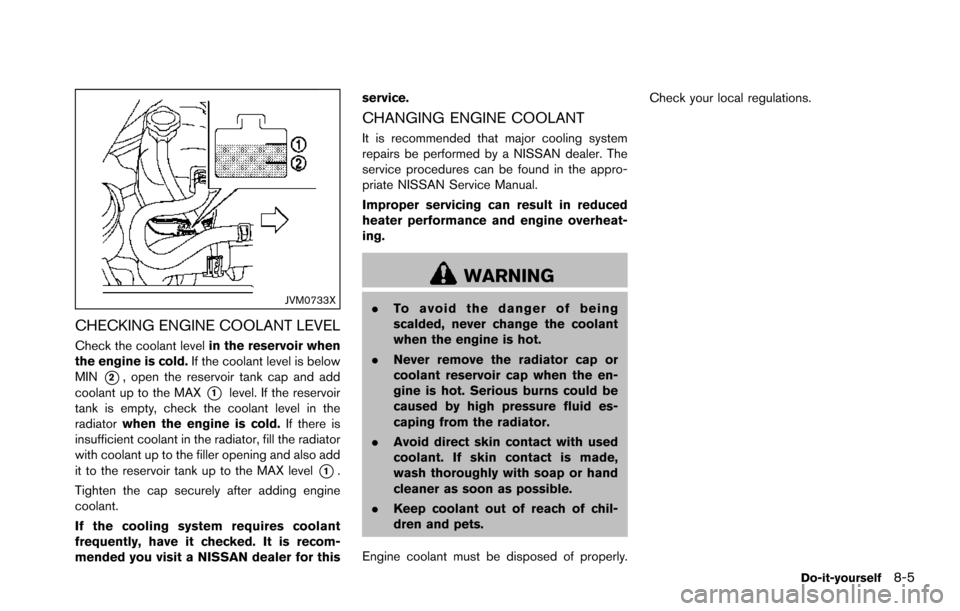
CHECKING ENGINE COOLANT LEVEL
Check the coolant levelin the reservoir when
the engine is cold. If the coolant level is below
MIN
*2, open the reservoir tank cap and add
coolant up to the MAX
*1level. If the reservoir
tank is empty, check the coolant level in the
radiator when the engine is cold. If there is
insufficient coolant in the radiator, fill the radiator
with coolant up to the filler opening and also add
it to the reservoir tank up to the MAX level
*1.
Tighten the cap securely after adding engine
coolant.
If the cooling system requires coolant
frequently, have it checked. It is recom-
mended you visit a NISSAN dealer for this service.
CHANGING ENGINE COOLANT
It is recommended that major cooling system
repairs be performed by a NISSAN dealer. The
service procedures can be found in the appro-
priate NISSAN Service Manual.
Improper servicing can result in reduced
heater performance and engine overheat-
ing.
WARNING
.
To avoid the danger of being
scalded, never change the coolant
when the engine is hot.
. Never remove the radiator cap or
coolant reservoir cap when the en-
gine is hot. Serious burns could be
caused by high pressure fluid es-
caping from the radiator.
. Avoid direct skin contact with used
coolant. If skin contact is made,
wash thoroughly with soap or hand
cleaner as soon as possible.
. Keep coolant out of reach of chil-
dren and pets.
Engine coolant must be disposed of properly. Check your local regulations.
Do-it-yourself8-5