2017 NISSAN ARMADA low oil pressure
[x] Cancel search: low oil pressurePage 18 of 614
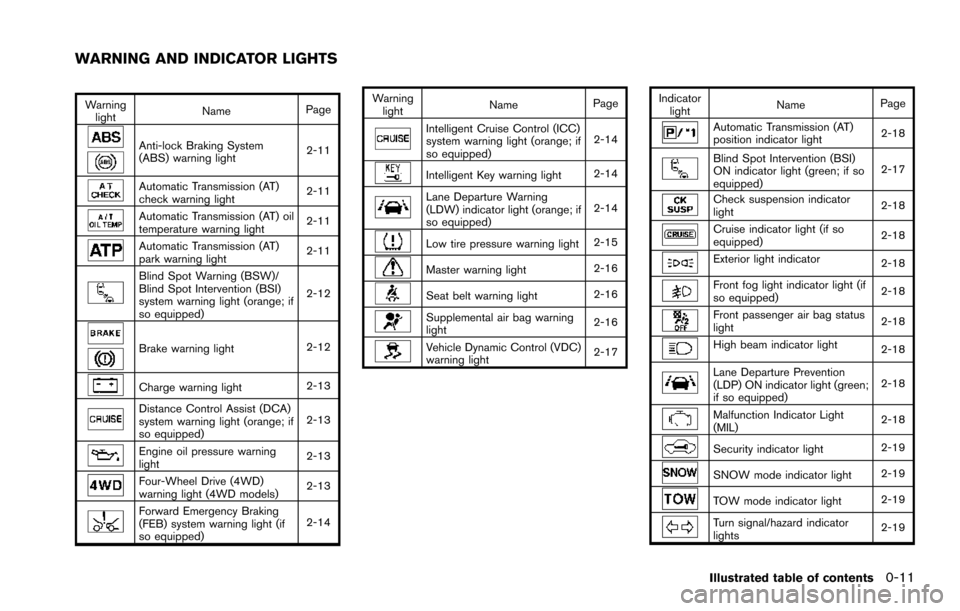
Warninglight Name
Page
Anti-lock Braking System
(ABS) warning light 2-11
Automatic Transmission (AT)
check warning light2-11
Automatic Transmission (AT) oil
temperature warning light
2-11
Automatic Transmission (AT)
park warning light2-11
Blind Spot Warning (BSW)/
Blind Spot Intervention (BSI)
system warning light (orange; if
so equipped)2-12
Brake warning light
2-12
Charge warning light2-13
Distance Control Assist (DCA)
system warning light (orange; if
so equipped)2-13
Engine oil pressure warning
light
2-13
Four-Wheel Drive (4WD)
warning light (4WD models)
2-13
Forward Emergency Braking
(FEB) system warning light (if
so equipped)2-14Warning
light Name
Page
Intelligent Cruise Control (ICC)
system warning light (orange; if
so equipped) 2-14
Intelligent Key warning light
2-14
Lane Departure Warning
(LDW) indicator light (orange; if
so equipped)2-14
Low tire pressure warning light
2-15
Master warning light2-16
Seat belt warning light
2-16
Supplemental air bag warning
light2-16
Vehicle Dynamic Control (VDC)
warning light2-17Indicator
light Name
Page
Automatic Transmission (AT)
position indicator light 2-18
Blind Spot Intervention (BSI)
ON indicator light (green; if so
equipped)2-17
Check suspension indicator
light
2-18
Cruise indicator light (if so
equipped)2-18
Exterior light indicator
2-18
Front fog light indicator light (if
so equipped)2-18
Front passenger air bag status
light
2-18
High beam indicator light
2-18
Lane Departure Prevention
(LDP) ON indicator light (green;
if so equipped)2-18
Malfunction Indicator Light
(MIL)
2-18
Security indicator light
2-19
SNOW mode indicator light2-19
TOW mode indicator light2-19
Turn signal/hazard indicator
lights2-19
Illustrated table of contents0-11
WARNING AND INDICATOR LIGHTS
Page 97 of 614
2-8Instruments and controls
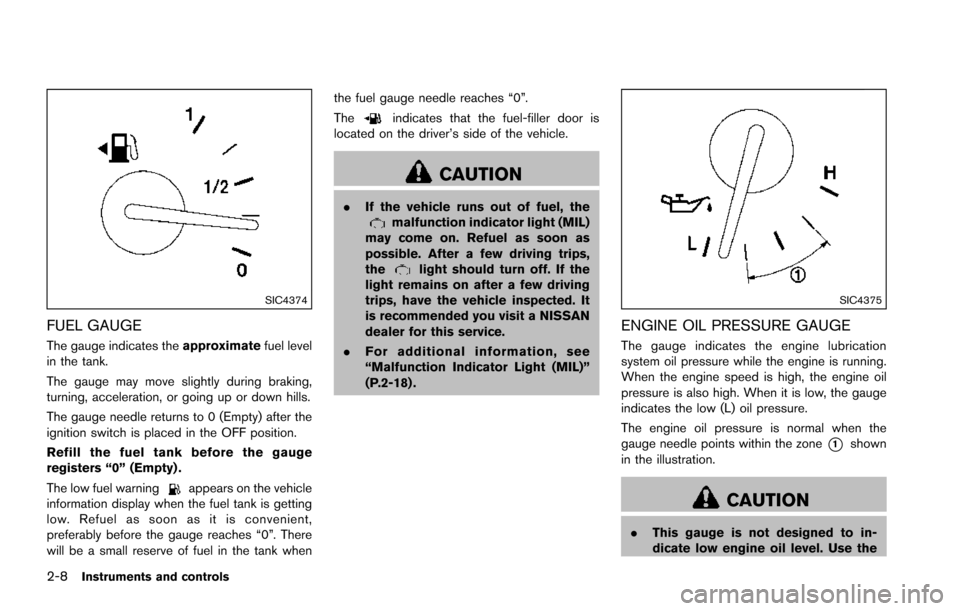
SIC4374
FUEL GAUGE
The gauge indicates theapproximatefuel level
in the tank.
The gauge may move slightly during braking,
turning, acceleration, or going up or down hills.
The gauge needle returns to 0 (Empty) after the
ignition switch is placed in the OFF position.
Refill the fuel tank before the gauge
registers “0” (Empty) .
The low fuel warning
appears on the vehicle
information display when the fuel tank is getting
low. Refuel as soon as it is convenient,
preferably before the gauge reaches “0”. There
will be a small reserve of fuel in the tank when the fuel gauge needle reaches “0”.
The
indicates that the fuel-filler door is
located on the driver’s side of the vehicle.
CAUTION
. If the vehicle runs out of fuel, themalfunction indicator light (MIL)
may come on. Refuel as soon as
possible. After a few driving trips,
the
light should turn off. If the
light remains on after a few driving
trips, have the vehicle inspected. It
is recommended you visit a NISSAN
dealer for this service.
. For additional information, see
“Malfunction Indicator Light (MIL)”
(P.2-18) .
SIC4375
ENGINE OIL PRESSURE GAUGE
The gauge indicates the engine lubrication
system oil pressure while the engine is running.
When the engine speed is high, the engine oil
pressure is also high. When it is low, the gauge
indicates the low (L) oil pressure.
The engine oil pressure is normal when the
gauge needle points within the zone
*1shown
in the illustration.
CAUTION
. This gauge is not designed to in-
dicate low engine oil level. Use the
Page 99 of 614
2-10Instruments and controls
Anti-lock Braking System (ABS) warning
lightForward Emergency Braking (FEB) system
warning light (if so equipped)CRUISE indicator light (if so equipped)
Intelligent Cruise Control (ICC) system
warning light (orange; if so equipped)Exterior light indicator
Automatic transmission check warning lightIntelligent Key warning lightFront fog light indicator light (if so equipped)
Automatic Transmission (AT) oil temperature
warning lightLane Departure Warning (LDW) indicator
light (orange; if so equipped)Front passenger air bag status light
Automatic Transmission (AT) park warning
lightLow tire pressure warning lightHigh beam indicator light
Blind Spot Warning (BSW)/Blind Spot
Intervention (BSI) system warning light
(orange; if so equipped)Master warning lightLane Departure Prevention (LDP) ON in-
dicator light (green; if so equipped)
Brake warning lightSeat belt warning lightMalfunction Indicator Light (MIL)
Supplemental air bag warning lightSecurity indicator light
Charge warning lightVehicle Dynamic Control (VDC) warning
lightSNOW mode indicator light
Distance Control Assist (DCA) system
warning light (orange; if so equipped)Automatic transmission position indicator
lightTOW mode indicator light
Engine oil pressure warning lightBlind Spot Intervention (BSI) ON indicator
light (green; if so equipped)Turn signal/hazard indicator lights
Four-Wheel Drive (4WD) warning light
(4WD models)Check suspension indicator lightVehicle Dynamic Control (VDC) off indicator
light
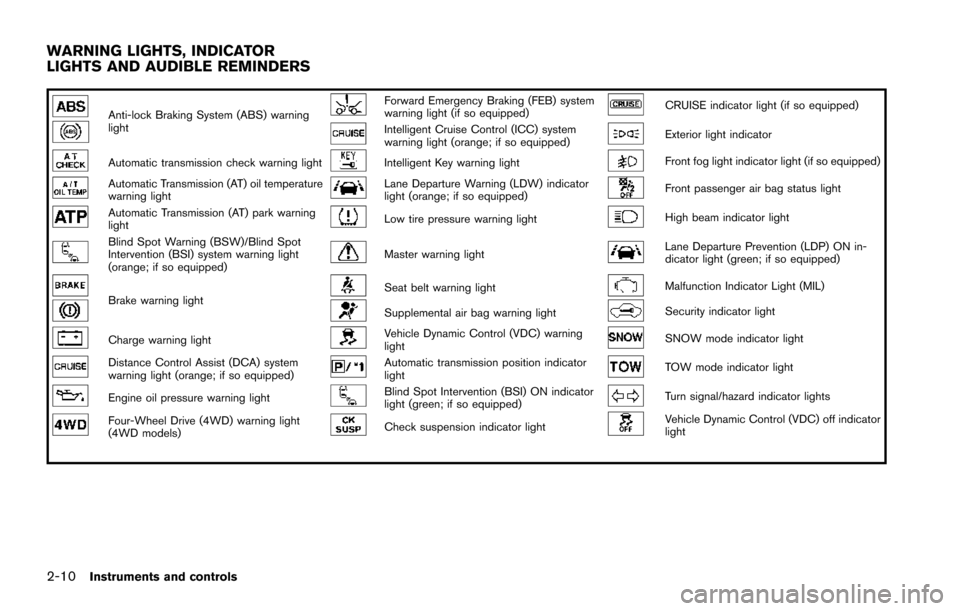
WARNING LIGHTS, INDICATOR
LIGHTS AND AUDIBLE REMINDERS
Page 102 of 614
ping distance and braking will re-
quire greater pedal effort as well as
pedal travel.
. If the brake fluid level is below the
minimum or MIN mark on the brake
fluid reservoir, do not drive until the
brake system has been checked. It
is recommended you visit a NISSAN
dealer for this service.
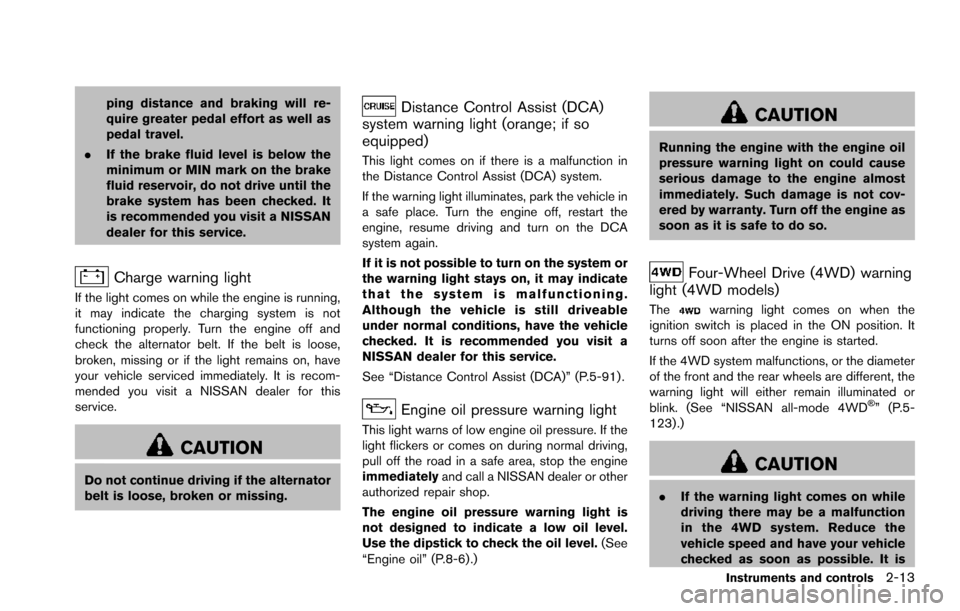
Charge warning light
If the light comes on while the engine is running,
it may indicate the charging system is not
functioning properly. Turn the engine off and
check the alternator belt. If the belt is loose,
broken, missing or if the light remains on, have
your vehicle serviced immediately. It is recom-
mended you visit a NISSAN dealer for this
service.
CAUTION
Do not continue driving if the alternator
belt is loose, broken or missing.
Distance Control Assist (DCA)
system warning light (orange; if so
equipped)
This light comes on if there is a malfunction in
the Distance Control Assist (DCA) system.
If the warning light illuminates, park the vehicle in
a safe place. Turn the engine off, restart the
engine, resume driving and turn on the DCA
system again.
If it is not possible to turn on the system or
the warning light stays on, it may indicate
that the system is malfunctioning.
Although the vehicle is still driveable
under normal conditions, have the vehicle
checked. It is recommended you visit a
NISSAN dealer for this service.
See “Distance Control Assist (DCA)” (P.5-91) .
Engine oil pressure warning light
This light warns of low engine oil pressure. If the
light flickers or comes on during normal driving,
pull off the road in a safe area, stop the engine
immediately and call a NISSAN dealer or other
authorized repair shop.
The engine oil pressure warning light is
not designed to indicate a low oil level.
Use the dipstick to check the oil level. (See
“Engine oil” (P.8-6).)
CAUTION
Running the engine with the engine oil
pressure warning light on could cause
serious damage to the engine almost
immediately. Such damage is not cov-
ered by warranty. Turn off the engine as
soon as it is safe to do so.
Four-Wheel Drive (4WD) warning
light (4WD models)
Thewarning light comes on when the
ignition switch is placed in the ON position. It
turns off soon after the engine is started.
If the 4WD system malfunctions, or the diameter
of the front and the rear wheels are different, the
warning light will either remain illuminated or
blink. (See “NISSAN all-mode 4WD
�Š” (P.5-
123) .)
CAUTION
. If the warning light comes on while
driving there may be a malfunction
in the 4WD system. Reduce the
vehicle speed and have your vehicle
checked as soon as possible. It is
Instruments and controls2-13
Page 358 of 614
1. Make sure that the Intelligent Key is on you.
2. Depress the brake pedal.
3. Push the ignition switch once to the ONposition.
For additional information about the remote
engine start function, see “Remote engine start”
(P.3-19) .ENGINE PROTECTION MODE
The engine has an engine protection mode to
reduce the chance of damage if the coolant
temperature becomes too high (for example,
when climbing steep grades in high temperature
with heavy loads, such as when towing a trailer) .
When the engine temperature reaches a certain
level:
. The engine coolant temperature gauge will
move toward the H position.
. Engine power may be reduced.
. The air conditioning cooling function may be
automatically turned OFF for a short time
(the blower will continue to operate) .
Engine power and, under some conditions,
vehicle speed will decrease. Vehicle speed can
be controlled with the accelerator pedal, but the
vehicle may not accelerate at the desired speed.
The transmission will downshift or upshift as it
reaches prescribed shift points. You can also
shift manually.
As driving conditions change and engine cool-
ant temperature is reduced, vehicle speed can
be increased using the accelerator pedal, and
air conditioning cooling function will automati-
cally be turned back ON. If:
1. The engine coolant temperature is not
reduced.
2. The air conditioning cooling function does not turn back ON.
3. The engine oil pressure warning light
illuminates or engine coolant temperature
gauge does not return to the normal range
from the H position, this may indicate a
malfunction. Move the vehicle off the road to
a safe area and allow the engine to cool. If
after checking the oil and coolant, the
remains on or engine coolant temperature
does not return to the normal range, do not
continue to drive. It is recommended you
contact a NISSAN dealer.
The Malfunction Indicator Light (MIL)
may
also come ON. You do not need to have your
vehicle towed, unless it remains on, but have it
inspected soon. It is recommended you contact
a NISSAN dealer for this service. See “Warning
lights, indicator lights and audible reminders”
(P.2-10) .
WARNING
Overheating can result in reduced en-
gine power and vehicle speed. The
Starting and driving5-17
DRIVING THE VEHICLE
Page 359 of 614
5-18Starting and driving
reduced speed may be lower than other
traffic, which could increase the chance
of a collision. Be especially careful
when driving. If the vehicle cannot
maintain a safe driving speed, pull to
the side of the road in a safe area.
Allow the engine to cool and return to
normal operation. See“If your vehicle
overheats” (P.6-14) .
CAUTION
Running the engine with the engine oil
pressure warning light on could cause
serious damage to the engine almost
immediately. Such damage is not cov-
ered by warranty. Turn off the engine as
soon as it is safe to do so.
AUTOMATIC TRANSMISSION
7 speed automatic transmission
The automatic transmission in your vehicle is
electronically controlled by a transmission con-
trol module to produce maximum efficiency and
smooth operation.
Shown on the following pages are the recom-
mended operating procedures for this transmis-
sion. Follow these procedures for maximum
vehicle performance and driving enjoyment.
Starting the vehicle
After starting the engine, fully depress the foot
brake pedal and push the shift lever button
before shifting the shift lever to the R (Reverse) ,
N (Neutral) , D (Drive) or Manual shift mode
position. Be sure the vehicle is fully stopped
before attempting to shift the shift lever.
This automatic transmission model is de-
signed so that the foot brake pedal must
be depressed before shifting from P (Park)
to any drive position while the ignition
switch position is ON.
The shift lever cannot be moved out of the
P (Park) position and into any of the other
gear positions if the ignition switch is
pushed to the LOCK, OFF or ACC position. 1. Keep the foot brake pedal depressed and
push the shift lever button to shift into a
driving gear.
2. Release the parking brake and foot brake, then gradually start the vehicle in motion.
WARNING
.Do not depress the accelerator
pedal while shifting from P (Park)
or N (Neutral) to R (Reverse) , D
(Drive) or manual shift mode. Al-
ways depress the brake pedal until
shifting is completed. Failure to do
so could cause you to lose control
and have an accident.
. Cold engine idle speed is high, so
use caution when shifting into a
forward or reverse gear before the
engine has warmed up.
. Never shift to either the P (Park) or
R (Reverse) position while the vehi-
cle is moving forward and P (Park) ,
D (Drive) position or manual shift
mode while the vehicle is moving
rearward. This could cause an acci-
dent or damage the transmission.
Page 463 of 614
5-122Starting and driving
.Recirculating the cool air in the cabinwhen the A/C is on reduces cooling load.
4. Drive at economical speeds and distances.
.Observing the speed limit and not ex- ceeding 60 MPH (97 km/h) (where
legally allowed) can improve fuel effi-
ciency due to reduced aerodynamic
drag.
.Maintaining a safe following distancebehind other vehicles reduces unneces-
sary braking.
.Safely monitoring traffic to anticipatechanges in speed permits reduced brak-
ing and smooth acceleration changes.
.Select a gear range suitable to road conditions.
5. Use cruise control.
.Using cruise control during highway driving helps maintain a steady speed.
.Cruise control is particularly effective in providing fuel savings when driving on
flat terrains.
6. Plan for the shortest route.
.Utilize a map or navigation system to determine the best route to save time.
7. Avoid idling.
.Shutting off your engine when safe for stops exceeding 30-60 seconds saves fuel and reduces emissions.
8. Buy an automated pass for toll roads.
.Automated passes permit drivers to use special lanes to maintain cruising speed
through the toll and avoid stopping and
starting.
9. Winter warm up.
.Limit idling time to minimize impact to fuel economy.
.Vehicles typically need no more than 30seconds of idling at start-up to effectively
circulate the engine oil before driving.
.Your vehicle will reach its ideal operatingtemperature more quickly while driving
versus idling.
10. Keeping your vehicle cool.
.Park your vehicle in a covered parking area or in the shade whenever possible.
.When entering a hot vehicle, opening thewindows will help to reduce the inside
temperature faster, resulting in reduced
demand on your A/C system. .
Keep your engine tuned up.
. Follow the recommended scheduled main-
tenance.
. Keep the tires inflated to the correct
pressure. Low tire pressure increases tire
wear and lowers fuel economy.
. Keep the wheels in correct alignment.
Improper alignment increases tire wear and
lowers fuel economy.
. Use the recommended viscosity engine oil.
(See “Engine oil and oil filter recommenda-
tion” (P.10-6) .)
INCREASING FUEL ECONOMY
Page 493 of 614
6-10In case of emergency
suspension, cycle the ignition switch ON/
OFF one time.
SCE0910
Installing the spare tire
1. Clean any mud or dirt from the surfacebetween the wheel and hub.
2. Carefully put the spare tire on and tighten the wheel nuts finger tight.
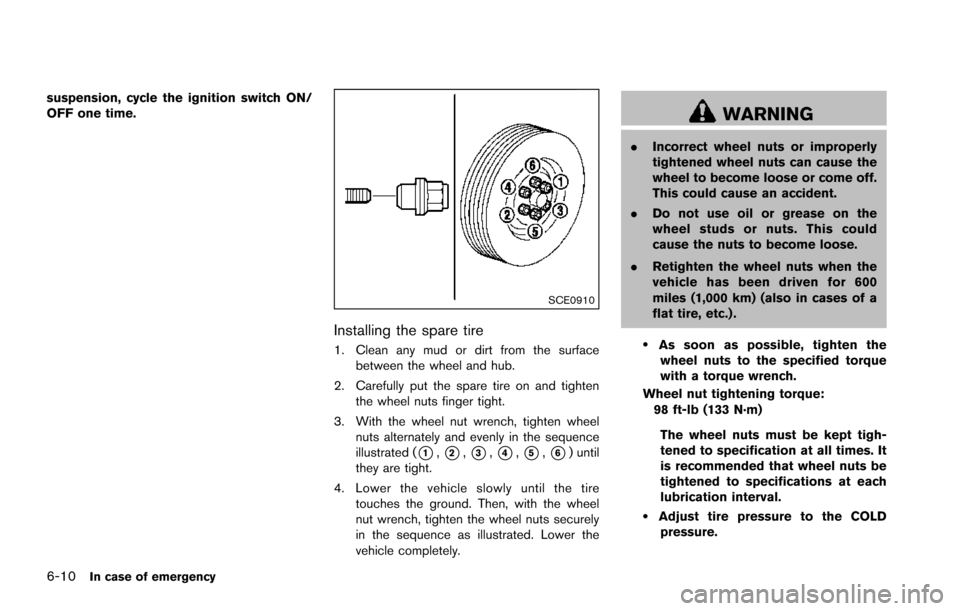
3. With the wheel nut wrench, tighten wheel nuts alternately and evenly in the sequence
illustrated (
*1,*2,*3,*4,*5,*6) until
they are tight.
4. Lower the vehicle slowly until the tire touches the ground. Then, with the wheel
nut wrench, tighten the wheel nuts securely
in the sequence as illustrated. Lower the
vehicle completely.
WARNING
.Incorrect wheel nuts or improperly
tightened wheel nuts can cause the
wheel to become loose or come off.
This could cause an accident.
. Do not use oil or grease on the
wheel studs or nuts. This could
cause the nuts to become loose.
. Retighten the wheel nuts when the
vehicle has been driven for 600
miles (1,000 km) (also in cases of a
flat tire, etc.) .
.As soon as possible, tighten the
wheel nuts to the specified torque
with a torque wrench.
Wheel nut tightening torque: 98 ft-lb (133 N·m)
The wheel nuts must be kept tigh-
tened to specification at all times. It
is recommended that wheel nuts be
tightened to specifications at each
lubrication interval.
.Adjust tire pressure to the COLDpressure.