Page 265 of 318

installed in the vehicle. The vehicle's elec-
tronics system may otherwise be damaged.
!Only charge the battery using the jump-
starting connection point.
A battery charger unit specially adapted for
Mercedes-Benz vehicles and tested and
approved by Mercedes-Benz is available as an
accessory. Only this device permits the charging
of the battery in its installed position. Contact an
authorized Mercedes-Benz Commercial Van
Center for information and availability. Read the
operating instructions for your charger before
charging the battery.
Recharge the battery more frequently if you use the vehicle mainly for short trips and/or drive at
low outside temperatures.
Only charge the installed battery with a battery
charger that has been tested and approved by
Mercedes-Benz, using the jump-start connec-
tion point in the engine compartment.
XConnect the battery charger to the positive
terminal and ground terminal in the same
order as when connecting the donor battery in
the jump-starting procedure (
Ypage 272).
iIf a battery is not installed and not in service,
you should charge it every three months. This
will counter self-discharging and prevent bat-
tery damage.
Care
!
Dirty battery clamps and battery surfaces
cause leak currents which lead to the batter-
ies discharging.
!Do not use cleaning agents containing fuel.
Cleaning agents containing fuel corrode the
battery housing.
!If dirt gets into the battery cell, battery self-
discharge will increase and the battery may
be damaged.
The following points on battery care must be
observed:
XRegularly check the battery terminals and the
fastening of the negative cable to the chassis
to ensure that they are firmly seated.
XAlways keep the battery terminals and battery
surfaces clean and dry.
XLightly grease the undersides of the battery
terminals with acid-resistant grease.
XOnly clean the battery casing with a commer-
cially available cleaning product.
Care
Notes on care
GWARNING
If you use openings in the bodywork or
detachable parts as steps, you could:
Rslip and/or fall
Rdamage the vehicle and cause yourself to
fall.
There is a risk of injury.
Always use secure climbing aids, e.g. a suita-
ble ladder.
!Do not use the lower sliding door guide (car-
riage) as a step. Otherwise, you could damage
the paneling and/or the sliding door mecha-
nism.
!For cleaning your vehicle, do not use any of
the following:
Rdry, rough or hard cloths
Rabrasive cleaning agents
Rsolvents
Rcleaning agents containing solvents
Do not scrub.
Do not touch the surfaces or protective films
with hard objects, e.g. a ring or ice scraper.
You could otherwise scratch or damage the
surfaces and protective film.
!Do not park your vehicle for a long period of
time directly after cleaning, particularly after
cleaning the wheel rim with wheel cleaner.
Wheel cleaner can lead to the increased cor-
rosion of the brake discs and pads. Therefore,
drive for a few minutes after cleaning. By
heating up the brakes, the brake discs and
pads dry. The vehicle can then be parked for a
long period of time.
HEnvironmental note
Only clean your vehicle at specially designed
wash bays. Dispose of empty containers and
Care263
Maintenance and care
Z
Page 266 of 318

used cleaning productsinan environmentally
responsible manner.
HEnvironmental note
Dispose of empty packaging and cleaning
cloths inan environmentally responsible man-
ner.
Regular care of your veh icle isa condition for
retaining the qualityin the long term.
Use care products and cleaning agents recom-
mended and approved byMercedes-Benz.
Washing the vehicle and cleaning the
paintwork
Automatic car wash
GWAR NING
Braking eff iciency isreduced after washing
the veh icle. There isa risk of an acc ident.
After the veh iclehas been washed, brake
carefully whilepaying attention to the traff ic
conditions unt ilfull braking power isrestored.
!Make sure that the automat iccar wash is
suitable for the size of the veh icle.
Before washing the veh icle inan automat ic
car wash, fold inthe exterior mirrors and
remove any additional antennas. Otherwise,
the exterior mirror, antenna or the veh icle
itself could bedamaged.
Make sure that the exterior mirrors are fully
folded out again and that any additional
antennas are re-installed when you leave the
automat iccar wash.
!Make sure that:
Rthe side wind ows and the roof are com-
plet ely closed
Rthe clim ate control blower is swit ched off
Rthewind shield wiper swit chisat position 0
The veh iclecould otherwise be damaged.
You can wash the veh icle inan automat iccar
wash from the very start.
Wash off excess dirtbefore cleaning the veh icle
in an automat iccar wash. After putting the vehicle through an automat
ic
car wash, wipeoff wax from:
Rthe windshield
Rthewind shield wiperblades
This will prevent smears and reduce wiping
noises caused byresidue on the windshield.
Ron vehicles with rear doors, from the rear view
c
amera lens inthe top of the license plate
molding (
Ypage 267)
Washing by hand
In some countries, washing by hand is only
allowed at specially equipped washing bays.
Observe the legal requirements of the country
you are currently in when washing by hand.
XDo not use hot water and donot wash the
vehicle in direct sunlight.
XUse a soft car sponge.
XUse a mildcleaning agent, e.g. a Mercedes-
Benz approved car shampoo.
XThoroughly hose down the vehicle with a gen-
tle jet of water.
XDo not point the water jet directly towards the
air inlet grilles.
XUse plenty of water and rinse out the sponge
frequently.
XRinse the vehicle with clean water and dry
thoroughly with a chamois.
XDo not let the cleaning agents dry on the
paintwork.
When using the vehicle inwinter, remove all
traces of road salt deposits carefully and as
soon as possible.
Power washers
GWARNING
The water jet from a circular jet nozz le(dirt
blasters) can cause invisible exterior damage
to the tires or chassis components. Compo-
nents damaged in this way may fail unexpect-
edly. There is a risk of an accident.
Do not use power washers with circular jet
nozzles to clean the vehicle. Have damaged
tires or chassis components replaced imme-
diat ely.
!Under no circumstances use power washers
in the vehicle interior. The pressurized water
264Care
Maintenance and care
Page 267 of 318

and associated spray produced by the power
washer could cause extensive damage to thevehicle.
!When using high-pressure cleaning equip-
ment, maintain a minimum distance of
approx. 1 ft (30 cm)betwee nthe spra ynozzle
and th evehicl eparts. Do no tuse apowe r
washer wit h around-jet nozzle. You could
damage th evehicl eor engin eparts.
!Kee pth ewater je tmovin gconstantl ywhile
cleaning .This will avoid causin gdamage to
th evehicle.
Do no tpoin tth ewater je tat:
Rdoo rjoints
Rrear vie wcamera
Rair bellows
Rbrak ehoses
Rwhee lbalance weights
Relectrica lcomponent s
Relectricalconnection s
Rseals
Rdrive train ,especially no tat th eintermedi-
ate bearin gof th epropelle rshaf t
Cleaning the engine
!Water mus tno tente rintak eor ventilation
openings. Whe ncleaning wit hhigh pressur e
water or steam cleaners ,th espray mus tno t
be aime ddirectl yat electrica lcomponent sor
th eterminals of electrica llines.
Preserve th eengin eafter th eengin ehas been
cleaned. Protect th ebelt drive system from
exposure to th epreservative agent.
Also observ eth einformation under "Powe r
washers " (
Ypage 264).
Cleaning the paintwork
!Do notaffix:
Rstickers
Rfilm s
Rmagneti cplates or similar items
to painte dsurfaces. You could otherwise
damage th epaintwork .
Scratches, corrosiv edeposits, area saffecte dby
corrosio nand damage caused by inadequate
car ecanno talways be completely repaired. In
suc hcases, visit aqualified specialist workshop .
XRemove impurities immediately, wher epos -
sible, whils tavoidin grubbin gto ohard.
XSoak insec tremain swit hinsec tremove rand
rinse off th etreated area safterwards .
XSoak birddroppings wit hwater and rinse off
th etreated area safterwards .
XRemove coolant, brak efluid, tree resin ,oils ,
fuel sand greases by rubbin ggentl ywit h a
cloth soaked in petroleum ether or lighte r
fluid.
XUse tar remove rto remove tar stains.
XUse silicon eremove rto remove wax .
Cleaning the windows
GWARNING
You could become trapped by th ewindshield
wiper sif they start movin gwhile cleaning th e
windshield or wiper blades. There is aris kof
injury.
Always switch off th ewindshield wiper sand
th eignition before cleaning th ewindshield or
wiper blades.
!Do no tfol dth ewindshield wiper saway from
th ewindshield unless th ehoo dis closed .Oth-
erwise, you could damage th ehood.
!Hold th ewiper arm securel ywhen foldin g
back. The windshield could be damaged if th e
wiper arm smack sagainst it suddenly.
!Do no tuse dry cloths, abrasiv eproducts ,
solvents or cleaning agents containin gsol-
vents to clean th einside of th ewindows .Do
no ttouch th einside sof th ewindows wit h
har dobjects ,e.g. an ice scrape ror ring. There
is otherwise aris kof damagin gth ewindows .
!Clean thewater drainag echannels of th e
windshield and th erear window at regular
intervals. Deposit ssuc has leaves, petals and
pollen may under certain circumstances pre -
ven twater from draining away. This can lead
to corrosio ndamage and damage to elec -
tronic components.
XClean th einside and outside of th ewindows
wit h a damp cloth and acleaning agen tthat is
recommended and approve dby Mercedes -
Benz .
Care265
Maintenance and care
Z
Page 268 of 318

Exterior
Cleaning the wheels
!Do not use any acidic or alkaline cleaning
agents. They can cause corrosion on the
wheel bolts or the retainer springs for the
wheel-balancing weights.
!Do not park your vehicle for a long period of
time directly after cleaning, particularly after
cleaning the wheel rim with wheel cleaner.
Wheel cleaner can lead to the increased cor-
rosion of the brake discs and pads. Therefore,
drive for a few minutes after cleaning. By
heating up the brakes, the brake discs and
pads dry. The vehicle can then be parked for a
long period of time.
If you clean the wheels with a power washer,
observe the safety notes for the power washer
(
Ypage 264). You could otherwise damage the
tires.
Cleaning the wiper blades
GWARNING
You could become trapped by the windshield wipers if they start moving while cleaning the
windshield or wiper blades. There is a risk of
injury.
Always switch off the windshield wipers and
the ignition before cleaning the windshield or
wiper blades.
!Do not fold the windshield wipers away from
the windshield unless the hood is closed. Oth-
erwise, you could damage the hood.
!Do not pull the wiper blade. Otherwise, the
wiper blade could be damaged.
!Do not clean wiper blades too often and do
not rub them too hard. Otherwise, the graph-
ite coating could be damaged. This could
cause wiper noise.
!Hold the wiper arm securely when folding
back. The windshield could be damaged if the
wiper arm smacks against it suddenly.
XTurn the SmartKey to position 0in the ignition
lock or remove the SmartKey.
XFold the windshield wiper arms away from the
windshield until you feel them engage.
XCarefully clean the wiper blades with a damp
cloth.
XFold back the wiper arms before switching on
the ignition.
Cleaning the exterior lighting
!Only use cleaning agents or cleaning cloths
which are suitable for plastic light lenses.
Unsuitable cleaning agents or cleaning cloths
could scratch or damage the plastic light len- ses.
XClean the plastic covers of the exterior light-
ing with a damp sponge and a mild cleaning
agent, e.g. Mercedes-Benz car shampoo, or
with cleaning cloths.
Cleaning the sensors
!Do not use dry, coarse or hard cloths and do
not scrub. You will otherwise scratch or dam-
age the sensors.
If you clean the sensors with a power washer
or steam cleaner, observe the information
provided by the manufacturer regarding the
distance to be maintained between the vehi-
cle and the nozzle of the power washer.
XClean drive system sensors :with water, car
shampoo and a soft cloth.
266Care
Maintenance and care
Page 269 of 318

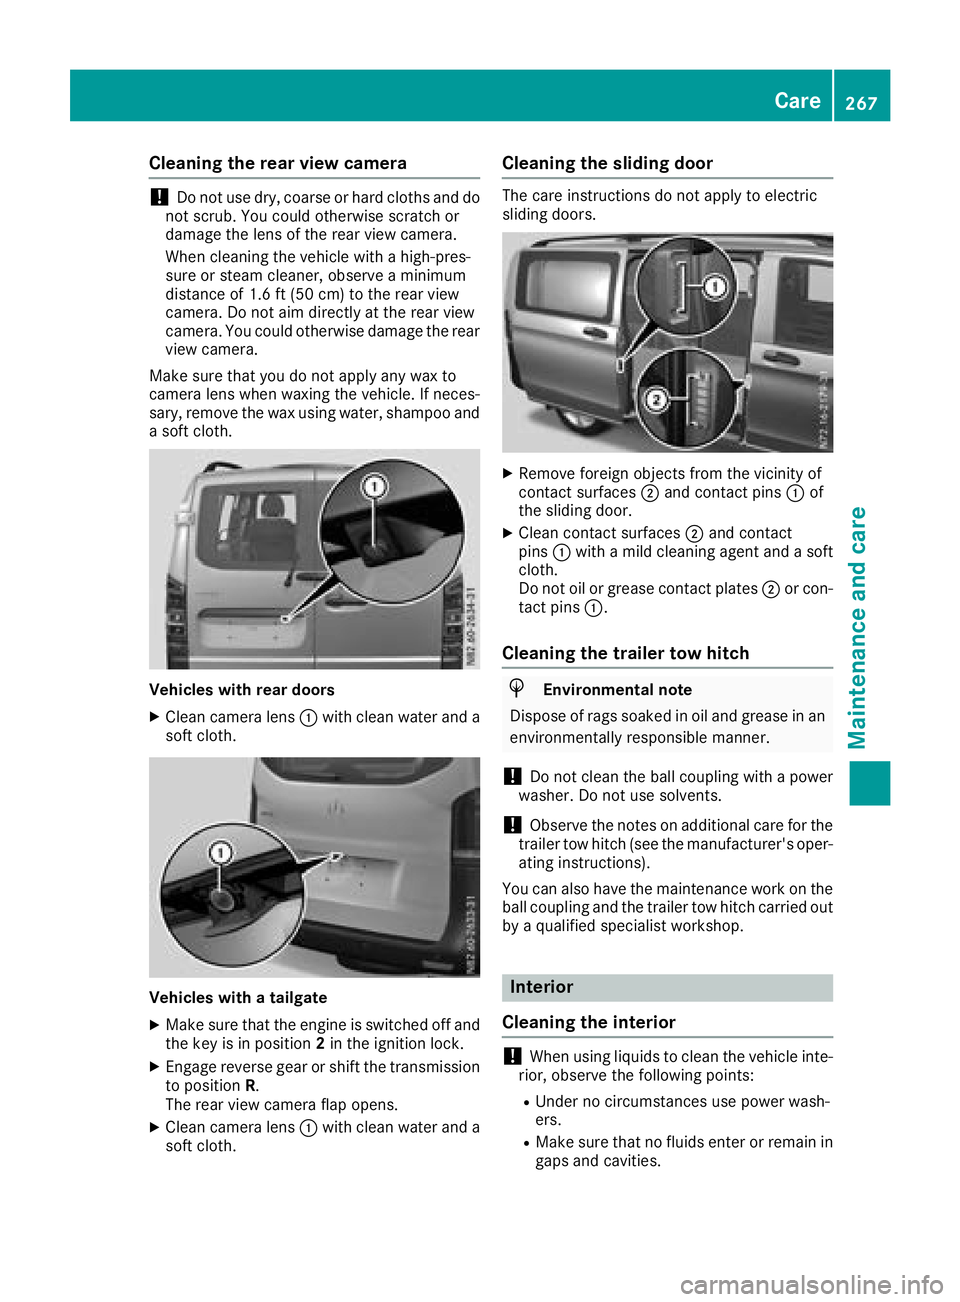
Cleaning the rear view camera
!Do not use dry, coarse or hard cloths and do
not scrub. You could otherwise scratch or
damage the lens of the rear view camera.
When cleaning the vehicle with a high-pres-
sure or steam cleaner, observe a minimum
distance of 1.6 ft (50 cm) to the rear view
camera. Do not aim directly at the rear view
camera. You could otherwise damage the rear
view camera.
Make sure that you do not apply any wax to
camera lens when waxing the vehicle. If neces-
sary, remove the wax using water, shampoo and a soft cloth.
Vehicles with rear doors
XClean camera lens :with clean water and a
soft cloth.
Vehicles with a tailgate
XMake sure that the engine is switched off and
the key is in position 2in the ignition lock.
XEngage reverse gear or shift the transmission
to position R.
The rear view camera flap opens.
XClean camera lens :with clean water and a
soft cloth.
Cleaning the sliding door
The care instructions do not apply to electric
sliding doors.
XRemove foreign objects from the vicinity of
contact surfaces ;and contact pins :of
the sliding door.
XClean contact surfaces ;and contact
pins :with a mild cleaning agent and a soft
cloth.
Do not oil or grease contact plates ;or con-
tact pins :.
Cleaning the trailer tow hitch
HEnvironmental note
Dispose of rags soaked in oil and grease in an
environmentally responsible manner.
!Do not clean the ball coupling with a power
washer. Do not use solvents.
!Observe the notes on additional care for the
trailer tow hitch (see the manufacturer's oper-
ating instructions).
You can also have the maintenance work on the ball coupling and the trailer tow hitch carried out
by a qualified specialist workshop.
Interior
Cleaning the interior
!When using liquids to clean the vehicle inte-
rior, observe the following points:
RUnder no circumstances use power wash-
ers.
RMake sure that no fluids enter or remain in
gaps and cavities.
Care267
Maintenance and care
Z
Page 270 of 318

REnsure sufficient ventilation when clean-
ing.
RMake sure that the vehicle interior is com-
pletely dry after cleaning.
Cleaning the display
!For cleaning, do not use any of the following:
Ralcohol-based thinner or gasoline
Rabrasive cleaning agents
Rcommercially-available household cleaning
agents
These may damage the display surface. Do
not put pressure on the display surface when
cleaning. This could lead to irreparable dam-
age to the display.
XSwitch off the display and let it cool down.
XClean the display surface with a commercially
available microfiber cloth and cleaner for
TFT/LCD displays.
XDry the display surface using a dry microfiber
cloth.
Cleaning the plastic trim
GWARNING
Care products and cleaning agents containing solvents cause surfaces in the cockpit to
become porous. As a result, plastic parts may
come loose in the event of air bag deploy-
ment. There is a risk of injury.
Do not use any care products and cleaning
agents to clean the cockpit.
!Do not affix the following to plastic surfaces:
Rstickers
Rfilms
Rscented oil bottles or similar items
You can otherwise damage the plastic.
!Do not allow cosmetics, insect repellent or
sunscreen to come into contact with the plas-
tic trim. This maintains the high-quality look of
the surfaces.
XWipe the plastic trim and the cockpit with a
damp, lint-free cloth, e.g. a microfiber cloth.
XHeavy soiling: use a mild detergent or care
products and cleaning agents recommended
and approved by Mercedes-Benz.
Cleaning the steering wheel and selec-
tor lever
XThoroughly wipe with a damp cloth.
XVehicles with leather upholstery: after
cleaning, use leather care agents that have
been recommended and approved by
Mercedes-Benz.
Cleaning the trim elements
!Do not use solvent-based cleaning agents
such as tar remover, wheel cleaners, polishes
or waxes. There is otherwise a risk of damag- ing the surface.
XWipe the trim elements with a damp, lint-free
cloth, e.g. a microfiber cloth.
XHeavy soiling: use care products and clean-
ing agents recommended and approved by
Mercedes-Benz.
Cleaning the seat covers
!Do not use microfiber cloths to clean genu-
ine leather or artificial leather covers. If used
often, a microfiber cloth can damage the
cover.
!Clean:
Rartificial leather covers with a cloth mois-
tened with a solution containing 1 %deter-
gent, e.g. dish washing liquid.
Rcloth covers with a microfiber cloth mois-
tened with a solution containing 1 %deter-
gent, e.g. dish washing liquid. Wipe entire
seat sections carefully to avoid leaving visi-
ble lines. Leave the seat to dry afterwards.
Cleaning results depend on the type of dirt
and how long it has been there.
Rgenuine leather covers carefully with a
damp cloth, then wipe the covers down
with a dry cloth. Make sure that the leather does not become soaked. Otherwise, the
leather could become rough or cracked.
Only use leather care agents that have
been tested and approved by Mercedes-
Benz. You can obtain these from a qualified
specialist workshop.
iPlease keep in mind that:
Rleather covers are a natural product and, as
such, are subject to a natural aging proc-
ess. Leather may react differently, e.g.
268Care
Maintenance and care
Page 271 of 318

increased wrinkling, to certain environmen-
tal influences (such as high humidity or
intense heat).
Rregular care is essential to make sure that
the appearance and comfort of the covers
are retained over time.
To clean genuine leather covers:
XRemove any dust, crumbs etc. If necessary,
carefully vacuum-clean the seat covers.
XCarefully wipe the leather seat covers with a
damp cloth.
XWipe over again with a dry cloth.
Make sure that the leather does not become
soaked, especially perforated parts.
XThen treat the leather seats with a leather
care foam.
Only use leather care agents that have been
tested and approved by Mercedes-Benz.
Observe the manufacturer's instructions.
Cleaning the seat belts
GWARNING
Seat belts can become severely weakened if
bleached or dyed. This could cause the seat
belts to tear or fail, for instance, in the event of an accident. This poses an increased risk of
injury or fatal injury.
Never bleach or dye the seat belts.
!Do not clean the seat belts using chemical
cleaning agents. Do not dry the seat belts by
heating at temperatures above 176 ‡(80 †)
or in direct sunlight.
Remove any stains or dirt immediately. This will
avoid residue or damage.
XUse clean, lukewarm water and soap solution.
Cleaning the headliner and carpets
XHeadliner: if it is very dirty, use a soft brush or
dry shampoo.
XCarpets: use the carpet and textile cleaning
agents recommended and approved by
Mercedes-Benz.
Care269
Maintenance and care
Z
Page 272 of 318

Useful information
This Operator's Manual describes all models as
well as standard and optional equipment of your
vehicle that were available at the time of going
to print. Country-specific variations are possi-
ble. Note that your vehicle may not be equipped
with all of the described functions. This also
applies to systems and functions relevant to
safety.
Read the information on qualified specialist
workshops (
Ypage 31).
Where will I find...?
Vehicle tool kit
General notes
Depending on the equipment version of the vehi- cle, the vehicle tool kit is:
Rin the seat base of the left front seat
Rin the rear stowage compartment
Rin the tool holder in the cargo compartment
Apart from some country-specific variants, vehi-
cles without a spare wheel are not equipped
with tire-changing tools. If your vehicle is equip-
ped with tire-changing tools, these are in the
vehicle tool kit. If the vehicle tool kit is stowed in
the driver's seat base, the jack is in a separate
holder in the cargo compartment on the right-
hand side of the vehicle next to the tailgate/rear door (
Ypage 272).
Some tools for changing a wheel are specific to
the vehicle. For more information on which tools are required and approved to perform a wheel
change on your vehicle, consult a qualified spe-
cialist workshop.
Necessary tire-changing tools can include, for
example:
Rjack
Rlug wrench
Rratchet wrench
iThe jack has a maximum weight of 7.5 kg
depending on the vehicle's equipment.
The maximum payload of the jack can be
found on the sticker on the jack itself.
The jack is maintenance-free. In the event of a malfunction, please contact a qualified spe-
cialist workshop.
Stowage compartment in the seat base
Stowage compartment in the seat base of the left
front seat
XTo open: press both latching springs :down
and release cover ;upwards from the seat
base.
XRemove cover ;by pulling upwards at an
angle from the seat base.
XRemove the clamping strap and remove the
vehicle tool kit.
For vehicles equipped with tire-changing
tools, the jack is in a separate holder in the
cargo compartment on the right-hand side of
the vehicle next to the tailgate/rear door
(
Ypage 272).
XTo close: after stowing the vehicle tool bag,
insert cover ;in front of the stowage com-
partment in the seat base and fold shut.
Latching springs :of cover ;must engage
audibly.
Stowage compartment in the rear
Opening/closing the stowage compart-
ment
Stowage compartment in the rear on the right-hand
side of the vehicle
270Where will I find...?
Breakdown assistance